This developer guide documents the internals of the Toolstack to help developers understand the code, fix bugs and add new features. It is a work-in-progress, with new documents added when ready and updated whenever needed.
The XAPI Toolstack forms the main control plane of a pool of XenServer hosts. It allows the administrator to:
Configure the hardware resources of XenServer hosts: storage, networking, graphics, memory.
Create, configure and destroy VMs and their virtual resources.
Control the lifecycle of VMs.
Monitor the status of hosts, VMs and related resources.
To this, the Toolstack:
Exposes an API that can be accessed by external clients over HTTP(s).
Exposes a CLI.
Ensures that physical resources are configured when needed, and VMs receive the resources they require.
Implements various features to help the administrator manage their systems.
Monitors running VMs.
Records metrics about physical and virtual resources.
High-level architecture
The XAPI Toolstack manages a cluster of hosts, network switches and storage on
behalf of clients such as XenCenter
and Xen Orchestra.
The most fundamental concept is of a Resource pool: the whole cluster managed
as a single entity. The following diagram shows a cluster of hosts running
xapi, all sharing some storage:
At any time, at most one host is known as the pool coordinator (formerly
known as “master”) and is responsible for coordination and locking resources
within the pool. When a pool is first created a coordinator host is chosen. The
coordinator role can be transferred
on user request in an orderly fashion (xe pool-designate-new-master)
on user request in an emergency (xe pool-emergency-transition-to-master)
automatically if HA is enabled on the cluster.
All hosts expose an HTTP, XML-RPC and JSON-RPC interface running on port 80 and
with TLS on port 443, but control operations will only be processed on the
coordinator host. Attempts to send a control operation to another host will
result in a XenAPI redirect error message. For efficiency the following
operations are permitted on non-coordinator hosts:
querying performance counters (and their history)
connecting to VNC consoles
import/export (particularly when disks are on local storage)
Since the coordinator host acts as coordinator and lock manager, the other
hosts will often talk to the coordinator. Non-coordinator hosts will also talk
to each other (over the same HTTP and RPC channels) to
transfer VM memory images (VM migration)
mirror disks (storage migration)
Note that some types of shared storage (in particular all those using vhd)
require coordination for disk GC and coalesce. This coordination is currently
done by xapi and hence it is not possible to share this kind of storage between
resource pools.
The following diagram shows the software running on a single host. Note that
all hosts run the same software (although not necessarily the same version, if
we are in the middle of a rolling update).
The XAPI Toolstack expects the host to be running Xen on x86. The Xen
hypervisor partitions the host into Domains, some of which can have
privileged hardware access, and the rest are unprivileged guests. The XAPI
Toolstack normally runs all of its components in the privileged initial domain,
Domain 0, also known as “the control domain”. However there is experimental
code which supports “driver domains” allowing storage and networking drivers to
be isolated in their own domains.
The Toolstack runs in an environment on a server (host) that has:
Physical hardware.
The Xen hypervisor.
The control domain (domain 0): the privileged domain that the Toolstack runs in.
Other, mostly unprivileged domains, usually for guests (VMs).
The Toolstack relies on various bits of software inside the control domain, and directly communicates with most of these:
Linux kernel including drivers for hardware and Xen paravirtualised devices (e.g. netback and blkback).
Interacts through /sys and /proc, udev scripts, xenstore, …
CentOS distribution including userspace tools and libraries.
systemd, networking tools, …
Xen-specific libraries, especially libxenctrl (a.k.a. libxc)
xenstored: a key-value pair configuration database
Accessible from all domains on a host, which makes it useful for inter-domain communication.
The control domain has access to the entire xenstore database, while other domains only see sub-trees that are specific to that domain.
Used for connecting VM disks and network interfaces, and other VM configuration options.
Used for VM status reporting, e.g. the capabilities of the PV drivers (if installed), the IP address, etc.
SM: Storage Manager
plugins which connect xapi’s internal storage interfaces to the control
APIs of external storage systems.
stunnel: a daemon which decodes TLS and forwards traffic to xapi (and the other way around).
Open vSwitch (OVS): a virtual network switch, used to connect VMs to network interfaces. The OVS offers several networking features that xapi takes advantage of.
QEMU: emulation of various bits of hardware
DEMU: emulation of Nvidia vGPUs
xenguest
emu-manager
pvsproxy
xenconsoled: allows access to guest consoles. This is common to all Xen
hosts.
The Toolstack also interacts with software that runs inside the guests:
PV drivers
The guest agent
Daemons
The Toolstack consists of a set of co-operating daemons:
xapi
manages clusters of hosts, co-ordinating access to shared storage and networking.
xenopsd
a low-level “domain manager” which takes care of creating, suspending,
resuming, migrating, rebooting domains by interacting with Xen via libxc and
libxl.
xcp-rrdd
a performance counter monitoring daemon which aggregates “datasources” defined
via a plugin API and records history for each. There are various rrdd-plugin daemons:
xcp-rrdd-gpumon
xcp-rrdd-iostat
xcp-rrdd-squeezed
xcp-rrdd-xenpm
xcp-rrdd-dcmi
xcp-rrdd-netdev
xcp-rrdd-cpu
xcp-networkd
a host network manager which takes care of configuring interfaces, bridges
and OpenVSwitch instances
squeezed
a daemon in charge of VM memory management
xapi-storage-script
for storage manipulation over SMAPIv3
message-switch
exchanges messages between the daemons on a host
xapi-guard
forwards uefi and vtpm persistence calls from domains to xapi
v6d
controls which features are enabled.
forkexecd
a helper daemon that assists the above daemons with executing binaries and scripts
xhad
The High-Availability daemon
perfmon
a daemon which monitors performance counters and sends “alerts”
if values exceed some pre-defined threshold
mpathalert
a daemon which monitors “storage paths” and sends “alerts”
if paths fail and need repair
wsproxy
handles access to VM consoles
Interfaces
Communication between the Toolstack daemon is built upon libraries from a
component called
xapi-idl.
Abstracts communication between daemons over the message-switch using JSON/RPC.
Contains the definition of the interfaces exposed by the daemons (except xapi).
The HA feature will restart VMs after hosts have failed, but what
happens if a whole site (e.g. datacenter) is lost? A disaster recovery
configuration is shown in the following diagram:
We rely on the storage array’s built-in mirroring to replicate (synchronously
or asynchronously: the admin’s choice) between the primary and the secondary
site. When DR is enabled the VM disk data and VM metadata are written to the
storage server and mirrored. The secondary site contains the other side
of the data mirror and a set of hosts, which may be powered off.
In normal operation, the DR feature allows a “dry-run” recovery where a host
on the secondary site checks that it can indeed see all the VM disk data
and metadata. This should be done regularly, so that admins are familiar with
the process.
After a disaster, the admin breaks the mirror on the secondary site and triggers
a remote power-on of the offline hosts (either using an out-of-band tool or
the built-in host power-on feature of xapi). The pool master on the secondary
site can connect to the storage and extract all the VM metadata. Finally the
VMs can all be restarted.
When the primary site is fully recovered, the mirror can be re-synchronised
and the VMs can be moved back.
Event handling in the Control Plane - Xapi, Xenopsd and Xenstore
Introduction
Xapi, xenopsd and xenstore use a number of different events to obtain
indications that some state changed in dom0 or in the guests. The events
are used as an efficient alternative to polling all these states
periodically.
xenstore provides a very configurable approach in which each and
any key can be watched individually by a xenstore client. Once the
value of a watched key changes, xenstore will indicate to the client
that the value for that key has changed. An ocaml xenstore client
library provides a way for ocaml programs such as xenopsd,
message-cli and rrdd to provide high-level ocaml callback functions
to watch specific key. It’s very common, for instance, for xenopsd
to watch specific keys in the xenstore keyspace of a guest and then
after receiving events for some or all of them, read other keys or
subkeys in xenstored to update its internal state mirroring the
state of guests and its devices (for instance, if the guest has pv
drivers and specific frontend devices have established connections
with the backend devices in dom0).
xapi also provides a very configurable event mechanism in which
the xenapi can be used to provide events whenever a xapi object (for
instance, a VM, a VBD etc) changes state. This event mechanism is
very reliable and is extensively used by XenCenter to provide
real-time update on the XenCenter GUI.
xenopsd provides a somewhat less configurable event mechanism,
where it always provides signals for all objects (VBDs, VMs
etc) whose state changed (so it’s not possible to select a subset of
objects to watch for as in xenstore or in xapi). It’s up to the
xenopsd client (eg. xapi) to receive these events and then filter
out or act on each received signal by calling back xenopsd and
asking it information for the specific signalled object. The main
use in xapi for the xenopsd signals is to update xapi’s database of
the current state of each object controlled by xenopsd (VBDs,
VMs etc).
Given a choice between polling states and receiving events when the
state change, we should in general opt for receiving events in the code
in order to avoid adding bottlenecks in dom0 that will prevent the
scalability of XenServer to many VMs and virtual devices.
Xapi
Sending events from the xenapi
A xenapi user client, such as XenCenter, the xe-cli or a python script,
can register to receive events from XAPI for specific objects in the
XAPI DB. XAPI will generate events for those registered clients whenever
the corresponding XAPI DB object changes.
This small python scripts shows how to register a simple event watch
loop for XAPI:
import XenAPI
session = XenAPI.Session("http://xshost")
session.login_with_password("username","password")
session.xenapi.event.register(["VM","pool"]) # register for events in the pool and VM objects whileTrue:
try:
events = session.xenapi.event.next() # block until a xapi event on a xapi DB object is availablefor event in events:
print "received event op=%s class=%s ref=%s"% (event['operation'], event['class'], event['ref'])
if event['class'] =='vm'and event['operation'] =='mod':
vm = event['snapshot']
print "xapi-event on vm: vm_uuid=%s, vm_name_label=%s, power_state=%s, current_operation=%s"% (vm['uuid'],vm['name_label'],vm['power_state'],vm['current_operations'].values())
except XenAPI.Failure, e:
if len(e.details) >0and e.details[0] =='EVENTS_LOST':
session.xenapi.event.unregister(["VM","pool"])
session.xenapi.event.register(["VM","pool"])
Receiving events from xenopsd
Xapi receives all events from xenopsd via the function
xapi_xenops.events_watch() in its own independent thread. This is a
single-threaded function that is responsible for handling all of the
signals sent by xenopsd. In some situations with lots of VMs and virtual
devices such as VBDs, this loop may saturate a single dom0 vcpu, which
will slow down handling all of the xenopsd events and may cause the
xenopsd signals to accumulate unboundedly in the worst case in the
updates queue in xenopsd (see Figure 1).
The function xapi_xenops.events_watch() calls
xenops_client.UPDATES.get() to obtain a list of (barrier,
barrier_events), and then it process each one of the barrier_event,
which can be one of the following events:
Vm id: something changed in this VM,
run xapi_xenops.update_vm() to query xenopsd about its state. The
function update_vm() will update power_state, allowed_operations,
console and guest_agent state in the xapi DB.
Vbd id: something changed in this VM,
run xapi_xenops.update_vbd() to query xenopsd about its state. The
function update_vbd() will update currently_attached and connected
in the xapi DB.
Vif id: something changed in this VM,
run xapi_xenops.update_vif() to query xenopsd about its state. The
function update_vif() will update activate and plugged state of in
the xapi DB.
Pci id: something changed in this VM,
run xapi_xenops.update_pci() to query xenopsd about its state.
Vgpu id: something changed in this VM,
run xapi_xenops.update_vgpu() to query xenopsd about its state.
Task id: something changed in this VM,
run xapi_xenops.update_task() to query xenopsd about its state.
The function update_task() will update the progress of the task in
the xapi DB using the information of the task in xenopsd.
All the xapi_xenops.update_X() functions above will call
Xenopsd_client.X.stat() functions to obtain the current state of X from
xenopsd:
There are a couple of optimisations while processing the events in
xapi_xenops.events_watch():
if an event X=(vm_id,dev_id) (eg. Vbd dev_id) has already been
processed in a barrier_events, it’s not processed again. A typical
value for X is eg. “<vm_uuid>.xvda” for a VBD.
if Events_from_xenopsd.are_supressed X, then this event
is ignored. Events are supressed if VM X.vm_id is migrating away
from the host
Barriers
When xapi needs to execute (and to wait for events indicating completion
of) a xapi operation (such as VM.start and VM.shutdown) containing many
xenopsd sub-operations (such as VM.start – to force xenopsd to change
the VM power_state, and VM.stat, VBD.stat, VIF.stat etc – to force the
xapi DB to catch up with the xenopsd new state for these objects), xapi
sends to the xenopsd input queue a barrier, indicating that xapi will
then block and only continue execution of the barred operation when
xenopsd returns the barrier. The barrier should only be returned when
xenopsd has finished the execution of all the operations requested by
xapi (such as VBD.stat and VM.stat in order to update the state of the
VM in the xapi database after a VM.start has been issued to xenopsd).
A recent problem has been detected in the xapi_xenops.events_watch()
function: when it needs to process many VM_check_state events, this
may push for later the processing of barriers associated with a
VM.start, delaying xapi in reporting (via a xapi event) that the VM
state in the xapi DB has reached the running power_state. This needs
further debugging, and is probably one of the reasons in CA-87377 why in
some conditions a xapi event reporting that the VM power_state is
running (causing it to go from yellow to green state in XenCenter) is
taking so long to be returned, way after the VM is already running.
Xenopsd
Xenopsd has a few queues that are used by xapi to store commands to be
executed (eg. VBD.stat) and update events to be picked up by xapi. The
main ones, easily seen at runtime by running the following command in
dom0, are:
# xenops-cli diagnostics --queue=org.xen.xapi.xenops.classic{ queues: [# XENOPSD INPUT QUEUE ... stuff that still needs to be processed by xenopsd
VM.stat
VBD.stat
VM.start
VM.shutdown
VIF.plug
etc
] workers: [# XENOPSD WORKER THREADS ... which stuff each worker thread is processing
] updates: { updates: [# XENOPSD OUTPUT QUEUE ... signals from xenopsd that need to be picked up by xapi
VM_check_state
VBD_check_state
etc
]} tasks: [# XENOPSD TASKS ... state of each known task, before they are manually deleted after completion of the task
]}
Sending events to xapi
Whenever xenopsd changes the state of a XenServer object such as a VBD
or VM, or when it receives an event from xenstore indicating that the
states of these objects have changed (perhaps because either a guest or
the dom0 backend changed the state of a virtual device), it creates a
signal for the corresponding object (VM_check_state, VBD_check_state
etc) and send it up to xapi. Xapi will then process this event in its
xapi_xenops.events_watch() function.
These signals may need to wait a long time to be processed if the
single-threaded xapi_xenops.events_watch() function is having
difficulties (ie taking a long time) to process previous signals in the
UPDATES queue from xenopsd.
Receiving events from xenstore
Xenopsd watches a number of keys in xenstore, both in dom0 and in each
guest. Xenstore is responsible to send watch events to xenopsd whenever
the watched keys change state. Xenopsd uses a xenstore client library to
make it easier to create a callback function that is called whenever
xenstore sends these events.
Xenopsd also needs to complement sometimes these watch events with
polling of some values. An example is the @introduceDomain event in
xenstore (handled in xenopsd/xc/xenstore_watch.ml), which indicates
that a new VM has been created. This event unfortunately does not
indicate the domid of the VM, and xenopsd needs to query Xen (via libxc)
which domains are now available in the host and compare with the
previous list of known domains, in order to figure out the domid of the
newly introduced domain.
It is not good practice to poll xenstore for changes of values. This
will add a large overhead to both xenstore and xenopsd, and decrease the
scalability of XenServer in terms of number of VMs/host and virtual
devices per VM. A much better approach is to rely on the watch events of
xenstore to indicate when a specific value has changed in xenstore.
Xenstore
Sending events to xenstore clients
If a xenstore client has created watch events for a key, then xenstore
will send events to this client whenever this key changes state.
Receiving events from xenstore clients
Xenstore clients indicate to xenstore that something state changed by
writing to some xenstore key. This may or may not cause xenstore to
create watch events for the corresponding key, depending on if other
xenstore clients have watches on this key.
High-Availability
High-Availability (HA) tries to keep VMs running, even when there are hardware
failures in the resource pool, when the admin is not present. Without HA
the following may happen:
during the night someone spills a cup of coffee over an FC switch; then
VMs running on the affected hosts will lose access to their storage; then
business-critical services will go down; then
monitoring software will send a text message to an off-duty admin; then
the admin will travel to the office and fix the problem by restarting
the VMs elsewhere.
With HA the following will happen:
during the night someone spills a cup of coffee over an FC switch; then
VMs running on the affected hosts will lose access to their storage; then
business-critical services will go down; then
the HA software will determine which hosts are affected and shut them down; then
the HA software will restart the VMs on unaffected hosts; then
services are restored; then on the next working day
the admin can arrange for the faulty switch to be replaced.
HA is designed to handle an emergency and allow the admin time to fix
failures properly.
Example
The following diagram shows an HA-enabled pool, before and after a network
link between two hosts fails.
When HA is enabled, all hosts in the pool
exchange periodic heartbeat messages over the network
send heartbeats to a shared storage device.
attempt to acquire a “master lock” on the shared storage.
HA is designed to recover as much as possible of the pool after a single failure
i.e. it removes single points of failure. When some subset of the pool suffers
a failure then the remaining pool members
figure out whether they are in the largest fully-connected set (the
“liveset”);
if they are not in the largest set then they “fence” themselves (i.e.
force reboot via the hypervisor watchdog)
elect a master using the “master lock”
restart all lost VMs.
After HA has recovered a pool, it is important that the original failure is
addressed because the remaining pool members may not be able to cope with
any more failures.
Design
HA must never violate the following safety rules:
there must be at most one master at all times. This is because the master
holds the VM and disk locks.
there must be at most one instance of a particular VM at all times. This
is because starting the same VM twice will result in severe filesystem
corruption.
However to be useful HA must:
detect failures quickly;
minimise the number of false-positives in the failure detector; and
make the failure handling logic as robust as possible.
The implementation difficulty arises when trying to be both useful and safe
at the same time.
Terminology
We use the following terminology:
fencing: also known as I/O fencing, refers to the act of isolating a
host from network and storage. Once a host has been fenced, any VMs running
there cannot generate side-effects observable to a third party. This means
it is safe to restart the running VMs on another node without violating the
safety-rule and running the same VM simultaneously in two locations.
heartbeating: exchanging status updates with other hosts at regular
pre-arranged intervals. Heartbeat messages reveal that hosts are alive
and that I/O paths are working.
statefile: a shared disk (also known as a “quorum disk”) on the “Heartbeat”
SR which is mapped as a block device into every host’s domain 0. The shared
disk acts both as a channel for heartbeat messages and also as a building
block of a Pool master lock, to prevent multiple hosts becoming masters in
violation of the safety-rule (a dangerous situation also known as
“split-brain”).
management network: the network over which the XenAPI XML/RPC requests
flow and also used to send heartbeat messages.
liveset: a per-Host view containing a subset of the Hosts in the Pool
which are considered by that Host to be alive i.e. responding to XenAPI
commands and running the VMs marked as resident_on there. When a Host b
leaves the liveset as seen by Host a it is safe for Host a to assume
that Host b has been fenced and to take recovery actions (e.g. restarting
VMs), without violating either of the safety-rules.
properly shared SR: an SR which has field shared=true; and which has a
PBD connecting it to every enabled Host in the Pool; and where each of
these PBDs has field currently_attached set to true. A VM whose disks
are in a properly shared SR could be restarted on any enabled Host,
memory and network permitting.
properly shared Network: a Network which has a PIF connecting it to
every enabled Host in the Pool; and where each of these PIFs has
field currently_attached set to true. A VM whose VIFs connect to
properly shared Networks could be restarted on any enabled Host,
memory and storage permitting.
agile: a VM is said to be agile if all disks are in properly shared SRs
and all network interfaces connect to properly shared Networks.
unprotected: an unprotected VM has field ha_always_run set to false
and will never be restarted automatically on failure
or have reconfiguration actions blocked by the HA overcommit protection.
best-effort: a best-effort VM has fields ha_always_run set to true and
ha_restart_priority set to best-effort.
A best-effort VM will only be restarted if (i) the failure is directly
observed; and (ii) capacity exists for an immediate restart.
No more than one restart attempt will ever be made.
protected: a VM is said to be protected if it will be restarted by HA
i.e. has field ha_always_run set to true and
field ha_restart_priority not set to `best-effort.
survival rule 1: describes the situation where hosts survive
because they are in the largest network partition with statefile access.
This is the normal state of the xhad daemon.
survival rule 2: describes the situation where all hosts have lost
access to the statefile but remain alive
while they can all see each-other on the network. In this state any further
failure will cause all nodes to self-fence.
This state is intended to cope with the system-wide temporary loss of the
storage service underlying the statefile.
Assumptions
We assume:
All I/O used for monitoring the health of hosts (i.e. both storage and
network-based heartbeating) is along redundant paths, so that it survives
a single hardware failure (e.g. a broken switch or an accidentally-unplugged
cable). It is up to the admin to ensure their environment is setup correctly.
The hypervisor watchdog mechanism will be able to guarantee the isolation
of nodes, once communication has been lost, within a pre-arranged time
period. Therefore no active power fencing equipment is required.
VMs may only be marked as protected if they are fully agile i.e. able
to run on any host, memory permitting. No additional constraints of any kind
may be specified e.g. it is not possible to make “CPU reservations”.
Pools are assumed to be homogenous with respect to CPU type and presence of
VT/SVM support (also known as “HVM”). If a Pool is created with
non-homogenous hosts using the --force flag then the additional
constraints will not be noticed by the VM failover planner resulting in
runtime failures while trying to execute the failover plans.
No attempt will ever be made to shutdown or suspend “lower” priority VMs
to guarantee the survival of “higher” priority VMs.
Once HA is enabled it is not possible to reconfigure the management network
or the SR used for storage heartbeating.
VMs marked as protected are considered to have failed if they are offline
i.e. the VM failure handling code is level-sensitive rather than
edge-sensitive.
VMs marked as best-effort are considered to have failed only when the host
where they are resident is declared offline
i.e. the best-effort VM failure handling code is edge-sensitive rather than
level-sensitive.
A single restart attempt is attempted and if this fails no further start is
attempted.
HA can only be enabled if all Pool hosts are online and actively responding
to requests.
when HA is enabled the database is configured to write all updates to
the “Heartbeat” SR, guaranteeing that VM configuration changes are not lost
when a host fails.
Components
The implementation is split across the following components:
xhad: the cluster membership daemon
maintains a quorum of hosts through network and storage heartbeats
xapi: used to configure the
HA policy i.e. which network and storage to use for heartbeating and which
VMs to restart after a failure.
xen: the Xen watchdog is used to reliably
fence the host when the host has been (partially or totally) isolated
from the cluster
To avoid a “split-brain”, the cluster membership daemon must “fence” (i.e.
isolate) nodes when they are not part of the cluster. In general there are
2 approaches:
cut the power of remote hosts which you can’t talk to on the network
any more. This is the approach taken by most open-source clustering
software since it is simpler. However it has the downside of requiring
the customer buy more hardware and set it up correctly.
rely on the remote hosts using a watchdog to cut their own power (i.e.
halt or reboot) after a timeout. This relies on the watchdog being
reliable. Most other people don’t trust the Linux watchdog;
after all the Linux kernel is highly threaded, performs a lot of (useful)
functions and kernel bugs which result in deadlocks do happen.
We use the Xen watchdog because we believe that the Xen hypervisor is
simple enough to reliably fence the host (via triggering a reboot of
domain 0 which then triggers a host reboot).
xhad
xhad is the cluster membership daemon:
it exchanges heartbeats with the other nodes to determine which nodes are
still in the cluster (the “live set”) and which nodes have definitely
failed (through watchdog fencing). When a host has definitely failed, xapi
will unlock all the disks and restart the VMs according to the HA policy.
Since Xapi is a critical part of the system, the xhad also acts as a
Xapi watchdog. It polls Xapi every few seconds and checks if Xapi can
respond. If Xapi seems to have failed then xhad will restart it. If restarts
continue to fail then xhad will consider the host to have failed and
self-fence.
xhad is configured via a simple config file written on each host in
/etc/xensource/xhad.conf. The file must be identical on each host
in the cluster. To make changes to the file, HA must be disabled and then
re-enabled afterwards. Note it may not be possible to re-enable HA depending
on the configuration change (e.g. if a host has been added but that host has
a broken network configuration then this will block HA enable).
The xhad.conf file is written in XML and contains
pool-wide configuration: this includes a list of all hosts which should
be in the liveset and global timeout information
local host configuration: this identifies the local host and described
which local network interface and block device to use for heartbeating.
The following is an example xhad.conf file:
<?xml version="1.0" encoding="utf-8"?><xhad-configversion="1.0"><!--pool-wide configuration--><common-config><GenerationUUID>xxxxxxxx-xxxx-xxxx-xxxx-xxxxxxxxxxxx</GenerationUUID><UDPport>694</UDPport><!--for each host, specify host UUID, and IP address--><host><HostID>xxxxxxxx-xxxx-xxxx-xxxx-xxxxxxxxxxxx</HostID><IPaddress>xxx.xxx.xxx.xx1</IPaddress></host><host><HostID>xxxxxxxx-xxxx-xxxx-xxxx-xxxxxxxxxxxx</HostID><IPaddress>xxx.xxx.xxx.xx2</IPaddress></host><host><HostID>xxxxxxxx-xxxx-xxxx-xxxx-xxxxxxxxxxxx</HostID><IPaddress>xxx.xxx.xxx.xx3</IPaddress></host><!--optional parameters [sec] --><parameters><HeartbeatInterval>4</HeartbeatInterval><HeartbeatTimeout>30</HeartbeatTimeout><StateFileInterval>4</StateFileInterval><StateFileTimeout>30</StateFileTimeout><HeartbeatWatchdogTimeout>30</HeartbeatWatchdogTimeout><StateFileWatchdogTimeout>45</StateFileWatchdogTimeout><BootJoinTimeout>90</BootJoinTimeout><EnableJoinTimeout>90</EnableJoinTimeout><XapiHealthCheckInterval>60</XapiHealthCheckInterval><XapiHealthCheckTimeout>10</XapiHealthCheckTimeout><XapiRestartAttempts>1</XapiRestartAttempts><XapiRestartTimeout>30</XapiRestartTimeout><XapiLicenseCheckTimeout>30</XapiLicenseCheckTimeout></parameters></common-config><!--local host configuration--><local-config><localhost><HostID>xxxxxxxx-xxxx-xxxx-xxxx-xxxxxxxxxxx2</HostID><HeartbeatInterface> xapi1</HeartbeatInterface><HeartbeatPhysicalInterface>bond0</HeartbeatPhysicalInterface><StateFile>/dev/statefiledevicename</StateFile></localhost></local-config></xhad-config>
The fields have the following meaning:
GenerationUUID: a UUID generated each time HA is reconfigured. This allows
xhad to tell an old host which failed; had been removed from the
configuration; repaired and then restarted that the world has changed
while it was away.
UDPport: the port number to use for network heartbeats. It’s important
to allow this traffic through the firewall and to make sure the same
port number is free on all hosts (beware of portmap services occasionally
binding to it).
HostID: a UUID identifying a host in the pool. We would normally use
xapi’s notion of a host uuid.
IPaddress: any IP address on the remote host. We would normally use
xapi’s notion of a management network.
HeartbeatTimeout: if a heartbeat packet is not received for this many
seconds, then xhad considers the heartbeat to have failed. This is
the user-supplied “HA timeout” value, represented below as T.
T must be bigger than 10; we would normally use 60s.
StateFileTimeout: if a storage update is not seen for a host for this
many seconds, then xhad considers the storage heartbeat to have failed.
We would normally use the same value as the HeartbeatTimeout T.
HeartbeatInterval: interval between heartbeat packets sent. We would
normally use a value 2 <= t <= 6, derived from the user-supplied
HA timeout via t = (T + 10) / 10
StateFileInterval: interval betwen storage updates (also known as
“statefile updates”). This would normally be set to the same value as
HeartbeatInterval.
HeartbeatWatchdogTimeout: If the host does not send a heartbeat for this
amount of time then the host self-fences via the Xen watchdog. We normally
set this to T.
StateFileWatchdogTimeout: If the host does not update the statefile for
this amount of time then the host self-fences via the Xen watchdog. We
normally set this to T+15.
BootJoinTimeout: When the host is booting and joining the liveset (i.e.
the cluster), consider the join a failure if it takes longer than this
amount of time. We would normally set this to T+60.
EnableJoinTimeout: When the host is enabling HA for the first time,
consider the enable a failure if it takes longer than this amount of time.
We would normally set this to T+60.
XapiHealthCheckInterval: Interval between “health checks” where we run
a script to check whether Xapi is responding or not.
XapiHealthCheckTimeout: Number of seconds to wait before assuming that
Xapi has deadlocked during a “health check”.
XapiRestartAttempts: Number of Xapi restarts to attempt before concluding
Xapi has permanently failed.
XapiRestartTimeout: Number of seconds to wait for a Xapi restart to
complete before concluding it has failed.
XapiLicenseCheckTimeout: Number of seconds to wait for a Xapi license
check to complete before concluding that xhad should terminate.
In addition to the config file, Xhad exposes a simple control API which
is exposed as scripts:
ha_set_pool_state (Init | Invalid): sets the global pool state to “Init” (before starting
HA) or “Invalid” (causing all other daemons who can see the statefile to
shutdown)
ha_start_daemon: if the pool state is “Init” then the daemon will
attempt to contact other daemons and enable HA. If the pool state is
“Active” then the host will attempt to join the existing liveset.
ha_query_liveset: returns the current state of the cluster.
ha_propose_master: returns whether the current node has been
elected pool master.
ha_stop_daemon: shuts down the xhad on the local host. Note this
will not disarm the Xen watchdog by itself.
ha_disarm_fencing: disables fencing on the local host.
ha_set_excluded: when a host is being shutdown cleanly, record the
fact that the VMs have all been shutdown so that this host can be ignored
in future cluster membership calculations.
Fencing
Xhad continuously monitors whether the host should remain alive, or if
it should self-fence. There are two “survival rules” which will keep a host
alive; if neither rule applies (or if xhad crashes or deadlocks) then the
host will fence. The rules are:
Xapi is running; the storage heartbeats are visible; this host is a
member of the “best” partition (as seen through the storage heartbeats)
Xapi is running; the storage is inaccessible; all hosts which should
be running (i.e. not those “excluded” by being cleanly shutdown) are
online and have also lost storage access (as seen through the network
heartbeats).
where the “best” partition is the largest one if that is unique, or if there
are multiple partitions of the same size then the one containing the lowest
host uuid is considered best.
The first survival rule is the “normal” case. The second rule exists only
to prevent the storage from becoming a single point of failure: all hosts
can remain alive until the storage is repaired. Note that if a host has
failed and has not yet been repaired, then the storage becomes a single
point of failure for the degraded pool. HA removes single point of failures,
but multiple failures can still cause problems. It is important to fix
failures properly after HA has worked around them.
creating VDIs (disks) on shared storage for heartbeating and storing
the pool database
arranging for these disks to be attached on host boot, before the “SRmaster”
is online
configuring and managing the xhad heartbeating daemon
The HA policy APIs include
methods to determine whether a VM is agile i.e. can be restarted in
principle on any host after a failure
planning for a user-specified number of host failures and enforcing
access control
restarting failed protected VMs in policy order
The HA policy settings are stored in the Pool database which is written
(synchronously)
to a VDI in the same SR that’s being used for heartbeating. This ensures
that the database can be recovered after a host fails and the VMs are
recovered.
Xapi stores 2 settings in its local database:
ha_disable_failover_actions: this is set to false when we want nodes
to be able to recover VMs – this is the normal case. It is set to true
during the HA disable process to prevent a split-brain forming while
HA is only partially enabled.
ha_armed: this is set to true to tell Xapi to start Xhad during
host startup and wait to join the liveset.
Disks on shared storage
The regular disk APIs for creating, destroying, attaching, detaching (etc)
disks need the SRmaster (usually but not always the Pool master) to be
online to allow the disks to be locked. The SRmaster cannot be brought
online until the host has joined the liveset. Therefore we have a
cyclic dependency: joining the liveset needs the statefile disk to be attached
but attaching a disk requires being a member of the liveset already.
The dependency is broken by adding an explicit “unlocked” attach storage
API called VDI_ATTACH_FROM_CONFIG. Xapi uses the VDI_GENERATE_CONFIG API
during the HA enable operation and stores away the result. When the system
boots the VDI_ATTACH_FROM_CONFIG is able to attach the disk without the
SRmaster.
The role of Host.enabled
The Host.enabled flag is used to mean, “this host is ready to start VMs and
should be included in failure planning”.
The VM restart planner assumes for simplicity that all protected VMs can
be started anywhere; therefore all involved networks and storage must be
properly shared.
If a host with an unplugged PBD were to become enabled then the corresponding
SR would cease to be properly shared, all the VMs would cease to be
agile and the VM restart logic would fail.
To ensure the VM restart logic always works, great care is taken to make
sure that Hosts may only become enabled when their networks and storage are
properly configured. This is achieved by:
when the master boots and initialises its database it sets all Hosts to
dead and disabled and then signals the HA background thread
(signal_database_state_valid)
to wake up from sleep and
start processing liveset information (and potentially setting hosts to live)
when a slave calls
Pool.hello
(i.e. after the slave has rebooted),
the master sets it to disabled, allowing it a grace period to plug in its
storage;
when a host (master or slave) successfully plugs in its networking and
storage it calls
consider_enabling_host
which checks that the
preconditions are met and then sets the host to enabled; and
when a slave notices its database connection to the master restart
(i.e. after the master xapi has just restarted) it calls
consider_enabling_host}
The steady-state
When HA is enabled and all hosts are running normally then each calls
ha_query_liveset every 10s.
Slaves check to see if the host they believe is the master is alive and has
the master lock. If another node has become master then the slave will
rewrite its pool.conf and restart. If no node is the master then the
slave will call
on_master_failure,
proposing itself and, if it is rejected,
checking the liveset to see which node acquired the lock.
The master monitors the liveset and updates the Host_metrics.live flag
of every host to reflect the liveset value. For every host which is not in
the liveset (i.e. has fenced) it enumerates all resident VMs and marks them
as Halted. For each protected VM which is not running, the master computes
a VM restart plan and attempts to execute it. If the plan fails then a
best-effort VM.start call is attempted. Finally an alert is generated if
the VM could not be restarted.
Note that XenAPI heartbeats are still sent when HA is enabled, even though
they are not used to drive the values of the Host_metrics.live field.
Note further that, when a host is being shutdown, the host is immediately
marked as dead and its host reference is added to a list used to prevent the
Host_metrics.live being accidentally reset back to live again by the
asynchronous liveset query. The Host reference is removed from the list when
the host restarts and calls Pool.hello.
Planning and overcommit
The VM failover planning code is sub-divided into two pieces, stored in
separate files:
binpack.ml: contains two algorithms for packing items of different sizes
(i.e. VMs) into bins of different sizes (i.e. Hosts); and
xapi_ha_vm_failover.ml: interfaces between the Pool database and the
binpacker; also performs counterfactual reasoning for overcommit protection.
The input to the binpacking algorithms are configuration values which
represent an abstract view of the Pool:
type('a,'b) configuration ={ hosts:('a * int64)list;(** a list of live hosts and free memory *) vms:('b * int64)list;(** a list of VMs and their memory requirements *) placement:('b *'a)list;(** current VM locations *) total_hosts:int;(** total number of hosts in the pool 'n' *) num_failures:int;(** number of failures to tolerate 'r' *)}
Note that:
the memory required by the VMs listed in placement has already been
substracted from the free memory of the hosts; it doesn’t need to be
subtracted again.
the free memory of each host has already had per-host miscellaneous
overheads subtracted from it, including that used by unprotected VMs,
which do not appear in the VM list.
the total number of hosts in the pool (total_hosts) is a constant for
any particular invocation of HA.
the number of failures to tolerate (num_failures) is the user-settable
value from the XenAPI Pool.ha_host_failures_to_tolerate.
There are two algorithms which satisfy the interface:
sig plan_always_possible:('a,'b) configuration ->bool; get_specific_plan:('a,'b) configuration ->'b list->('b *'a)listend
The function get_specific_plan takes a configuration and a list of VMs(
the host where they are resident on have failed). It returns a VM restart
plan represented as a VM to Host association list. This is the function
called by the background HA VM restart thread on the master.
The function plan_always_possible returns true if every sequence of Host
failures of length
num_failures (irrespective of whether all hosts failed at once, or in
multiple separate episodes)
would result in calls to get_specific_plan which would allow all protected
VMs to be restarted.
This function is heavily used by the overcommit protection logic as well as code in XenCenter which aims to
maximise failover capacity using the counterfactual reasoning APIs:
There are two binpacking algorithms: the more detailed but expensive
algorithmm is used for smaller/less
complicated pool configurations while the less detailed, cheaper algorithm
is used for the rest. The
choice between algorithms is based only on total_hosts (n) and
num_failures (r).
Note that the choice of algorithm will only change if the number of Pool
hosts is varied (requiring HA to be disabled and then enabled) or if the
user requests a new num_failures target to plan for.
The expensive algorithm uses an exchaustive search with a
“biggest-fit-decreasing” strategy that
takes the biggest VMs first and allocates them to the biggest remaining Host.
The implementation keeps the VMs and Hosts as sorted lists throughout.
There are a number of transformations to the input configuration which are
guaranteed to preserve the existence of a VM to host allocation (even if
the actual allocation is different). These transformations which are safe
are:
VMs may be removed from the list
VMs may have their memory requirements reduced
Hosts may be added
Hosts may have additional memory added.
The cheaper algorithm is used for larger Pools where the state space to
search is too large. It uses the same “biggest-fit-decreasing” strategy
with the following simplifying approximations:
every VM that fails is as big as the biggest
the number of VMs which fail due to a single Host failure is always the
maximum possible (even if these are all very small VMs)
the largest and most capable Hosts fail
An informal argument that these approximations are safe is as follows:
if the maximum number of VMs fail, each of which is size of the largest
and we can find a restart plan using only the smaller hosts then any real
failure:
can never result in the failure of more VMs;
can never result in the failure of bigger VMs; and
can never result in less host capacity remaining.
Therefore we can take this almost-certainly-worse-than-worst-case failure
plan and:
replace the remaining hosts in the worst case plan with the real remaining
hosts, which will be the same size or larger; and
replace the failed VMs in the worst case plan with the real failed VMs,
which will be fewer or the same in number and smaller or the same in size.
Note that this strategy will perform best when each host has the same number
of VMs on it and when all VMs are approximately the same size. If one very big
VM exists and a lot of smaller VMs then it will probably fail to find a plan.
It is more tolerant of differing amounts of free host memory.
Overcommit protection
Overcommit protection blocks operations which would prevent the Pool being
able to restart protected VMs after host failure.
The Pool may become unable to restart protected VMs in two general ways:
(i) by running out of resource i.e. host memory; and (ii) by altering host
configuration in such a way that VMs cannot be started (or the planner
thinks that VMs cannot be started).
API calls which would change the amount of host memory currently in use
(VM.start, VM.resume, VM.migrate etc)
have been modified to call the planning functions supplying special
“configuration change” parameters.
Configuration change values represent the proposed operation and have type
type configuration_change ={(** existing VMs which are leaving *) old_vms_leaving:(API.ref_host *(API.ref_VM * API.vM_t))list;(** existing VMs which are arriving *) old_vms_arriving:(API.ref_host *(API.ref_VM * API.vM_t))list;(** hosts to pretend to disable *) hosts_to_disable: API.ref_host list;(** new number of failures to consider *) num_failures:int option;(** new VMs to restart *) new_vms_to_protect: API.ref_VM list;}
A VM migration will be represented by saying the VM is “leaving” one host and
“arriving” at another. A VM start or resume will be represented by saying the
VM is “arriving” on a host.
Note that no attempt is made to integrate the overcommit protection with the
general VM.start host chooser as this would be quite expensive.
Note that the overcommit protection calls are written as asserts called
within the message forwarder in the master, holding the main forwarding lock.
API calls which would change the system configuration in such a way as to
prevent the HA restart planner being able to guarantee to restart protected
VMs are also blocked. These calls include:
VBD.create: where the disk is not in a properly shared SR
VBD.insert: where the CDROM is local to a host
VIF.create: where the network is not properly shared
PIF.unplug: when the network would cease to be properly shared
PBD.unplug: when the storage would cease to be properly shared
Host.enable: when some network or storage would cease to be
properly shared (e.g. if this host had a broken storage configuration)
xen
The Xen hypervisor has per-domain watchdog counters which, when enabled,
decrement as time passes and can be reset from a hypercall from the domain.
If the domain fails to make the hypercall and the timer reaches zero then
the domain is immediately shutdown with reason reboot. We configure Xen
to reboot the host when domain 0 enters this state.
High-level operations
Enabling HA
Before HA can be enabled the admin must take care to configure the
environment properly. In particular:
NIC bonds should be available for network heartbeats;
multipath should be configured for the storage heartbeats;
all hosts should be online and fully-booted.
The XenAPI client can request a specific shared SR to be used for
storage heartbeats, otherwise Xapi will use the Pool’s default SR.
Xapi will use VDI_GENERATE_CONFIG to ensure the disk will be attached
automatically on system boot before the liveset has been joined.
Note that extra effort is made to re-use any existing heartbeat VDIS
so that
if HA is disabled with some hosts offline, when they are rebooted they
stand a higher chance of seeing a well-formed statefile with an explicit
invalid state. If the VDIs were destroyed on HA disable then hosts which
boot up later would fail to attach the disk and it would be harder to
distinguish between a temporary storage failure and a permanent HA disable.
the heartbeat SR can be created on expensive low-latency high-reliability
storage and made as small as possible (to minimise infrastructure cost),
safe in the knowledge that if HA enables successfully once, it won’t run
out of space and fail to enable in the future.
The Xapi-to-Xapi communication looks as follows:
The Xapi Pool master calls Host.ha_join_liveset on all hosts in the
pool simultaneously. Each host
runs the ha_start_daemon script
which starts Xhad. Each Xhad starts exchanging heartbeats over the network
and storage defined in the xhad.conf.
Joining a liveset
The Xhad instances exchange heartbeats and decide which hosts are in
the “liveset” and which have been fenced.
After joining the liveset, each host clears
the “excluded” flag which would have
been set if the host had been shutdown cleanly before – this is only
needed when a host is shutdown cleanly and then restarted.
Xapi periodically queries the state of xhad via the ha_query_liveset
command. The state will be Starting until the liveset is fully
formed at which point the state will be Online.
When the ha_start_daemon script returns then Xapi will decide
whether to stand for master election or not. Initially when HA is being
enabled and there is a master already, this node will be expected to
stand unopposed. Later when HA notices that the master host has been
fenced, all remaining hosts will stand for election and one of them will
be chosen.
Shutting down a host
When a host is to be shutdown cleanly, it can be safely “excluded”
from the pool such that a future failure of the storage heartbeat will
not cause all pool hosts to self-fence (see survival rule 2 above).
When a host is “excluded” all other hosts know that the host does not
consider itself a master and has no resources locked i.e. no VMs are
running on it. An excluded host will never allow itself to form part
of a “split brain”.
Once a host has given up its master role and shutdown any VMs, it is safe
to disable fencing with ha_disarm_fencing and stop xhad with
ha_stop_daemon. Once the daemon has been stopped the “excluded”
bit can be set in the statefile via ha_set_excluded and the
host safely rebooted.
Restarting a host
When a host restarts after a failure Xapi notices that ha_armed is
set in the local database. Xapi
runs the attach-static-vdis script to attach the statefile and
database VDIs. This can fail if the storage is inaccessible; Xapi will
retry until it succeeds.
runs the ha_start_daemon to join the liveset, or determine that HA
has been cleanly disabled (via setting the state to Invalid).
In the special case where Xhad fails to access the statefile and the
host used to be a slave then Xapi will try to contact the previous master
and find out
who the new master is;
whether HA is enabled on the Pool or not.
If Xapi can confirm that HA was disabled then it will disarm itself and
join the new master. Otherwise it will keep waiting for the statefile
to recover.
In the special case where the statefile has been destroyed and cannot
be recovered, there is an emergency HA disable API the admin can use to
assert that HA really has been disabled, and it’s not simply a connectivity
problem. Obviously this API should only be used if the admin is totally
sure that HA has been disabled.
Disabling HA
There are 2 methods of disabling HA: one for the “normal” case when the
statefile is available; and the other for the “emergency” case when the
statefile has failed and can’t be recovered.
Disabling HA cleanly
HA can be shutdown cleanly when the statefile is working i.e. when hosts
are alive because of survival rule 1. First the master Xapi tells the local
Xhad to mark the pool state as “invalid” using ha_set_pool_state.
Every xhad instance will notice this state change the next time it performs
a storage heartbeat. The Xhad instances will shutdown and Xapi will notice
that HA has been disabled the next time it attempts to query the liveset.
If a host loses access to the statefile (or if none of the hosts have
access to the statefile) then HA can be disabled uncleanly.
Disabling HA uncleanly
The Xapi master first calls Host.ha_disable_failover_actions on each host
which sets ha_disable_failover_decisions in the lcoal database. This
prevents the node rebooting, gaining statefile access, acquiring the
master lock and restarting VMs when other hosts have disabled their
fencing (i.e. a “split brain”).
Once the master is sure that no host will suddenly start recovering VMs
it is safe to call Host.ha_disarm_fencing which runs the script
ha_disarm_fencing and then shuts down the Xhad with ha_stop_daemon.
Add a host to the pool
We assume that adding a host to the pool is an operation the admin will
perform manually, so it is acceptable to disable HA for the duration
and to re-enable it afterwards. If a failure happens during this operation
then the admin will take care of it by hand.
Multi-version drivers
Linux loads device drivers on boot and every device driver exists in one
version. XAPI extends this scheme such that device drivers may exist in
multiple variants plus a mechanism to select the variant being loaded on
boot. Such a driver is called a multi-version driver and we expect only
a small subset of drivers, built and distributed by XenServer, to have
this property. The following covers the background, API, and CLI for
multi-version drivers in XAPI.
Variant vs. Version
A driver comes in several variants, each of which has a version. A
variant may be updated to a later version while retaining its identity.
This makes variants and versions somewhat synonymous and is admittedly
confusing.
Device Drivers in Linux and XAPI
Drivers that are not compiled into the kernel are loaded dynamically
from the file system. They are loaded from the hierarchy
/lib/modules/<kernel-version>/
and we are particularly interested in the hierarchy
/lib/modules/<kernel-version>/updates/
where vendor-supplied (“driver disk”) drivers are located and where we
want to support multiple versions. A driver has typically file extension
.ko (kernel object).
A presence in the file system does not mean that a driver is loaded as
this happens only on demand. The actually loaded drivers
(or modules, in Linux parlance) can be observed from
/proc/modules
netlink_diag 16384 0 - Live 0x0000000000000000
udp_diag 16384 0 - Live 0x0000000000000000
tcp_diag 16384 0 - Live 0x0000000000000000
which includes dependencies between modules (the - means no dependencies).
Driver Properties
A driver name is unique and a driver can be loaded only once. The fact
that kernel object files are located in a file system hierarchy means
that a driver may exist multiple times and in different version in the
file system. From the kernel’s perspective a driver has a unique name
and is loaded at most once. We thus can talk about a driver using its
name and acknowledge it may exist in different versions in the file
system.
A driver that is loaded by the kernel we call active.
A driver file (name.ko) that is in a hierarchy searched by the
kernel is called selected. If the kernel needs the driver of that
name, it would load this object file.
For a driver (name.ko) selection and activation are independent
properties:
inactive, deselected: not loaded now and won’t be loaded on next
boot.
active, deselected: currently loaded but won’t be loaded on next
boot.
inactive, selected: not loaded now but will be loaded on demand.
active, selected: currently loaded and will be loaded on demand
after a reboot.
For a driver to be selected it needs to be in the hierarchy searched by
the kernel. By removing a driver from the hierarchy it can be
de-selected. This is possible even for drivers that are already loaded.
Hence, activation and selection are independent.
Multi-Version Drivers
To support multi-version drivers, XenServer introduces a new
hierarchy in Dom0. This is mostly technical background because a
lower-level tool deals with this and not XAPI directly.
/lib/modules/<kernel-version>/updates/ is searched by the kernel for
drivers.
The hierarchy is expected to contain symbolic links to the file
actually containing the driver:
/lib/modules/<kernel-version>/xenserver/<driver>/<version>/<name>.ko
The xenserver hierarchy provides drivers in several versions. To
select a particular version, we expect a symbolic link from
updates/<name>.ko to <driver>/<version>/<name>.ko. At the next boot,
the kernel will search the updates/ entries and load the linked
driver, which will become active.
Selection of a driver is synonymous with creating a symbolic link to the
desired version.
Versions
The version of a driver is encoded in the path to its object file but
not in the name itself: for xenserver/intel-ice/1.11.17.1/ice.ko the
driver name is ice and only its location hints at the version.
The kernel does not reveal the location from where it loaded an active
driver. Hence the name is not sufficient to observe the currently active
version. For this, we use ELF notes.
The driver file (name.ko) is in ELF linker format and may contain
custom ELF notes. These are binary annotations that can be compiled
into the file. The kernel reveals these details for loaded drivers
(i.e., modules) in:
/sys/module/<name>/notes/
The directory contains files like
/sys/module/xfs/notes/.note.gnu.build-id
with a specific name (.note.xenserver) for our purpose. Such a file contains
in binary encoding a sequence of records, each containing:
A null-terminated name (string)
A type (integer)
A desc (see below)
The format of the description is vendor specific and is used for
a null-terminated string holding the version. The name is fixed to
“XenServer”. The exact format is described in ELF notes.
A note with the name “XenServer” and a particular type then has the version
as a null-terminated string the desc field. Additional “XenServer” notes
of a different type may be present.
API
XAPI has capabilities to inspect and select multi-version drivers.
The API uses the terminology introduced above:
A driver is specific to a host.
A driver has a unique name; however, for API purposes a driver is
identified by a UUID (on the CLI) and reference (programmatically).
A driver has multiple variants; each variant has a version.
Programatically, variants are represented as objects (referenced by
UUID and a reference) but this is mostly hidden in the CLI for
convenience.
A driver variant is active if it is currently used by the kernel
(loaded).
A driver variant is selected if it will be considered by the kernel
(on next boot or when loading on demand).
Only one variant can be active, and only one variants can be selected.
Inspection and selection of drivers is facilitated by a tool
(“drivertool”) that is called by xapi. Hence, XAPI does not by itself
manipulate the file system that implements driver selection.
Class Host_driver represents an instance of a multi-version driver on
a host. It references Driver_variant objects for the details of the
available and active variants. A variant has a version.
Fields
All fields are read-only and can’t be set directly. Be aware that names
in the CLI and the API may differ.
host: reference to the host where the driver is installed.
name: string; name of the driver without “.ko” extension.
variants: string set; set of variants available on the host for this
driver. The name of each variant of a driver is unique and used in
the CLI for selecting it.
selected_varinat: variant, possibly empty. Variant that is selected,
i.e. the variant of the driver that will be considered by the kernel
when loading the driver the next time. May be null when none is
selected.
active_variant: variant, possibly empty. Variant that is currently
loaded by the kernel.
The CLI uses hostdriver and a dash instead of an underscore. The CLI
also offers convenience fields. Whenever selected and
active variant are not the same, a reboot is required to activate the
selected driver/variant combination.
(We are not using host-driver in the CLI to avoid the impression that
this is part of a host object.)
Methods
All method invocations require Pool_Operator rights. “The Pool
Operator role manages host- and pool-wide resources, including setting
up storage, creating resource pools and managing patches, high
availability (HA) and workload balancing (WLB)”
select (self, variant); select variant of driver self. Selecting
the variant (a reference) of an existing driver.
deselect(self): this driver can’t be loaded next time the kernel is
looking for a driver. This is a potentially dangerous operation, so it’s
protected in the CLI with a --force flag.
rescan (host): scan the host and update its driver information.
Called on toolstack restart and may be invoked from the CLI for
development.
Class Driver_variant
An object of this class represents a variant of a driver on a host,
i.e., it is specific to both.
name: unique name
driver: what host driver this belongs to
version: string; a driver variant has a version
status: string: development status, like “beta”
hardware_present: boolean, true if the host has the hardware
installed supported by this driver
The only method available is select(self) to select a variant. It has
the same effect as the select method on the Host_driver class.
The CLI comes with corresponding xe hostdriver-variant-* commands to
list and select a variant.
Each Host_driver and Driver_variant object is represented in the
database and data is persisted over reboots. This means this data will
be part of data collected in a xen-bugtool invocation.
Scan and Rescan
On XAPI start-up, XAPI updates the Host_driver objects belonging to the
host to reflect the actual situation. This can be initiated from the
CLI, too, mostly for development.
NUMA
NUMA in a nutshell
Systems that contain more than one CPU socket are typically built on a Non-Uniform Memory Architecture (NUMA) 12.
In a NUMA system each node has fast, lower latency access to local memory.
2 of those are due to 2 separate physical packages (sockets)
a further 2 is due to Sub-NUMA-Clustering (aka Nodes Per Socket for AMD) where the L3 cache is split
The L3 cache is shared among multiple cores, but cores 0-5 have lower latency access to one part of it, than cores 6-11, and this is also reflected by splitting memory addresses into 4 31GiB ranges in total.
In the diagram the closer the memory is to the core, the lower the access latency:
local NUMA node (to a group of cores, e.g. L#0 P#0), node 0
remote NUMA node in same package (L#1 P#2), node 1
remote NUMA node in other packages (L#2 P#1 and ‘L#3P#3’), node 2 and 3
The NUMA distance matrix
Accessing remote NUMA node in the other package has to go through a shared interconnect, which has lower bandwidth than the direct connections, and also a bottleneck if both cores have to access remote memory: the bandwidth for a single core is effectively at most half.
This is reflected in the NUMA distance/latency matrix.
The units are arbitrary, and by convention access latency to the local NUMA node is given distance ‘10’.
Relative latency matrix by logical indexes:
index
0
2
1
3
0
10
21
11
21
2
21
10
21
11
1
11
21
10
21
3
21
11
21
10
This follows the latencies described previously:
fast access to local NUMA node memory (by definition), node 0, cost 10
slightly slower access latency to the other NUMA node in same package, node 1, cost 11
twice as slow access latency to remote NUMA memory in the other physical package (socket): nodes 2 and 3, cost 21
There is also I/O NUMA where a cost is similarly associated to where a PCIe is plugged in, but exploring that is future work (it requires exposing NUMA topology to the Dom0 kernel to benefit from it), and for simplicity the diagram above does not show it.
Advantages of NUMA
NUMA does have advantages though: if each node accesses only its local memory, then each node can independently achieve maximum throughput.
For best performance, we should:
minimize the amount of interconnect bandwidth we are using
run code that accesses memory allocated on the closest NUMA node
maximize the number of NUMA nodes that we use in the system as a whole
If a VM’s memory and vCPUs can entirely fit within a single NUMA node then we should tell Xen to prefer to allocate memory from and run the vCPUs on a single NUMA node.
Xen vCPU soft-affinity
The Xen scheduler supports 2 kinds of constraints:
hard pinning: a vCPU may only run on the specified set of pCPUs and nowhere else
soft pinning: a vCPU is preferably run on the specified set of pCPUs, but if they are all busy then it may run elsewhere
Hard pinning can be used to partition the system. But, it can potentially leave part of the system idle while another part is bottlenecked by many vCPUs competing for the same limited set of pCPUs.
Xen does not migrate workloads between NUMA nodes on its own (the Linux kernel can). Although, it is possible to achieve a similar effect with explicit migration.
However, migration introduces additional delays and is best avoided for entire VMs.
Therefore, soft pinning is preferred: Running on a potentially suboptimal pCPU that uses remote memory could still be better than not running it at all until a pCPU is free to run it.
Xen will also allocate memory for the VM according to the vCPU (soft) pinning: If the vCPUs are pinned to NUMA nodes A and B, Xen allocates memory from NUMA nodes A and B in a round-robin way, resulting in interleaving.
Current default: No vCPU pinning
By default, when no vCPU pinning is used, Xen interleaves memory from all NUMA nodes. This averages the memory performance, but individual tasks’ performance may be significantly higher or lower depending on which NUMA node the application may have “landed” on.
As a result, restarting processes will speed them up or slow them down as address space randomization picks different memory regions inside a VM.
This uses the memory bandwidth of all memory controllers and distributes the load across all nodes.
However, the memory latency is higher as the NUMA interconnects are used for most memory accesses and vCPU synchronization within the Domains.
Note that this is not the worst case: the worst case would be for memory to be allocated on one NUMA node, but the vCPU always running on the furthest away NUMA node.
Best effort NUMA-aware memory allocation for VMs
Summary
The best-effort mode attempts to fit Domains into NUMA nodes and to balance memory usage.
It soft-pins Domains on the NUMA node with the most available memory when adding the Domain.
Memory is currently allocated when booting the VM (or while constructing the resuming VM).
Parallel boot issue: Memory is not pre-allocated on creation, but allocated during boot.
The result is that parallel VM creation and boot can exhaust the memory of NUMA nodes.
Goals
By default, Xen stripes the VM’s memory across all NUMA nodes of the host, which means that every VM has to go through all the interconnects.
The goal here is to find a better allocation than the default, not necessarily an optimal allocation.
An optimal allocation would require knowing what VMs you would start/create in the future, and planning across hosts.
This allows the host to use all NUMA nodes to take advantage of the full memory bandwidth available on the pool hosts.
Overall, we want to balance the VMs across NUMA nodes, such that we use all NUMA nodes to take advantage of the maximum memory bandwidth available on the system.
For now this proposed balancing will be done only by balancing memory usage: always heuristically allocating VMs on the NUMA node that has the most available memory.
For now, this allocation has a race condition: This happens when multiple VMs are booted in parallel, because we don’t wait until Xen has constructed the domain for each one (that’d serialize domain construction, which is currently parallel).
This may be improved in the future by having an API to query Xen where it has allocated the memory, and to explicitly ask it to place memory on a given NUMA node (instead of best_effort).
If a VM doesn’t fit into a single node then it is not so clear what the best approach is.
One criteria to consider is minimizing the NUMA distance between the nodes chosen for the VM.
Large NUMA systems may not be fully connected in a mesh requiring multiple hops to each a node, or even have asymmetric links, or links with different bandwidth.
The specific NUMA topology is provided by the ACPI SLIT table as the matrix of distances between nodes.
It is possible that 3 NUMA nodes have a smaller average/maximum distance than 2, so we need to consider all possibilities.
For N nodes there would be 2^N possibilities, so [Topology.NUMA.candidates] limits the number of choices to 65520+N (full set of 2^N possibilities for 16 NUMA nodes, and a reduced set of choices for larger systems).
Implementation
[Topology.NUMA.candidates] is a sorted sequence of node sets, in ascending order of maximum/average distances.
Once we’ve eliminated the candidates not suitable for this VM (that do not have enough total memory/pCPUs) we are left with a monotonically increasing sequence of nodes.
There are still multiple possibilities with same average distance.
This is where we consider our second criteria - balancing - and pick the node with most available free memory.
Once a suitable set of NUMA nodes are picked we compute the CPU soft affinity as the union of the CPUs from all these NUMA nodes.
If we didn’t find a solution then we let Xen use its default allocation.
The “distances” between NUMA nodes may not all be equal, e.g. some nodes may have shorter links to some remote NUMA nodes, while others may have to go through multiple hops to reach it.
See page 13 in 4 for a diagram of an AMD Opteron 6272 system.
Limitations and tradeoffs
Booting multiple VMs in parallel will result in potentially allocating both on the same NUMA node (race condition)
When we’re about to run out of host memory we’ll fall back to striping memory again, but the soft affinity mask won’t reflect that (this needs an API to query Xen on where it has actually placed the VM, so we can fix up the mask accordingly)
XAPI is not aware of NUMA balancing across a pool. Xenopsd chooses NUMA nodes purely based on amount of free memory on the NUMA nodes of the host, even if a better NUMA placement could be found on another host
Very large (>16 NUMA nodes) systems may only explore a limited number of choices (fit into a single node vs fallback to full interleaving)
The exact VM placement is not yet controllable
Microbenchmarks with a single VM on a host show both performance improvements and regressions on memory bandwidth usage: previously a single VM may have been able to take advantage of the bandwidth of both NUMA nodes if it happened to allocate memory from the right places, whereas now it’ll be forced to use just a single node.
As soon as you have more than 1 VM that is busy on a system enabling NUMA balancing should almost always be an improvement though.
It is not supported to combine hard vCPU masks with soft affinity: if hard affinities are used, then no NUMA scheduling is done by the toolstack, and we obey exactly what the user has asked for with hard affinities.
This shouldn’t affect other VMs since the memory used by hard-pinned VMs will still be reflected in overall less memory available on individual NUMA nodes.
Corner case: the ACPI standard allows certain NUMA nodes to be unreachable (distance 0xFF = -1 in the Xen bindings).
This is not supported and will cause an exception to be raised.
If this is an issue in practice the NUMA matrix could be pre-filtered to contain only reachable nodes.
NUMA nodes with 0 CPUs are accepted (it can result from hard affinity pinning)
NUMA balancing is not considered during HA planning
Dom0 is a single VM that needs to communicate with all other VMs, so NUMA balancing is not applied to it (we’d need to expose NUMA topology to the Dom0 kernel, so it can better allocate processes)
IO NUMA is out of scope for now
XAPI datamodel design
New API field: Host.numa_affinity_policy.
Choices: default_policy, any, best_effort.
On upgrade the field is set to default_policy
Changes in the field only affect newly (re)booted VMs, for changes to take effect on existing VMs a host evacuation or reboot is needed
There may be more choices in the future (e.g. strict, which requires both Xen and toolstack changes).
Meaning of the policy:
any: the Xen default where it allocated memory by striping across NUMA nodes
best_effort: the algorithm described in this document, where soft pinning is used to achieve better balancing and lower latency
default_policy: when the admin hasn’t expressed a preference
Currently, default_policy is treated as any, but the admin can change it, and then the system will remember that change across upgrades.
If we didn’t have a default_policy then changing the “default” policy on an upgrade would be tricky: we either risk overriding an explicit choice of the admin, or existing installs cannot take advantage of the improved performance from best_effort
Future XAPI versions may change default_policy to mean best_effort.
Admins can still override it to any if they wish on a host by host basis.
It is not expected that users would have to change best_effort, unless they run very specific workloads, so a pool level control is not provided at this moment.
There is also no separate feature flag: this host flag acts as a feature flag that can be set through the API without restarting the toolstack.
Although obviously only new VMs will benefit.
Debugging the allocator is done by running xl vcpu-list and investigating the soft pinning masks, and by analyzing xensource.log.
Xenopsd implementation
See the documentation in [softaffinity.mli] and [topology.mli].
[Softaffinity.plan] returns a [CPUSet] given a host’s NUMA allocation state and a VM’s NUMA allocation request.
[Topology.CPUSet] provides helpers for operating on a set of CPU indexes.
[Topology.NUMAResource] is a [CPUSet] and the free memory available on a NUMA node.
[Topology.NUMARequest] is a request for a given number of vCPUs and memory in bytes.
[Topology.NUMA] represents a host’s NUMA allocation state.
[Topology.NUMA.candidates] are groups of nodes orderd by minimum average distance.
The sequence is limited to [N+65520], where [N] is the number of NUMA nodes.
This avoids exponential state space explosion on very large systems (>16 NUMA nodes).
[Topology.NUMA.choose] will choose one NUMA node deterministically, while trying to keep overall NUMA node usage balanced.
[Domain.numa_placement] builds a [NUMARequest] and uses the above [Topology] and [Softaffinity] functions to compute and apply a plan.
We used to have a xenopsd.conf configuration option to enable NUMA placement, for backwards compatibility this is still supported, but only if the admin hasn’t set an explicit policy on the Host.
It is best to remove the experimental xenopsd.conf entry though, a future version may completely drop it.
Tests are in [test_topology.ml] which checks balancing properties and whether the plan has improved best/worst/average-case access times in a simulated test based on 2 predefined NUMA distance matrixes (one from Intel and one from an AMD system).
Future work
Enable ‘best_effort’ mode by default once more testing has been done
Add an API to query Xen for the NUMA node memory placement (where it has actually allocated the VM’s memory).
Currently, only the xl debug-keys interface exists which is not supported in production as it can result in killing the host via the watchdog, and is not a proper API, but a textual debug output with no stability guarantees.
More host policies, e.g. strict.
Requires the XAPI pool scheduler to be NUMA aware and consider it as part of choosing hosts.
VM level policy that can set a NUMA affinity index, mapped to a NUMA node modulo NUMA nodes available on the system (this is needed so that after migration we don’t end up trying to allocate vCPUs to a non-existent NUMA node)
VM level anti-affinity rules for NUMA placement (can be achieved by setting unique NUMA affinity indexes)
Disks are represented in the XenAPI as VDI objects. Disk snapshots are represented
as VDI objects with the flag is_a_snapshot set to true. Snapshots are always
considered read-only, and should only be used for backup or cloning into new
disks. Disk snapshots have a lifetime independent of the disk they are a snapshot
of i.e. if someone deletes the original disk, the snapshots remain. This contrasts
with some storage arrays in which snapshots are “second class” objects which are
automatically deleted when the original disk is deleted.
Disks are implemented in Xapi via “Storage Manager” (SM) plugins. The SM plugins
conform to an api (the SMAPI) which has operations including
vdi_create: make a fresh disk, full of zeroes
vdi_snapshot: create a snapshot of a disk
File-based vhd implementation
The existing “EXT” and “NFS” file-based Xapi SM plugins store disk data in
trees of .vhd files as in the following diagram:
From the XenAPI point of view, we have one current VDI and a set of snapshots,
each taken at a different point in time. These VDIs correspond to leaf vhds in
a tree stored on disk, where the non-leaf nodes contain all the shared blocks.
The vhd files are always thinly-provisioned which means they only allocate new
blocks on an as-needed basis. The snapshot leaf vhd files only contain vhd
metadata and therefore are very small (a few KiB). The parent nodes containing
the shared blocks only contain the shared blocks. The current leaf initially
contains only the vhd metadata and therefore is very small (a few KiB) and will
only grow when the VM writes blocks.
File-based vhd implementations are a good choice if a “gold image” snapshot
is going to be cloned lots of times.
Block-based vhd implementation
The existing “LVM”, “LVMoISCSI” and “LVMoHBA” block-based Xapi SM plugins store
disk data in trees of .vhd files contained within LVM logical volumes:
Non-snapshot VDIs are always stored full size (a.k.a. thickly-provisioned).
When parent nodes are created they are automatically shrunk to the minimum size
needed to store the shared blocks. The LVs corresponding with snapshot VDIs
only contain vhd metadata and by default consume 8MiB. Note: this is different
to VDI.clones which are stored full size.
Block-based vhd implementations are not a good choice if a “gold image” snapshot
is going to be cloned lots of times, since each clone will be stored full size.
Hypothetical LUN implementation
A hypothetical Xapi SM plugin could use LUNs on an iSCSI storage array
as VDIs, and the array’s custom control interface to implement the “snapshot”
operation:
From the XenAPI point of view, we have one current VDI and a set of snapshots,
each taken at a different point in time. These VDIs correspond to LUNs on the
same iSCSI target, and internally within the target these LUNs are comprised of
blocks from a large shared copy-on-write pool with support for dedup.
Reverting disk snapshots
There is no current way to revert in-place a disk to a snapshot, but it is
possible to create a writable disk by “cloning” a snapshot.
VM snapshots
Let’s say we have a VM, “VM1” that has 2 disks. Concentrating only
on the VM, VBDs and VDIs, we have the following structure:
When we take a snapshot, we first ask the storage backends to snapshot
all of the VDIs associated with the VM, producing new VDI objects.
Then we copy all of the metadata, producing a new ‘snapshot’ VM
object, complete with its own VBDs copied from the original, but now
pointing at the snapshot VDIs. We also copy the VIFs and VGPUs
but for now we will ignore those.
This process leads to a set of objects that look like this:
We have fields that help navigate the new objects: VM.snapshot_of,
and VDI.snapshot_of. These, like you would expect, point to the
relevant other objects.
Deleting VM snapshots
When a snapshot is deleted Xapi calls the SM API vdi_delete. The Xapi SM
plugins which use vhd format data do not reclaim space immediately; instead
they mark the corresponding vhd leaf node as “hidden” and, at some point later,
run a garbage collector process.
The garbage collector will first determine whether a “coalesce” should happen i.e.
whether any parent nodes have only one child i.e. the “shared” blocks are only
“shared” with one other node. In the following example the snapshot delete leaves
such a parent node and the coalesce process copies blocks from the redundant
parent’s only child into the parent:
Note that if the vhd data is being stored in LVM, then the parent node will
have had to be expanded to full size to accommodate the writes. Unfortunately
this means the act of reclaiming space actually consumes space itself, which
means it is important to never completely run out of space in such an SR.
Once the blocks have been copied, we can now cut one of the parents out of the
tree by relinking its children into their grandparent:
Finally the garbage collector can remove unused vhd files / LVM LVs:
Reverting VM snapshots
The XenAPI call VM.revert overwrites the VM metadata with the snapshot VM
metadata, deletes the current VDIs and replaces them with clones of the
snapshot VDIs. Note there is no “vdi_revert” in the SMAPI.
Revert implementation details
This is the process by which we revert a VM to a snapshot. The
first thing to notice is that there is some logic that is called
from message_forwarding.ml,
which uses some low-level database magic to turn the current VM
record into one that looks like the snapshot object. We then go
to the rest of the implementation in xapi_vm_snapshot.ml.
First,
we shut down the VM if it is currently running. Then, we revert
all of the VBDs, VIFs and VGPUs.
To revert the VBDs, we need to deal with the VDIs underneath them.
In order to create space, the first thing we do is delete all of
the VDIs currently attached via VBDs to the VM.
We then clone the disks from the snapshot. Note that there is
no SMAPI operation ‘revert’ currently - we simply clone from
the snapshot VDI. It’s important to note that cloning
creates a new VDI object: this is not the one we started with gone.
Tracing
Tracing is a powerful tool for observing system behavior across multiple components, making it especially
useful for debugging and performance analysis in complex environments.
By integrating OpenTelemetry (a standard that unifies OpenTracing and OpenCensus) and the Zipkin v2 protocol,
XAPI enables efficient tracking and visualization of operations across internal and external systems.
This facilitates detailed analysis and improves collaboration between teams.
Tracing is commonly used in high-level applications such as web services. As a result, less widely-used or
non-web-oriented languages may lack dedicated libraries for distributed tracing (An OCaml implementation
has been developed specifically for XenAPI).
How tracing works in XAPI
Spans and Trace Context
A span is the core unit of a trace, representing a single operation with a defined start and end time.
Spans can contain sub-spans that represent child tasks. This helps identify bottlenecks or areas that
can be parallelized.
A span can contain several contextual elements such as tags (key-value pairs),
events (time-based data), and errors.
The TraceContext HTTP standard defines how trace IDs and span contexts are propagated across systems,
enabling full traceability of operations.
This data enables the creation of relationships between tasks and supports visualizations such as
architecture diagrams or execution flows. These help in identifying root causes of issues and bottlenecks,
and also assist newcomers in onboarding to the project.
Configuration
To enable tracing, you need to create an Observer object in XAPI. This can be done using the xe CLI:
If you specify an invalid or unreachable HTTP endpoint, the configuration will fail.
components: Specify which internal components (e.g., xapi, xenopsd) should be traced.
Additional components are expected to be supported in future releases. An experimental smapi component
is also available and requires additional configuration (explained below).
endpoints: The observer can collect traces locally in /var/log/dt or forward them to external
visualization tools such as Jaeger. Currently, only HTTP/S endpoints
are supported, and they require additional configuration steps (see next section).
To disable tracing you just need to set enabled to false:
smapi component is currently considered experimental and is filtered by default. To enable it, you must
explicitly configure the following in xapi.conf:
observer-experimental-components=""
This tells XAPI that no components are considered experimental, thereby allowing smapi to be traced.
A modification to xapi.conf requires a restart of the XAPI toolstack.
Enabling HTTP/S endpoints
By default HTTP and HTTPS endpoints are disabled. To enable them, add the following lines to xapi.conf:
As with enabling smapi component, modifying xapi.conf requires a restart of the XAPI toolstack.
Note: HTTPS endpoint support is available but not tested and may not work.
Sending local trace to endpoint
By default, traces are generated locally in the /var/log/dt directory. You can copy or forward
these traces to another location or endpoint using the xs-trace tool. For example, if you have
a Jaeger server running locally, you can copy a trace to an endpoint by running:
This technique adds a temporary attribute, custom.random=1234, which will appear in the generated trace
spans, making it easier to search for specific activity in trace visualisation tools. It may also be possible
to achieve similar tagging using baggage parameters directly in individual xe commands, but this approach
is currently undocumented.
Baggage
Baggage, contextual information that resides alongside the context, is supported. This means you can run
the following command:
BAGGAGE="mybaggage=apples" xe vm-list
You will be able to search for tags mybaggage=apples.
Traceparent
Another way to assist in trace searching is to use the TRACEPARENT HTTP header. It is an HTTP header field that
identifies the incoming request. It has a specific format
and it is supported by XAPI. Once generated you can run command as:
XenServer has supported passthrough for GPU devices since XenServer 6.0. Since
the advent of NVIDIA’s vGPU-capable GRID K1/K2 cards it has been possible to
carve up a GPU into smaller pieces yielding a more scalable solution to
boosting graphics performance within virtual machines.
The K1 has four GK104 GPUs and the K2 two GK107 GPUs. Each of these will be exposed through Xapi so a host with a single K1 card will have access to four independent PGPUs.
Each of the GPUs can then be subdivided into vGPUs. For each type of PGPU,
there are a few options of vGPU type which consume different amounts of the
PGPU. For example, K1 and K2 cards can currently be configured in the following
ways:
Note, this diagram is not to scale, the PGPU resource required by each
vGPU type is as follows:
vGPU type
PGPU kind
vGPUs / PGPU
k100
GK104
8
k140Q
GK104
4
k200
GK107
8
k240Q
GK107
4
k260Q
GK107
2
Currently each physical GPU (PGPU) only supports homogeneous vGPU
configurations but different configurations are supported on different PGPUs
across a single K1/K2 card. This means that, for example, a host with a K1 card
can run 64 VMs with k100 vGPUs (8 per PGPU).
XenServer’s vGPU architecture
A new display type has been added to the device model:
With this in place, qemu can now be started using a new option that will
enable it to communicate with a new display emulator, vgpu to expose the
graphics device to the guest. The vgpu binary is responsible for handling the
VGX-capable GPU and, once it has been successfully passed through, the in-guest
drivers can be installed in the same way as when it detects new hardware.
The diagram below shows the relevant parts of the architecture for this
project.
Relevant code
In Xenopsd: Xenops_server_xen is where
Xenopsd gets the vGPU information from the values passed from Xapi;
In Xenopsd: Device.__start is where the vgpu process is started, if
necessary, before Qemu.
Xapi’s API and data model
A lot of work has gone into the toolstack to handle the creation and management
of VMs with vGPUs. We revised our data model, introducing a semantic link
between VGPU and PGPU objects to help with utilisation tracking; we
maintained the GPU_group concept as a pool-wide abstraction of PGPUs
available for VMs; and we added VGPU_types which are configurations for
VGPU objects.
Aside: The VGPU type in Xapi’s data model predates this feature and was
synonymous with GPU-passthrough. A VGPU is simply a display device assigned to
a VM which may be a vGPU (this feature) or a whole GPU (a VGPU of type
passthrough).
VGPU_types can be enabled/disabled on a per-PGPU basis allowing for
reservation of particular PGPUs for certain workloads. VGPUs are allocated on
PGPUs within their GPU group in either a depth-first or breadth-first
manner, which is configurable on a per-group basis.
VGPU_types are created by xapi at startup depending on the available
hardware and config files present in dom0. They exist in the pool database, and
a primary key is used to avoid duplication. In XenServer 6.x the tuple of
(vendor_name, model_name) was used as the primary key, however this was not
ideal as these values are subject to change. XenServer 7.0 switched to a
new primary key
generated from static metadata, falling back to the old method for backwards
compatibility.
A VGPU_type will be garbage collected when there is no VGPU of that type
and there is no hardware which supports that type. On VM import, all VGPUs and
VGPU_types will be created if necessary - if this results in the creation of a
new VGPU_type then the VM will not be usable until the required hardware and
drivers are installed.
Relevant code
In Xapi: Xapi_vgpu_type contains the type definitions and parsing logic
for vGPUs;
In Xapi: Xapi_pgpu_helpers defines the functions used to allocate vGPUs
on PGPUs.
Xapi <-> Xenopsd interface
In XenServer 6.x, all VGPU config was added to the VM’s platform field at
startup, and this information was used by xenopsd to start the display emulator.
See the relevant code in ocaml/xapi/vgpuops.ml.
In XenServer 7.0, to facilitate support of VGPU on Intel hardware in parallel
with the existing NVIDIA support, VGPUs were made first-class objects in the
xapi-xenopsd interface. The interface is described in the design document on
the GPU support evolution.
VM startup
On the pool master:
Assuming no WLB, all VM.start tasks pass through
Xapi_vm_helpers.choose_host_for_vm_no_wlb. If the VM has a vGPU, the list
of all hosts in the pool is split into a list of lists, where the first list
is the most optimal in terms of the GPU group’s allocation mode and the PGPU
availability on each host.
Each list of hosts in turn is passed to Xapi_vm_placement.select_host,
which checks storage, network and memory availability, until a suitable host
is found.
Once a host has been chosen, allocate_vm_to_host will set the
VM.scheduled_to_be_resident_on and VGPU.scheduled_to_be_resident_on
fields.
The task is then ready to be forwarded to the host on which the VM will start:
If the VM has a VGPU, the startup task is wrapped in
Xapi_gpumon.with_gpumon_stopped. This makes sure that the NVIDIA driver
is not in use so can be loaded or unloaded from physical GPUs as required.
The VM metadata, including VGPU metadata, is passed to xenopsd. The creation
of the VGPU metadata is done by vgpus_of_vm. Note that at this point
passthrough VGPUs are represented by the PCI device type, and metadata is
generated by pcis_of_vm.
As part of starting up the VM, xenopsd should report a VGPU event or a
PCI event, which xapi will use to indicate that the xapi VGPU object can
be marked as currently_attached.
Usage
To create a VGPU of a given type you can use vgpu-create:
To see a list of VGPU types available for use on your XenServer, run the
following command. Note: these will only be populated if you have installed the
relevant NVIDIA RPMs and if there is hardware installed on that host supported
each type. Using params=all will display more information such as the maximum
number of heads supported by that VGPU type and which PGPUs have this type
enabled and supported.
$ xe vgpu-type-list [params=all]
To access the new and relevant parameters on a PGPU (i.e.
supported_VGPU_types, enabled_VGPU_types, resident_VGPUs) you can use
pgpu-param-get with param-name=supported-vgpu-typesparam-name=enabled-vgpu-types and param-name=resident-vgpus respectively.
Or, alternatively, you can use the following command to list all the parameters
for the PGPU. You can get the types supported or enabled for a given PGPU:
$ xe pgpu-list uuid=... params=all
Xapi Storage Migration
The Xapi Storage Migration (XSM) also known as “Storage Motion” allows
a running VM to be migrated within a pool, between different hosts
and different storage simultaneously;
a running VM to be migrated to another pool;
a disk attached to a running VM to be moved to another SR.
The following diagram shows how XSM works at a high level:
The slowest part of a storage migration is migrating the storage, since virtual
disks can be very large. Xapi starts by taking a snapshot and copying that to
the destination as a background task. Before the datapath connecting the VM
to the disk is re-established, xapi tells tapdisk to start mirroring all
writes to a remote tapdisk over NBD. From this point on all VM disk writes
are written to both the old and the new disk.
When the background snapshot copy is complete, xapi can migrate the VM memory
across. Once the VM memory image has been received, the destination VM is
complete and the original can be safely destroyed.
Xapi
Xapi is the xapi-project host and cluster manager.
Xapi is responsible for:
providing a stable interface (the XenAPI)
allowing one client to manage multiple hosts
hosting the “xe” CLI
authenticating users and applying role-based access control
locking resources (in particular disks)
allowing storage to be managed through plugins
planning and coping with host failures (“High Availability”)
storing VM and host configuration
generating alerts
managing software patching
Principles
The XenAPI interface must remain backwards compatible, allowing older
clients to continue working
Xapi delegates all Xenstore/libxc/libxl access to Xenopsd, so Xapi could
be run in an unprivileged helper domain
Xapi delegates the low-level storage manipulation to SM plugins.
Xapi delegates setting up host networking to xcp-networkd.
Xapi delegates monitoring performance counters to xcp-rrdd.
Overview
The following diagram shows the internals of Xapi:
The top of the diagram shows the XenAPI clients: XenCenter, XenOrchestra,
OpenStack and CloudStack using XenAPI and HTTP GET/PUT over ports 80 and 443 to
talk to xapi. These XenAPI communications (JSON-RPC or XML-RPC over HTTP
POST and HTTP GET/PUT) are always authenticated using either PAM (by default using the local
passwd and group files) or through Active Directory.
The APIs are classified into categories:
coordinator-only: these are the majority of current APIs. The coordinator
should be called and relied upon to forward the call to the right place with
the right locks held.
normally-local: these are performance special cases
such as disk import/export and console connection which are sent directly to
hosts which have the most efficient access to the data.
emergency: these deal with scenarios where the coordinator is offline
If the incoming API call should be resent to the coordinator then a XenAPI
HOST_IS_SLAVE error message containing the coordinator’s IP is sent
back to the client.
Once past the initial checks, API calls enter the “message forwarding” layer which
locks resources (via the current_operations mechanism)
decides which host should execute the request.
If the request should run locally then a direct function call is used;
otherwise the message forwarding code makes a synchronous API call to a
specific other host. Note: Xapi currently employs a “thread per request” model
which causes one POSIX thread to be created for each request. Even when a
request is forwarded its thread persists, blocking until the result
becomes available.
If the XenAPI call is a VM lifecycle operation then it is converted into a
Xenopsd API call and forwarded over a Unix domain socket. Xapi and Xenopsd have
similar notions of cancellable asynchronous “tasks”, so the current Xapi task
(all operations run in the context of a task) is bound to the Xenopsd task, so
cancellation is passed through and progress updates are received.
If the XenAPI call is a storage operation then the “storage access” layer
verifies that the storage objects are in the correct state (SR
attached/detached; VDI attached/activated; read-only/read-write)
invokes the relevant operation in the Storage Manager API (SMAPI) v2
interface;
depending on the type of SR:
uses the SMAPIv2 to SMAPIv1 converter to generate the necessary command-line
to talk to the SMAPIv1 plugin (EXT, NFS, LVM etc) and to execute it
uses the SMAPIv2 to SMAPIv3 converter daemon xapi-storage-script to
exectute the necessary SMAPIv3 command (GFS2)
persists the state of the storage objects (including the result of a
VDI.attach call) to persistent storage
Internally the SMAPIv1 plugins use privileged access to the Xapi database to
directly set fields (e.g. VDI.virtual_size) that would be considered read/only
to other clients. The SMAPIv1 plugins also rely on Xapi for
knowledge of all hosts which may access the storage
locking of disks within the resource pool
safely executing code on other hosts via the “Xapi plugin” mechanism
The Xapi database contains Host and VM metadata and is shared pool-wide. The
coordinator keeps a copy in memory, and all other nodes send remote queries to the
coordinator. The database associates each object with a generation count which
is used to implement the XenAPI event.next and event.from APIs. The
database is routinely asynchronously flushed to disk in XML format. If the
“redo-log” is enabled then all database writes are written synchronously as deltas
to a shared block device. Without the “redo-log”, recent updates may be lost if
Xapi is killed before a flush.
High-Availability refers to planning for host failure, monitoring host
liveness and then following-through on the plans. Xapi defers HA to an
external host liveness monitor called xhad. When xhad confirms that
a host has failed – and has been isolated from the storage – then Xapi
will restart any VMs which have failed and which have been marked as
“protected” by HA. Xapi can also impose admission control to prevent the
pool from becoming overloaded and thus unable to cope with an arbitrary
number of host failures.
The xe CLI is implemented in terms of the XenAPI, but for efficiency the
implementation is linked directly into Xapi. The xe program remotes its
command-line to Xapi, and Xapi sends back a series of simple commands (prompt
for input; print line; fetch file; exit etc).
This document describes how to add a new class to the data model that
defines the Xen Server API. It complements two other documents that
describe how to extend an existing class:
As a running example, we will use the addition of a class that is part
of the design for the PVS Direct feature. PVS Direct introduces
proxies that serve VMs with disk images. This class was added via commit
CP-16939 to Xen API.
Example: PVS_server
In the world of Xen Server, each important concept like a virtual
machine, interface, or users is represented by a class in the data model.
A class defines methods and instance variables. At runtime, all class
instances are held in an in-memory database. For example, part of [PVS
Direct] is a class PVS_server, representing a resource that provides
block-level data for virtual machines. The design document defines it to
have the following important properties:
Fields
(string set) addresses (RO/constructor) IPv4 addresses of the
server.
(int) first_port (RO/constructor) First UDP port accepted by the
server.
(int) last_port (RO/constructor) Last UDP port accepted by the
server.
(PVS_farm ref) farm (RO/constructor) Link to the farm that this
server is included in. A PVS_server object must always have a valid
farm reference; the PVS_server will be automatically GC’ed by xapi
if the associated PVS_farm object is removed.
(string) uuid (R0/runtime) Unique identifier/object reference.
Allocated by the server.
Methods (or Functions)
(PVS_server ref) introduce (string set addresses, int first_port, int last_port, PVS_farm ref farm) Introduce a new PVS server into
the farm. Allowed at any time, even when proxies are in use. The
proxies will be updated automatically.
(void) forget (PVS_server ref self) Remove a PVS server from the
farm. Allowed at any time, even when proxies are in use. The
proxies will be updated automatically.
Implementation Overview
The implementation of a class is distributed over several files:
ocaml/idl/datamodel.ml – central class definition
ocaml/idl/datamodel_types.ml – definition of releases
ocaml/xapi/cli_frontend.ml – declaration of CLI operations
ocaml/xapi/cli_operations.ml – implementation of CLI operations
ocaml/xapi/records.ml – getters and setters
ocaml/xapi/OMakefile – refers to xapi_pvs_farm.ml
ocaml/xapi/api_server.ml – refers to xapi_pvs_farm.ml
ocaml/xapi/message_forwarding.ml
ocaml/xapi/xapi_pvs_farm.ml – implementation of methods, new file
Data Model
The data model ocaml/idl/datamodel.ml defines the class. To keep the
name space tidy, most helper functions are grouped into an internal
module:
(* datamodel.ml *)
let schema_minor_vsn = 103 (* line 21 -- increment this *)
let _pvs_farm = "PVS_farm" (* line 153 *)
module PVS_farm = struct (* line 8658 *)
let lifecycle = [Prototyped, rel_dundee_plus, ""]
let introduce = call
~name:"introduce"
~doc:"Introduce new PVS farm"
~result:(Ref _pvs_farm, "the new PVS farm")
~params:
[ String,"name","name of the PVS farm"
]
~lifecycle
~allowed_roles:_R_POOL_OP
()
let forget = call
~name:"forget"
~doc:"Remove a farm's meta data"
~params:
[ Ref _pvs_farm, "self", "this PVS farm"
]
~errs:[
Api_errors.pvs_farm_contains_running_proxies;
Api_errors.pvs_farm_contains_servers;
]
~lifecycle
~allowed_roles:_R_POOL_OP
()
let set_name = call
~name:"set_name"
~doc:"Update the name of the PVS farm"
~params:
[ Ref _pvs_farm, "self", "this PVS farm"
; String, "value", "name to be used"
]
~lifecycle
~allowed_roles:_R_POOL_OP
()
let add_cache_storage = call
~name:"add_cache_storage"
~doc:"Add a cache SR for the proxies on the farm"
~params:
[ Ref _pvs_farm, "self", "this PVS farm"
; Ref _sr, "value", "SR to be used"
]
~lifecycle
~allowed_roles:_R_POOL_OP
()
let remove_cache_storage = call
~name:"remove_cache_storage"
~doc:"Remove a cache SR for the proxies on the farm"
~params:
[ Ref _pvs_farm, "self", "this PVS farm"
; Ref _sr, "value", "SR to be removed"
]
~lifecycle
~allowed_roles:_R_POOL_OP
()
let obj =
let null_str = Some (VString "") in
let null_set = Some (VSet []) in
create_obj (* <---- creates class *)
~name: _pvs_farm
~descr:"machines serving blocks of data for provisioning VMs"
~doccomments:[]
~gen_constructor_destructor:false
~gen_events:true
~in_db:true
~lifecycle
~persist:PersistEverything
~in_oss_since:None
~messages_default_allowed_roles:_R_POOL_OP
~contents:
[ uid _pvs_farm ~lifecycle
; field ~qualifier:StaticRO ~lifecycle
~ty:String "name" ~default_value:null_str
"Name of the PVS farm. Must match name configured in PVS"
; field ~qualifier:DynamicRO ~lifecycle
~ty:(Set (Ref _sr)) "cache_storage" ~default_value:null_set
~ignore_foreign_key:true
"The SR used by PVS proxy for the cache"
; field ~qualifier:DynamicRO ~lifecycle
~ty:(Set (Ref _pvs_server)) "servers"
"The set of PVS servers in the farm"
; field ~qualifier:DynamicRO ~lifecycle
~ty:(Set (Ref _pvs_proxy)) "proxies"
"The set of proxies associated with the farm"
]
~messages:
[ introduce
; forget
; set_name
; add_cache_storage
; remove_cache_storage
]
()
end
let pvs_farm = PVS_farm.obj
The class is defined by a call to create_obj and it defines the
fields and messages (methods) belonging to the class. Each field has a
name, a type, and some meta information. Likewise, each message
(or method) is created by call that describes its parameters.
The PVS_farm has additional getter and setter methods for accessing
its fields. These are not declared here as part of the messages
but are automatically generated.
To make sure the new class is actually used, it is important to enter it
into two lists:
(* datamodel.ml *)
let all_system = (* line 8917 *)
[
...
vgpu_type;
pvs_farm;
...
]
let expose_get_all_messages_for = [ (* line 9097 *)
...
_pvs_farm;
_pvs_server;
_pvs_proxy;
When a field refers to another object that itself refers back to it,
these two need to be entered into the all_relations list. For example,
_pvs_server refers to a _pvs_farm value via "farm", which, in
turn, refers to the _pvs_server value via its "servers" field.
The CLI provides access to objects from the command line. The following
conventions exist for naming fields:
A field in the data model uses an underscore (_) but a hyphen (-)
in the CLI: what is cache_storage in the data model becomes
cache-storage in the CLI.
When a field contains a reference or multiple, like proxies, it
becomes proxy-uuids in the CLI because references are always
referred to by their UUID.
CLI Getters and Setters
All fields can be read from the CLI and some fields can also be set via
the CLI. These getters and setters are mostly generated automatically
and need to be connected to the CLI through a function in
ocaml/xapi/records.ml. Note that field names here use the
naming convention for the CLI:
(* ocaml/xapi/records.ml *)
let pvs_farm_record rpc session_id pvs_farm =
let _ref = ref pvs_farm in
let empty_record =
ToGet (fun () -> Client.PVS_farm.get_record rpc session_id !_ref) in
let record = ref empty_record in
let x () = lzy_get record in
{ setref = (fun r -> _ref := r ; record := empty_record)
; setrefrec = (fun (a,b) -> _ref := a; record := Got b)
; record = x
; getref = (fun () -> !_ref)
; fields=
[ make_field ~name:"uuid"
~get:(fun () -> (x ()).API.pVS_farm_uuid) ()
; make_field ~name:"name"
~get:(fun () -> (x ()).API.pVS_farm_name)
~set:(fun name ->
Client.PVS_farm.set_name rpc session_id !_ref name) ()
; make_field ~name:"cache-storage"
~get:(fun () -> (x ()).API.pVS_farm_cache_storage
|> List.map get_uuid_from_ref |> String.concat "; ")
~add_to_set:(fun sr_uuid ->
let sr = Client.SR.get_by_uuid rpc session_id sr_uuid in
Client.PVS_farm.add_cache_storage rpc session_id !_ref sr)
~remove_from_set:(fun sr_uuid ->
let sr = Client.SR.get_by_uuid rpc session_id sr_uuid in
Client.PVS_farm.remove_cache_storage rpc session_id !_ref sr)
()
; make_field ~name:"server-uuids"
~get:(fun () -> (x ()).API.pVS_farm_servers
|> List.map get_uuid_from_ref |> String.concat "; ")
~get_set:(fun () -> (x ()).API.pVS_farm_servers
|> List.map get_uuid_from_ref)
()
; make_field ~name:"proxy-uuids"
~get:(fun () -> (x ()).API.pVS_farm_proxies
|> List.map get_uuid_from_ref |> String.concat "; ")
~get_set:(fun () -> (x ()).API.pVS_farm_proxies
|> List.map get_uuid_from_ref)
()
]
}
CLI Interface to Methods
Methods accessible from the CLI are declared in
ocaml/xapi/cli_frontend.ml. Each declaration refers to the real
implementation of the method, like Cli_operations.PVS_far.introduce:
(* cli_frontend.ml *)
let rec cmdtable_data : (string*cmd_spec) list =
(* ... *)
"pvs-farm-introduce",
{
reqd=["name"];
optn=[];
help="Introduce new PVS farm";
implementation=No_fd Cli_operations.PVS_farm.introduce;
flags=[];
};
"pvs-farm-forget",
{
reqd=["uuid"];
optn=[];
help="Forget a PVS farm";
implementation=No_fd Cli_operations.PVS_farm.forget;
flags=[];
};
CLI Implementation of Methods
Each CLI operation that is not a getter or setter has an implementation
in cli_operations.ml which is implemented in terms of the real
implementation:
(* cli_operations.ml *)
module PVS_farm = struct
let introduce printer rpc session_id params =
let name = List.assoc "name" params in
let ref = Client.PVS_farm.introduce ~rpc ~session_id ~name in
let uuid = Client.PVS_farm.get_uuid rpc session_id ref in
printer (Cli_printer.PList [uuid])
let forget printer rpc session_id params =
let uuid = List.assoc "uuid" params in
let ref = Client.PVS_farm.get_by_uuid ~rpc ~session_id ~uuid in
Client.PVS_farm.forget rpc session_id ref
end
Fields that should show up in the CLI interface by default are declared
in the gen_cmds value:
Error messages used by an implementation are introduced in two files:
(* ocaml/xapi-consts/api_errors.ml *)
let pvs_farm_contains_running_proxies = "PVS_FARM_CONTAINS_RUNNING_PROXIES"
let pvs_farm_contains_servers = "PVS_FARM_CONTAINS_SERVERS"
let pvs_farm_sr_already_added = "PVS_FARM_SR_ALREADY_ADDED"
let pvs_farm_sr_is_in_use = "PVS_FARM_SR_IS_IN_USE"
let sr_not_in_pvs_farm = "SR_NOT_IN_PVS_FARM"
let pvs_farm_cant_set_name = "PVS_FARM_CANT_SET_NAME"
(* ocaml/idl/datamodel.ml *)
(* PVS errors *)
error Api_errors.pvs_farm_contains_running_proxies ["proxies"]
~doc:"The PVS farm contains running proxies and cannot be forgotten." ();
error Api_errors.pvs_farm_contains_servers ["servers"]
~doc:"The PVS farm contains servers and cannot be forgotten."
();
error Api_errors.pvs_farm_sr_already_added ["farm"; "SR"]
~doc:"Trying to add a cache SR that is already associated with the farm"
();
error Api_errors.sr_not_in_pvs_farm ["farm"; "SR"]
~doc:"The SR is not associated with the farm."
();
error Api_errors.pvs_farm_sr_is_in_use ["farm"; "SR"]
~doc:"The SR is in use by the farm and cannot be removed."
();
error Api_errors.pvs_farm_cant_set_name ["farm"]
~doc:"The name of the farm can't be set while proxies are active."
()
Method Implementation
The implementation of methods lives in a module in ocaml/xapi:
The file below is typically a new file and needs to be added to
ocaml/xapi/OMakefile.
(* ocaml/xapi/xapi_pvs_farm.ml *)
module D = Debug.Make(struct let name = "xapi_pvs_farm" end)
module E = Api_errors
let api_error msg xs = raise (E.Server_error (msg, xs))
let introduce ~__context ~name =
let pvs_farm = Ref.make () in
let uuid = Uuid.to_string (Uuid.make_uuid ()) in
Db.PVS_farm.create ~__context
~ref:pvs_farm ~uuid ~name ~cache_storage:[];
pvs_farm
(* ... *)
Messages received on a slave host may or may not be executed there. In
the simple case, each methods executes locally:
(* ocaml/xapi/message_forwarding.ml *)
module PVS_farm = struct
let introduce ~__context ~name =
info "PVS_farm.introduce %s" name;
Local.PVS_farm.introduce ~__context ~name
let forget ~__context ~self =
info "PVS_farm.forget";
Local.PVS_farm.forget ~__context ~self
let set_name ~__context ~self ~value =
info "PVS_farm.set_name %s" value;
Local.PVS_farm.set_name ~__context ~self ~value
let add_cache_storage ~__context ~self ~value =
info "PVS_farm.add_cache_storage";
Local.PVS_farm.add_cache_storage ~__context ~self ~value
let remove_cache_storage ~__context ~self ~value =
info "PVS_farm.remove_cache_storage";
Local.PVS_farm.remove_cache_storage ~__context ~self ~value
end
Adding a field to the API
This page describes how to add a field to XenAPI. A field is a parameter of a class that can be used in functions and read from the API.
Bumping the database schema version
Whenever a field is added to or removed from the API, its schema version needs
to be increased. XAPI needs this fundamental procedure in order to be able to
detect that an automatic database upgrade is necessary or to find out that the
new schema is incompatible with the existing database. If the schema version is
not bumped, XAPI will start failing in unpredictable ways. Note that bumping
the version is not necessary when adding functions, only when adding fields.
The current version number is kept at the top of the file
ocaml/idl/datamodel_common.ml in the variables schema_major_vsn and
schema_minor_vsn, of which only the latter should be incremented (the major
version only exists for historical reasons). When moving to a new XenServer
release, also update the variable last_release_schema_minor_vsn to the schema
version of the last release. To keep track of the schema versions of recent
XenServer releases, the file contains variables for these, such as
miami_release_schema_minor_vsn. After starting a new version of Xapi on an
existing server, the database is automatically upgraded if the schema version
of the existing database matches the value of last_release_schema_*_vsn in the
new Xapi.
As an example, the patch below shows how the schema version was bumped when the
new API fields used for ActiveDirectory integration were added:
--- a/ocaml/idl/datamodel.ml Tue Nov 11 16:17:48 2008 +0000
+++ b/ocaml/idl/datamodel.ml Tue Nov 11 15:53:29 2008 +0000
@@ -15,17 +15,20 @@ open Datamodel_types
open Datamodel_types
(* IMPORTANT: Please bump schema vsn if you change/add/remove a _field_.
You do not have to dump vsn if you change/add/remove a message *)
let schema_major_vsn = 5
-let schema_minor_vsn = 55
+let schema_minor_vsn = 56
(* Historical schema versions just in case this is useful later *)
let rio_schema_major_vsn = 5
let rio_schema_minor_vsn = 19
+let miami_release_schema_major_vsn = 5
+let miami_release_schema_minor_vsn = 35
+
(* the schema vsn of the last release: used to determine whether we can
upgrade or not.. *)
let last_release_schema_major_vsn = 5
-let last_release_schema_minor_vsn = 35
+let last_release_schema_minor_vsn = 55
Setting the schema hash
In the ocaml/idl/schematest.ml there is the last_known_schema_hash This needs to be updated to be the next hash after the schema version was bumped. Get the new hash by running make test and you will receive the correct hash in the error message.
Adding the new field to some existing class
ocaml/idl/datamodel.ml
Add a new “field” line to the class in the file ocaml/idl/datamodel.ml or ocaml/idl/datamodel_[class].ml. The new field might require
a suitable default value. This default value is used in case the user does not
provide a value for the field.
A field has a number of parameters:
The lifecycle parameter, which shows how the field has evolved over time.
The qualifier parameter, which controls access to the field. The following
values are possible:
Value
Meaning
StaticRO
Field is set statically at install-time.
DynamicRO
Field is computed dynamically at run time.
RW
Field is read/write.
The ty parameter for the type of the field.
The default_value parameter.
The name of the field.
A documentation string.
Example of a field in the pool class:
field ~lifecycle:[Published, rel_orlando, "Controls whether HA is enabled"]
~qualifier:DynamicRO ~ty:Bool
~default_value:(Some (VBool false)) "ha_enabled" "true if HA is enabled on the pool, false otherwise";
See datamodel_types.ml for information about other parameters.
Changing Constructors
Adding a field would change the constructors for the class – functions
Db.*.create – and therefore, any references to these in the code need to be
updated. In the example, the argument ~ha_enabled:false should be added to any
call to Db.Pool.create.
Examples of where these calls can be found is in ocaml/tests/common/test_common.ml and ocaml/xapi/xapi_[class].ml.
CLI Records
If you want this field to show up in the CLI (which you probably do), you will
also need to modify the Records module, in the file
ocaml/xapi-cli-server/records.ml. Find the record function for the class which
you have modified, add a new entry to the fields list using make_field. This type can be found in the same file.
The only required parameters are name and get (and unit, of course ).
If your field is a map or set, then you will need to pass in get_{map,set}, and
optionally set_{map,set}, if it is a RW field. The hidden parameter is useful
if you don’t want this field to show up in a *_params_list call. As an example,
here is a field that we’ve just added to the SM class:
The new fields can be tested by copying the newly compiled xapi binary to a
test box. After the new xapi service is started, the file
/var/log/xensource.log in the test box should contain a few lines reporting the
successful upgrade of the metadata schema in the test box:
[...|xapi] Db has schema major_vsn=5, minor_vsn=57 (current is 5 58) (last is 5 57)
[...|xapi] Database schema version is that of last release: attempting upgrade
[...|sql] attempting to restore database from /var/xapi/state.db
[...|sql] finished parsing xml
[...|sql] writing db as xml to file '/var/xapi/state.db'.
[...|xapi] Database upgrade complete, restarting to use new db
Making this field accessible as a CLI attribute
XenAPI functions to get and set the value of the new field are generated
automatically. It requires some extra work, however, to enable such operations
in the CLI.
The CLI has commands such as host-param-list and host-param-get. To make a new
field accessible by these commands, the file xapi-cli-server/records.ml needs to
be edited. For the pool.ha-enabled field, the pool_record function in this file
contains the following (note the convention to replace underscores by hyphens
in the CLI):
let pool_record rpc session_id pool =
...
[
...
make_field ~name:"ha-enabled" ~get:(fun () -> string_of_bool (x ()).API.pool_ha_enabled) ();
...
]}
NB: the ~get parameter must return a string so include a relevant function to convert the type of the field into a string i.e. string_of_bool
See xapi-cli-server/records.ml for examples of handling field types other than Bool.
Adding a function to the API
This page describes how to add a function to XenAPI.
Add message to API
The file idl/datamodel.ml is a description of the API, from which the
marshalling and handler code is generated.
In this file, the create_obj function is used to define a class which may
contain fields and support operations (known as “messages”). For example, the
identifier host is defined using create_obj to encapsulate the operations which
can be performed on a host.
In order to add a function to the API, we need to add a message to an existing
class. This entails adding a function in idl/datamodel.ml or one of the other datamodel files to describe the new
message and adding it to the class’s list of messages. In this example, we are adding to idl/datamodel_host.ml.
The function to describe the new message will look something like the following:
let host_price_of = call ~flags:[`Session]
~name:"price_of"
~in_oss_since:None
~lifecycle:[]
~params:[(Ref _host, "host", "The host containing the price information");
(String, "item", "The item whose price is queried")]
~result:(Float, "The price of the item")
~doc:"Returns the price of a named item."
~allowed_roles:_R_POOL_OP
()
By convention, the name of the function is formed from the name of the class
and the name of the message: host and price_of, in the example. An entry for
host_price_of is added to the messages of the host class:
let host =
create_obj ...
~messages: [...
host_price_of;
]
...
The parameters passed to call are all optional (except ~name and ~lifecycle).
The ~flags parameter is used to set conditions for the use of the message.
For example, `Session is used to indicate that the call must be made in the
presence of an existing session.
The value of the ~lifecycle parameter should be [] in new code, with dune
automatically generating appropriate values (datamodel_lifecycle.ml)
The ~params parameter describes a list of the formal parameters of the message.
Each parameter is described by a triple. The first component of the triple is
the type (from type ty in idl/datamodel_types.ml); the second is the name
of the parameter, and the third is a human-readable description of the parameter.
The first triple in the list is conventionally the instance of the class on
which the message will operate. In the example, this is a reference to the host.
Similarly, the ~result describes the message’s return type, although this is
permitted to merely be a single value rather than a list of values. If no
~result is specified, the default is unit.
The ~doc parameter describes what the message is doing.
The bool ~hide_from_docs parameter prevents the message from being included in the documentation when generated.
The bool ~pool_internal parameter is used to indicate if the message should be callable by external systems or only internal hosts.
The ~errs parameter is a list of possible exceptions that the message can raise.
The parameter ~lifecycle takes in an array of (Status, version, doc) to indicate the lifecycle of the message type. This takes over from ~in_oss_since which indicated the release that the message type was introduced. NOTE: Leave this parameter empty, it will be populated on build.
The ~allowed_roles parameter is used for access control (see below).
Compiling xen-api.(hg|git) will cause the code corresponding to this message
to be generated and output in ocaml/xapi/server.ml. In the example above, a
section handling an incoming call host.price_of appeared in ocaml/xapi/server.ml.
However, after this was generated, the rest of the build failed because this
call expects a price_of function in the Host object.
Update expose_get_all_messages_for list
If you are adding a new class, do not forget to add your new class _name to
the expose_get_all_messages_for list, at the bottom of datamodel.ml, in
order to have automatically generated get_all and get_all_records functions
attached to it.
Update the RBAC field containing the roles expected to use the new API call
After the RBAC integration, Xapi provides by default a set of static roles
associated to the most common subject tasks.
The api calls associated with each role are defined by a new ~allowed_roles
parameter in each api call, which specifies the list of static roles that
should be able to execute the call. The possible roles for this list is one of
the following names, defined in datamodel.ml:
role_pool_admin
role_pool_operator
role_vm_power_admin
role_vm_admin
role_vm_operator
role_read_only
So, for instance,
~allowed_roles:[role_pool_admin,role_pool_operator] (* this is not the recommended usage, see example below *)
would be a valid list (though it is not the recommended way of using
allowed_roles, see below), meaning that subjects belonging to either
role_pool_admin or role_pool_operator can execute the api call.
The RBAC requirements define a policy where the roles in the list above are
supposed to be totally-ordered by the set of api-calls associated with each of
them. That means that any api-call allowed to role_pool_operator should also be
in role_pool_admin; any api-call allowed to role_vm_power_admin should also be
in role_pool_operator and also in role_pool_admin; and so on. Datamodel.ml
provides shortcuts for expressing these totally-ordered set of roles policy
associated with each api-call:
_R_POOL_ADMIN, equivalent to [role_pool_admin]
_R_POOL_OP, equivalent to [role_pool_admin,role_pool_operator]
_R_VM_POWER_ADMIN, equivalent to [role_pool_admin,role_pool_operator,role_vm_power_admin]
_R_VM_ADMIN, equivalent to [role_pool_admin,role_pool_operator,role_vm_power_admin,role_vm_admin]
_R_VM_OP, equivalent to [role_pool_admin,role_pool_operator,role_vm_power_admin,role_vm_admin,role_vm_op]
_R_READ_ONLY, equivalent to [role_pool_admin,role_pool_operator,role_vm_power_admin,role_vm_admin,role_vm_op,role_read_only]
The ~allowed_roles parameter should use one of the shortcuts in the list above,
instead of directly using a list of roles, because the shortcuts above make sure
that the roles in the list are in a total order regarding the api-calls
permission sets. Creating an api-call with e.g.
allowed_roles:[role_pool_admin,role_vm_admin] would be wrong, because that
would mean that a pool_operator cannot execute the api-call that a vm_admin can,
breaking the total-order policy expected in the RBAC 1.0 implementation.
In the future, this requirement might be relaxed.
So, the example above should instead be used as:
~allowed_roles:_R_POOL_OP (* recommended usage via pre-defined totally-ordered role lists *)
and so on.
How to determine the correct role of a new api-call:
if only xapi should execute the api-call, ie. it is an internal call: _R_POOL_ADMIN
if it is related to subject, role, external-authentication: _R_POOL_ADMIN
if it is related to accessing Dom0 (via console, ssh, whatever): _R_POOL_ADMIN
if it is related to the pool object: R_POOL_OP
if it is related to the host object, licenses, backups, physical devices: _R_POOL_OP
if it is related to managing VM memory, snapshot/checkpoint, migration: _R_VM_POWER_ADMIN
if it is related to creating, destroying, cloning, importing/exporting VMs: _R_VM_ADMIN
if it is related to starting, stopping, pausing etc VMs or otherwise accessing/manipulating VMs: _R_VM_OP
if it is related to being able to login, manipulate own tasks and read values only: _R_READ_ONLY
Update message forwarding
The “message forwarding” layer describes the policy of whether an incoming API
call should be forwarded to another host (such as another member of the pool)
or processed on the host which receives the call. This policy may be
non-trivial to describe and so cannot be auto-generated from the data model.
In xapi/message_forwarding.ml, add a function to the relevant module to
describe this policy. In the running example, we add the following function to
the Host module:
let price_of ~__context ~host ~item =
info "Host.price_of for item %s" item;
let local_fn = Local.Host.price_of ~host ~item in
let remote_fn = Client.Host.price_of ~host ~item in
do_op_on ~local_fn ~__context ~host ~remote_fn
After the ~__context parameter, the parameters of this new function should
match the parameters we specified for the message. In this case, that is the
host and the item to query the price of.
The do_op_on function takes a function to execute locally and a function to
execute remotely and performs one of these operations depending on whether the
given host is the local host.
The local function references Local.Host.price_of, which is a function we will
write in the next step.
Implement the function
Now we write the function to perform the logic behind the new API call.
For a host-based call, this will reside in xapi/xapi_host.ml. For other
classes, other files with similar names are used.
We add the following function to xapi/xapi_host.ml:
let price_of ~__context ~host ~item =
if item = "fish" then 3.14 else 0.00
We also need to add the function to the interface xapi/xapi_host.mli:
val price_of :
__context:Context.t -> host:API.ref_host -> item:string -> float
Congratulations, you’ve added a function to the API!
Add the operation to the CLI
Edit xapi-cli-server/cli_frontend.ml. Add a block to the definition of cmdtable_data as
in the following example:
"host-price-of",
{
reqd=["host-uuid"; "item"];
optn=[];
help="Find out the price of an item on a certain host.";
implementation= No_fd Cli_operations.host_price_of;
flags=[];
};
Include here the following:
The names of required (reqd) and optional (optn) parameters.
A description to be displayed when calling xe help <cmd> in the help field.
The implementation should use With_fd if any communication with the
client is necessary (for example, showing the user a warning, sending the
contents of a file, etc.) Otherwise, No_fd can be used as above.
The flags field can be used to set special options:
Vm_selectors: adds a “vm” parameter for the name of a VM (rather than a UUID)
Host_selectors: adds a “host” parameter for the name of a host (rather than a UUID)
Standard: includes the command in the list of common commands displayed by xe help
Neverforward:
Hidden:
Deprecated of string list:
Now we must implement Cli_operations.host_price_of. This is done in
xapi-cli-server/cli_operations.ml. This function typically extracts the parameters and
forwards them to the internal implementation of the function. Other arbitrary
code is permitted. For example:
let host_price_of printer rpc session_id params =
let host = Client.Host.get_by_uuid rpc session_id (List.assoc "host-uuid" params) in
let item = List.assoc "item" params in
let price = string_of_float (Client.Host.price_of ~rpc ~session_id ~host ~item) in
printer (Cli_printer.PList [price])
Tab Completion in the CLI
The CLI features tab completion for many of its commands’ parameters.
Tab completion is implemented in the file ocaml/xe-cli/bash-completion, which
is installed on the host as /etc/bash_completion.d/cli, and is done on a
parameter-name rather than on a command-name basis. The main portion of the
bash-completion file is a case statement that contains a section for each of
the parameters that benefit from completion. There is also an entry that
catches all parameter names ending at -uuid, and performs an automatic lookup
of suitable UUIDs. The host-uuid parameter of our new host-price-of command
therefore automatically gains completion capabilities.
Executing the CLI operation
Recompile xapi with the changes described above and install it on a test machine.
Execute the following command to see if the function exists:
xe help host-price-of
Invoke the function itself with the following command:
xe host-price-of host-uuid=<tab> item=fish
and you should find out the price of fish.
Adding a XenAPI extension
A XenAPI extension is a new RPC which is implemented as a separate executable
(i.e. it is not part of xapi)
but which still benefits from xapi parameter type-checking, multi-language
stub generation, documentation generation, authentication etc.
An extension can be backported to previous versions by simply adding the
implementation, without having to recompile xapi itself.
A XenAPI extension is in two parts:
a declaration in the xapi datamodel.
This must use the ~forward_to:(Extension "filename") parameter. The filename must be unique, and
should be the same as the XenAPI call name.
an implementation executable in the dom0 filesystem with path /etc/xapi.d/extensions/filename
To define an extension
First write the declaration in the datamodel. The act of specifying the
types and writing the documentation will help clarify the intended meaning
of the call.
Second create a prototype of your implementation and put an executable file
in /etc/xapi.d/extensions/filename. The calling convention is:
the file must be executable
xapi will parse the XMLRPC call arguments received over the network and check the session_id is
valid
xapi will execute the named executable
the XMLRPC call arguments will be sent to the executable on stdin and
stdin will be closed afterwards
the executable will run and print an XMLRPC response on stdout
xapi will read the response and return it to the client.
Second make a pull request
containing only the datamodel definitions (it is not necessary to include the
prototype too).
This will attract review comments which will help you improve your API further.
Once the pull request is merged, then the API call name and extension are officially
yours and you may use them on any xapi version which supports the extension mechanism.
Packaging your extension
Your extension /etc/xapi.d/extensions/filename (and dependencies) should be
packaged for your target distribution (for XenServer dom0 this would be a CentOS
RPM). Once the package is unpacked on the target machine, the extension should
be immediately callable via the XenAPI, provided the xapi version supports
the extension mechanism. Note the xapi version does not need to know about
the specific extension in advance: it will always look in /etc/xapi.d/extensions/ for
all RPC calls whose name it does not recognise.
Limitations
On type-checking
if the xapi version is new enough to know about your specific extension:
xapi will type-check the call arguments for you
if the xapi version is too old to know about your specific extension:
the extension will still be callable but the arguments will not be type-checked.
On access control
if the xapi version is new enough to know about your specific extension:
you can declare that a user must have a particular role (e.g. ‘VM admin’)
if the xapi version is too old to know about your specific extension:
the extension will still be callable but the client must have the ‘Pool admin’ role.
Since a xapi which knows about your specific extension is stricter than an older
xapi, it’s a good idea to develop against the new xapi and then test older
xapi versions later.
How to set up alarms
Introduction
In XAPI, alarms are triggered by a Python daemon located at /opt/xensource/bin/perfmon.
The daemon is managed as a systemd service and can be configured by setting parameters in /etc/sysconfig/perfmon.
It listens on an internal Unix socket to receive commands. Otherwise, it runs in a loop, periodically requesting metrics from XAPI. It can then be configured to generate events based on these metrics. It can monitor various types of XAPI objects, including VMs, SRs, and Hosts. The configuration for each object is defined by writing an XML string into the object’s other-config key.
The metrics used by perfmon are collected by the xcp-rrdd daemon. The xcp-rrdd daemon is a component of XAPI responsible for collecting metrics and storing them as Round-Robin Databases (RRDs).
A XAPI plugin also exists, providing the functions refresh and debug_mem, which send commands through the Unix socket. The refresh function is used when an other-config key is added or updated; it triggers the daemon to reread the monitored objects so that new alerts are taken into account. The debug_mem function logs the objects currently being monitored into /var/log/user.log as a dictionary.
Monitoring and alarms
Overview
To get the metrics, perfmon requests XAPI by calling: http://localhost/rrd_updates?session_id=<ref>&start=1759912021&host=true&sr_uuid=all&cf=AVERAGE&interval=60
Different consolidation functions can be used like AVERAGE, MIN, MAX or LAST. See the details in the next sections for specific objects and how to set it.
Once retrieve, perfmon will check all its triggers and generate alarms if needed.
Specific XAPI objects
VMs
To set an alarm on a VM, you need to write an XML string into the other-config key of the object. For example, to trigger an alarm when the CPU usage is higher than 50%, run:
Now, if you generate some load inside the VM and the CPU usage goes above 50%, the perfmon daemon will create a message (a XAPI object) with the name ALARM. This message will include a priority, a timestamp, an obj-uuid and a body. To list all messages that are alarms, run:
xe message-list name=ALARM
You will see, for example:
uuid ( RO) : dadd7cbc-cb4e-5a56-eb0b-0bb31c102c94
name ( RO): ALARM
priority ( RO): 3 class ( RO): VM
obj-uuid ( RO): ea9efde2-d0f2-34bb-74cb-78c303f65d89
timestamp ( RO): 20251007T11:30:26Z
body ( RO): value: 0.986414
config:
<variable>
<name value="cpu_usage"/>
<alarm_trigger_level value="0.5"/>
</variable>
where the body contains all the relevant information: the value that triggered the alarm and the configuration of your alarm.
When configuring you alarm, your XML string can:
have multiple <variable> nodes
use the following values for child nodes:
name: what to call the variable (no default)
alarm_priority: the priority of the messages generated (default ‘3’)
alarm_trigger_level: level of value that triggers an alarm (no default)
alarm_trigger_sense:‘high’ if alarm_trigger_level is a max, otherwise ’low’. (default ‘high’)
alarm_trigger_period: num seconds of ‘bad’ values before an alarm is sent (default ‘60’)
alarm_auto_inhibit_period: num seconds this alarm disabled after an alarm is sent (default ‘3600’)
consolidation_fn: how to combine variables from rrd_updates into one value (default is ‘average’ for ‘cpu_usage’, ‘get_percent_fs_usage’ for ‘fs_usage’, ‘get_percent_log_fs_usage’ for ’log_fs_usage’,‘get_percent_mem_usage’ for ‘mem_usage’, & ‘sum’ for everything else)
rrd_regex matches the names of variables from (xe vm-data-sources-list uuid=$vmuuid) used to compute value (only has defaults for “cpu_usage”, “network_usage”, and “disk_usage”)
Notice that alarm_priority will be the priority of the generated message, 0 being low priority.
SRs
To set an alarm on an SR object, as with VMs, you need to write an XML string into the other-config key of the SR. For example, you can run:
alarm_priority: the priority of the messages generated (default ‘3’)
alarm_trigger_level: level of value that triggers an alarm (no default)
alarm_trigger_sense: ‘high’ if alarm_trigger_level is a max, otherwise ’low’. (default ‘high’)
alarm_trigger_period: num seconds of ‘bad’ values before an alarm is sent (default ‘60’)
alarm_auto_inhibit_period:num seconds this alarm disabled after an alarm is sent (default ‘3600’)
consolidation_fn: how to combine variables from rrd_updates into one value (default is ‘average’ for ‘cpu_usage’ & ‘sum’ for everything else)
rrd_regex matches the names of variables from (xe host-data-source-list uuid=) used to compute value (only has defaults for “cpu_usage”, “network_usage”, “memory_free_kib” and “sr_io_throughput_total_xxxxxxxx”) where that last one ends with the first eight characters of the SR UUID)
As a special case for SR throughput, it is also possible to configure a Host by writing XML into the other-config key of an SR connected to it. For example:
This only works for that specific variable name, and rrd_regex must not be specified.
Configuration done directly on the host (variable-name, sr_io_throughput_total_xxxxxxxx) takes priority.
Which metrics are available?
Accepted name for metrics are:
cpu_usage: matches RRD metrics with the pattern cpu[0-9]+
network_usage: matches RRD metrics with the pattern vif_[0-9]+_[rt]x
disk_usage: match RRD metrics with the pattern vbd_(xvd|hd)[a-z]+_(read|write)
fs_usage, log_fs_usage, mem_usage and memory_internal_free do not match anything by default.
By using rrd_regex, you can add your own expressions. To get a list of available metrics with their descriptions, you can call the get_data_sources method for VM, for SR and also for Host.
A python script is provided at the end to get data sources. Using the script we can, for example, see:
# ./get_data_sources.py --vm 5a445deb-0a8e-c6fe-24c8-09a0508bbe21List of data sources related to VM 5a445deb-0a8e-c6fe-24c8-09a0508bbe21
cpu0 | CPU0 usage
cpu_usage | Domain CPU usage
memory | Memory currently allocated to VM
memory_internal_free | Memory used as reported by the guest agent
memory_target | Target of VM balloon driver
...
vbd_xvda_io_throughput_read | Data read from the VDI, in MiB/s
...
You can then set up an alarm when the data read from a VDI exceeds a certain level by doing:
Here is the script that allows you to get data sources:
#!/usr/bin/env python3import argparse
import sys
import XenAPI
defpretty_print(data_sources):
ifnot data_sources:
print("No data sources.")
return# Compute alignment for something nice max_label_len = max(len(data["name_label"]) for data in data_sources)
for data in data_sources:
label = data["name_label"]
desc = data["name_description"]
print(f"{label:<{max_label_len}} | {desc}")
deflist_vm_data(session, uuid):
vm_ref = session.xenapi.VM.get_by_uuid(uuid)
data_sources = session.xenapi.VM.get_data_sources(vm_ref)
print(f"\nList of data sources related to VM {uuid}")
pretty_print(data_sources)
deflist_host_data(session, uuid):
host_ref = session.xenapi.host.get_by_uuid(uuid)
data_sources = session.xenapi.host.get_data_sources(host_ref)
print(f"\nList of data sources related to Host {uuid}")
pretty_print(data_sources)
deflist_sr_data(session, uuid):
sr_ref = session.xenapi.SR.get_by_uuid(uuid)
data_sources = session.xenapi.SR.get_data_sources(sr_ref)
print(f"\nList of data sources related to SR {uuid}")
pretty_print(data_sources)
defmain():
parser = argparse.ArgumentParser(
description="List data sources related to VM, host or SR" )
parser.add_argument("--vm", help="VM UUID")
parser.add_argument("--host", help="Host UUID")
parser.add_argument("--sr", help="SR UUID")
args = parser.parse_args()
# Connect to local XAPI: no identification required to access local socket session = XenAPI.xapi_local()
try:
session.xenapi.login_with_password("", "")
if args.vm:
list_vm_data(session, args.vm)
if args.host:
list_host_data(session, args.host)
if args.sr:
list_sr_data(session, args.sr)
except XenAPI.Failure as e:
print(f"XenAPI call failed: {e.details}")
sys.exit(1)
finally:
session.xenapi.session.logout()
if __name__ =="__main__":
main()
XE CLI architecture
Info
The links in this page point to the source files of xapi
v1.132.0, not to the
latest source code. Meanwhile, the CLI server code in xapi has been moved to a
library separate from the main xapi binary, and has its own subdirectory
ocaml/xapi-cli-server.
Architecture
The actual CLI is a very lightweight binary in
ocaml/xe-cli
It is just a dumb client, that does everything that xapi tells
it to do
This is a security issue
We must trust the xenserver that we connect to, because it
can tell xe to read local files, download files, …
When it is first called, it takes the few command-line arguments
it needs, and then passes the rest to xapi in a HTTP PUT request
Each argument is in a separate line
Then it loops doing what xapi tells it to do, in a loop, until
xapi tells it to exit or an exception happens
the command table maps command names to records that contain
the implementation of the command, among other things
Then the command name is looked
up
in the command table, and the corresponding operation is
executed with the parsed key-value parameter list passed to it
Walk-through: CLI handler in xapi (external calls)
Definitions for the HTTP handler
Constants.cli_uri = "/cli"
Datamodel.http_actions = [...;
("post_cli", (Post, Constants.cli_uri, false, [], _R_READ_ONLY, []));
...]
(* these public http actions will NOT be checked by RBAC *)
(* they are meant to be used in exceptional cases where RBAC is already *)
(* checked inside them, such as in the XMLRPC (API) calls *)
Datamodel.public_http_actions_with_no_rbac_check` = [...
"post_cli"; (* CLI commands -> calls XMLRPC *)
...]
Xapi.common_http_handlers = [...;
("post_cli", (Http_svr.BufIO Xapi_cli.handler));
...]
Xapi.server_init () =
...
"Registering http handlers", [], (fun () -> List.iter Xapi_http.add_handler common_http_handlers);
...
Due to there definitions, Xapi_http.add_handler does not perform RBAC checks for post_cli. This means that the CLI handler does not use Xapi_http.assert_credentials_ok when a request comes in, as most other handlers do. The reason is that RBAC checking is delegated to the actual XenAPI calls that are being done by the commands in Cli_operations.
This means that the Xapi_http.add_handler call so resolves to simply:
Http_svr.Server.add_handler server Http.Post "/cli" (Http_svr.BufIO Xapi_cli.handler))
…which means that the function Xapi_cli.handler is called directly when an HTTP POST request with path /cli comes in.
High-level request processing
Xapi_cli.handler:
Reads the body of the HTTP request, limitted to Xapi_globs.http_limit_max_cli_size = 200 * 1024 characters.
Sends a protocol version string to the client: "XenSource thin CLI protocol" plus binary encoded major (0) and (2) minor numbers.
Reads the protocol version from the client and exits with an error if it does not match the above.
Calls Xapi_cli.parse_session_and_args with the request’s body to extract the session ref, if there.
Calls Cli_frontend.parse_commandline to parse the rest of the command line from the body.
Calls Xapi_cli.exec_command to execute the command.
On error, calls exception_handler.
Xapi_cli.parse_session_and_args:
Is passed the request body and reads it line by line. Each line is considered an argument.
Removes any CR chars from the end of each argument.
If the first arg starts with session_id=, the the bit after this prefix is considered to be a session reference.
Returns the session ref (if there) and (remaining) list of args.
Cli_frontend.parse_commandline:
Returns the command name and assoc list of param names and values. It handles --name and -flag arguments by turning them into key/value string pairs.
Xapi_cli.exec_command:
Finds username/password params.
Get the rpc function: this is the so-called “fake_rpc callback”, which does not use the network or HTTP at all, but goes straight to Api_server.callback1 (the XenAPI RPC entry point). This function is used by the CLI handler to do loopback XenAPI calls.
Logs the parsed xe command, omitting sensitive data.
Continues as Xapi_cli.do_rpcs
Looks up the command name in the command table from Cli_frontend (raises an error if not found).
Checks if all required params have been supplied (raises an error if not).
Checks that the host is a pool master (raises an error if not).
Depending on the command, a session.login_with_password or session.slave_local_login_with_password XenAPI call is made with the supplied username and password. If the authentication passes, then a session reference is returned for the RBAC role that belongs to the user. This session is used to do further XenAPI calls.
Next, the implementation of the command in Cli_operations is executed.
Command implementations
The various commands are implemented in cli_operations.ml. These functions are only called after user authentication has passed (see above). However, RBAC restrictions are only enforced inside any XenAPI calls that are made, and not on any of the other code in cli_operations.ml.
The type of each command implementation function is as follows (see cli_cmdtable.ml):
type op =
Cli_printer.print_fn ->
(Rpc.call -> Rpc.response) ->
API.ref_session -> ((string*string) list) -> unit
So each function receives a printer for sending text output to the xe client, and rpc function and session reference for doing XenAPI calls, and a key/value pair param list. Here is a typical example:
let bond_create printer rpc session_id params =
let network = List.assoc "network-uuid" params in
let mac = List.assoc_default "mac" params "" in
let network = Client.Network.get_by_uuid rpc session_id network in
let pifs = List.assoc "pif-uuids" params in
let uuids = String.split_on_char ',' pifs in
let pifs = List.map (fun uuid -> Client.PIF.get_by_uuid rpc session_id uuid) uuids in
let mode = Record_util.bond_mode_of_string (List.assoc_default "mode" params "") in
let properties = read_map_params "properties" params in
let bond = Client.Bond.create rpc session_id network pifs mac mode properties in
let uuid = Client.Bond.get_uuid rpc session_id bond in
printer (Cli_printer.PList [ uuid])
The necessary parameters are looked up in params using List.assoc or similar.
UUIDs are translated into reference by get_by_uuid XenAPI calls (note that the Client module is the XenAPI client, and functions in there require the rpc function and session reference).
Then the main API call is made (Client.Bond.create in this case).
Further API calls may be made to output data for the client, and passed to the printer.
This is the common case for CLI operations: they do API calls based on the parameters that were passed in.
However, other commands are more complicated, for example vm_import/export and vm_migrate. These contain a lot more logic in the CLI commands, and also send commands to the client to instruct it to read or write files and/or do HTTP calls.
Yet other commands do not actually do any XenAPI calls, but instead get “helpful” information from other places. Example: diagnostic_gc_stats, which displays statistics from xapi’s OCaml GC.
Tutorials
The following tutorials show how to extend the CLI (and XenAPI):
In the present version of XenServer, metadata changes resulting in
writes to the database are not persisted in non-volatile storage. Hence,
in case of failure, up to five minutes’ worth of metadata changes could
be lost. The Metadata-on-LUN feature addresses the issue by
ensuring that all database writes are retained. This will be used to
improve recovery from failure by storing incremental deltas which can
be re-applied to an old version of the database to bring it more
up-to-date. An implication of this is that clients will no longer be
required to perform a ‘pool-sync-database’ to protect critical writes,
because all writes will be implicitly protected.
This is implemented by saving descriptions of all persistent database
writes to a LUN when HA is active. Upon xapi restart after failure, such
as on master fail-over, these descriptions are read and parsed to
restore the latest version of the database.
Layout on block device
It is useful to store the database on the block device as well as the
deltas, so that it is unambiguous on recovery which version of the
database the deltas apply to.
The content of the block device will be structured as shown in
the table below. It consists of a header; the rest of the
device is split into two halves.
Length (bytes)
Description
Header
16
Magic identifier
1
ASCII NUL
1
Validity byte
First half database
36
UUID as ASCII string
16
Length of database as decimal ASCII
(as specified)
Database (binary data)
16
Generation count as decimal ASCII
36
UUID as ASCII string
First half deltas
16
Length of database delta as decimal ASCII
(as specified)
Database delta (binary data)
16
Generation count as decimal ASCII
36
UUID as ASCII string
Second half database
36
UUID as ASCII string
16
Length of database as decimal ASCII
(as specified)
Database (binary data)
16
Generation count as decimal ASCII
36
UUID as ASCII string
Second half deltas
16
Length of database delta as decimal ASCII
(as specified)
Database delta (binary data)
16
Generation count as decimal ASCII
36
UUID as ASCII string
After the header, one or both halves may be devoid of content. In a half
which contains a database, there may be zero or more deltas (repetitions
of the last three entries in each half).
The structure of the device is split into two halves to provide
double-buffering. In case of failure during write to one half, the other
half remains intact.
The magic identifier at the start of the file protect against attempting
to treat a different device as a redo log.
The validity byte is a single `ascii character indicating the
state of the two halves. It can take the following values:
Byte
Description
0
Neither half is valid
1
First half is valid
2
Second half is valid
The use of lengths preceding data sections permit convenient reading.
The constant repetitions of the UUIDs act as nonces to protect
against reading in invalid data in the case of an incomplete or corrupt
write.
Architecture
The I/O to and from the block device may involve long delays. For
example, if there is a network problem, or the iSCSI device disappears,
the I/O calls may block indefinitely. It is important to isolate this
from xapi. Hence, I/O with the block device will occur in a separate
process.
Xapi will communicate with the I/O process via a UNIX domain socket using a
simple text-based protocol described below. The I/O process will use to
ensure that it can always accept xapi’s requests with a guaranteed upper
limit on the delay. Xapi can therefore communicate with the process
using blocking I/O.
Xapi will interact with the I/O process in a best-effort fashion. If it
cannot communicate with the process, or the process indicates that it
has not carried out the requested command, xapi will continue execution
regardless. Redo-log entries are idempotent (modulo the raising of
exceptions in some cases) so it is of little consequence if a particular
entry cannot be written but others can. If xapi notices that the process
has died, it will attempt to restart it.
The I/O process keeps track of a pointer for each half indicating the
position at which the next delta will be written in that half.
Protocol
Upon connection to the control socket, the I/O process will attempt to
connect to the block device. Depending on whether this is successful or
unsuccessful, one of two responses will be sent to the client.
connect|ack_ if it is successful; or
connect|nack|<length>|<message> if it is unsuccessful, perhaps
because the block device does not exist or cannot be read from. The
<message> is a description of the error; the <length> of the message
is expressed using 16 digits of decimal ascii.
The former message indicates that the I/O process is ready to receive
commands. The latter message indicates that commands can not be sent to
the I/O process.
There are three commands which xapi can send to the I/O
process. These are described below, with a high level description of the
operational semantics of the I/O process’ actions, and the corresponding
responses. For ease of parsing, each command is ten bytes in length.
Write database
Xapi requests that a new database is written to the block device, and
sends its content using the data socket.
Command:
: writedb___|<uuid>|<generation-count>|<length>
The UUID is expressed as 36 ASCII
characters. The length of the data and the generation-count are
expressed using 16 digits of decimal ASCII.
Semantics:
Read the validity byte.
If one half is valid, we will use the other half. If no halves
are valid, we will use the first half.
Read the data from the data socket and write it into the
chosen half.
Set the pointer for the chosen half to point to the position
after the data.
Set the validity byte to indicate the chosen half is valid.
Response:
: writedb|ack_ in case of successful write; or
writedb|nack|<length>|<message> otherwise.
For error messages, the length of the message is expressed using
16 digits of decimal ascii. In particular, the
error message for timeouts is the string Timeout.
Write database delta
Xapi sends a description of a database delta to append to the block
device.
The UUID is expressed as 36 ASCII
characters. The length of the data and the generation-count are
expressed using 16 digits of decimal ASCII.
Semantics:
Read the validity byte to establish which half is valid. If
neither half is valid, return with a nack.
If the half’s pointer is set, seek to that position. Otherwise,
scan through the half and stop at the position after the
last write.
Write the entry.
Update the half’s pointer to point to the position after
the entry.
Response:
: writedelta|ack_ in case of successful append; or
writedelta|nack|<length>|<message> otherwise.
For error messages, the length of the message is expressed using
16 digits of decimal ASCII. In particular, the
error message for timeouts is the string Timeout.
Read log
Xapi requests the contents of the log.
Command:
: read______
Semantics:
Read the validity byte to establish which half is valid. If
neither half is valid, return with an end.
Attempt to read the database from the current half.
If this is successful, continue in that half reading entries up
to the position of the half’s pointer. If the pointer is not
set, read until a record of length zero is found or the end of
the half is reached. Otherwise—if the attempt to the read the
database was not successful—switch to using the other half and
try again from step 2.
Finally output an end.
Response:
: read|nack_|<length>|<message> in case of error; or
read|db___|<generation-count>|<length>|<data> for a database record, then a
sequence of zero or more
read|delta|<generation-count>|<length>|<data> for each delta record, then
read|end__
For each record, and for error messages, the length of the data or
message is expressed using 16 digits of decimal ascii. In particular, the
error message for timeouts is the string Timeout.
Re-initialise log
Xapi requests that the block device is re-initialised with a fresh
redo-log.
Command:
: empty_____\
Semantics:
: 1. Set the validity byte to indicate that neither half is valid.
Response:
: empty|ack_ in case of successful re-initialisation; or
empty|nack|<length>|<message> otherwise.
For error messages, the length of the message is expressed using
16 digits of decimal ASCII. In particular, the
error message for timeouts is the string Timeout.
Impact on xapi performance
The implementation of the feature causes a slow-down in xapi of around
6% in the general case. However, if the LUN becomes inaccessible this
can cause a slow-down of up to 25% in the worst case.
The figure below shows the result of testing four configurations,
counting the number of database writes effected through a command-line
‘xe pool-param-set’ call.
The first and second configurations are xapi without the
Metadata-on-LUN feature, with HA disabled and
enabled respectively.
The third configuration shows xapi with the
Metadata-on-LUN feature using a healthy LUN to which
all database writes can be successfully flushed.
The fourth configuration shows xapi with the
Metadata-on-LUN feature using an inaccessible LUN for
which all database writes fail.
Testing strategy
The section above shows how xapi performance is affected by this feature. The
sections below describe the dev-testing which has already been undertaken, and
propose how this feature will impact on regression testing.
Dev-testing performed
A variety of informal tests have been performed as part of the
development process:
Enable HA.
Confirm LUN starts being used to persist database writes.
Enable HA, disable HA.
Confirm LUN stops being used.
Enable HA, kill xapi on master, restart xapi on master.
Confirm that last database write before kill is successfully
restored on restart.
Repeatedly enable and disable HA.
Confirm that no file descriptors are leaked (verified by counting
the number of descriptors in /proc/pid/fd/).
Enable HA, reboot the master.
Due to HA, a slave becomes the master (or this can be forced using
‘xe pool-emergency-transition-to-master’). Confirm that the new
master starts is able to restore the database from the LUN from the
point the old master left off, and begins to write new changes to
the LUN.
Enable HA, disable the iSCSI volume.
Confirm that xapi continues to make progress, although database
writes are not persisted.
Enable HA, disable and enable the iSCSI volume.
Confirm that xapi begins to use the LUN when the iSCSI volume is
re-enabled and subsequent writes are persisted.
These tests have been undertaken using an iSCSI target VM and a real
iSCSI volume on lannik. In these scenarios, disabling the iSCSI volume
consists of stopping the VM and unmapping the LUN, respectively.
Proposed new regression test
A new regression test is proposed to confirm that all database writes
are persisted across failure.
There are three types of database modification to test: row creation,
field-write and row deletion. Although these three kinds of write could
be tested in separate tests, the means of setting up the pre-conditions
for a field-write and a row deletion require a row creation, so it is
convenient to test them all in a single test.
Start a pool containing three hosts.
Issue a CLI command on the master to create a row in the
database, e.g.
xe network-create name-label=a.
Forcefully power-cycle the master.
On fail-over, issue a CLI command on the new master to check that
the row creation persisted:
xe network-list name-label=a,
confirming that the returned string is non-empty.
Issue a CLI command on the master to modify a field in the new row
in the database:
where <uuid> is the UUID returned from step 2. The returned string
should contain
abcd.
Issue a CLI command on the master to delete the row from the
database:
xe network-destroy uuid=<uuid>,
where <uuid> is the UUID returned from step 2.
Forcefully power-cycle the master.
On fail-over, issue a CLI command on the new master to check that
the row does not exist:
xe network-list name-label=a,
confirming that the returned string is empty.
Impact on existing regression tests
The Metadata-on-LUN feature should mean that there is no
need to perform an ‘xe pool-sync-database’ operation in existing HA
regression tests to ensure that database state persists on xapi failure.
XAPI's Internals
The articles provided under this sub-section intend to act as a developer
resource for toolstack engineers.
Subsections of Internals
Certificates and PEM Files
Xapi uses certificates for secure communication within a pool and with
external clients. These certificates are using the PEM file format and
reside in the Dom0 file system. This documents explains the purpose of
these files.
Certificates that identify a host. These certificates are comprised of
both a private and a public key. The public key may be distributed to
other hosts.
xapi-ssl.pem
This certificate identifies a host for extra-pool clients.
This is the certificate used by the API HTTPS server that clients like
XenCenter or CVAD connect to. On installation of XenServer it is auto
generated but can be updated by a user using the API. This is the most
important certificate for a user to establish an HTTPS connection to a
pool or host to be used as an API.
/etc/xensource/xapi-ssl.pem
contains private and public key for this host
Host.get_server_certificate API call
referenced by /etc/stunnel/xapi.conf
xe host-server-certificate-install XE command to replace the
certificate.
See below for xapi-stunnel-ca-bundle for additional certificates that
can be added to a pool in support of a user-supplied host certificate.
xe host-reset-server-certificate creates a new self-signed certificate.
xapi-pool-tls.pem
This certificate identifies a host inside a pool. It is auto generated
and used for all intra-pool HTTPS connections. It needs to be
distributed inside a pool to establish trust. The distribution of the
public part of the certificate is performed by the API and must not be
done manually.
/etc/xensource/xapi-pool-tls.pem
contains private and public key for this host
referenced by /etc/stunnel/xapi.conf
This certificate can be re-generated using the API or XE
Host.refresh_server_certificate
xe host-refresh-server-certificate
Certificate Bundles
Certifiacte bundles are used by stunnel. They are a collection of public
keys from hosts and certificates provided by a user. Knowing a host’s
public key facilitates stunnel connecting to the host.
Bundles by themselves are a technicality as they organise a set of
certificates in a single file but don’t add new certificates.
xapi-pool-ca-bundle.pem and certs-pool/*.pem
Collection of public keys from xapi-pool-tls.pem across the
pool. The public keys are collected in the certs-pool directory: each is
named after the UUID of its host and the bundle is constructed from
them.
bundle of public keys from hosts’ xapi-pool-tls.pem
constructed from PEM files in certs-pool/
/opt/xensource/bin/update-ca-bundle.sh generates the bundle from PEM
files
xapi-stunnel-ca-bundle.pem and certs/*.pem
User-supplied certificates; they are not essential for the operation of
a pool from Xapi’s perspective. They make stunnel aware of certificates
used by clients when using HTTPS for API calls.
in a plain pool installation, these are empty; PEMs supplied by a user
are stored here and bundled into the xapi-stunnerl-ca-bundle.pem.
bundle of public keys supploed by a user
constructed from PEM files in certs/
/opt/xensource/bin/update-ca-bundle.sh generates the bundle from PEM files
Updated by a user using xe pool-install-ca-certificate
Pool.install_ca_certificate
Pool.uninstall_ca_certificate
xe pool-certificate-sync explicitly distribute these certificates in
the pool.
User-provided certificates can be used to let xapi connect to WLB.
Generated Parts of Xapi
Introduction
Many parts of xapi are auto-generated during the build process.
This article aims to document some of these modules and how they relate to each
other. The intention of this article is to serve as a developer resource and,
as such, its contents are prone to change (or become inaccurate) as the
codebase evolves. The ultimate source of truth remains the codebase itself.
Interface Description
All of XenAPI’s data model is described within the ocaml/idl subdirectory.
The data model itself describes the classes that make up the API.
The classes themselves comprise fields and messages (methods), relating
functionality together.
API Types (aPI.ml)
The internal representation of each object is a record whose type is specified
within the generated API module, as part of building xapi-types. For
example, the task object’s structure is defined by the type task_t.
Similarly, API includes the internal type representation used to represent
fields. For example, a type such as (string -> vdi_operations) map, used by
the data model, is defined as (string * vdi_operations) list within API
(where vdi_operations itself is a polymorphic variant also defined by
API).
Note that the all the type definitions within API are annotated with
[@@deriving rpc]. This ensures that the final module, after preprocessing,
also contains functions to marshal each type to/from Rpc.t values (which is
important for Server - described later - which receives that format as
input).
Database Actions (db_actions.ml)
The majority of XenAPI consists of methods used to read and modify the fields
of objects in the database. These methods are automatically generated and
their implementations are placed within the generated Db_actions module.
The Db_actions module consists of various, related, parts: type definitions
for a subset of objects’ fields, marshallers for converting API types to/from
strings, and database action handlers. Briefly, the role of each of these is
described below:
Type definitions for XenAPI objects are redefined in Db_actions in order to
exclude internal fields. If a field is marked as “internal only” within the
data model, then it should only exist within internal representations (those
defined by API, described above). For example, task_t (describing a
task object) - as described by Db_actions - notably omits the field
task_session (of type session ref) so as to not leak sensitive information
to clients (in this case, the reference to the session that created the task
object).
Fields of the database are internally stored as strings and must be
marshalled to typed values for use in OCaml code using DB actions. To this
end, submodules String_to_DM and DM_to_String are generated to include code
for doing these conversions. These submodules consist of the inverse
operations of the other. For example, for the data model type Observer ref set, the function ref_Observer_set exists in both String_to_DM
(as string -> [`Observer] API.Ref.t list) and
in DM_to_String (inversely, as [`Observer] API.Ref.t list -> string).
Handlers for actions that read/write fields of database objects are
implemented by Db_actions. Each handler uses the relevant marshallers to
marshal inputs and outputs. Note that Db_actions generates two variants of
get_record for each class: a normal get_record which returns the public
class representation as described by the types defined in Db_actions, and a
get_record_internal, which returns the full class representation (including
internal fields) as described by the API module.
Registering for Snapshots
The Db_actions module also generates modules that register callbacks
for Xapi’s event mechanisms. These modules are named in the format
Class_init and consist only of top-level code, evaluated for its
effect.
As each event must provide a snapshot of the related object, the event
mechanism must be able to read records from the database. To do this,
Eventgen exposes an API that Db_actions uses to register callbacks
(one for each type of object in the database).
For example, within Db_actions, there is a module VM_init,
consisting of:
As snapshots are served to external clients, the functions use the
public get_record functions - returning types defined by API -
which omits internal fields.
Notice that the type of values being mapped to is __context:Context.t -> self:string -> unit -> Rpc.t.
The presence of unit in the type is to permit partial application
(of __context and self) to create thunks. The type unit -> Rpc.t
is lossy, it says nothing about the context or object reference being
used to fetch the snapshot; these details are captured by the closure
arising from partial application. This means that code can arbitrarily
delay the fetching of a snapshot and then “force” it (on demand)
later. In practice, these snapshots are not delayed for long, see
Eventgen for more information.
Custom Actions (custom_actions.ml)
The API operations that require a custom implementation (i.e. are not
automatically generated) are grouped together into a signature called
CUSTOM_ACTIONS within custom_actions.ml.
The isolation of these methods into their own signature is important for
ensuring implementations exist for them.
The Actions submodule of Api_server_common can be ascribed
this signature. The purpose of the Actions sub-module is to group custom
implementations together whilst renaming them using module aliases. For
example, the custom implementations of messages associate with the task class
exist within xapi_task.ml - the module arising from this file is aliased,
within Actions, to rename it and satisfy the CUSTOM_ACTIONS signature (e.g.
module Task = Xapi_task).
The signature is not explicitly ascribed to Actions at its definition site,
but is used by functors which are parameterised by modules satisfying
CUSTOM_ACTIONS. The important modules of note are Actions itself (which
comprise the concrete implementations of custom messages in Xapi) and the
Forwarder sub-module (of Api_server_common) which uses the
Message_forwarding.Forward functor to potentially override (via shadowing)
the implementations of custom actions, in order to define policies around
forwarding (e.g. whether the coordinator should handle a custom action by
appealing to a subordinate host, usually via the Client module - described
later).
Server (server.ml)
The Server modules contains the logic to handle incoming calls from Xapi’s
HTTP server. At the top level, it contains a functor (parameterised by Local
and Forward - both satisfying the CUSTOM_ACTIONS signature), that contains a
large pattern match on the name of the supplied message (e.g.
Host.get_record). Then, dependent on the semantics of the message itself, the
body of each handler differs in slight ways when doing dispatch.
The top-level dispatch_call function
The top-level dispatch function, dispatch_call, has the following header:
let dispatch_call (http_req: Http.Request.t)(fd: Unix.file_descr)(call: Rpc.call)=
The incoming HTTP request (http_req) and - related - socket’s file descriptor
(Unix.file_descr) are forwarded - within handler code - to
Server_helpers.do_dispatch. The HTTP request is important because task and
tracing-related metadata can be propagated using fields within the request
header. The file descriptor can be used to determine the origin of the request
(whether it’s local or not) but also can permit flexibility in upgrading
protocols (as is done in other parts of Xapi, such as the /cli handler, where
the connection starts off as HTTP but continues as something else).
The Anatomy of a Handler
A typical handler, within dispatch_call, looks like the following:
|"task.get_name_label"|"task_get_name_label"->beginmatch__params with|[session_id_rpc; self_rpc]->(* has no side-effect; should be handled by DB action *)(* has no asynchronous mode *)let session_id = ref_session_of_rpc session_id_rpc inlet self = ref_task_of_rpc self_rpc in Session_check.check ~intra_pool_only:false ~session_id ~action:"task.get_name_label";let arg_names_values =[("session_id", session_id_rpc);("self", self_rpc)]inlet key_names = [] inlet rbac __context fn = Rbac.check session_id __call ~args:arg_names_values ~keys:key_names ~__context ~fn inlet marshaller =(fun x -> rpc_of_string x)inlet local_op =fun~__context ->(rbac __context (fun()->(Db_actions.DB_Action.Task.get_name_label ~__context:(Context.check_for_foreign_database ~__context)~self)))inlet supports_async = false inlet generate_task_for = false in ApiLogRead.debug "task.get_name_label";let resp = Server_helpers.do_dispatch ~session_id supports_async __call local_op marshaller fd http_req __label __sync_ty generate_task_for in resp
|_-> Server_helpers.parameter_count_mismatch_failure __call "1"(string_of_int ((List.length __params)- 1))end
The start of each handler contains calls to unmarshal arguments from their
Rpc.t representation to that defined by the API module. These functions are
automatically generated during preprocessing of the aPI.ml file (API
modules from xapi-types, described above). The conversion from the incoming
XML-RPC (or JSON-RPC) to the Rpc.t encoding is handled by Api_server before
it calls dispatch_call.
In the example above, the “local” operation (local_op) uses handlers
generated within Db_actions (described above). This is typical of handlers
for DB-related actions (the most common type of action): they have no
forwarding logic (thus, no entry in the CUSTOM_ACTIONS signature) as they can
only be carried out on the coordinator host (which maintains the database). If
a subordinate host wishes to change the database, it must use a custom endpoint
and protocol (not described here).
To see more about how the CUSTOM_ACTIONS signature is used in practice, you
can look at the “local” and “forward” operations for a message with custom
handling. For example, in Pool_patch.apply:
As mentioned above, the Custom and Forward modules are both inputs
to Server’s Make functor. The difference lies in how they are
instantiated: Api_server ensures that Custom is referring to local
implementations (such as that arising from modules defined by files
named xapi_*.ml) and Forward is referring to the module derived by
Message_forwarding (but shadowed with implementations that may apply
different handling to the call).
RBAC Checking and Auditing
In order to implement RBAC (Role Based Access Control) checking for individual
messages, each handler contains logic that wraps an action (as a callback)
within code that calls into the Rbac module (specifically, the Rbac.check
function).
In the typical case, Rbac.check compares the name of a call against the list
of RBAC permissions granted to the role associated with the originator’s
session/context. There is more involved logic for key-related RBAC checks
(explained later).
For an accessible listing of each (static) RBAC permission, Xapi auto-generates
a CSV file containing this information in a tabular format (within
rbac_static.csv). The information in that file is consistent with the
auto-generated Rbac_static module described in this document.
Along with providing authorisation checking, the Rbac.check function also
appends to an audit log which contains a (sanitised) list of actions (alongside
their RBAC check outcome).
RBAC Checking of Keys
In auto-generated handlers for add_to and remove_from messages (e.g.
pool.add_to_other_config), the RBAC check may cite a list of key
descriptors. For example:
These keys are specified within the data model as being tied to specific roles,
in order to apply role-based exclusions to specific keys. The usual situation
is that the setter for such a (string -> string) map field (e.g.
pool.set_other_config) requires a more privileged role than the roles
specified for individual keys.
The mechanism that enforces this check is somewhat brittle at present: the
Rbac.check function is provided the list of key descriptors and the
(association) list of (unmarshalled) arguments. If the key descriptor list is
non-empty, it will consult the argument listing for the cited key (i.e. the key
name mapped to by “key” in the argument listing) and then attempt to match that
against a descriptor. If there is a match, it will check the current session
against the list of RBAC permissions. The key-related RBAC permissions are
encoded in the format action/key:key (all lowercase) - for example,
pool.add_to_other_config/key:xencenter.customfields.*.
Alternative Wire Names
In order to support languages that have keywords that collide with message
names within Xapi, an alternative wire format is also cased upon within
dispatch_call.
For example, Python uses the keyword from to handle imports and, so, an API
call (using xmlrpc.client) - rendered as event.from - is a syntactic error.
To get around this, the API permits an underscore to be substituted in place of
the period (.) that separates the class name from the message name (e.g.
event_from).
This apparent duplication of cases does not amount to a concrete duplication of
matching code within the compiled module (due to how OCaml special cases the
compilation of pattern matching over constant strings). However, in future, we
could avoid casing on both of them by normalising the name of the incoming call
(i.e. transform event.from to event_from prior to matching).
Client (client.ml)
The Client module serves as the main module of the xapi-client library. The
primary consumer of this library is Xapi itself, for use when a host may call
into another host (or itself).
For example, when defining a message forwarding policy, the implementation of a
handler may use the Client module to invoke a function on another host. For
instance, the message forwarding of Pool_patch.apply (from
xapi/message_forwarding.ml):
let apply ~__context ~self ~host = info "Pool_patch.apply: pool patch = '%s'; host = '%s'"(pool_patch_uuid ~__context self)(host_uuid ~__context host);let local_fn = Local.Pool_patch.apply ~self ~host in do_op_on ~local_fn ~__context ~host (fun session_id rpc -> Client.Pool_patch.apply ~rpc ~session_id ~self ~host
)
The do_op_on machinery provides the rpc transport (Rpc.call -> Rpc.response) to the callback which passes it to Client’s implementation
(which just performs the relevant marshalling). The RPC transport itself is
XML-RPC over HTTP (as implemented by the internal http-lib library -
ocaml/libs/http-lib).
Client Internals
Internally, the Client module contains a few functors. The top-level functor,
ClientF is parameterised by a signature describing an arbitrary monad. The
intention is to permit users to instantiate clients defined in terms of an RPC
transport that may be asynchronous (for example, within the context of a
program using Lwt or Async for its networking).
There is also a sub-functor AsyncF (within ClientF) that is parameterised
by a module that provides a qualifier string to be prepended to calls’ method
names. A few messages in Xapi can be qualified with async qualifiers (in
particular, Async and InternalAsync). The AsyncF functor provides
handling of those calls and is used to define the sub-modules (within
ClientF) Async and InternalAsync. (the former prepending Async and the
latter further prepending Internal). Code at the top-level of Server’s
dispatch_call function is used to parse (and remove) this async qualifier
from the provided message name.
moduleClientF=functor(X:IO)->struct(* ... *)moduleAsyncF=functor(AQ:AsyncQualifier)->struct(* handling of messages with asynchronous modes *)moduleSession=structlet create_from_db_file ~rpc ~session_id ~filename =let session_id = rpc_of_ref_session session_id inlet filename = rpc_of_string filename in rpc_wrapper rpc (Printf.sprintf "%sAsync.session.create_from_db_file" AQ.async_qualifier)[ session_id; filename ]>>=fun x -> return (ref_task_of_rpc x)(* ... *)end(* ... *)end(* handling of messages with synchronous modes; similar to above, but without prefixing of "Async" *)moduleAsync=AsyncF(structlet async_qualifier =""end)moduleInternalAsync=AsyncF(structlet async_qualifier ="Internal"end)end(* instantiate Client with the identity monad *)moduleClient=ClientF(Id)
The usual Client module used by users of xapi-client is the Client
sub-module, defined in terms of the identity monad (which simply applies the
given continuation as its sequencing logic and performs no wrapping):
moduleId=structtype'a t ='a
let bind x f = f x
let return x = x
endmoduleClient=ClientF(Id)
This results in synchronous semantics, whereby any code within Xapi that uses
it would block as it waits for a response via the RPC transport. This is not an
issue in practice, as each call is given its own thread during the dispatch logic.
Note that the RPC transport itself is defined in terms of the provided monad.
In the identity case, it’s a simple alias, and so the type of rpc is rendered
Rpc.call -> Rpc.response. However, if you were to provide a monad defined,
for example, in terms of Lwt.t (i.e. type 'a t = 'a Lwt.t), the expected
type of the transport would reflect that: Rpc.call -> Rpc.response Lwt.t.
Rbac_static
The data model assigns specific roles to messages and fields. In order
to permit RBAC (Role Based Access Control) checking for the related
actions, Xapi must be able to determine the required role(s) for a
given action. To this end, Rbac_static is generated to contain
entries that encode this information.
The format of the entries in Rbac_static is rather peculiar. For
example, for the action Pool_patch.apply, we find
permission_pool_patch_apply defined at the top-level:
let permission_pool_patch_apply ={(* 311/2196 *) role_uuid ="d4385002-b920-5412-4c57-b010f451fa81"; role_name_label ="pool_patch.apply"; role_name_description = permission_description; role_subroles = [];(* permission cannot have any subroles *) role_is_internal = true;}
This record is of type role_t (as defined by Db_actions). This
record is later incorporated into role-specific lists of permissions
(for each statically known role).
The reason that Rbac_static defines permissions in a format defined
by Db_actions is because, to avoid flooding the database with
thousands of entries, Rbac_static acts as its own database. In
Xapi_role, functions are defined that mirror the functionality of
functions within Db_actions (e.g. get_by_uuid).
The get_by_uuid function (within Xapi_role) illustrates the bypassing of the database clearly:
let get_by_uuid ~__context ~uuid =match find_role_by_uuid uuid with|Some static_record -> ref_of_role ~role:static_record
|None->(* pass-through to Db *) Db.Role.get_by_uuid ~__context ~uuid
If a role can be found (by UUID) statically (within Rbac_static),
then that is used. Otherwise, the database is queried. Using the
database as a fallback is important because there is still a dynamic
component to the RBAC checking in Xapi: users can define their own
roles that incorporate other roles as sub-roles - it’s just that
the statically-known roles won’t be stored in the database. Precluding
static roles from the database helps to avoid making the database
larger and prevents users from deleting static roles from the
database.
Host memory accounting
Memory is used for many things:
the hypervisor code: this is the Xen executable itself
the hypervisor heap: this is needed for per-domain structures and per-vCPU
structures
the crash kernel: this is needed to collect information after a host crash
domain RAM: this is the memory the VM believes it has
shadow memory: for HVM guests running on hosts without hardware assisted
paging (HAP) Xen uses shadow to optimise page table updates. For all guests
shadow is used during live migration for tracking the memory transfer.
video RAM for the virtual graphics card
Some of these are constants (e.g. hypervisor code) while some depend on the VM
configuration (e.g. domain RAM). Xapi calls the constants “host overhead” and
the variables due to VM configuration as “VM overhead”. There is no low-level
API to query this information, therefore xapi will sample the host overheads
at system boot time and model the per-VM overheads.
Host overhead
The host overhead is not managed by xapi, instead it is sampled. After the host
boots and before any VMs start, xapi asks Xen how much memory the host has in
total, and how much memory is currently free. Xapi subtracts the free from the
total and stores this as the host overhead.
VM overhead
The inputs to the model are
VM.memory_static_max: the maximum amount of RAM the domain will be able to use
VM.HVM_shadow_multiplier: allows the shadow memory to be increased
VM.VCPUs_max: the maximum number of vCPUs the domain will be able to use
First the shadow memory is calculated, in MiB
Second the VM overhead is calculated, in MiB
Memory required to start a VM
If ballooning is disabled, the memory required to start a VM is the same as the VM
overhead above.
If ballooning is enabled then the memory calculation above is modified to use the
VM.memory_dynamic_max rather than the VM.memory_static_max.
Memory required to migrate a VM
If ballooning is disabled, the memory required to receive a migrating VM is the same
as the VM overhead above.
If ballooning is enabled, then the VM will first be ballooned down to VM.memory_dynamic_min
and then it will be migrated across. If the VM fails to balloon all the way down, then
correspondingly more memory will be required on the receiving side.
XAPI's Storage Layers
Info
The links in this page point to the source files of xapi
v25.11.0.
Xapi directly communicates only with the SMAPIv2 layer. There are no
plugins directly implementing the SMAPIv2 interface, but the plugins in
other layers are accessed through it:
graph TD
A[xapi] --> B[SMAPIv2 interface]
B --> C[SMAPIv2 <-> SMAPIv1 state machine: storage_smapiv1_wrapper.ml]
C --> G[SMAPIv2 <-> SMAPIv1 translation: storage_smapiv1.ml]
B --> D[SMAPIv2 <-> SMAPIv3 translation: xapi-storage-script]
G --> E[SMAPIv1 plugins]
D --> F[SMAPIv3 plugins]
SMAPIv1
These are the files related to SMAPIv1 in /ocaml/xapi/:
sm.ml:
OCaml “bindings” for the SMAPIv1 Python “drivers” (SM)
sm_exec.ml:
support for implementing the above “bindings”.
The parameters are converted to XML-RPC, passed to the relevant python script (“driver”),
and then the standard output of the program is parsed as an XML-RPC response (we use
ocaml/libs/http-lib/xMLRPC.ml
for parsing XML-RPC).
When adding new functionality, we can modify type call to add parameters,
but when we don’t add any common ones, we should just pass the new
parameters in the args record.
smint.ml:
Contains types, exceptions, … for the SMAPIv1 OCaml interface.
storage_smapiv1_wrapper.ml:
The Wrapper
module wraps a SMAPIv2 server (Server_impl) and takes care of
locking and datapaths (in case of multiple connections (=datapaths)
from VMs to the same VDI, using a state machine for SMAPIv1 operations.
It will use the superstate computed by the
vdi_automaton.ml
in xapi-idl) to compute the required actions to reach the desired state from the current one.
It also implements some functionality, like the DP module, that is not implemented in lower layers.
storage_smapiv1.ml:
a SMAPIv2 server that translates SMAPIv2 calls to SMAPIv1 ones, by calling
ocaml/xapi/sm.ml.
It calls passes the XML-RPC requests as the first command-line argument to the
corresponding Python script, which returns an XML-RPC response on standard
output.
SMAPIv2
These are the files related to SMAPIv2, which need to be modified to
implement new calls:
ocaml/xapi-idl/storage/storage_skeleton.ml:
A stub SMAPIv2 storage server implementation that matches the
SMAPIv2 storage server interface (this is verified by
storage_skeleton_test.ml),
each of its function just raise a Storage_interface.Unimplemented
error. This skeleton is used to automatically fill the unimplemented
methods of the below storage servers to satisfy the interface.
ocaml/xapi/storage_mux.ml:
A SMAPIv2 server, which multiplexes between other servers. A
different SMAPIv2 server can be registered for each SR. Then it
forwards the calls for each SR to the “storage plugin” registered
for that SR.
We use message-switch under the hood for RPC communication between
xapi-idl components. The
main Storage_mux.Server (basically Storage_impl.Wrapper(Mux)) is
registered to
listen
on the “org.xen.xapi.storage” queue during xapi’s
startup,
and this is the main entry point for incoming SMAPIv2 function calls.
Storage_mux does not really multiplex between different plugins right
now: earlier during xapi’s
startup,
the same SMAPIv1 storage server module is
registered
on the various “org.xen.xapi.storage.<sr type>” queues for each
supported SR type. (This will change with SMAPIv3, which is accessed via
a SMAPIv2 plugin outside of xapi that translates between SMAPIv2 and
SMAPIv3.) Then, in
Storage_access.create_sr,
which is called
during SR.create,
and also
during PBD.plug,
the relevant “org.xen.xapi.storage.<sr type>” queue needed for that
PBD is registered with Storage_mux in
Storage_access.bind
for the SR of that PBD. So basically what happens is that xapi registers itself as a SMAPIv2
server, and forwards incoming function calls to itself through
message-switch, using its Storage_mux module. These calls are
forwarded to xapi’s SMAPIv1 module doing SMAPIv2 -> SMAPIv1
translation.
Registration of the various storage servers
sequenceDiagram
participant q as message-switch
participant v1 as Storage_smapiv1.SMAPIv1
participant svr as Storage_mux.Server
Note over q, svr: xapi startup, "Starting SMAPIv1 proxies"
q ->> v1:org.xen.xapi.storage.sr_type_1
q ->> v1:org.xen.xapi.storage.sr_type_2
q ->> v1:org.xen.xapi.storage.sr_type_3
Note over q, svr: xapi startup, "Starting SM service"
q ->> svr:org.xen.xapi.storage
Note over q, svr: SR.create, PBD.plug
svr ->> q:org.xapi.storage.sr_type_2
What happens when a SMAPIv2 “function” is called
graph TD
call[SMAPIv2 call] --VDI.attach2--> org.xen.xapi.storage
subgraph message-switch
org.xen.xapi.storage
org.xen.xapi.storage.SR_type_x
end
org.xen.xapi.storage --VDI.attach2--> Storage_smapiv1_wrapper.Wrapper
subgraph xapi
subgraph Storage_mux.server
Storage_smapiv1_wrapper.Wrapper --> Storage_mux.mux
end
Storage_smapiv1.SMAPIv1
end
Storage_mux.mux --VDI.attach2--> org.xen.xapi.storage.SR_type_x
org.xen.xapi.storage.SR_type_x --VDI.attach2--> Storage_smapiv1.SMAPIv1
subgraph SMAPIv1
driver_x[SMAPIv1 driver for SR_type_x]
end
Storage_smapiv1.SMAPIv1 --vdi_attach--> driver_x
Interface Changes, Backward Compatibility, & SXM
During SXM, xapi calls SMAPIv2 functions on a remote xapi. Therefore it
is important to keep all those SMAPIv2 functions backward-compatible
that we call remotely (e.g. Remote.VDI.attach), otherwise SXM from an
older to a newer xapi will break.
Functionality implemented in SMAPIv2 layers
The layer between SMAPIv2 and SMAPIv1 is much fatter than the one between
SMAPIv2 and SMAPIv3. The latter does not do much, apart from simple
translation. However, the former has large portions of code in its intermediate
layers, in addition to the basic SMAPIv2 <-> SMAPIv1 translation in
storage_access.ml.
These are the two files in xapi that implement the SMAPIv2 storage interface,
from higher to lower level:
Functionality implemented by higher layers is not implemented by the layers below it.
Extra functionality in storage_task.ml
storage_smapiv1_wrapper.ml also implements the UPDATES and TASK SMAPIv2 APIs. These are backed by the Updates, Task_server, and Scheduler modules from
xcp-idl, instantiated in xapi’s Storage_task module. Migration code in
Storage_mux will interact with these to update task progress. There is also
an event loop in xapi that keeps calling UPDATES.get to keep the tasks in
xapi’s database in sync with the storage manager’s tasks.
Storage_smapiv1_wrapper.ml also implements the legacy VDI.attach call by simply
calling the newer VDI.attach2 call in the same module. In general, this is a
good place to implement a compatibility layer for deprecated functionality
removed from other layers, because this is the first module that intercepts a
SMAPIv2 call.
Extra functionality in storage_mux.ml
Storage_mux redirects all storage motion (SXM) code to storage_migrate.ml,
and the multiplexed will be managed by storage_migrate.ml. The main implementation
resides in the DATA and DATA.MIRROR modules. Migration code will use
the Storage_task module to run the operations and update the task’s progress.
It also implements the Policy module from the SMAPIv2 interface.
SMAPIv3
SMAPIv3 has a slightly different interface from SMAPIv2.
The
xapi-storage-script
daemon is a SMAPIv2 plugin separate from xapi that is doing the SMAPIv2 ↔ SMAPIv3 translation.
It keeps the plugins registered with xapi-idl (their message-switch queues)
up to date as their files appear or disappear from the relevant directory.
Python bindings, used by the SM scripts that implement the SMAPIv3
interface.
These bindings are built by running make at the root level,
and appear in the _build/default/ocaml/xapi-storage/python/xapi/storage/api/v5/
directory.
On a XenServer host, they are stored in the
/usr/lib/python3.6/site-packages/xapi/storage/api/v5/
directory
SMAPIv3 Plugins
For SMAPIv3 we have
volume plugins to manipulate SRs and volumes (=VDIs) in them, and
datapath plugins for connecting to the volumes. Volume plugins tell us
which datapath plugins we can use with each volume, and what to pass to
the plugin. Both volume and datapath plugins implement some common
functionality: the SMAPIv3 plugin
interface.
How SMAPIv3 works:
The xapi-storage-script daemon detects volume and datapath plugins
stored in subdirectories of the
/usr/libexec/xapi-storage-script/volume/ and
/usr/libexec/xapi-storage-script/datapath/ directories, respectively.
When it finds a new datapath plugin, it adds the plugin to a lookup table and
uses it the next time that datapath is required.
When it finds a new volume plugin, it binds a new
message-switch
queue named after the plugin’s subdirectory to a new server instance that uses these volume scripts.
To invoke a SMAPIv3 method, it executes a program named
<Interface name>.<function name> in the plugin’s directory,
for example
/usr/libexec/xapi-storage-script/volume/org.xen.xapi.storage.gfs2/SR.ls.
The inputs to each script can be passed as command-line arguments and
are type-checked using the generated Python bindings, and so are the outputs.
The URIs of the SRs that xapi-storage-script knows about are stored in the
/var/run/nonpersistent/xapi-storage-script/state.db file,
these URIs can be used on the command line when an sr argument is expected.
Registration of the various SMAPIv3 plugins
sequenceDiagram
participant q as message-switch
participant v1 as (Storage_access.SMAPIv1)
participant svr as Storage_mux.Server
participant vol_dir as /../volume/
participant dp_dir as /../datapath/
participant script as xapi-storage-script
Note over script, vol_dir: xapi-storage-script startup
script ->> vol_dir: new subdir org.xen.xapi.storage.sr_type_4
q ->> script: org.xen.xapi.storage.sr_type_4
script ->> dp_dir: new subdir sr_type_4_dp
Note over q, svr: xapi startup, "Starting SMAPIv1 proxies"
q -->> v1:org.xen.xapi.storage.sr_type_1
q -->> v1:org.xen.xapi.storage.sr_type_2
q -->> v1:org.xen.xapi.storage.sr_type_3
Note over q, svr: xapi startup, "Starting SM service"
q ->> svr:org.xen.xapi.storage
Note over q, svr: SR.create, PBD.plug
svr ->> q:org.xapi.storage.sr_type_4
What happens when a SMAPIv3 “function” is called
graph TD
call[SMAPIv2 call] --VDI.attach2--> org.xen.xapi.storage
subgraph message-switch
org.xen.xapi.storage
org.xen.xapi.storage.SR_type_x
end
org.xen.xapi.storage --VDI.attach2--> Storage_impl.Wrapper
subgraph xapi
subgraph Storage_mux.server
Storage_impl.Wrapper --> Storage_mux.mux
end
Storage_access.SMAPIv1
end
Storage_mux.mux --VDI.attach2--> org.xen.xapi.storage.SR_type_x
org.xen.xapi.storage.SR_type_x -."VDI.attach2".-> Storage_access.SMAPIv1
subgraph SMAPIv1
driver_x[SMAPIv1 driver for SR_type_x]
end
Storage_access.SMAPIv1 -.vdi_attach.-> driver_x
subgraph SMAPIv3
xapi-storage-script --Datapath.attach--> v3_dp_plugin_x
subgraph SMAPIv3 plugins
v3_vol_plugin_x[volume plugin for SR_type_x]
v3_dp_plugin_x[datapath plugin for SR_type_x]
end
end
org.xen.xapi.storage.SR_type_x --VDI.attach2-->xapi-storage-script
The file
xcp-idl/storage/storage_interface.ml
defines a number of SMAPIv2 errors, ultimately all errors from the various
SMAPIv2 storage servers in xapi will be returned as one of these. Most of the
errors aren’t converted into a specific exception in Storage_interface, but
are simply wrapped with Storage_interface.Backend_error.
The
Storage_utils.transform_storage_exn
function is used by the client code in xapi to translate the SMAPIv2
errors into XenAPI errors again, this unwraps the errors wrapped with
Storage_interface.Backend_error.
Message Forwarding
In the message forwarding layer, first we check the validity of VDI
operations using mark_vdi and mark_sr. These first check that the
operation is valid operations,
using Xapi_vdi.check_operation_error,
for mark_vdi, which also inspects the current operations of the VDI,
and then, if the operation is valid, it is added to the VDI’s current
operations, and update_allowed_operations is called. Then we forward
the VDI operation to a suitable host that has a PBD plugged for the
VDI’s SR.
Checking that the SR is attached
For the VDI operations, we check at two different places whether the SR
is attached: first, at the Xapi level, in
Xapi_vdi.check_operation_error,
for the resize operation, and then, at the SMAPIv1 level, in
Sm.assert_pbd_is_plugged. Sm.assert_pbd_is_plugged performs the
same checks, plus it checks that the PBD is attached to the localhost,
unlike Xapi_vdi.check_operation_error. This behaviour is correct,
because Xapi_vdi.check_operation_error is called from the message
forwarding layer, which forwards the call to a host that has the SR
attached.
VDI Identifiers and Storage Motion
VDI “location”: this is the VDI identifier used by the SM backend.
It is usually the UUID of the VDI, but for ISO SRs it is the name of
the ISO.
VDI “content_id”: this is used for storage motion, to reduce the
amount of data copied. When we copy over a VDI, the content_id will
initially be the same. However, when we attach a VDI as read-write,
and then detach it, then we will blank its content_id (set it to a
random UUID), because we may have written to it, so the content
could be different. .
The core idea of storage migration is surprisingly simple: We have VDIs attached to a VM,
and we wish to migrate these VDIs from one SR to another. This necessarily requires
us to copy the data stored in these VDIs over to the new SR, which can be a long-running
process if there are gigabytes or even terabytes of them. We wish to minimise the
down time of this process to allow the VM to keep running as much as possible.
At a very high level, the SXM process generally only consists of two stages: preparation
and mirroring. The preparation is about getting the receiving host ready for the
mirroring operation, while the mirroring itself can be further divided into two
more operations: 1. sending new writes to both sides; 2.copying existing data from
source to destination. The exact detail of how to set up a mirror differs significantly
between SMAPIv1 and SMAPIv3, but both of them will have to perform the above two
operations.
Once the mirroring is established, it is a matter of checking the status of the
mirroring and carry on with the follwoing VM migration.
The reality is more complex than what we had hoped for. For example, in SMAPIv1,
the mirror establishment is quite an involved process and is itself divided into
several stages, which will be discussed in more detail later on.
SXM Multiplexing
This section is about the design idea behind the additional layer of mutiplexing specifically
for Storage Xen Motion (SXM) from SRs using SMAPIv3. It is recommended that you have read the
introduction doc for the storage layer first to understand how storage
multiplexing is done between SMAPIv2 and SMAPI{v1, v3} before reading this.
Motivation
The existing SXM code was designed to work only with SMAPIv1 SRs, and therefore
does not take into account the dramatic difference in the ways SXM is done between
SMAPIv1 and SMAPIv3. The exact difference will be covered later on in this doc, for this section
it is sufficient to assume that they have two ways of doing migration. Therefore,
we need different code paths for migration from SMAPIv1 and SMAPIv3.
But we have storage_mux.ml
Indeed, storage_mux.ml is responsible for multiplexing and forwarding requests to
the correct storage backend, based on the SR type that the caller specifies. And
in fact, for inbound SXM to SMAPIv3 (i.e. migrating into a SMAPIv3 SR, GFS2 for example),
storage_mux is doing the heavy lifting of multiplexing between different storage
backends. Every time a Remote. call is invoked, this will go through the SMAPIv2
layer to the remote host and get multiplexed on the destination host, based on
whether we are migrating into a SMAPIv1 or SMAPIv3 SR (see the diagram below).
And the inbound SXM is implemented
by implementing the existing SMAPIv2 -> SMAPIv3 calls (see import_activate for example)
which may not have been implemented before.
While this works fine for inbound SXM, it does not work for outbound SXM. A typical SXM
consists of four combinations, the source sr type (v1/v3) and the destiantion sr
type (v1/v3), any of the four combinations is possible. We have already covered the
destination multiplexing (v1/v3) by utilising storage_mux, and at this point we
have run out of multiplexer for multiplexing on the source. In other words, we
can only mutiplex once for each SMAPIv2 call, and we can either use that chance for
either the source or the destination, and we have already used it for the latter.
Thought experiments on an alternative design
To make it even more concrete, let us consider an example: the mirroring logic in
SXM is different based on the source SR type of the SXM call. You might imagine
defining a function like MIRROR.start v3_sr v1_sr that will be multiplexed
by the storage_mux based on the source SR type, and forwarded to storage_smapiv3_migrate,
or even just xapi-storage-script, which is indeed quite possible.
Now at this point we have already done the multiplexing, but we still wish to
multiplex operations on destination SRs, for example, we might want to attach a
VDI belonging to a SMAPIv1 SR on the remote host. But as we have already done the
multiplexing and is now inside xapi-storage-script, we have lost any chance of doing
any further multiplexing :(
Design
The idea of this new design is to introduce an additional multiplexing layer that
is specific for multiplexing calls based on the source SR type. For example, in
the diagram below the send_start src_sr dest_sr will take both the src SR and the
destination SR as parameters, and suppose the mirroring logic is different for different
types of source SRs (i.e. SMAPIv1 or SMAPIv3), the storage migration code will
necessarily choose the right code path based on the source SR type. And this is
exactly what is done in this additional multiplexing layer. The respective logic
for doing {v1,v3}-specifi mirroring, for example, will stay in storage_smapi{v1,v3}_migrate.ml
Note that later on storage_smapi{v1,v3}_migrate.ml will still have the flexibility
to call remote SMAPIv2 functions, such as Remote.VDI.attach dest_sr vdi, and
it will be handled just as before.
SMAPIv1 migration
This section is about migration from SMAPIv1 SRs to SMAPIv1 or SMAPIv3 SRs, since
the migration is driven by the source host, it is usally the source host that
determines most of the logic during a storage migration.
First we take a look at an overview diagram of what happens during SMAPIv1 SXM:
the diagram is labelled with S1, S2 … which indicates different stages of the migration.
We will talk about each stage in more detail below.
Preparation
Before we can start our migration process, there are a number of preparations
needed to prepare for the following mirror. For SMAPIv1 this involves:
Create a new VDI (called leaf) that will be used as the receiving VDI for all the new writes
Create a dummy snapshot of the VDI above to make sure it is a differencing disk and can be composed later on
Create a VDI (called parent) that will be used to receive the existing content of the disk (the snapshot)
Note that the leaf VDI needs to be attached and activated on the destination host (to a non-exsiting mirror_vm)
since it will later on accept writes to mirror what is written on the source host.
The parent VDI may be created in two different ways: 1. If there is a “similar VDI”,
clone it on the destination host and use it as the parent VDI; 2. If there is no
such VDI, create a new blank VDI. The similarity here is defined by the distances
between different VDIs in the VHD tree, which is exploiting the internal representation
of the storage layer, hence we will not go into too much detail about this here.
Once these preparations are done, a mirror_receive_result data structure is then
passed back to the source host that will contain all the necessary information about
these new VDIs, etc.
Establishing mirror
At a high level, mirror establishment for SMAPIv1 works as follows:
Take a snapshot of a VDI that is attached to VM1. This gives us an immutable
copy of the current state of the VDI, with all the data up until the point we took
the snapshot. This is illustrated in the diagram as a VDI and its snapshot connecting
to a shared parent, which stores the shared content for the snapshot and the writable
VDI from which we took the snapshot (snapshot)
Mirror the writable VDI to the server hosts: this means that all writes that goes to the
client VDI will also be written to the mirrored VDI on the remote host (mirror)
Copy the immutable snapshot from our local host to the remote (copy)
Compose the mirror and the snapshot to form a single VDI
Destroy the snapshot on the local host (cleanup)
Mirror
The mirroring process for SMAPIv1 is rather unconventional, so it is worth
documenting how this works. Instead of a conventional client server architecture,
where the source client connects to the destination server directly through the
NBD protocol in tapdisk, the connection is established in xapi and then passed
onto tapdisk. It was done in this rather unusual way mainly due to authentication
issues. Because it is xapi that is creating the connection, tapdisk does not need
to be concerned about authentication of the connection, thus simplifying the storage
component. This is reasonable as the storage component should focus on handling
storage requests rather than worrying about network security.
The diagram below illustrates this prcess. First, xapi on the source host will
initiate an https request to the remote xapi. This request contains the necessary
information about the VDI to be mirrored, and the SR that contains it, etc. This
information is then passed onto the https handler on the destination host (called
nbd_handler) which then processes this information. Now the unusual step is that
both the source and the destination xapi will pass this connection onto tapdisk,
by sending the fd representing the socket connection to the tapdisk process. On
the source this would be nbd client process of tapdisk, and on the destination
this would be the nbd server process of the tapdisk. After this step, we can consider
a client-server connection is established between two tapdisks on the client and
server, as if the tapdisk on the source host makes a request to the tapdisk on the
destination host and initiates the connection. On the diagram, this is indicated
by the dashed lines between the tapdisk processes. Logically, we can view this as
xapi creates the connection, and then passes this connection down into tapdisk.
Snapshot
The next step would be create a snapshot of the VDI. This is easily done as a
VDI.snapshot operation. If the VDI was in VHD format, then internally this would
create two children for, one for the snapshot, which only contains the metadata
information and tends to be small, the other for the writable VDI where all the
new writes will go to. The shared base copy contains the shared blocks.
Copy and compose
Once the snapshot is created, we can then copy the snapshot from the source
to the destination. This step is done by sparse_dd using the nbd protocol. This
is also the step that takes the most time to complete.
sparse_dd is a process forked by xapi that does the copying of the disk blocks.
sparse_dd can supports a number of protocols, including nbd. In this case, sparse_dd
will initiate an https put request to the destination host, with a url of the form
<address>/services/SM/nbdproxy/<sr>/<vdi>. This https request then
gets handled by the https handler on the destination host B, which will then spawn
a handler thread. This handler will find the
“generic” nbd server1 of either tapdisk or qemu-dp, depending on the destination
SR type, and then start proxying data between the https connection socket and the
socket connected to the nbd server.
Once copying is done, the snapshot and mirrored VDI can be then composed into a
single VDI.
Finish
At this point the VDI is synchronised to the new host! Mirror is still working at this point
though because that will not be destroyed until the VM itself has been migrated
as well. Some cleanups are done at this point, such as deleting the snapshot
that is taken on the source, destroying the mirror datapath, etc.
The end results look like the following. Note that VM2 is in dashed line as it
is not yet created yet. The next steps would be to migrate the VM1 itself to the
destination as well, but this is part of the VM migration process and will not
be covered here.
SMAPIv3 migration
This section covers the mechanism of migrations from SRs using SMAPIv3 (to
SMAPIv1 or SMAPIv3). Although the core ideas are the same, SMAPIv3 has a rather
different mechanism for mirroring: 1. it does not require xapi to take snapshot
of the VDI anymore, since the mirror itself will take care of replicating the
existing data to the destination; 2. there is no fd passing for connection establishment anymore, and instead proxies are used for connection setup.
Preparation
The preparation work for SMAPIv3 is greatly simplified by the fact that the mirror
at the storage layer will copy the existing data in the VDI to the destination.
This means that snapshot of the source VDI is not required anymore. So we are left
with only one thing:
Create a VDI used for mirroring the data of the source VDI
For this reason, the implementation logic for SMAPIv3 preparation is also shorter,
as the complexity is now handled by the storage layer, which is where it is supposed
to be handled.
Establishing mirror
The other significant difference is that the storage backend for SMAPIv3 qemu-dp
SRs no longer accepts fds, so xapi needs to proxy the data between two nbd client
and nbd server.
SMAPIv3 provides the Data.mirror uri domain remote which needs three parameters:
uri for accessing the local disk, doamin for the domain slice on which mirroring
should happen, and most importantly for this design, a remote url which represents
the remote nbd server to which the blocks of data can be sent to.
This function itself, when called by xapi and forwarded to the storage layer’s qemu-dp
nbd client, will initiate a nbd connection to the nbd server pointed to by remote.
This works fine when the storage migration happens entirely within a local host,
where qemu-dp’s nbd client and nbd server can communicate over unix domain sockets.
However, it does not work for inter-host migrations as qemu-dp’s nbd server is not
exposed publicly over the network (just as tapdisk’s nbd server). Therefore a proxying
service on the source host is needed for forwarding the nbd connection from the
source host to the destination host. And it would be the responsiblity of
xapi to manage this proxy service.
The following diagram illustrates the mirroring process of a single VDI:
The first step for xapi is then to set up a nbd proxy thread that will be listening
on a local unix domain socket with path /var/run/nbdproxy/export/<domain> where
domain is the domain parameter mentioned above in Data.mirror. The nbd proxy
thread will accept nbd connections (or rather any connections, it does not
speak/care about nbd protocol at all) and sends an https put request
to the remote xapi. The proxy itself will then forward the data exactly as it is
to the remote side through the https connection.
Once the proxy is set up, xapi will call Data.mirror, which
will be forwarded to the xapi-storage-script and is further forwarded to the qemu-dp.
This call contains, among other parameters, the destination NBD server url (remote)
to be connected. In this case the destination nbd server is exactly the domain
socket to which the proxy thread is listening. Therefore the remote parameter
will be of the form nbd+unix:///<export>?socket=<socket> where the export is provided
by the destination nbd server that represents the VDI prepared on the destination
host, and the socket will be the path of the unix domain socket where the proxy
thread (which we just created) is listening at.
When this connection is set up, the proxy process will talk to the remote xapi via
https requests, and on the remote side, an https handler will proxy this request to
the appropriate nbd server of either tapdisk or qemu-dp, using exactly the same
import proxy as mentioned before.
Note that this proxying service is tightly integrated with outbound SXM of SMAPIv3
SRs. This is to make it simple to focus on the migration itself.
Although there is no need to explicitly copy the VDI anymore, we still need to
transfer the data and wait for it finish. For this we use Data.stat call provided
by the storage backend to query the status of the mirror, and wait for it to finish
as needed.
Limitations
This way of establishing the connection simplifies the implementation of the migration
for SMAPIv3, but it also has limitations:
One proxy per live VDI migration is needed, which can potentially consume lots of resources in dom0, and we should measure the impact of this before we switch to using more resource-efficient ways such as wire guard that allows establishing a single connection between multiple hosts.
Finish
As there is no need to copy a VDI, there is also no need to compose or delete the
snapshot. The cleanup procedure would therefore just involve destroy the datapath
that was used for receiving writes for the mirrored VDI.
Error Handling
Storage migration is a long-running process, and is prone to failures in each
step. Hence it is important specifying what errors could be raised at each step
and their significance. This is beneficial both for the user and for triaging.
There are two general cleanup functions in SXM: MIRROR.receive_cancel and
MIRROR.stop. The former is for cleaning up whatever has been created by MIRROR.receive_start
on the destination host (such as VDIs for receiving mirrored data). The latter is
a more comprehensive function that attempts to “undo” all the side effects that
was done during the SXM, and also calls receive_cancel as part of its operations.
Currently error handling was done by building up a list of cleanup functions in
the on_fail list ref as the function executes. For example, if the receive_start
has been completed successfully, add receive_cancel to the list of cleanup functions.
And whenever an exception is encountered, just execute whatever has been added
to the on_fail list ref. This is convenient, but does entangle all the error
handling logic with the core SXM logic itself, making the code rather than hard
to understand and maintain.
The idea to fix this is to introduce explicit “stages” during the SXM and define
explicitly what error handling should be done if it fails at a certain stage. This
helps separate the error handling logic into the with part of a try with block,
which is where they are supposed to be. Since we need to accommodate the existing
SMAPIv1 migration (which has more stages than SMAPIv3), the following stages are
introduced: preparation (v1,v3), snapshot(v1), mirror(v1, v3), copy(v1). Note that
each stage also roughly corresponds to a helper function that is called within Storage_migrate.start,
which is the wrapper function that initiates storage migration. And each helper
functions themselves would also have error handling logic within themselves as
needed (e.g. see Storage_smapiv1_migrate.receive_start) to deal with exceptions
that happen within each helper functions.
Preparation (SMAPIv1 and SMAPIv3)
The preparation stage generally corresponds to what is done in receive_start, and
this function itself will handle exceptions when there are partial failures within
the function itself, such as an exception after the receiving VDI is created.
It will use the old-style on_fail function but only with a limited scope.
There is nothing to be done at a higher level (i.e within MIRROR.start which
calls receive_start) if preparation has failed.
Snapshot and mirror failure (SMAPIv1)
For SMAPIv1, the mirror is done in a bit cumbersome way. The end goal is to establish
connections between two tapdisk processes on the source and destination hosts.
To achieve this goal, xapi will do two main jobs: 1. create a connection between two
hosts and pass the connection to tapdisk; 2. create a snapshot as a starting point
of the mirroring process.
Therefore handling of failures at these two stages are similar: clean up what was
done in the preparation stage by calling receive_cancel, and that is almost it.
Again, we will leave whatever is needed for partial failure handling within those
functions themselves and only clean up at a stage-level in storage_migrate.ml
Note that receive_cancel is a multiplexed function for SMAPIv1 and SMAPIv3, which
means different clean up logic will be executed depending on what type of SR we
are migrating from.
Mirror failure (SMAPIv3)
The Data.stat call in SMAPIv3 returns a data structure that includes the current
progress of the mirror job, whether it has completed syncing the existing data and
whether the mirorr has failed. Similar to how it is done in SMAPIv1, we wait for
the sync to complete once we issue the Data.mirror call, by repeatedly polling
the status of the mirror using the Data.stat call. During this process, the status
of the mirror is also checked and if a failure is detected, a Migration_mirror_failure
will be raised and then gets handled by the code in storage_migrate.ml by calling
Storage_smapiv3_migrate.receive_cancel2, which will clean up the mirror datapath
and destroy the mirror VDI, similar to what is done in SMAPIv1.
Copy failure (SMAPIv1)
The final step of storage migration for SMAPIv1 is to copy the snapshot from the
source to the destination. At this stage, most of the side effectful work has been
done, so we do need to call MIRROR.stop to clean things up if we experience an
failure during copying.
SMAPIv1 Migration implementation detail
Info
The following doc refers to the xapi a version
of xapi that is before 24.37 after which point this code structure has undergone
many changes as part of adding support for SMAPIv3 SXM. Therefore the following
tutorial might be less relevant in terms of the implementation detail. Although
the general principle should remain the same.
sequenceDiagram
participant local_tapdisk as local tapdisk
participant local_smapiv2 as local SMAPIv2
participant xapi
participant remote_xapi as remote xapi
participant remote_smapiv2 as remote SMAPIv2 (might redirect)
participant remote_tapdisk as remote tapdisk
Note over xapi: Sort VDIs increasingly by size and then age
loop VM's & snapshots' VDIs & suspend images
xapi->>remote_xapi: plug dest SR to dest host and pool master
alt VDI is not mirrored
Note over xapi: We don't mirror RO VDIs & VDIs of snapshots
xapi->>local_smapiv2: DATA.copy remote_sm_url
activate local_smapiv2
local_smapiv2-->>local_smapiv2: SR.scan
local_smapiv2-->>local_smapiv2: VDI.similar_content
local_smapiv2-->>remote_smapiv2: SR.scan
Note over local_smapiv2: Find nearest smaller remote VDI remote_base, if any
alt remote_base
local_smapiv2-->>remote_smapiv2: VDI.clone
local_smapiv2-->>remote_smapiv2: VDI.resize
else no remote_base
local_smapiv2-->>remote_smapiv2: VDI.create
end
Note over local_smapiv2: call copy'
activate local_smapiv2
local_smapiv2-->>remote_smapiv2: SR.list
local_smapiv2-->>remote_smapiv2: SR.scan
Note over local_smapiv2: create new datapaths remote_dp, base_dp, leaf_dp
Note over local_smapiv2: find local base_vdi with same content_id as dest, if any
local_smapiv2-->>remote_smapiv2: VDI.attach2 remote_dp dest
local_smapiv2-->>remote_smapiv2: VDI.activate remote_dp dest
opt base_vdi
local_smapiv2-->>local_smapiv2: VDI.attach2 base_dp base_vdi
local_smapiv2-->>local_smapiv2: VDI.activate base_dp base_vdi
end
local_smapiv2-->>local_smapiv2: VDI.attach2 leaf_dp vdi
local_smapiv2-->>local_smapiv2: VDI.activate leaf_dp vdi
local_smapiv2-->>remote_xapi: sparse_dd base_vdi vdi dest [NBD URI for dest & remote_dp]
Note over remote_xapi: HTTP handler verifies credentials
remote_xapi-->>remote_tapdisk: then passes connection to tapdisk's NBD server
local_smapiv2-->>local_smapiv2: VDI.deactivate leaf_dp vdi
local_smapiv2-->>local_smapiv2: VDI.detach leaf_dp vdi
opt base_vdi
local_smapiv2-->>local_smapiv2: VDI.deactivate base_dp base_vdi
local_smapiv2-->>local_smapiv2: VDI.detach base_dp base_vdi
end
local_smapiv2-->>remote_smapiv2: DP.destroy remote_dp
deactivate local_smapiv2
local_smapiv2-->>remote_smapiv2: VDI.snapshot remote_copy
local_smapiv2-->>remote_smapiv2: VDI.destroy remote_copy
local_smapiv2->>xapi: task(snapshot)
deactivate local_smapiv2
else VDI is mirrored
Note over xapi: We mirror RW VDIs of the VM
Note over xapi: create new datapath dp
xapi->>local_smapiv2: VDI.attach2 dp
xapi->>local_smapiv2: VDI.activate dp
xapi->>local_smapiv2: DATA.MIRROR.start dp remote_sm_url
activate local_smapiv2
Note over local_smapiv2: copy disk data & mirror local writes
local_smapiv2-->>local_smapiv2: SR.scan
local_smapiv2-->>local_smapiv2: VDI.similar_content
local_smapiv2-->>remote_smapiv2: DATA.MIRROR.receive_start similars
activate remote_smapiv2
remote_smapiv2-->>local_smapiv2: mirror_vdi,mirror_dp,copy_diffs_from,copy_diffs_to,dummy_vdi
deactivate remote_smapiv2
local_smapiv2-->>local_smapiv2: DP.attach_info dp
local_smapiv2-->>remote_xapi: connect to [NBD URI for mirror_vdi & mirror_dp]
Note over remote_xapi: HTTP handler verifies credentials
remote_xapi-->>remote_tapdisk: then passes connection to tapdisk's NBD server
local_smapiv2-->>local_tapdisk: pass socket & dp to tapdisk of dp
local_smapiv2-->>local_smapiv2: VDI.snapshot local_vdi [mirror:dp]
local_smapiv2-->>local_tapdisk: [Python] unpause disk, pass dp
local_tapdisk-->>remote_tapdisk: mirror new writes via NBD to socket
Note over local_smapiv2: call copy' snapshot copy_diffs_to
local_smapiv2-->>remote_smapiv2: VDI.compose copy_diffs_to mirror_vdi
local_smapiv2-->>remote_smapiv2: VDI.remove_from_sm_config mirror_vdi base_mirror
local_smapiv2-->>remote_smapiv2: VDI.destroy dummy_vdi
local_smapiv2-->>local_smapiv2: VDI.destroy snapshot
local_smapiv2->>xapi: task(mirror ID)
deactivate local_smapiv2
xapi->>local_smapiv2: DATA.MIRROR.stat
activate local_smapiv2
local_smapiv2->>xapi: dest_vdi
deactivate local_smapiv2
end
loop until task finished
xapi->>local_smapiv2: UPDATES.get
xapi->>local_smapiv2: TASK.stat
end
xapi->>local_smapiv2: TASK.stat
xapi->>local_smapiv2: TASK.destroy
end
opt for snapshot VDIs
xapi->>local_smapiv2: SR.update_snapshot_info_src remote_sm_url
activate local_smapiv2
local_smapiv2-->>remote_smapiv2: SR.update_snapshot_info_dest
deactivate local_smapiv2
end
Note over xapi: ...
Note over xapi: reserve resources for the new VM in dest host
loop all VDIs
opt VDI is mirrored
xapi->>local_smapiv2: DP.destroy dp
end
end
opt post_detach_hook
opt active local mirror
local_smapiv2-->>remote_smapiv2: DATA.MIRROR.receive_finalize [mirror ID]
Note over remote_smapiv2: destroy mirror dp
end
end
Note over xapi: memory image migration by xenopsd
Note over xapi: destroy the VM record
Receiving SXM
These are the remote calls in the above diagram sent from the remote host to
the receiving end of storage motion:
Remote SMAPIv2 -> local SMAPIv2 RPC calls:
SR.list
SR.scan
SR.update_snapshot_info_dest
VDI.attach2
VDI.activate
VDI.snapshot
VDI.destroy
For copying:
For copying from base:
VDI.clone
VDI.resize
For copying without base:
VDI.create
For mirroring:
DATA.MIRROR.receive_start
VDI.compose
VDI.remove_from_sm_config
DATA.MIRROR.receive_finalize
HTTP requests to xapi:
Connecting to NBD URI via xapi’s HTTP handler
This is how xapi coordinates storage migration. We’ll do it as a code walkthrough through the two layers: xapi and storage-in-xapi (SMAPIv2).
a dictionary of (string * string) key-value pairs about the destination (dest). This is the result of a previous call to the destination pool, Host.migrate_receive
live, a boolean of whether we should live-migrate or suspend-resume,
vdi_map, a mapping of VDI references to destination SR references,
vif_map, a mapping of VIF references to destination network references,
vgpu_map, similar for VGPUs
options, another dictionary of options
let migrate_send' ~__context ~vm ~dest ~live ~vdi_map ~vif_map ~vgpu_map ~options = SMPERF.debug "vm.migrate_send called vm:%s"(Db.VM.get_uuid ~__context ~self:vm);letopenXapi_xenopsinlet localhost = Helpers.get_localhost ~__context inlet remote = remote_of_dest dest in(* Copy mode means we don't destroy the VM on the source host. We also don't
copy over the RRDs/messages *)let copy =try bool_of_string (List.assoc "copy" options)with_-> false in
It begins by getting the local host reference, deciding whether we’re copying or moving, and converting the input dest parameter from an untyped string association list to a typed record, remote, which is declared further up the file:
type remote ={ rpc : Rpc.call -> Rpc.response; session : API.ref_session; sm_url :string; xenops_url :string; master_url :string; remote_ip :string;(* IP address *) remote_master_ip :string;(* IP address *) dest_host : API.ref_host;}
this contains:
A function, rpc, for calling XenAPI RPCs on the destination
A session valid on the destination
A sm_url on which SMAPIv2 APIs can be called on the destination
A master_url on which XenAPI commands can be called (not currently used)
The IP address, remote_ip, of the destination host
The IP address, remote_master_ip, of the master of the destination pool
Next, we determine which VDIs to copy:
(* The first thing to do is to create mirrors of all the disks on the remote.
We look through the VM's VBDs and all of those of the snapshots. We then
compile a list of all of the associated VDIs, whether we mirror them or not
(mirroring means we believe the VDI to be active and new writes should be
mirrored to the destination - otherwise we just copy it)
We look at the VDIs of the VM, the VDIs of all of the snapshots, and any
suspend-image VDIs. *)let vm_uuid = Db.VM.get_uuid ~__context ~self:vm inlet vbds = Db.VM.get_VBDs ~__context ~self:vm inlet vifs = Db.VM.get_VIFs ~__context ~self:vm inlet snapshots = Db.VM.get_snapshots ~__context ~self:vm inlet vm_and_snapshots = vm :: snapshots inlet snapshots_vbds = List.concat_map (fun self -> Db.VM.get_VBDs ~__context ~self) snapshots inlet snapshot_vifs = List.concat_map (fun self -> Db.VM.get_VIFs ~__context ~self) snapshots in
we now decide whether we’re intra-pool or not, and if we’re intra-pool whether we’re migrating onto the same host (localhost migrate). Intra-pool is decided by trying to do a lookup of our current host uuid on the destination pool.
let is_intra_pool =try ignore(Db.Host.get_uuid ~__context ~self:remote.dest_host); true with_-> false inlet is_same_host = is_intra_pool && remote.dest_host == localhost inif copy && is_intra_pool thenraise(Api_errors.Server_error(Api_errors.operation_not_allowed,["Copy mode is disallowed on intra pool storage migration, try efficient alternatives e.g. VM.copy/clone."]));
Having got all of the VBDs of the VM, we now need to find the associated VDIs, filtering out empty CDs, and decide whether we’re going to copy them or mirror them - read-only VDIs can be copied but RW VDIs must be mirrored.
let vms_vdis = List.filter_map (vdi_filter __context true) vbds in
where vdi_filter is defined earler:
(* We ignore empty or CD VBDs - nothing to do there. Possible redundancy here:
I don't think any VBDs other than CD VBDs can be 'empty' *)let vdi_filter __context allow_mirror vbd =if Db.VBD.get_empty ~__context ~self:vbd || Db.VBD.get_type ~__context ~self:vbd =`CDthenNoneelselet do_mirror = allow_mirror &&(Db.VBD.get_mode ~__context ~self:vbd =`RW)inlet vm = Db.VBD.get_VM ~__context ~self:vbd inlet vdi = Db.VBD.get_VDI ~__context ~self:vbd inSome(get_vdi_mirror __context vm vdi do_mirror)
This in turn calls get_vdi_mirror which gathers together some important info:
type vdi_mirror ={ vdi :[`VDI] API.Ref.t;(* The API reference of the local VDI *) dp :string;(* The datapath the VDI will be using if the VM is running *) location :string;(* The location of the VDI in the current SR *) sr :string;(* The VDI's current SR uuid *) xenops_locator :string;(* The 'locator' xenops uses to refer to the VDI on the current host *) size : Int64.t;(* Size of the VDI *) snapshot_of :[`VDI] API.Ref.t;(* API's snapshot_of reference *) do_mirror :bool;(* Whether we should mirror or just copy the VDI *)}
xenops_locator is <sr uuid>/<vdi uuid>, and dp is vbd/<domid>/<device> if the VM is running and vbd/<vm_uuid>/<vdi_uuid> if not.
So now we have a list of these records for all VDIs attached to the VM. For these we check explicitly that they’re all defined in the vdi_map, the mapping of VDI references to their destination SR references.
check_vdi_map ~__context vms_vdis vdi_map;
We then figure out the VIF map:
let vif_map =if is_intra_pool then vif_map
else infer_vif_map ~__context (vifs @ snapshot_vifs) vif_map
in
More sanity checks: We can’t do a storage migration if any of the VDIs is a reset-on-boot one - since the state will be lost on the destination when it’s attached:
(* Block SXM when VM has a VDI with on_boot=reset *) List.(iter (fun vconf ->let vdi = vconf.vdi inif(Db.VDI.get_on_boot ~__context ~self:vdi ==`reset)thenraise(Api_errors.Server_error(Api_errors.vdi_on_boot_mode_incompatible_with_operation,[Ref.string_of vdi]))) vms_vdis);
We now consider all of the VDIs associated with the snapshots. As for the VM’s VBDs above, we end up with a vdi_mirror list. Note we pass false to the allow_mirror parameter of the get_vdi_mirror function as none of these snapshot VDIs will ever require mirrorring.
let snapshots_vdis = List.filter_map (vdi_filter __context false)
Finally we get all of the suspend-image VDIs from all snapshots as well as the actual VM, since it might be suspended itself:
snapshots_vbds inlet suspends_vdis = List.fold_left
(fun acc vm ->if Db.VM.get_power_state ~__context ~self:vm =`Suspendedthenlet vdi = Db.VM.get_suspend_VDI ~__context ~self:vm inlet sr = Db.VDI.get_SR ~__context ~self:vdi inif is_intra_pool && Helpers.host_has_pbd_for_sr ~__context ~host:remote.dest_host ~sr
then acc
else(get_vdi_mirror __context vm vdi false):: acc
else acc) [] vm_and_snapshots in
Sanity check that we can see all of the suspend-image VDIs on this host:
(* Double check that all of the suspend VDIs are all visible on the source *) List.iter (fun vdi_mirror ->let sr = Db.VDI.get_SR ~__context ~self:vdi_mirror.vdi inif not (Helpers.host_has_pbd_for_sr ~__context ~host:localhost ~sr)thenraise(Api_errors.Server_error(Api_errors.suspend_image_not_accessible,[ Ref.string_of vdi_mirror.vdi ]))) suspends_vdis;
Next is a fairly complex piece that determines the destination SR for all of these VDIs. We don’t require API uses to decide destinations for all of the VDIs on snapshots and hence we have to make some decisions here:
let dest_pool = List.hd (XenAPI.Pool.get_all remote.rpc remote.session)inlet default_sr_ref = XenAPI.Pool.get_default_SR remote.rpc remote.session dest_pool inlet suspend_sr_ref =let pool_suspend_SR = XenAPI.Pool.get_suspend_image_SR remote.rpc remote.session dest_pool
and host_suspend_SR = XenAPI.Host.get_suspend_image_sr remote.rpc remote.session remote.dest_host inif pool_suspend_SR <> Ref.null then pool_suspend_SR else host_suspend_SR in(* Resolve placement of unspecified VDIs here - unspecified VDIs that
are 'snapshot_of' a specified VDI go to the same place. suspend VDIs
that are unspecified go to the suspend_sr_ref defined above *)let extra_vdis = suspends_vdis @ snapshots_vdis inlet extra_vdi_map = List.map
(fun vconf ->let dest_sr_ref =let is_mapped = List.mem_assoc vconf.vdi vdi_map
and snapshot_of_is_mapped = List.mem_assoc vconf.snapshot_of vdi_map
and is_suspend_vdi = List.mem vconf suspends_vdis
and remote_has_suspend_sr = suspend_sr_ref <> Ref.null
and remote_has_default_sr = default_sr_ref <> Ref.null inlet log_prefix = Printf.sprintf "Resolving VDI->SR map for VDI %s:"(Db.VDI.get_uuid ~__context ~self:vconf.vdi)inif is_mapped thenbegin debug "%s VDI has been specified in the map" log_prefix; List.assoc vconf.vdi vdi_map
endelseif snapshot_of_is_mapped thenbegin debug "%s Snapshot VDI has entry in map for it's snapshot_of link" log_prefix; List.assoc vconf.snapshot_of vdi_map
endelseif is_suspend_vdi && remote_has_suspend_sr thenbegin debug "%s Mapping suspend VDI to remote suspend SR" log_prefix; suspend_sr_ref
endelseif is_suspend_vdi && remote_has_default_sr thenbegin debug "%s Remote suspend SR not set, mapping suspend VDI to remote default SR" log_prefix; default_sr_ref
endelseif remote_has_default_sr thenbegin debug "%s Mapping unspecified VDI to remote default SR" log_prefix; default_sr_ref
endelsebegin error "%s VDI not in VDI->SR map and no remote default SR is set" log_prefix;raise(Api_errors.Server_error(Api_errors.vdi_not_in_map,[ Ref.string_of vconf.vdi ]))endin(vconf.vdi, dest_sr_ref)) extra_vdis in
At the end of this we’ve got all of the VDIs that need to be copied and destinations for all of them:
let vdi_map = vdi_map @ extra_vdi_map inlet all_vdis = vms_vdis @ extra_vdis in(* The vdi_map should be complete at this point - it should include all the
VDIs in the all_vdis list. *)
check there’s no CBT (we can’t currently migrate the CBT metadata), make our client to talk to Xenopsd, make a mutable list of remote VDIs (which I think is redundant right now), decide whether we need to do anything for HA (we disable HA protection for this VM on the destination until it’s fully migrated) and eject any CDs from the VM.
Up until now this has mostly been gathering info (aside from the ejecting CDs bit), but now we’ll start to do some actions, so we begin a try-catch block:
try
but we’ve still got a bit of thinking to do: we sort the VDIs to copy based on age/size:
(* Sort VDIs by size in principle and then age secondly. This gives better
chances that similar but smaller VDIs would arrive comparatively
earlier, which can serve as base for incremental copying the larger
ones. *)let compare_fun v1 v2 =let r = Int64.compare v1.size v2.size inif r = 0 thenlet t1 = Date.to_unix_time (Db.VDI.get_snapshot_time ~__context ~self:v1.vdi)inlet t2 = Date.to_unix_time (Db.VDI.get_snapshot_time ~__context ~self:v2.vdi)in compare t1 t2
else r inlet all_vdis = all_vdis |> List.sort compare_fun inlet total_size = List.fold_left (fun acc vconf -> Int64.add acc vconf.size) 0L all_vdis inlet so_far = ref 0L in
The copy functions are written such that they take continuations. This it to make the error handling simpler - each individual component function can perform its setup and execute the continuation. In the event of an exception coming from the continuation it can then unroll its bit of state and rethrow the exception for the next layer to handle.
with_many is a simple helper function for nesting invocations of functions that take continuations. It has the delightful type:
('a -> ('b -> 'c) -> 'c) -> 'a list -> ('b list -> 'c) -> 'c
(* Helper function to apply a 'with_x' function to a list *)letrec with_many withfn many fn =letrec inner l acc =match l with| [] -> fn acc
| x::xs -> withfn x (fun y -> inner xs (y::acc))in inner many []
As an example of its operation, imagine our withfn is as follows:
let withfn x c = Printf.printf "Starting withfn: x=%d\n" x;try c (string_of_int x)with e -> Printf.printf "Handling exception for x=%d\n" x;raise e;;
All the real action is in vdi_copy_fun, which copies or mirrors a single VDI:
let vdi_copy_fun __context dbg vdi_map remote is_intra_pool remote_vdis so_far total_size copy vconf continuation = TaskHelper.exn_if_cancelling ~__context;letopenStorage_accessinlet dest_sr_ref = List.assoc vconf.vdi vdi_map inlet dest_sr_uuid = XenAPI.SR.get_uuid remote.rpc remote.session dest_sr_ref in(* Plug the destination shared SR into destination host and pool master if unplugged.
Plug the local SR into destination host only if unplugged *)let dest_pool = List.hd (XenAPI.Pool.get_all remote.rpc remote.session)inlet master_host = XenAPI.Pool.get_master remote.rpc remote.session dest_pool inlet pbds = XenAPI.SR.get_PBDs remote.rpc remote.session dest_sr_ref inlet pbd_host_pair = List.map (fun pbd ->(pbd, XenAPI.PBD.get_host remote.rpc remote.session pbd)) pbds inlet hosts_to_be_attached =[master_host; remote.dest_host]inlet pbds_to_be_plugged = List.filter (fun(_, host)->(List.mem host hosts_to_be_attached)&&(XenAPI.Host.get_enabled remote.rpc remote.session host)) pbd_host_pair in List.iter (fun(pbd,_)->if not (XenAPI.PBD.get_currently_attached remote.rpc remote.session pbd)then XenAPI.PBD.plug remote.rpc remote.session pbd) pbds_to_be_plugged;
It begins by attempting to ensure the SRs we require are definitely attached on the destination host and on the destination pool master.
There’s now a little logic to support the case where we have cross-pool SRs and the VDI is already visible to the destination pool. Since this is outside our normal support envelope there is a key in xapi_globs that has to be set (via xapi.conf) to enable this:
letrec dest_vdi_exists_on_sr vdi_uuid sr_ref retry =trylet dest_vdi_ref = XenAPI.VDI.get_by_uuid remote.rpc remote.session vdi_uuid inlet dest_vdi_sr_ref = XenAPI.VDI.get_SR remote.rpc remote.session dest_vdi_ref inif dest_vdi_sr_ref = sr_ref then true
else false
with_->if retry thenbegin XenAPI.SR.scan remote.rpc remote.session sr_ref; dest_vdi_exists_on_sr vdi_uuid sr_ref false
endelse false
in(* CP-4498 added an unsupported mode to use cross-pool shared SRs - the initial
use case is for a shared raw iSCSI SR (same uuid, same VDI uuid) *)let vdi_uuid = Db.VDI.get_uuid ~__context ~self:vconf.vdi inlet mirror =if!Xapi_globs.relax_xsm_sr_check thenif(dest_sr_uuid = vconf.sr)thenbegin(* Check if the VDI uuid already exists in the target SR *)if(dest_vdi_exists_on_sr vdi_uuid dest_sr_ref true)then false
else failwith ("SR UUID matches on destination but VDI does not exist")endelse true
else(not is_intra_pool)||(dest_sr_uuid <> vconf.sr)in
The check also covers the case where we’re doing an intra-pool migration and not copying all of the disks, in which case we don’t need to do anything for that disk.
We now have a wrapper function that creates a new datapath and passes it to a continuation function. On error it handles the destruction of the datapath:
let with_new_dp cont =let dp = Printf.sprintf (if vconf.do_mirror then"mirror_%s"else"copy_%s") vconf.dp intry cont dp
with e ->(try SMAPI.DP.destroy ~dbg ~dp ~allow_leak:false with_-> info "Failed to cleanup datapath: %s" dp);raise e in
and now a helper that, given a remote VDI uuid, looks up the reference on the remote host and gives it to a continuation function. On failure of the continuation it will destroy the remote VDI:
let with_remote_vdi remote_vdi cont = debug "Executing remote scan to ensure VDI is known to xapi"; XenAPI.SR.scan remote.rpc remote.session dest_sr_ref;let query = Printf.sprintf "(field \"location\"=\"%s\") and (field \"SR\"=\"%s\")" remote_vdi (Ref.string_of dest_sr_ref)inlet vdis = XenAPI.VDI.get_all_records_where remote.rpc remote.session query inlet remote_vdi_ref =match vdis with| [] ->raise(Api_errors.Server_error(Api_errors.vdi_location_missing,[Ref.string_of dest_sr_ref; remote_vdi]))| h :: [] -> debug "Found remote vdi reference: %s"(Ref.string_of (fst h)); fst h
|_->raise(Api_errors.Server_error(Api_errors.location_not_unique,[Ref.string_of dest_sr_ref; remote_vdi]))intry cont remote_vdi_ref
with e ->(try XenAPI.VDI.destroy remote.rpc remote.session remote_vdi_ref with_-> error "Failed to destroy remote VDI");raise e in
another helper to gather together info about a mirrored VDI:
let mirror_to_remote new_dp =let task =if not vconf.do_mirror then SMAPI.DATA.copy ~dbg ~sr:vconf.sr ~vdi:vconf.location ~dp:new_dp ~url:remote.sm_url ~dest:dest_sr_uuid
elsebegin(* Though we have no intention of "write", here we use the same mode as the
associated VBD on a mirrored VDIs (i.e. always RW). This avoids problem
when we need to start/stop the VM along the migration. *)let read_write = true in(* DP set up is only essential for MIRROR.start/stop due to their open ended pattern.
It's not necessary for copy which will take care of that itself. *) ignore(SMAPI.VDI.attach ~dbg ~dp:new_dp ~sr:vconf.sr ~vdi:vconf.location ~read_write); SMAPI.VDI.activate ~dbg ~dp:new_dp ~sr:vconf.sr ~vdi:vconf.location; ignore(Storage_access.register_mirror __context vconf.location); SMAPI.DATA.MIRROR.start ~dbg ~sr:vconf.sr ~vdi:vconf.location ~dp:new_dp ~url:remote.sm_url ~dest:dest_sr_uuid
endinlet mapfn x =let total = Int64.to_float total_size inlet done_ = Int64.to_float !so_far /. total inlet remaining = Int64.to_float vconf.size /. total in done_ +. x *. remaining inletopenStorage_accessinlet task_result = task |> register_task __context
|> add_to_progress_map mapfn
|> wait_for_task dbg
|> remove_from_progress_map
|> unregister_task __context
|> success_task dbg inlet mirror_id, remote_vdi =if not vconf.do_mirror thenlet vdi = task_result |> vdi_of_task dbg in remote_vdis := vdi.vdi ::!remote_vdis;None, vdi.vdi
elselet mirrorid = task_result |> mirror_of_task dbg inlet m = SMAPI.DATA.MIRROR.stat ~dbg ~id:mirrorid inSome mirrorid, m.Mirror.dest_vdi in so_far := Int64.add !so_far vconf.size; debug "Local VDI %s %s to %s" vconf.location (if vconf.do_mirror then"mirrored"else"copied") remote_vdi; mirror_id, remote_vdi in
This is the bit that actually starts the mirroring or copying. Before the call to mirror we call VDI.attach and VDI.activate locally to ensure that if the VM is shutdown then the detach/deactivate there doesn’t kill the mirroring process.
Note the parameters to the SMAPI call are sr and vdi, locating the local VDI and SM backend, new_dp, the datapath we’re using for the mirroring, url, which is the remote url on which SMAPI calls work, and dest, the destination SR uuid. These are also the arguments to copy above too.
There’s a little function to calculate the overall progress of the task, and the function waits until the completion of the task before it continues. The function success_task will raise an exception if the task failed. For DATA.mirror, completion implies both that the disk data has been copied to the destination and that all local writes are being mirrored to the destination. Hence more cleanup must be done on cancellation. In contrast, if the DATA.copy path had been taken then the operation at this point has completely finished.
The result of this function is an optional mirror id and the remote VDI uuid.
Next, there is a post_mirror function:
let post_mirror mirror_id mirror_record =trylet result = continuation mirror_record in(match mirror_id with|Some mid -> ignore(Storage_access.unregister_mirror mid);|None-> ());if mirror && not (Xapi_fist.storage_motion_keep_vdi () || copy)then Helpers.call_api_functions ~__context (fun rpc session_id -> XenAPI.VDI.destroy rpc session_id vconf.vdi); result
with e ->let mirror_failed =match mirror_id with|Some mid -> ignore(Storage_access.unregister_mirror mid);let m = SMAPI.DATA.MIRROR.stat ~dbg ~id:mid in(try SMAPI.DATA.MIRROR.stop ~dbg ~id:mid with_-> ()); m.Mirror.failed
|None-> false inif mirror_failed thenraise(Api_errors.Server_error(Api_errors.mirror_failed,[Ref.string_of vconf.vdi]))elseraise e in
This is poorly named - it is post mirror and copy. The aim of this function is to destroy the source VDIs on successful completion of the continuation function, which will have migrated the VM to the destination. In its exception handler it will stop the mirroring, but before doing so it will check to see if the mirroring process it was looking after has itself failed, and raise mirror_failed if so. This is because a failed mirror can result in a range of actual errors, and we decide here that the failed mirror was probably the root cause.
These functions are assembled together at the end of the vdi_copy_fun function:
if mirror then
with_new_dp (fun new_dp ->
let mirror_id, remote_vdi = mirror_to_remote new_dp in
with_remote_vdi remote_vdi (fun remote_vdi_ref ->
let mirror_record = get_mirror_record ~new_dp remote_vdi remote_vdi_ref in
post_mirror mirror_id mirror_record))
else
let mirror_record = get_mirror_record vconf.location (XenAPI.VDI.get_by_uuid remote.rpc remote.session vdi_uuid) in
continuation mirror_record
again, mirror here is poorly named, and means mirror or copy.
Once all of the disks have been mirrored or copied, we jump back to the body of migrate_send. We split apart the mirror records according to the source of the VDI:
then we reassemble all_map from this, for some reason:
let all_map = List.concat [suspends_map; snapshots_map; vdi_map]in
Now we need to update the snapshot-of links:
(* All the disks and snapshots have been created in the remote SR(s),
* so update the snapshot links if there are any snapshots. *)if snapshots_map <> [] then update_snapshot_info ~__context ~dbg ~url:remote.sm_url ~vdi_map ~snapshots_map;
I’m not entirely sure why this is done in this layer as opposed to in the storage layer.
A little housekeeping:
let xenops_vdi_map = List.map (fun mirror_record ->(mirror_record.mr_local_xenops_locator, mirror_record.mr_remote_xenops_locator)) all_map in(* Wait for delay fist to disappear *) wait_for_fist __context Xapi_fist.pause_storage_migrate "pause_storage_migrate"; TaskHelper.exn_if_cancelling ~__context;
the fist thing here simply allows tests to put in a delay at this specific point.
We also check the task to see if we’ve been cancelled and raise an exception if so.
The VM metadata is now imported into the remote pool, with all the XenAPI level objects remapped:
let new_vm =if is_intra_pool
then vm
else(* Make sure HA replaning cycle won't occur right during the import process or immediately after *)let () =if ha_always_run_reset then XenAPI.Pool.ha_prevent_restarts_for ~rpc:remote.rpc ~session_id:remote.session ~seconds:(Int64.of_float !Xapi_globs.ha_monitor_interval)in(* Move the xapi VM metadata to the remote pool. *)let vms =let vdi_map = List.map (fun mirror_record ->{ local_vdi_reference = mirror_record.mr_local_vdi_reference; remote_vdi_reference =Some mirror_record.mr_remote_vdi_reference;}) all_map inlet vif_map = List.map (fun(vif, network)->{ local_vif_reference = vif; remote_network_reference = network;}) vif_map inlet vgpu_map = List.map (fun(vgpu, gpu_group)->{ local_vgpu_reference = vgpu; remote_gpu_group_reference = gpu_group;}) vgpu_map
in inter_pool_metadata_transfer ~__context ~remote ~vm ~vdi_map
~vif_map ~vgpu_map ~dry_run:false ~live:true ~copy
inlet vm = List.hd vms inlet () =if ha_always_run_reset then XenAPI.VM.set_ha_always_run ~rpc:remote.rpc ~session_id:remote.session ~self:vm ~value:false in(* Reserve resources for the new VM on the destination pool's host *)let () = XenAPI.Host.allocate_resources_for_vm remote.rpc remote.session remote.dest_host vm true in vm in
also make sure all the networks are plugged for the VM on the destination.
Next we create the xenopsd-level vif map, equivalent to the vdi_map above:
(* Create the vif-map for xenops, linking VIF devices to bridge names on the remote *)let xenops_vif_map =let vifs = XenAPI.VM.get_VIFs ~rpc:remote.rpc ~session_id:remote.session ~self:new_vm in List.map (fun vif ->let vifr = XenAPI.VIF.get_record ~rpc:remote.rpc ~session_id:remote.session ~self:vif inlet bridge = Xenops_interface.Network.Local(XenAPI.Network.get_bridge ~rpc:remote.rpc ~session_id:remote.session ~self:vifr.API.vIF_network)in vifr.API.vIF_device, bridge
) vifs
in
Now we destroy any extra mirror datapaths we set up previously:
(* Destroy the local datapaths - this allows the VDIs to properly detach, invoking the migrate_finalize calls *) List.iter (fun mirror_record ->if mirror_record.mr_mirrored
thenmatch mirror_record.mr_dp with|Some dp -> SMAPI.DP.destroy ~dbg ~dp ~allow_leak:false |None-> ()) all_map;
More housekeeping:
SMPERF.debug "vm.migrate_send: migration initiated vm:%s" vm_uuid;(* In case when we do SXM on the same host (mostly likely a VDI
migration), the VM's metadata in xenopsd will be in-place updated
as soon as the domain migration starts. For these case, there
will be no (clean) way back from this point. So we disable task
cancellation for them here.
*)if is_same_host then(TaskHelper.exn_if_cancelling ~__context; TaskHelper.set_not_cancellable ~__context);
Finally we get to the memory-image part of the migration:
(* It's acceptable for the VM not to exist at this point; shutdown commutes with storage migrate *)begintry Xapi_xenops.Events_from_xenopsd.with_suppressed queue_name dbg vm_uuid
(fun () ->let xenops_vgpu_map =(* can raise VGPU_mapping *) infer_vgpu_map ~__context ~remote new_vm in migrate_with_retry
~__context queue_name dbg vm_uuid xenops_vdi_map
xenops_vif_map xenops_vgpu_map remote.xenops_url; Xapi_xenops.Xenopsd_metadata.delete ~__context vm_uuid)with| Xenops_interface.Does_not_exist("VM",_)| Xenops_interface.Does_not_exist("extra",_)-> info "%s: VM %s stopped being live during migration""vm_migrate_send" vm_uuid
|VGPU_mapping(msg)-> info "%s: VM %s - can't infer vGPU map: %s""vm_migrate_send" vm_uuid msg;raise Api_errors.
(Server_error(vm_migrate_failed,([ vm_uuid
; Helpers.get_localhost_uuid ()
; Db.Host.get_uuid ~__context ~self:remote.dest_host
;"The VM changed its power state during migration"])))end; debug "Migration complete"; SMPERF.debug "vm.migrate_send: migration complete vm:%s" vm_uuid;
Now we tidy up after ourselves:
(* So far the main body of migration is completed, and the rests are
updates, config or cleanup on the source and destination. There will
be no (clean) way back from this point, due to these destructive
changes, so we don't want user intervention e.g. task cancellation.
*) TaskHelper.exn_if_cancelling ~__context; TaskHelper.set_not_cancellable ~__context; XenAPI.VM.pool_migrate_complete remote.rpc remote.session new_vm remote.dest_host; detach_local_network_for_vm ~__context ~vm ~destination:remote.dest_host; Xapi_xenops.refresh_vm ~__context ~self:vm;
the function pool_migrate_complete is called on the destination host, and consists of a few things that ordinarily would be set up during VM.start or the like:
let pool_migrate_complete ~__context ~vm ~host =let id = Db.VM.get_uuid ~__context ~self:vm in debug "VM.pool_migrate_complete %s" id;let dbg = Context.string_of_task __context inlet queue_name = Xapi_xenops_queue.queue_of_vm ~__context ~self:vm inif Xapi_xenops.vm_exists_in_xenopsd queue_name dbg id thenbegin Cpuid_helpers.update_cpu_flags ~__context ~vm ~host; Xapi_xenops.set_resident_on ~__context ~self:vm; Xapi_xenops.add_caches id; Xapi_xenops.refresh_vm ~__context ~self:vm; Monitor_dbcalls_cache.clear_cache_for_vm ~vm_uuid:id
end
More tidying up, remapping some remaining VBDs and clearing state on the sender:
(* Those disks that were attached at the point the migration happened will have been
remapped by the Events_from_xenopsd logic. We need to remap any other disks at
this point here *)if is_intra_pool
then List.iter
(fun vm' -> intra_pool_vdi_remap ~__context vm' all_map; intra_pool_fix_suspend_sr ~__context remote.dest_host vm') vm_and_snapshots;(* If it's an inter-pool migrate, the VBDs will still be 'currently-attached=true'
because we supressed the events coming from xenopsd. Destroy them, so that the
VDIs can be destroyed *)if not is_intra_pool && not copy
then List.iter (fun vbd -> Db.VBD.destroy ~__context ~self:vbd)(vbds @ snapshots_vbds); new_vm
in
The remark about the Events_from_xenopsd is that we have a thread watching for events that are emitted by xenopsd, and we resynchronise xapi’s state according to xenopsd’s state for several fields for which xenopsd is considered the canonical source of truth. One of these is the exact VDI the VBD is associated with.
The suspend_SR field of the VM is set to the source’s value, so we reset that.
Now we move the RRDs:
if not copy thenbegin Rrdd_proxy.migrate_rrd ~__context ~remote_address:remote.remote_ip ~session_id:(Ref.string_of remote.session)~vm_uuid:vm_uuid ~host_uuid:(Ref.string_of remote.dest_host) ()
end;
This can be done for intra- and inter- pool migrates in the same way, simplifying the logic.
However, for messages and blobs we have to only migrate them for inter-pool migrations:
if not is_intra_pool && not copy thenbegin(* Replicate HA runtime flag if necessary *)if ha_always_run_reset then XenAPI.VM.set_ha_always_run ~rpc:remote.rpc ~session_id:remote.session ~self:new_vm ~value:true;(* Send non-database metadata *) Xapi_message.send_messages ~__context ~cls:`VM~obj_uuid:vm_uuid
~session_id:remote.session ~remote_address:remote.remote_master_ip; Xapi_blob.migrate_push ~__context ~rpc:remote.rpc
~remote_address:remote.remote_master_ip ~session_id:remote.session ~old_vm:vm ~new_vm ;(* Signal the remote pool that we're done *)end;
Lastly, we destroy the VM record on the source:
Helpers.call_api_functions ~__context (fun rpc session_id ->if not is_intra_pool && not copy thenbegin info "Destroying VM ref=%s uuid=%s"(Ref.string_of vm) vm_uuid; Xapi_vm_lifecycle.force_state_reset ~__context ~self:vm ~value:`Halted; List.iter (fun self -> Db.VM.destroy ~__context ~self) vm_and_snapshots
end); SMPERF.debug "vm.migrate_send exiting vm:%s" vm_uuid; new_vm
The exception handler still has to clean some state, but mostly things are handled in the CPS functions declared above:
with e -> error "Caught %s: cleaning up"(Printexc.to_string e);(* We do our best to tidy up the state left behind *) Events_from_xenopsd.with_suppressed queue_name dbg vm_uuid (fun () ->trylet_, state = XenopsAPI.VM.stat dbg vm_uuid inif Xenops_interface.(state.Vm.power_state =Suspended)thenbegin debug "xenops: %s: shutting down suspended VM" vm_uuid; Xapi_xenops.shutdown ~__context ~self:vm None;end;with_-> ());if not is_intra_pool && Db.is_valid_ref __context vm thenbegin List.map (fun self -> Db.VM.get_uuid ~__context ~self) vm_and_snapshots
|> List.iter (fun self ->trylet vm_ref = XenAPI.VM.get_by_uuid remote.rpc remote.session self in info "Destroying stale VM uuid=%s on destination host" self; XenAPI.VM.destroy remote.rpc remote.session vm_ref
with e -> error "Caught %s while destroying VM uuid=%s on destination host"(Printexc.to_string e) self)end;let task = Context.get_task_id __context inlet oc = Db.Task.get_other_config ~__context ~self:task inif List.mem_assoc "mirror_failed" oc thenbeginlet failed_vdi = List.assoc "mirror_failed" oc inlet vconf = List.find (fun vconf -> vconf.location=failed_vdi) vms_vdis in debug "Mirror failed for VDI: %s" failed_vdi;raise(Api_errors.Server_error(Api_errors.mirror_failed,[Ref.string_of vconf.vdi]))end; TaskHelper.exn_if_cancelling ~__context;beginmatch e with| Storage_interface.Backend_error(code, params)->raise(Api_errors.Server_error(code, params))| Storage_interface.Unimplemented(code)->raise(Api_errors.Server_error(Api_errors.unimplemented_in_sm_backend,[code]))| Xenops_interface.Cancelled_-> TaskHelper.raise_cancelled ~__context
|_->raise e
end
Failures during the migration can result in the VM being in a suspended state. There’s no point leaving it like this since there’s nothing that can be done to resume it, so we force shut it down.
We also try to remove the VM record from the destination if we managed to send it there.
Finally we check for mirror failure in the task - this is set by the events thread watching for events from the storage layer, in storage_access.ml
Storage code
The part of the code that is conceptually in the storage layer, but physically in xapi, is located in
storage_migrate.ml. There are logically a few separate parts to this file:
A stateful module for persisting state across xapi restarts.
Let’s start by considering the way the storage APIs are intended to be used.
Copying a VDI
DATA.copy takes several parameters:
dbg - a debug string
sr - the source SR (a uuid)
vdi - the source VDI (a uuid)
dp - unused
url - a URL on which SMAPIv2 API calls can be made
sr - the destination SR in which the VDI should be copied
and returns a parameter of type Task.id. The API call is intended to be called in an asynchronous fashion - ie., the caller makes the call, receives the task ID back and polls or uses the event mechanism to wait until the task has completed. The task may be cancelled via the Task.cancel API call. The result of the operation is obtained by calling TASK.stat, which returns a record:
type t ={ id: id; dbg:string; ctime:float; state: state; subtasks:(string* state)list; debug_info:(string*string)list; backtrace:string;}
Where the state field contains the result once the task has completed:
type async_result_t =|Vdi_infoof vdi_info
|Mirror_idof Mirror.id
type completion_t ={ duration :float; result : async_result_t option
}type state =|Pendingoffloat|Completedof completion_t
|Failedof Rpc.t
Once the result has been obtained from the task, the task should be destroyed via the TASK.destroy API call.
The implementation uses the url parameter to make SMAPIv2 calls to the destination SR. This is used, for example, to invoke a VDI.create call if necessary. The URL contains an authentication token within it (valid for the duration of the XenAPI call that caused this DATA.copy API call).
The implementation tries to minimize the amount of data copied by looking for related VDIs on the destination SR. See below for more details.
Mirroring a VDI
DATA.MIRROR.start takes a similar set of parameters to that of copy:
dbg - a debug string
sr - the source SR (a uuid)
vdi - the source VDI (a uuid)
dp - the datapath on which the VDI has been attached
url - a URL on which SMAPIv2 API calls can be made
sr - the destination SR in which the VDI should be copied
Similar to copy above, this returns a task id. The task ‘completes’ once the mirror has been set up - that is, at any point afterwards we can detach the disk and the destination disk will be identical to the source. Unlike for copy the operation is ongoing after the API call completes, since new writes need to be mirrored to the destination. Therefore the completion type of the mirror operation is Mirror_id which contains a handle on which further API calls related to the mirror call can be made. For example MIRROR.stat whose signature is:
Here we are constructing a module Remote on which we can do SMAPIv2 calls directly on the destination.
try
Wrap the whole function in an exception handler.
(* Find the local VDI *)let vdis = Local.SR.scan ~dbg ~sr inlet local_vdi =try List.find (fun x -> x.vdi = vdi) vdis
withNot_found-> failwith (Printf.sprintf "Local VDI %s not found" vdi)in
We first find the metadata for our source VDI by doing a local SMAPIv2 call SR.scan. This returns a list of VDI metadata, out of which we extract the VDI we’re interested in.
try
Another exception handler. This looks redundant to me right now.
let similar_vdis = Local.VDI.similar_content ~dbg ~sr ~vdi in
let similars = List.map (fun vdi -> vdi.content_id) similar_vdis in
debug "Similar VDIs to %s = [ %s ]" vdi (String.concat "; " (List.map (fun x -> Printf.sprintf "(vdi=%s,content_id=%s)" x.vdi x.content_id) similar_vdis));
Here we look for related VDIs locally using the VDI.similar_content SMAPIv2 API call. This searches for related VDIs and returns an ordered list where the most similar is first in the list. It returns both clones and snapshots, and hence is more general than simply following snapshot_of links.
let remote_vdis = Remote.SR.scan ~dbg ~sr:dest in
(** We drop cbt_metadata VDIs that do not have any actual data *)
let remote_vdis = List.filter (fun vdi -> vdi.ty <> "cbt_metadata") remote_vdis in
let nearest = List.fold_left
(fun acc content_id -> match acc with
| Some x -> acc
| None ->
try Some (List.find (fun vdi -> vdi.content_id = content_id && vdi.virtual_size <= local_vdi.virtual_size) remote_vdis)
with Not_found -> None) None similars in
debug "Nearest VDI: content_id=%s vdi=%s"
(Opt.default "None" (Opt.map (fun x -> x.content_id) nearest))
(Opt.default "None" (Opt.map (fun x -> x.vdi) nearest));
Here we look for VDIs on the destination with the same content_id as one of the locally similar VDIs. We will use this as a base image and only copy deltas to the destination. This is done by cloning the VDI on the destination and then using sparse_dd to find the deltas from our local disk to our local copy of the content_id disk and streaming these to the destination. Note that we need to ensure the VDI is smaller than the one we want to copy since we can’t resize disks downwards in size.
If we’ve found a base VDI we clone it and resize it immediately. If there’s nothing on the destination already we can use, we just create a new VDI. Note that the calls to create and clone may well fail if the destination host is not the SRmaster. This is handled purely in the rpc function:
letrec rpc ~srcstr ~dststr url call =let result = XMLRPC_protocol.rpc ~transport:(transport_of_url url)~srcstr ~dststr ~http:(xmlrpc ~version:"1.0"?auth:(Http.Url.auth_of url)~query:(Http.Url.get_query_params url)(Http.Url.get_uri url)) call
inif not result.Rpc.success thenbegin debug "Got failure: checking for redirect"; debug "Call was: %s"(Rpc.string_of_call call); debug "result.contents: %s"(Jsonrpc.to_string result.Rpc.contents);match Storage_interface.Exception.exnty_of_rpc result.Rpc.contents with| Storage_interface.Exception.Redirect(Some ip)->letopen Http.Urlinlet newurl =match url with|(Http h, d)->(Http{h with host=ip}, d)|_-> remote_url ip in debug "Redirecting to ip: %s" ip;let r = rpc ~srcstr ~dststr newurl call in debug "Successfully redirected. Returning"; r
|_-> debug "Not a redirect"; result
endelse result
Back to the copy function:
let remote_copy = copy' ~task ~dbg ~sr ~vdi ~url ~dest ~dest_vdi:remote_base.vdi |> vdi_info in
This calls the actual data copy part. See below for more on that.
let snapshot = Remote.VDI.snapshot ~dbg ~sr:dest ~vdi_info:remote_copy in Remote.VDI.destroy ~dbg ~sr:dest ~vdi:remote_copy.vdi;Some(Vdi_info snapshot)
Finally we snapshot the remote VDI to ensure we’ve got a VDI of type ‘snapshot’ on the destination, and we delete the non-snapshot VDI.
with e -> error "Caught %s: copying snapshots vdi"(Printexc.to_string e);raise(Internal_error(Printexc.to_string e))with|Backend_error(code, params)| Api_errors.Server_error(code, params)->raise(Backend_error(code, params))| e ->raise(Internal_error(Printexc.to_string e))
The exception handler does nothing - so we leak remote VDIs if the exception happens after we’ve done our cloning :-(
DATA.copy_into
Let’s now look at the data-copying part. This is common code shared between VDI.copy, VDI.copy_into and MIRROR.start and hence has some duplication of the calls made above.
This call takes roughly the same parameters as the ``DATA.copy` call above, except it specifies the destination VDI.
Once again we construct a module to do remote SMAPIv2 calls
(* Check the remote SR exists *)let srs = Remote.SR.list ~dbg inif not(List.mem dest srs)then failwith (Printf.sprintf "Remote SR %s not found" dest);
Sanity check.
let vdis = Remote.SR.scan ~dbg ~sr:dest inlet remote_vdi =try List.find (fun x -> x.vdi = dest_vdi) vdis
withNot_found-> failwith (Printf.sprintf "Remote VDI %s not found" dest_vdi)in
Find the metadata of the destination VDI
let dest_content_id = remote_vdi.content_id in
If we’ve got a local VDI with the same content_id as the destination, we only need copy the deltas, so we make a note of the destination content ID here.
(* Find the local VDI *)let vdis = Local.SR.scan ~dbg ~sr inlet local_vdi =try List.find (fun x -> x.vdi = vdi) vdis
withNot_found-> failwith (Printf.sprintf "Local VDI %s not found" vdi)in debug "copy local=%s/%s content_id=%s" sr vdi local_vdi.content_id; debug "copy remote=%s/%s content_id=%s" dest dest_vdi remote_vdi.content_id;
Find the source VDI metadata.
if local_vdi.virtual_size > remote_vdi.virtual_size then begin
(* This should never happen provided the higher-level logic is working properly *)
error "copy local=%s/%s virtual_size=%Ld > remote=%s/%s virtual_size = %Ld" sr vdi local_vdi.virtual_size dest dest_vdi remote_vdi.virtual_size;
failwith "local VDI is larger than the remote VDI";
end;
Sanity check - the remote VDI can’t be smaller than the source.
let on_fail :(unit->unit)list ref = ref [] in
We do some ugly error handling here by keeping a mutable list of operations to perform in the event of a failure.
let base_vdi =trylet x =(List.find (fun x -> x.content_id = dest_content_id) vdis).vdi in debug "local VDI %s has content_id = %s; we will perform an incremental copy" x dest_content_id;Some x
with_-> debug "no local VDI has content_id = %s; we will perform a full copy" dest_content_id;Nonein
See if we can identify a local VDI with the same content_id as the destination. If not, no problem.
Construct some datapaths - named reasons why the VDI is attached - that we will pass to VDI.attach/activate.
let dest_vdi_url = Http.Url.set_uri remote_url (Printf.sprintf "%s/nbd/%s/%s/%s"(Http.Url.get_uri remote_url) dest dest_vdi remote_dp)|> Http.Url.to_string in debug "copy remote=%s/%s NBD URL = %s" dest dest_vdi dest_vdi_url;
Here we are constructing a URI that we use to connect to the destination xapi. The handler for this particular path will verify the credentials and then pass the connection on to tapdisk which will behave as a NBD server. The VDI has to be attached and activated for this to work, unlike the new NBD handler in xapi-nbd that is smarter. The handler for this URI is declared in this file
let id=State.copy_id_of (sr,vdi)in debug "Persisting state for copy (id=%s)" id; State.add id State.(Copy_op Copy_state.({ base_dp; leaf_dp; remote_dp; dest_sr=dest; copy_vdi=remote_vdi.vdi; remote_url=url}));
Since we’re about to perform a long-running operation that is stateful, we persist the state here so that if xapi is restarted we can cancel the operation and not leak VDI attaches. Normally in xapi code we would be doing VBD.plug operations to persist the state in the xapi db, but this is storage code so we have to use a different mechanism.
In this chunk of code we attach and activate the disk on the remote SR via the SMAPI, then locally attach and activate both the VDI we’re copying and the base image we’re copying deltas from (if we’ve got one). We then call sparse_dd to copy the data to the remote NBD URL. There is some logic to update progress indicators and to cancel the operation if the SMAPIv2 call TASK.cancel is called.
Once the operation has terminated (either on success, error or cancellation), we remove the local attach and activations in the with_activated_disk function and the remote attach and activation by destroying the datapath on the remote SR. We then remove the persistent state relating to the copy.
SMPERF.debug "mirror.copy: copy complete local_vdi:%s dest_vdi:%s" vdi dest_vdi; debug "setting remote=%s/%s content_id <- %s" dest dest_vdi local_vdi.content_id; Remote.VDI.set_content_id ~dbg ~sr:dest ~vdi:dest_vdi ~content_id:local_vdi.content_id;(* PR-1255: XXX: this is useful because we don't have content_ids by default *) debug "setting local=%s/%s content_id <- %s" sr local_vdi.vdi local_vdi.content_id; Local.VDI.set_content_id ~dbg ~sr ~vdi:local_vdi.vdi ~content_id:local_vdi.content_id;Some(Vdi_info remote_vdi)
The last thing we do is to set the local and remote content_id. The local set_content_id is there because the content_id of the VDI is constructed from the location if it is unset in the storage_access.ml module of xapi (still part of the storage layer)
with e -> error "Caught %s: performing cleanup actions"(Printexc.to_string e); perform_cleanup_actions !on_fail;raise e
Here we perform the list of cleanup operations. Theoretically. It seems we don’t ever actually set this to anything, so this is dead code.
DATA.MIRROR.start
let start' ~task ~dbg ~sr ~vdi ~dp ~url ~dest = debug "Mirror.start sr:%s vdi:%s url:%s dest:%s" sr vdi url dest; SMPERF.debug "mirror.start called sr:%s vdi:%s url:%s dest:%s" sr vdi url dest;let remote_url = Http.Url.of_string url inletmoduleRemote=Client(structlet rpc = rpc ~srcstr:"smapiv2"~dststr:"dst_smapiv2" remote_url end)in(* Find the local VDI *)let vdis = Local.SR.scan ~dbg ~sr inlet local_vdi =try List.find (fun x -> x.vdi = vdi) vdis
withNot_found-> failwith (Printf.sprintf "Local VDI %s not found" vdi)in
As with the previous calls, we make a remote module for SMAPIv2 calls on the destination, and we find local VDI metadata via SR.scan
let id = State.mirror_id_of (sr,local_vdi.vdi)in
Mirror ids are deterministically constructed.
(* A list of cleanup actions to perform if the operation should fail. *)let on_fail :(unit->unit)list ref = ref [] in
As with copy we look locally for similar VDIs. However, rather than use that here we actually pass this information on to the destination SR via the receive_start internal SMAPIv2 call:
let result_ty = Remote.DATA.MIRROR.receive_start ~dbg ~sr:dest ~vdi_info:local_vdi ~id ~similar:similars inlet result =match result_ty with Mirror.Vhd_mirror x -> x
in
This gives the destination SR a chance to say what sort of migration it can support. We only support Vhd_mirror style migrations which require the destination to support the compose SMAPIv2 operation. The type of x is a record:
mirror_vdi is the VDI to which new writes should be mirrored.
mirror_datapath is the remote datapath on which the VDI has been attached and activated. This is required to construct the remote NBD url
copy_diffs_from represents the source base VDI to be used for the non-mirrored data copy.
copy_diffs_to is the remote VDI to copy those diffs to
dummy_vdi exists to prevent leaf-coalesce on the mirror_vdi
(* Enable mirroring on the local machine *)let mirror_dp = result.Mirror.mirror_datapath inlet uri =(Printf.sprintf "/services/SM/nbd/%s/%s/%s" dest result.Mirror.mirror_vdi.vdi mirror_dp)inlet dest_url = Http.Url.set_uri remote_url uri inlet request = Http.Request.make ~query:(Http.Url.get_query_params dest_url)~version:"1.0"~user_agent:"smapiv2" Http.Put uri inlet transport = Xmlrpc_client.transport_of_url dest_url in
This is where we connect to the NBD server on the destination.
debug "Searching for data path: %s" dp;let attach_info = Local.DP.attach_info ~dbg:"nbd"~sr ~vdi ~dp in debug "Got it!";
we need the local attach_info to find the local tapdisk so we can send it the connected NBD socket.
This should probably be set directly after the call to receive_start
let tapdev =match tapdisk_of_attach_info attach_info with|Some tapdev -> debug "Got tapdev";let pid = Tapctl.get_tapdisk_pid tapdev inlet path = Printf.sprintf "/var/run/blktap-control/nbdclient%d" pid in with_transport transport (with_http request (fun(response, s)-> debug "Here inside the with_transport";let control_fd = Unix.socket Unix.PF_UNIX Unix.SOCK_STREAM 0 in finally
(fun () -> debug "Connecting to path: %s" path; Unix.connect control_fd (Unix.ADDR_UNIX path);let msg = dp inlet len = String.length msg inlet written = Unixext.send_fd control_fd msg 0 len [] s in debug "Sent fd";if written <> len thenbegin error "Failed to transfer fd to %s" path; failwith "foo"end)(fun () -> Unix.close control_fd))); tapdev
|None-> failwith "Not attached"in
Here we connect to the remote NBD server, then pass that connected fd to the local tapdisk that is using the disk. This fd is passed with a name that is later used to tell tapdisk to start using it - we use the datapath name for this.
debug "Adding to active local mirrors: id=%s" id;let alm = State.Send_state.({ url; dest_sr=dest; remote_dp=mirror_dp; local_dp=dp; mirror_vdi=result.Mirror.mirror_vdi.vdi; remote_url=url; tapdev; failed=false; watchdog=None})in State.add id (State.Send_op alm); debug "Added";
As for copy we persist some state to disk to say that we’re doing a mirror so we can undo any state changes after a toolstack restart.
debug "About to snapshot VDI = %s"(string_of_vdi_info local_vdi);let local_vdi = add_to_sm_config local_vdi "mirror"("nbd:"^ dp)inlet local_vdi = add_to_sm_config local_vdi "base_mirror" id inlet snapshot =try Local.VDI.snapshot ~dbg ~sr ~vdi_info:local_vdi
with| Storage_interface.Backend_error(code,_)when code ="SR_BACKEND_FAILURE_44"->raise(Api_errors.Server_error(Api_errors.sr_source_space_insufficient,[ sr ]))| e ->raise e
in debug "Done!"; SMPERF.debug "mirror.start: snapshot created, mirror initiated vdi:%s snapshot_of:%s" snapshot.vdi local_vdi.vdi ; on_fail :=(fun () -> Local.VDI.destroy ~dbg ~sr ~vdi:snapshot.vdi)::!on_fail;
This bit inserts into sm_config the name of the fd we passed earlier to do mirroring. This is interpreted by the python SM backends and passed on the tap-ctl invocation to unpause the disk. This causes all new writes to be mirrored via NBD to the file descriptor passed earlier.
This is the watchdog that runs tap-ctl stats every 5 seconds watching mirror_failed for evidence of a failure in the mirroring code. If it detects one the only thing it does is to notify that the state of the mirroring has changed. This will be picked up by the thread in xapi that is monitoring the state of the mirror. It will then issue a MIRROR.stat call which will return the state of the mirror including the information that it has failed.
This is where we copy the VDI returned by the snapshot invocation to the remote VDI called copy_diffs_to. We only copy deltas, but we rely on copy' to figure out which disk the deltas should be taken from, which it does via the content_id field.
we can now destroy the dummy vdi on the remote (which will cause a leaf-coalesce in due course), and we destroy the local snapshot here (which will also cause a leaf-coalesce in due course, providing we don’t destroy it first). The return value from the function is the mirror_id that we can use to monitor the state or cancel the mirror.
This is not the end of the story, since we need to detach the remote datapath being used for mirroring when we detach this end. The hook function is in storage_migrate.ml:
let post_detach_hook ~sr ~vdi ~dp =letopen State.Send_stateinlet id = State.mirror_id_of (sr,vdi)in State.find_active_local_mirror id |> Opt.iter (fun r ->let remote_url = Http.Url.of_string r.url inletmoduleRemote=Client(structlet rpc = rpc ~srcstr:"smapiv2"~dststr:"dst_smapiv2" remote_url end)inlet t = Thread.create (fun () -> debug "Calling receive_finalize"; log_and_ignore_exn
(fun () -> Remote.DATA.MIRROR.receive_finalize ~dbg:"Mirror-cleanup"~id); debug "Finished calling receive_finalize"; State.remove_local_mirror id; debug "Removed active local mirror: %s" id
) () in Opt.iter (fun id -> Scheduler.cancel scheduler id) r.watchdog; debug "Created thread %d to call receive finalize and dp destroy"(Thread.id t))
This removes the persistent state and calls receive_finalize on the destination. The body of that functions is:
let receive_finalize ~dbg ~id =let recv_state = State.find_active_receive_mirror id inletopen State.Receive_statein Opt.iter (fun r -> Local.DP.destroy ~dbg ~dp:r.leaf_dp ~allow_leak:false) recv_state; State.remove_receive_mirror id
which removes the persistent state on the destination and destroys the datapath associated with the mirror.
Additionally, there is also a pre-deactivate hook. The rationale for this is that we want to detect any failures to write that occur right at the end of the SXM process. So if there is a mirror operation going on, before we deactivate we wait for tapdisk to flush its queue of outstanding requests, then we query whether there has been a mirror failure. The code is just above the detach hook in storage_migrate.ml:
let pre_deactivate_hook ~dbg ~dp ~sr ~vdi =letopen State.Send_stateinlet id = State.mirror_id_of (sr,vdi)inlet start = Mtime_clock.counter () inlet get_delta () = Mtime_clock.count start |> Mtime.Span.to_s in State.find_active_local_mirror id |> Opt.iter (fun s ->try(* We used to pause here and then check the nbd_mirror_failed key. Now, we poll
until the number of outstanding requests has gone to zero, then check the
status. This avoids confusing the backend (CA-128460) *)letopenTapctlinlet ctx = create () inletrec wait () =if get_delta () > reqs_outstanding_timeout thenraiseTimeout;let st = stats ctx s.tapdev inif st.Stats.reqs_outstanding > 0
then(Thread.delay 1.0; wait ())else st
inlet st = wait () in debug "Got final stats after waiting %f seconds"(get_delta ());if st.Stats.nbd_mirror_failed = 1
thenbegin error "tapdisk reports mirroring failed"; s.failed <- true
end;with|Timeout-> error "Timeout out after %f seconds waiting for tapdisk to complete all outstanding requests"(get_delta ()); s.failed <- true
| e -> error "Caught exception while finally checking mirror state: %s"(Printexc.to_string e); s.failed <- true
)
The server is generic because it does not accept fd passing, and I call those
“special” nbd server/fd receiver. ↩︎
XAPI requests walk-throughs
Let’s detail the handling process of an XML request within XAPI.
The first document uses the migration as an example of such request.
In this document we will use the VM.pool_migrate request to illustrate
the interaction between various components within the XAPI toolstack during
migration. However this schema can be applied to other requests as well.
Not all parts of the Xapi toolstack are shown here as not all are involved in
the migration process. For instance you won’t see the squeezed
nor mpathalert two daemons that belong to the toolstack but don’t
participate in the migration of a VM.
Anatomy of a VM migration
Migration is initiated by a Xapi client that sends VM.pool_migrate, an RPC
XML request.
The Xen API server handles this request and dispatches it to the server.
The server is generated using XAPI IDL and requests are wrapped whithin a
context, either to be forwarded to a host or executed locally. Broadly, the
context follows RBAC rules. The executed function is related to the message of
the request (refer to XenAPI Reference).
In the case of the migration you can refer to ocaml/idl/datamodel_vm.ml.
The server will dispatch the operation to server helpers, executing the
operation synchronously or asynchronously and returning the RPC answer.
Message forwarding decides if operation must be executed by another host
of the pool and then forward the call or if is executed locally.
When executed locally the high-level migration operation is send to the
Xenopsd daemon by posting a message on a known queue on the message switch.
Xenopsd will get the command and will split it into several atomic
operations that will be run by the xenopsd backend.
Xenopsd with its backend can then access xenstore or execute hypercall to
interact with xen a server the micro operation.
A diagram is worth a thousand words
flowchart TD
%% First we are starting by a XAPI client that is sending an XML-RPC request
client((Xapi client)) -. sends RPC XML request .->
xapi_server{"`Dispatch RPC
**api_server.ml**`"}
style client stroke:#CAFEEE,stroke-width:4px
%% XAPI Toolstack internals
subgraph "Xapi Toolstack (master of the pool)"
style server stroke:#BAFA00,stroke-width:4px,stroke-dasharray: 5 5
xapi_server --dispatch call (ie VM.pool_migrate)--> server("`Auto generated using *IDL*
**server.ml**`")
server --do_dispatch (ie VM.pool_migrate)--> server_helpers["`server helpers
**server_helpers.ml**`"]
server_helpers -- call management (ie xapi_vm_migrate.ml)--> message_forwarding["`check where to run the call **message_forwarding.ml**`"]
message_forwarding -- execute locally --> vm_management["`VM Mgmt
like **xapi_vm_migrate.ml**`"]
vm_management -- Call --> xapi_xenops["`Transform xenops
see (**xapi_xenops.ml**)`"]
xapi_xenops <-- Post following IDL model (see xenops_interface.ml) --> msg_switch
subgraph "Message Switch Daemon"
msg_switch[["Queues"]]
end
subgraph "Xenopsd Daemon"
msg_switch <-- Push/Pop on org.xen.xapi.xenopsd.classic --> xenopsd_server
xenopsd_server["`Xenposd *frontend*
get & split high level opertion into atomics`"] o-- linked at compile time --o xenopsd_backend
end
end
%% Xenopsd backend is accessing xen and xenstore
xenopsd_backend["`Xenopsd *backend*
Backend XC (libxenctrl)`"] -. access to .-> xen_hypervisor["Xen hypervisor & xenstore"]
style xen_hypervisor stroke:#BEEF00,stroke-width:2px
%% Can send request to the host where call must be executed
message_forwarding -.forward call to .-> elected_host["Host where call must be executed"]
style elected_host stroke:#B0A,stroke-width:4px
Xenopsd
Xenopsd is the VM manager of the XAPI Toolstack.
Xenopsd is responsible for:
Do no harm: Xenopsd should never touch domains/VMs which it hasn’t been
asked to manage. This means that it can co-exist with other VM managers
such as ‘xl’ and ’libvirt’.
Be independent: Xenopsd should be able to work in isolation. In particular
the loss of some other component (e.g. the network) should not by itself
prevent VMs being managed locally (including shutdown and reboot).
Asynchronous by default: Xenopsd exposes task monitoring and offers
cancellation for all operations. Xenopsd ensures that the system is always
in a manageable state after an operation has been cancelled.
Avoid state duplication: where another component owns some state, Xenopsd
will always defer to it. We will avoid creating out-of-sync caches of
this state.
Be debuggable: Xenopsd will expose diagnostic APIs and tools to allow
its internal state to be inspected and modified.
Subsections of Xenopsd
Xenopsd Architecture
Xenopsd instances run on a host and manage VMs on behalf of clients. This
picture shows 3 different Xenopsd instances: 2 named “xenopsd-xc” and 1 named
“xenopsd-xenlight”.
Each instance is responsible for managing a disjoint set of VMs. Clients should
never ask more than one Xenopsd to manage the same VM.
Managing a VM means:
allowing devices (disks, nics, PCI cards, vCPUs etc) to be manipulated
providing updates to clients when things change (reboots, console becomes
available, guest agent says something etc).
For a full list of features, consult the feature list.
Each Xenopsd instance has a unique name on the host. A typical name is
org.xen.xcp.xenops.classic
org.xen.xcp.xenops.xenlight
A higher-level tool, such as xapi
will associate VMs with individual Xenopsd names.
Running multiple Xenopsds is necessary because
The virtual hardware supported by different technologies (libxc, libxl, qemu)
is expected to be different. We can guarantee the virtual hardware is stable
across a rolling upgrade by running the VM on the old Xenopsd. We can then switch
Xenopsds later over a VM reboot when the VM admin is happy with it. If the
VM admin is unhappy then we can reboot back to the original Xenopsd again.
The suspend/resume/migrate image formats will differ across technologies
(again libxc vs libxl) and it will be more reliable to avoid switching
technology over a migrate.
In the future different security domains may have different Xenopsd instances
providing even stronger isolation guarantees between domains than is possible
today.
Communication with Xenopsd is handled through a Xapi-global library:
xcp-idl. This library supports
message framing: by default using HTTP but a binary framing format is
available
message encoding: by default we use JSON but XML is also available
RPCs over Unix domain sockets and persistent queues.
This library allows the communication details to be changed without having to
change all the Xapi clients and servers.
Xenopsd has a number of “backends” which perform the low-level VM operations
such as (on Xen) “create domain” “hotplug disk” “destroy domain”. These backends
contain all the hypervisor-specific code including
connecting to Xenstore
opening the libxc /proc/xen/privcmd interface
initialising libxl contexts
The following diagram shows the internal structure of Xenopsd:
At the top of the diagram two client RPC have been sent: one to start a VM
and the other to fetch the latest events. The RPCs are all defined in
xcp-idl/xen/xenops_interface.ml.
The RPCs are received by the Xenops_server module and decomposed into
“micro-ops” (labelled “μ op”). These micro ops represent actions like
create a Xen domain (recall a Xen domain is an empty shell with no memory)
build a Xen domain: this is where the kernel or hvmloader is copied in
launch a device model: this is where a qemu instance is started (if one is
required)
hotplug a device: this involves writing the frontend and backend trees to
Xenstore
unpause a domain (recall a Xen domain is created in the paused state)
Each of these micro-ops is represented by a function call in a “backend plugin”
interface. The micro-ops are enqueued in queues, one queue per VM. There is a
thread pool (whose size can be changed dynamically by the admin) which pulls
micro-ops from the VM queues and calls the corresponding backend function.
The active backend (there can only be one backend per Xenopsd instance)
executes the micro-ops. The Xenops_server_xen backend in the picture above
talks to libxc, libxl and qemu to create and destroy domains. The backend
also talks to other Xapi services, in particular
it registers datasources with xcp-rrdd, telling xcp-rrdd to measure I/O
throughput and vCPU utilisation
it reserves memory for new domains by talking to squeezed
it makes disks available by calling SMAPIv2 VDI.{at,de}tach, VDI.{,de}activate
it launches subprocesses by talking to forkexecd (avoiding problems with
accidental fd capture)
Xenopsd backends are also responsible for monitoring running VMs. In the
Xenops_server_xen backend this is done by watching Xenstore for
@releaseDomain watch events
device hotplug status changes
When such an event happens (for example: @releaseDomain sent when a domain
requests a reboot) the corresponding operation does not happen inline. Instead
the event is rebroadcast upwards to Xenops_server as a signal (for example:
“VM id needs some attention”) and a “VM_stat” micro-op is queued in the
appropriate queue. Xenopsd does not allow operations to run on the same VM
in parallel and enforces this by:
pushing all operations pertaining to a VM to the same queue
associating each VM queue to at-most-one worker pool thread
The event takes the form “VM id needs some attention” and not “VM id needs
to be rebooted” because, by the time the queue is flushed, the VM may well now
be in a different state. Perhaps rather than being rebooted it now needs to
be shutdown; or perhaps the domain is now in a good state because the reboot
has already happened. The signals sent by the backend to the Xenops_server are
a bit like event channel notifications in the Xen ring protocols: they are
requests to ask someone to perform work, they don’t themselves describe the work
that needs to be done.
An implication of this design is that it should always be possible to answer
the question, “what operation should be performed to get the VM into a valid state?”.
If an operation is cancelled half-way through or if Xenopsd is suddenly restarted,
it will ask the question about all the VMs and perform the necessary operations.
The operations must be designed carefully to make this work. For example if Xenopsd
is restarted half-way through starting a VM, it must be obvious on restart that
the VM should either be forcibly shutdown or rebooted to make it a valid state
again. Note: we don’t demand that operations are performed as transactions;
we only demand that the state they leave the system be “sensible” in the sense
that the admin will recognise it and be able to continue their work.
Sometimes this can be achieved through careful ordering of side-effects
within the operations, taking advantage of artifacts of the system such as:
a domain which has not been fully created will have total vCPU time = 0 and
will be paused. If we see one of these we should reboot it because it may
not be fully intact.
In the absense of “tells” from the system, operations are expected to journal
their intentions and support restart after failure.
There are three categories of metadata associated with VMs:
system metadata: this is created as a side-effect of starting VMs. This
includes all the information about active disks and nics stored in Xenstore
and the list of running domains according to Xen.
VM: this is the configuration to use when the VM is started or rebooted.
This is like a “config file” for the VM.
VmExtra: this is the runtime configuration of the VM. When VM configuration
is changed it often cannot be applied immediately; instead the VM continues
to run with the previous configuration. We need to track the runtime
configuration of the VM in order for suspend/resume and migrate to work. It
is also useful to be able to tell a client, “on next reboot this value will
be x but currently it is x-1”.
VM and VmExtra metadata is stored by Xenopsd in the domain 0 filesystem, in
a simple directory hierarchy.
There are a number of hook points at which xenopsd may execute certain scripts. These scripts are found in hook-specific directories of the form /etc/xapi.d/<hookname>/. All executable scripts in these directories are run with the following arguments:
<script.sh> -reason <reason> -vmuuid <uuid of VM>
The scripts are executed in filename-order. By convention, the filenames are usually of the form 10resetvdis.
clean-shutdown
hard-shutdown
clean-reboot
hard-reboot
suspend
source -- passed to pre-migrate hook on source host
destination -- passed to post-migrate hook on destination (Dundee only)
none
For example, in order to execute a script on VM shutdown, it would be sufficient to create the script in the post-destroy hook point:
/etc/xapi.d/vm-post-destroy/01myscript.sh
containing
#!/bin/bash
echo I was passed $@ > /tmp/output
And when, for example, VM e30d0050-8f15-e10d-7613-cb2d045c8505 is shut-down, the script is executed:
[vagrant@localhost ~]$ sudo xe vm-shutdown --force uuid=e30d0050-8f15-e10d-7613-cb2d045c8505
[vagrant@localhost ~]$ cat /tmp/output
I was passed -vmuuid e30d0050-8f15-e10d-7613-cb2d045c8505 -reason hard-shutdown
PVS Proxy OVS Rules
Rule Design
The Open vSwitch (OVS) daemon implements a programmable switch.
XenServer uses it to re-direct traffic between three entities:
PVS server - identified by its IP address
a local VM - identified by its MAC address
a local Proxy - identified by its MAC address
VM and PVS server are unaware of the Proxy; xapi configures OVS to
redirect traffic between PVS and VM to pass through the proxy.
OVS uses rules that match packets. Rules are organised in sets called
tables. A rule can be used to match a packet and to inject it into
another rule set/table such that a packet can be matched again.
Furthermore, a rule can set registers associated with a packet which that
can be matched in subsequent rules. In that way, a packet can be tagged
such that it will only match specific rules downstream that match the
tag.
Xapi configures 3 rule sets:
Table 0 - Entry Rules
Rules match UDP traffic between VM/PVS, Proxy/VM, and PVS/VM where the
PVS server is identified by its IP and all other components by their MAC
address. All packets are tagged with the direction they are going and
re-submitted into Table 101 which handles ports.
Table 101 - Port Rules
Rules match UDP traffic going to a specific port of the PVS server and
re-submit it into Table 102.
Table 102 - Exit Rules
These rules implement the redirection:
Rules matching packets coming from VM to PVS are directed to the Proxy.
Rules matching packets coming from PVS to VM are directed to the Proxy.
Rules matching packets coming from the Proxy are already addressed
properly (to the VM) are handled normally.
Requirements for suspend image framing
We are currently (Dec 2013) undergoing a transition from the ‘classic’ xenopsd
backend (built upon calls to libxc) to the ‘xenlight’ backend built on top of
the officially supported libxl API.
During this work, we have come across an incompatibility between the suspend
images created using the ‘classic’ backend and those created using the new
libxl-based backend. This needed to be fixed to enable RPU to any new version
of XenServer.
Historic ‘classic’ stack
Prior to this work, xenopsd was involved in the construction of the suspend
image and we ended up with an image with the following format:
+-----------------------------+
| "XenSavedDomain\n" | <-- added by xenopsd-classic
|-----------------------------|
| Memory image dump | <-- libxc
|-----------------------------|
| "QemuDeviceModelRecord\n" |
| <size of following record> | <-- added by xenopsd-classic
| (a 32-bit big-endian int) |
|-----------------------------|
| "QEVM" | <-- libxc/qemu
| Qemu device record |
+-----------------------------+
We have also been carrying a patch in the Xen patchqueue against
xc_domain_restore. This patch (revert_qemu_tail.patch) stopped
xc_domain_restore from attempting to read past the memory image dump. At which
point xenopsd-classic would just take over and restore what it had put there.
Requirements for new stack
For xenopsd-xenlight to work, we need to operate without the
revert_qemu_tail.patch since libxl assumes it is operating on top of an
upstream libxc.
We need the following relationship between suspend images created on one
backend being able to be restored on another backend. Where the backends are
old-classic (OC), new-classic (NC) and xenlight (XL). Obviously all suspend
images created on any backend must be able to be restored on the same backend:
It turns out this was not so simple. After removing the patch against
xc_domain_restore and allowing libxc to restore the hvm_buffer_tail, we found
that supsend images created with OC (detailed in the previous section) are not
of a valid format for two reasons:
i. The "XenSavedDomain\n" was extraneous;
ii. The Qemu signature section (prior to the record) is not of valid form.
It turns out that the section with the Qemu signature can be one of the
following:
a. "QemuDeviceModelRecord" (NB. no newline) followed by the record to EOF;
b. "DeviceModelRecord0002" then a uint32_t length followed by record;
c. "RemusDeviceModelState" then a uint32_t length followed by record;
The old-classic (OC) backend not only uses an invalid signature (since it
contains a trailing newline) but it also includes a length, and the length is
in big-endian when the uint32_t is seen to be little-endian.
We considered creating a proxy for the fd in the incompatible cases but since
this would need to be a 22-lookahead byte-by-byte proxy this was deemed
impracticle. Instead we have made patched libxc with a much simpler patch to
understand this legacy format.
Because peek-ahead is not possible on pipes, the patch for (ii) needed to be
applied at a point where the hvm tail had been read completely. We piggy-backed
on the point after (a) had been detected. At this point the remainder of the fd
is buffered (only around 7k) and the magic “QEVM” is expected at the head of
this buffer. So we simply added a patch to check if there was a pesky newline
and the buffer[5:8] was “QEVM” and if it was we could discard the first
5 bytes:
0 1 2 3 4 5 6 7 8
Legacy format from OC: [...| \n | \x | \x | \x | \x | Q | E | V | M |...]
Required at this point: [...| Q | E | V | M |...]
Changes made
To make the above use-cases work, we have made the following changes:
1. Make new-classic (NC) not restore Qemu tail (let libxc do it)
xenopsd.git:ef3bf4b
2. Make new-classic use valid signature (b) for future restore images
xenopsd.git:9ccef3e
3. Make xc_domain_restore in libxc understand legacy xenopsd (OC) format
xen-4.3.pq.hg:libxc-restore-legacy-image.patch
4. Remove revert-qemu-tail.patch from Xen patchqueue
xen-4.3.pq.hg:3f0e16f2141e
5. Make xenlight (XL) use "XenSavedDomain\n" start-of-image signature
xenopsd.git:dcda545
This has made the required use-cases work as follows:
A suspend image is now constructed as a series of header-record pairs. The
initial signature (1.) is used to determine whether we are dealing with the
unstructured, “legacy” suspend image or the new, structured format.
Each header is two 64-bit integers: the first identifies the header type and
the second is the length of the record that follows in bytes. The following
types have been defined (the ones marked with a (*) have yet to be
implemented):
* Xenops : Metadata for the suspend image
* Libxc : The result of a xc_domain_save
* Libxl* : Not implemented
* Libxc_legacy : Marked as a libxc record saved using pre-Xen-4.5
* Qemu_trad : The qemu save file for the Qemu used in XenServer
* Qemu_xen* : Not implemented
* Demu* : Not implemented
* End_of_image : A footer marker to denote the end of the suspend image
Some of the above types do not have the notion of a length since they cannot be
known upfront before saving and also are delegated to other layers of the stack
on restoring. Specifically these are the memory image sections, libxc and
libxl.
Tasks
Some operations performed by Xenopsd are blocking, for example:
suspend/resume/migration
attaching disks (where the SMAPI VDI.attach/activate calls can perform network
I/O)
We want to be able to
present the user with an idea of progress (perhaps via a “progress bar”)
allow the user to cancel a blocked operation that is taking too long
associate logging with the user/client-initiated actions that spawned them
Principles
all operations which may block (the vast majority) should be written in an
asynchronous style i.e. the operations should immediately return a Task id
all operations should guarantee to respond to a cancellation request in a
bounded amount of time (30s)
when cancelled, the system should always be left in a valid state
clients are responsible for destroying Tasks when they are finished with the
results
Types
A task has a state, which may be Pending, Completed or failed:
type async_result =unittype completion_t ={ duration :float; result : async_result option
}type state =|Pendingoffloat|Completedof completion_t
|Failedof Rpc.t
When a task is Failed, we assocate it with a marshalled exception (a value of type
Rpc.t). This exception must be one from the set defined in the
Xenops_interface.
To see how they are marshalled, see
Xenops_server.
From the point of view of a client, a Task has the immutable type (which can be
queried with a Task.stat):
type t ={ id: id; dbg:string; ctime:float; state: state; subtasks:(string* state)list; debug_info:(string*string)list;}
where
id is a unique (integer) id generated by Xenopsd. This is how a Task is
represented to clients
dbg is a client-provided debug key which will be used in log lines, allowing
lines from the same Task to be associated together
ctime is the creation time
state is the current state (Pending/Completed/Failed)
subtasks lists logical internal sub-operations for debugging
debug_info includes miscellaneous key/value pairs used for debugging
Internally, Xenopsd uses a
mutable record type
to track Task state. This is broadly similar to the interface type except
the state is mutable: this allows Tasks to complete
the task contains a “do this now” thunk
there is a “cancelling” boolean which is toggled to request a cancellation.
there is a list of cancel callbacks
there are some fields related to “cancel points”
Persistence
The Tasks are intended to represent activities associated with in-memory queues
and threads. Therefore the active Tasks are kept in memory in a map, and will
be lost over a process restart. This is desirable since we will also lose the
queued items and the threads, so there is no need to resync on start.
Note that every operation must ensure that the state of the system is recoverable
on restart by not leaving it in an invalid state. It is not necessary to either
guarantee to complete or roll-back a Task. Tasks are not expected to be
transactional.
Lifecycle of a Task
All Tasks returned by API functions are created as part of the enqueue functions:
queue_operation_*.
Even operations which are performed internally are normally wrapped in Tasks by
the function
immediate_operation.
A queued operation will be processed by one of the
queue worker threads.
It will
set the thread-local debug key to the Task.dbg
call task.Xenops_task.run, taking care to catch exceptions and update
the task.Xenops_task.state
unset the thread-local debug key
generate an event on the Task to provoke clients to query the current state.
Task implementations must update their progress as they work. For the common
case of a compound operation like VM_start which is decomposed into
multiple “micro-ops” (e.g. VM_createVM_build) there is a useful
helper function
perform_atomics
which divides the progress ‘bar’ into sections, where each “micro-op” can have
a different size (weight). A progress callback function is passed into
each Xenopsd backend function so it can be updated with fine granularity. For
example note the arguments to
B.VM.save
Clients are expected to destroy Tasks they are responsible for creating. Xenopsd
cannot do this on their behalf because it does not know if they have successfully
queried the Task status/result.
When Xenopsd is a client of itself, it will take care to destroy the Task
properly, for example see
immediate_operation.
Cancellation
The goal of cancellation is to unstick a blocked operation and to return the
system to some valid state, not any valid state in particular.
Xenopsd does not treat operations as transactions;
when an operation is cancelled it may
fully complete (e.g. if it was about to do this anyway)
fully abort (e.g. if it had made no progress)
enter some other valid state (e.g. if it had gotten half way through)
Xenopsd will never leave the system in an invalid state after cancellation.
Every Xenopsd operation should unblock and return the system to a valid state within
a reasonable amount of time after a cancel request. This should be as quick as possible
but up to 30s may be acceptable.
Bear in mind that a human is probably impatiently watching a UI say “please wait”
and which doesn’t have any notion of progress itself. Keep it quick!
Cancellation is triggered by TASK.cancel which calls
cancel.
This
if about to block: register a suitable cancel callback safely with with_cancel.
Xenopsd’s libxc backend can block in 2 different ways, and therefore has 2 different
types of cancel callback:
cancellable Xenstore watches
cancellable subprocesses
Xenstore watches are used for device hotplug and unplug. Xenopsd has to wait for
the backend or for a udev script to do something. If that blocks, we need
a way to cancel the watch. The easiest way to cancel a watch is to watch an
additional path (a “cancel path”) and delete it, see
cancellable_watch.
The “cancel paths” are placed within the VM’s Xenstore directory to ensure that
cleanup code which does xenstore-rm will automatically “cancel” all outstanding
watches. Note that we trigger a cancel by deleting rather than creating, to avoid
racing with delete and creating orphaned Xenstore entries.
Subprocesses are used for suspend/resume/migrate. Xenopsd hands file descriptors
to libxenguest by running a subprocess and passing the fds to it. Xenopsd therefore
gets the process id and can send it a signal to cancel it. See
Cancellable_subprocess.run.
Testing with cancel points
Cancellation is difficult to test, as it is completely asynchronous. Therefore
Xenopsd has some built-in cancellation testing infrastructure known as “cancel points”.
A “cancel point” is a point in the code where a Cancelled exception could
be thrown, either by checking the cancelling boolean or as a side-effect of
a cancel callback. The
check_cancelling
function increments a counter every time it passes one of these points, and
this value is returned to clients in the
Task.debug_info.
A test harness
runs a series of operations. Each operation is first run all the way through to
completion to discover the total number of cancel points. The operation is then
re-run with a
request to cancel at a particular point.
The test then waits for the system to stabilise and verifies that it appears to be
in a valid state.
Preventing Tasks leaking
The client who creates a Task must destroy it when the Task is finished, and
they have processed the result. What if a client like xapi is restarted while
a Task is running?
We assume that, if xapi is talking to a xenopsd, then xapi completely owns it.
Therefore xapi should destroy any completed tasks that it doesn’t recognise.
If a user wishes to manage VMs with xenopsd in parallel with xapi, the user
should run a separate xenopsd.
Features
General
Pluggable backends including
xc: drives Xen via libxc and xenguest
simulator: simulates operations for component-testing
Supports running multiple instances and backends on the same host, looking
after different sets of VMs
Extensive configuration via command-line (see manpage) and config
file
Command-line tool for easy VM administration and troubleshooting
User-settable degree of concurrency to get VMs started quickly
VMs
VM start/shutdown/reboot
VM suspend/resume/checkpoint/migrate
VM pause/unpause
VM s3suspend/s3resume
customisable SMBIOS tables for OEM-locked VMs
hooks for 3rd party extensions:
pre-start
pre-destroy
post-destroy
pre-reboot
per-VM xenguest replacement
suppression of VM reboot loops
live vCPU hotplug and unplug
vCPU to pCPU affinity setting
vCPU QoS settings (weight and cap for the Xen credit2 scheduler)
DMC memory-ballooning support
support for storage driver domains
live update of VM shadow memory
guest-initiated disk/nic hotunplug
guest-initiated disk eject
force disk/nic unplug
support for ‘surprise-removable’ devices
disk QoS configuration
nic QoS configuration
persistent RTC
two-way guest agent communication for monitoring and control
network carrier configuration
port-locking for nics
text and VNC consoles over TCP and Unix domain sockets
PV kernel and ramdisk whitelisting
configurable VM videoram
programmable action-after-crash behaviour including: shutting down
the VM, taking a crash dump or leaving the domain paused for inspection
ability to move nics between bridges/switches
advertises the VM memory footprints
PCI passthrough
support for discrete emulators (e.g. ‘demu’)
PV keyboard and mouse
qemu stub domains
cirrus and stdvga graphics cards
HVM serial console (useful for debugging)
support for vGPU
workaround for ‘spurious page faults’ kernel bug
workaround for ‘machine address size’ kernel bug
Hosts
CPUid masking for heterogenous pools: reports true features and current
features
Host console reading
Hypervisor version and capabilities reporting
Host CPU querying
APIs
versioned JSON-RPC API with feature advertisements
clients can disconnect, reconnect and easily resync with the latest
VM state without losing updates
all operations have task control including
asynchronous cancellation: for both subprocesses and xenstore watches
progress updates
subtasks
per-task debug logs
asynchronous event watching API
advertises VM metrics
memory usage
balloon driver co-operativeness
shadow memory usage
domain ids
channel passing (via sendmsg(2)) for efficient memory image copying
Operation Walk-Throughs
Let’s trace through interesting operations to see how the whole system
works.
Sequence diagram of the process of Live Migration.
Inspiration for other walk-throughs:
Shutting down a VM and waiting for it to happen
A VM wants to reboot itself
A disk is hotplugged
A disk refuses to hotunplug
A VM is suspended
Subsections of Walk-throughs
Walkthrough: Starting a VM
A Xenopsd client wishes to start a VM. They must first tell Xenopsd the VM
configuration to use. A VM configuration is broken down into objects:
VM: A device-less Virtual Machine
VBD: A virtual block device for a VM
VIF: A virtual network interface for a VM
PCI: A virtual PCI device for a VM
Treating devices as first-class objects is convenient because we wish to expose
operations on the devices such as hotplug, unplug, eject (for removable media),
carrier manipulation (for network interfaces) etc.
The “add” functions in the Xenopsd interface cause Xenopsd to create the
objects:
the XenAPI has many clients which are updated on long release cycles. The
main property needed is backwards compatibility, so that new release of xapi
remain compatible with these older clients. Quite often, we will choose to
“grandfather in” some poorly designed interface simply because we wish to
avoid imposing churn on 3rd parties.
the Xenopsd API clients are all open-source and are part of the xapi-project.
These clients can be updated as the API is changed. The main property needed
is to keep the interface clean, so that it properly hides the complexity
of dealing with Xen from other components.
The Xenopsd “VM.add” function has code like this:
let add' x = debug "VM.add %s"(Jsonrpc.to_string (rpc_of_t x)); DB.write x.id x;letmoduleB=(val get_backend () :S)in B.VM.add x; x.id
This function does 2 things:
it stores the VM configuration in the “database”
it tells the “backend” that the VM exists
The Xenopsd database is really a set of config files in the filesystem. All
objects belonging to a VM (recall we only have VMs, VBDs, VIFs, PCIs and not
stand-alone entities like disks) and are placed into a subdirectory named after
the VM e.g.:
Xenopsd doesn’t have as persistent a notion of a VM as xapi, it is expected that
all objects are deleted when the host is rebooted. However the objects should
be persisted over a simple Xenopsd restart, which is why the objects are stored
in the filesystem.
Aside: it would probably be more appropriate to store the metadata in Xenstore
since this has the exact object lifetime we need. This will require a more
performant Xenstore to realise.
Every running Xenopsd process is linked with a single backend. Currently backends
exist for:
Xen via libxc, libxenguest and xenstore
Xen via libxl, libxc and xenstore
Xen via libvirt
KVM by direct invocation of qemu
Simulation for testing
From here we shall assume the use of the “Xen via libxc, libxenguest and xenstore” (a.k.a.
“Xenopsd classic”) backend.
The backend VM.add
function checks whether the VM we have to manage already exists – and if it does
then it ensures the Xenstore configuration is intact. This Xenstore configuration
is important because at any time a client can query the state of a VM with
VM.stat
and this relies on certain Xenstore keys being present.
Once the VM metadata has been registered with Xenopsd, the client can call
VM.start.
Like all potentially-blocking Xenopsd APIs, this function returns a Task id.
Please refer to the Task handling design for a general
overview of how tasks are handled.
Clients can poll the state of a task by calling TASK.stat
but most clients will prefer to use the event system instead.
Please refer to the Event handling design for a general
overview of how events are handled.
The event model is similar to the XenAPI: clients call a blocking
UPDATES.get
passing in a token which represents the point in time when the last UPDATES.get
returned. The call blocks until some objects have changed state, and these object
ids are returned (NB in the XenAPI the current object states are returned)
The client must then call the relevant “stat” function, in this
case TASK.stat
The client will be able to see the task make progress and use this to – for example –
populate a progress bar in a UI. If the client needs to cancel the task then it
can call the TASK.cancel;
again see the Task handling design to understand how this is
implemented.
When the Task has completed successfully, then calls to *.stat will show:
the power state is Paused
exactly one valid Xen domain id
all VBDs have active = plugged = true
all VIFs have active = plugged = true
all PCI devices have plugged = true
at least one active console
a valid start time
valid “targets” for memory and vCPU
Note: before a Task completes, calls to *.stat will show partial updates. E.g.
the power state may be paused, but no disk may have been plugged.
UI clients must choose whether they are happy displaying this in-between state
or whether they wish to hide it and pretend the whole operation has happened
transactionally. If a particular, when a client wishes to perform side-effects in
response to xenopsd state changes (for example, to clean up an external resource
when a VIF becomes unplugged), it must be very careful to avoid responding
to these in-between states. Generally, it is safest to passively report these
values without driving things directly from them.
Note: the Xenopsd implementation guarantees that, if it is restarted at any point
during the start operation, on restart the VM state shall be “fixed” by either
(i) shutting down the VM; or (ii) ensuring the VM is intact and running.
In the case of xapi every Xenopsd
Task id bound one-to-one with a XenAPI task by the function
sync_with_task.
The function update_task
is called when xapi receives a notification that a Xenopsd Task has changed state,
and updates the corresponding XenAPI task.
Xapi launches exactly one thread per Xenopsd instance (“queue”) to monitor for
background events via the function
events_watch
while each thread performing a XenAPI call waits for its specific Task to complete
via the function
event_wait.
It is the responsibility of the client to call
TASK.destroy
when the Task is no longer needed. Xenopsd won’t destroy the task because it contains
the success/failure result of the operation which is needed by the client.
What happens when a Xenopsd receives a VM.start request?
When Xenopsd receives the request it adds it to the appropriate per-VM queue
via the function
queue_operation.
To understand this and other internal details of Xenopsd, consult the
architecture description.
The queue_operation_int
function looks like this:
let queue_operation_int dbg id op =let task = Xenops_task.add tasks dbg (fun t -> perform op t;None)in Redirector.push id (op, task); task
The “task” is a record containing Task metadata plus a “do it now” function
which will be executed by a thread from the thread pool. The
module Redirector
takes care of:
pushing operations to the right queue
ensuring at most one worker thread is working on a VM’s operations
reducing the queue size by coalescing items together
providing a diagnostics interface
Once a thread from the worker pool becomes free, it will execute the “do it now”
function. In the example above this is perform op t where op is
VM_start vm and t is the Task. The function
perform_exn
has fragments like this:
|VM_start(id, force)->( debug "VM.start %s (force=%b)" id force ;let power =(B.VM.get_state (VM_DB.read_exn id)).Vm.power_state inmatch power with|Running-> info "VM %s is already running" id
|_-> perform_atomics (atomics_of_operation op) t ; VM_DB.signal id "^^^^^^^^^^^^^^^^^^^^--------
)
Each “operation” (e.g. VM_start vm) is decomposed into “micro-ops” by the
function
atomics_of_operation
where the micro-ops are small building-block actions common to the higher-level
operations. Each operation corresponds to a list of “micro-ops”, where there is
no if/then/else. Some of the “micro-ops” may be a no-op depending on the VM
configuration (for example a PV domain may not need a qemu). In the case of
VM_start vm
the Xenopsd server starts by calling the functions that
decompose
the VM_hook_script, VM_create and VM_build micro-ops:
The VM_hook_script micro-op runs the corresponding “hook” scripts. The
code is all in the
Xenops_hooks
module and looks for scripts in the hardcoded path /etc/xapi.d.
2. create a Xen domain
The VM_create micro-op calls the VM.create function in the backend.
In the classic Xenopsd backend, the
VM.create_exn
function must
check if we’re creating a domain for a fresh VM or resuming an existing one:
if it’s a resume then the domain configuration stored in the VmExtra database
table must be used
ask squeezed to create a memory “reservation” big enough to hold the VM
memory. Unfortunately the domain cannot be created until the memory is free
because domain create often fails in low-memory conditions. This means the
“reservation” is associated with our “session” with squeezed; if Xenopsd
crashes and restarts the reservation will be freed automatically.
create the Domain via the libxc hypercall Xenctrl.domain_create
callgenerate_create_info()
for storing the platform data (vCPUs, etc) the domain’s Xenstore tree.
xenguest then uses this in the build phase (see below) to build the domain.
“transfer” the squeezed reservation to the domain such that squeezed will
free the memory if the domain is destroyed later
compute and set an initial balloon target depending on the amount of memory
reserved (recall we ask for a range between dynamic_min and dynamic_max)
apply the “suppress spurious page faults” workaround if requested
set the “machine address size”
“hotplug” the vCPUs. This operates a lot like memory ballooning – Xen creates
lots of vCPUs and then the guest is asked to only use some of them. Every VM
therefore starts with the “VCPUs_max” setting and co-operative hotplug is
used to reduce the number. Note there is no enforcement mechanism: a VM which
cheats and uses too many vCPUs would have to be caught by looking at the
performance statistics.
3. build the domain
The build phase waits, if necessary, for the Xen memory scrubber to catch
up reclaiming memory, runs NUMA placement, sets vCPU affinity and invokes
the xenguest to build the system memory layout of the domain.
See the walk-through of the VM_build μ-op for details.
4. mark each VBD as “active”
VBDs and VIFs are said to be “active” when they are intended to be used by a
particular VM, even if the backend/frontend connection hasn’t been established,
or has been closed. If someone calls VBD.stat or VIF.stat then
the result includes both “active” and “plugged”, where “plugged” is true if
the frontend/backend connection is established.
For example xapi will
set VBD.currently_attached
to “active || plugged”. The “active” flag is conceptually very similar to the
traditional “online” flag (which is not documented in the upstream Xen tree
as of Oct/2014 but really should be) except that on unplug, one would set
the “online” key to “0” (false) first before initiating the hotunplug. By
contrast the “active” flag is set to false after the unplug i.e. “set_active”
calls bracket plug/unplug. If the “active” flag was set before the unplug
attempt then as soon as the frontend/backend connection is removed clients
would see the VBD as completely dissociated from the VM – this would be misleading
because Xenopsd will not have had time to use the storage API to release locks
on the disks. By cleaning up before setting “active” to false, clients
can be assured that the disks are now free to be reassigned.
5. handle non-persistent disks
A non-persistent disk is one which is reset to a known-good state on every
VM start. The VBD_epoch_begin is the signal to perform any necessary reset.
6. plug VBDs
The VBD_plug micro-op will plug the VBD into the VM. Every VBD is plugged
in a carefully-chosen order.
Generally, plug order is important for all types of devices. For VBDs, we must
work around the deficiency in the storage interface where a VDI, once attached
read/only, cannot be attached read/write. Since it is legal to attach the same
VDI with multiple VBDs, we must plug them in such that the read/write VBDs
come first. From the guest’s point of view the order we plug them doesn’t
matter because they are indexed by the Xenstore device id (e.g. 51712 = xvda).
call VDI.attach and VDI.activate in the storage API to make the
devices ready (start the tapdisk processes etc)
add the Xenstore frontend/backend directories containing the block device
info
add the extra xenstore keys returned by the VDI.attach call that are
needed for SCSIid passthrough which is needed to support VSS
write the VBD information to the Xenopsd database so that future calls to
VBD.stat can be told about the associated disk (this is needed so clients
like xapi can cope with CD insert/eject etc)
if the qemu is going to be in a different domain to the storage, a frontend
device in the qemu domain is created.
The Xenstore keys are written by the functions
Device.Vbd.add_async
and
Device.Vbd.add_wait.
In a Linux domain (such as dom0) when the backend directory is created, the kernel
creates a “backend device”. Creating any device will cause a kernel UEVENT to fire
which is picked up by udev. The udev rules run a script whose only job is to
stat(2) the device (from the “params” key in the backend) and write the major
and minor number to Xenstore for blkback to pick up. (Aside: FreeBSD doesn’t do
any of this, instead the FreeBSD kernel module simply opens the device in the
“params” key). The script also writes the backend key “hotplug-status=connected”.
We currently wait for this key to be written so that later calls to VBD.stat
will return with “plugged=true”. If the call returns before this key is written
then sometimes we receive an event, call VBD.stat and conclude erroneously
that a spontaneous VBD unplug occurred.
7. mark each VIF as “active”
This is for the same reason as VBDs are marked “active”.
8. plug VIFs
Again, the order matters. Unlike VBDs,
there is no read/write read/only constraint and the devices
have unique indices (0, 1, 2, …) but Linux kernels have often (always?)
ignored the actual index and instead relied on the order of results from the
xenstore-ls listing. The order that xenstored returns the items happens
to be the order the nodes were created so this means that (i) xenstored must
continue to store directories as ordered lists rather than maps (which would
be more efficient); and (ii) Xenopsd must make sure to plug the vifs in
the same order. Note that relying on ethX device numbering has always been a
bad idea but is still common. I bet if you change this, many tests will
suddenly start to fail!
compute the port locking configuration required and write this to a well-known
location in the filesystem where it can be read from the udev scripts. This
really should be written to Xenstore instead, since this scheme doesn’t work
with driver domains.
add the Xenstore frontend/backend directories containing the network device
info
write the VIF information to the Xenopsd database so that future calls to
VIF.stat can be told about the associated network
if the qemu is going to be in a different domain to the storage, a frontend
device in the qemu domain is created.
Similarly to the VBD case, the function
Device.Vif.add
will write the Xenstore keys and wait for the “hotplug-status=connected” key.
We do this because we cannot apply the port locking rules until the backend
device has been created, and we cannot know the rules have been applied
until after the udev script has written the key. If we didn’t wait for it then
the VM might execute without all the port locking properly configured.
9. create the device model
The VM_create_device_model micro-op will create a qemu device model if
the VM is HVM; or
the VM uses a PV keyboard or mouse (since only qemu currently has backend
support for these devices).
(if using a qemu stubdom) it will create and build the qemu domain
compute the necessary qemu arguments and launch it.
Note that qemu (aka the “device model”) is created after the VIFs and VBDs have
been plugged but before the PCI devices have been plugged. Unfortunately qemu
traditional infers the needed emulated hardware by inspecting the Xenstore
VBD and VIF configuration and assuming that we want one emulated device per
PV device, up to the natural limits of the emulated buses (i.e. there can be
at most 4 IDE devices: {primary,secondary}{master,slave}). Not only does this
create an ordering dependency that needn’t exist – and which impacts migration
downtime – but it also completely ignores the plain fact that, on a Xen system,
qemu can be in a different domain than the backend disk and network devices.
This hack only works because we currently run everything in the same domain.
There is an option (off by default) to list the emulated devices explicitly
on the qemu command-line. If we switch to this by default then we ought to be
able to start up qemu early, as soon as the domain has been created (qemu will
need to know the domain id so it can map the I/O request ring).
10. plug PCI devices
PCI devices are treated differently to VBDs and VIFs.
If we are attaching the device to an
HVM guest then instead of relying on the traditional Xenstore frontend/backend
state machine we instead send RPCs to qemu requesting they be hotplugged. Note
the domain is paused at this point, but qemu still supports PCI hotplug/unplug.
The reasons why this doesn’t follow the standard Xenstore model are known only
to the people who contributed this support to qemu.
Again the order matters because it determines the position of the virtual device
in the VM.
Note that Xenopsd doesn’t know anything about the PCI devices; concepts such
as “GPU groups” belong to higher layers, such as xapi.
11. mark the domain as alive
A design principle of Xenopsd is that it should tolerate failures such as being
suddenly restarted. It guarantees to always leave the system in a valid state,
in particular there should never be any “half-created VMs”. We achieve this for
VM start by exploiting the mechanism which is necessary for reboot. When a VM
wishes to reboot it causes the domain to exit (via SCHEDOP_shutdown) with a
“reason code” of “reboot”. When Xenopsd sees this event VM_check_state
operation is queued. This operation calls
VM.get_domain_action_request
to ask the question, “what needs to be done to make this VM happy now?”. The
implementation checks the domain state for shutdown codes and also checks a
special Xenopsd Xenstore key. When Xenopsd creates a Xen domain it sets this
key to “reboot” (meaning “please reboot me if you see me”) and when Xenopsd
finishes starting the VM it clears this key. This means that if Xenopsd crashes
while starting a VM, the new Xenopsd will conclude that the VM needs to be rebooted
and will clean up the current domain and create a fresh one.
12. unpause the domain
A Xenopsd VM.start will always leave the domain paused, so strictly speaking
this is a separate “operation” queued by the client (such as xapi) after the
VM.start has completed. The function
VM.unpause
is reassuringly simple:
See the walk-through of the Domain.build function
for more details on this phase.
Apply the cpuid configuration
Store the current domain configuration on disk – it’s important to know
the difference between the configuration you started with and the configuration
you would use after a reboot because some properties (such as maximum memory
and vCPUs) as fixed on create.
Callwait_xen_free_mem
to wait (if necessary), for the Xen memory scrubber to catch up reclaiming memory.
It
calls Xenctrl.physinfo which returns:
hostinfo.free_pages - the free and already scrubbed pages (available)
host.scrub_pages - the not yet scrubbed pages (not yet available)
repeats this until a timeout as long as free_pages is lower
than the required pages
unless if scrub_pages is 0 (no scrubbing left to do)
Note: free_pages is system-wide memory, not memory specific to a NUMA node.
Because this is not NUMA-aware, in case of temporary node-specific memory shortage,
this check is not sufficient to prevent the VM from being spread over all NUMA nodes.
It is planned to resolve this issue by claiming NUMA node memory during NUMA placement.
Call the hypercall to set the timer mode
Call the hypercall to set the number of vCPUs
Call the numa_placement function
as described in the NUMA feature description
when the xe configuration option numa_placement is set to Best_effort
(except when the VM has a hard CPU affinity).
match!Xenops_server.numa_placement with|Any-> ()
|Best_effort-> log_reraise (Printf.sprintf "NUMA placement")(fun () ->if has_hard_affinity then D.debug "VM has hard affinity set, skipping NUMA optimization"else numa_placement domid ~vcpus
~memory:(Int64.mul memory.xen_max_mib 1048576L))
NUMA placement
build_pre passes the domid, the number of vCPUs and xen_max_mib to the
numa_placement
function to run the algorithm to find the best NUMA placement.
When it returns a NUMA node to use, it calls the Xen hypercalls
to set the vCPU affinity to this NUMA node:
let vm = NUMARequest.make ~memory ~vcpus inlet nodea =match!numa_resources with|None-> Array.of_list nodes
|Some a -> Array.map2 NUMAResource.min_memory (Array.of_list nodes) a
in numa_resources :=Some nodea ; Softaffinity.plan ~vm host nodea
By using the default auto_node_affinity feature of Xen,
setting the vCPU affinity causes the Xen hypervisor to activate
NUMA node affinity for memory allocations to be aligned with
the vCPU affinity of the domain.
Summary: This passes the information to the hypervisor that memory
allocation for this domain should preferably be done from this NUMA node.
Invoke the xenguest program
With the preparation in build_pre completed, Domain.buildcalls
the xenguest function to invoke the xenguest program to build the domain.
This can be used, for example, when there might not be enough memory on the preferred
NUMA node, and there are other NUMA nodes (in the same CPU package) to use
(reference).
xenguest
As part of starting a new domain in VM_build, xenopsd calls xenguest.
When multiple domain build threads run in parallel,
also multiple instances of xenguest also run in parallel:
xenguest is called by the xenopsd Domain.build function
to perform the build phase for new VMs, which is part of the xenopsdVM.start operation.
xenguest
was created as a separate program due to issues with
libxenguest:
It wasn’t threadsafe: fixed, but it still uses a per-call global struct
It had an incompatible licence, but now licensed under the LGPL.
Those were fixed, but we still shell out to xenguest, which is currently
carried in the patch queue for the Xen hypervisor packages, but could become
an individual package once planned changes to the Xen hypercalls are stabilised.
Over time, xenguest has evolved to build more of the initial domain state.
xenopsd must pass this information to xenguest to build a VM:
The domain type to build for (HVM, PHV or PV).
It is passed using the command line option --mode hvm_build.
The domid of the created empty domain,
The amount of system memory of the domain,
A number of other parameters that are domain-specific.
xenopsd uses the Xenstore to provide platform data:
the vCPU affinity
the vCPU credit2 weight/cap parameters
whether the NX bit is exposed
whether the viridian CPUID leaf is exposed
whether the system has PAE or not
whether the system has ACPI or not
whether the system has nested HVM or not
whether the system has an HPET or not
When called to build a domain, xenguest reads those and builds the VM accordingly.
Walkthrough of the xenguest build mode
flowchart
subgraph xenguest[xenguest #8209;#8209;mode hvm_build domid]
direction LR
stub_xc_hvm_build[stub_xc_hvm_build#40;#41;] --> get_flags[
get_flags#40;#41; <#8209; Xenstore platform data
]
stub_xc_hvm_build --> configure_vcpus[
configure_vcpus#40;#41; #8209;> Xen hypercall
]
stub_xc_hvm_build --> setup_mem[
setup_mem#40;#41; #8209;> Xen hypercalls to setup domain memory
]
end
Based on the given domain type, the xenguest program calls dedicated
functions for the build process of the given domain type.
These are:
stub_xc_hvm_build() for HVM,
stub_xc_pvh_build() for PVH, and
stub_xc_pv_build() for PV domains.
These domain build functions call these functions:
get_flags() to get the platform data from the Xenstore
configure_vcpus() which uses the platform data from the Xenstore to configure vCPU affinity and the credit scheduler parameters vCPU weight and vCPU cap (max % pCPU time for throttling)
The setup_mem function for the given VM type.
The function hvm_build_setup_mem()
For HVM domains, hvm_build_setup_mem() is responsible for deriving the memory
layout of the new domain, allocating the required memory and populating for the
new domain. It must:
Derive the e820 memory layout of the system memory of the domain
including memory holes depending on PCI passthrough and vGPU flags.
Load the BIOS/UEFI firmware images
Store the final MMIO hole parameters in the Xenstore
Call the libxenguest function xc_dom_boot_mem_init() (see below)
Call construct_cpuid_policy() to apply the CPUID featureset policy
The function xc_dom_boot_mem_init()
flowchart LR
subgraph xenguest
hvm_build_setup_mem[hvm_build_setup_mem#40;#41;]
end
subgraph libxenguest
hvm_build_setup_mem --> xc_dom_boot_mem_init[xc_dom_boot_mem_init#40;#41;]
xc_dom_boot_mem_init -->|vmemranges| meminit_hvm[meninit_hvm#40;#41;]
click xc_dom_boot_mem_init "https://github.com/xen-project/xen/blob/39c45c/tools/libs/guest/xg_dom_boot.c#L110-L126" _blank
click meminit_hvm "https://github.com/xen-project/xen/blob/39c45c/tools/libs/guest/xg_dom_x86.c#L1348-L1648" _blank
end
hvm_build_setup_mem() calls
xc_dom_boot_mem_init()
to allocate and populate the domain’s system memory.
It calls
meminit_hvm()
to loop over the vmemranges of the domain for mapping the system RAM
of the guest from the Xen hypervisor heap. Its goals are:
Attempt to allocate 1GB superpages when possible
Fall back to 2MB pages when 1GB allocation failed
Fall back to 4k pages when both failed
It uses the hypercall
XENMEM_populate_physmap
to perform memory allocation and to map the allocated memory
to the system RAM ranges of the domain.
At the end of this walkthrough, a sequence diagram of the overall process is included.
Invocation
The command to migrate the VM is dispatched
by the autogenerated dispatch_call function from xapi/server.ml. For
more information about the generated functions you can have a look to
XAPI IDL model.
The command triggers the operation
VM_migrate
that uses many low level atomics operations. These are:
The migrate command has several parameters such as:
Should it be started asynchronously,
Should it be forwarded to another host,
How arguments should be marshalled, and so on.
A new thread is created by xapi/server_helpers.ml
to handle the command asynchronously. The helper thread checks if
the command should be passed to the message forwarding
layer in order to be executed on another host (the destination) or locally (if
it is already at the destination host).
It will finally reach xapi/api_server.ml that will take the action
of posted a command to the message broker message switch.
It is a JSON-RPC HTTP request sends on a Unix socket to communicate between some
XAPI daemons. In the case of the migration this message sends by XAPI will be
consumed by the xenopsd
daemon that will do the job of migrating the VM.
Overview
The migration is an asynchronous task and a thread is created to handle this task.
The task reference is returned to the client, which can then check
its status until completion.
As shown in the introduction, xenopsd
fetches the
VM_migrate
operation from the message broker.
The entities that need to be migrated are: VDI, VIF, VGPU and PCI components.
During the migration process, the destination domain will be built with the same
UUID as the original VM, except that the last part of the UUID will be
XXXXXXXX-XXXX-XXXX-XXXX-000000000001. The original domain will be removed using
XXXXXXXX-XXXX-XXXX-XXXX-000000000000.
Preparing VM migration
At specific places, xenopsd can execute hooks to run scripts.
In case a pre-migrate script is in place, a command to run this script
is sent to the original domain.
Likewise, a command is sent to Qemu using the Qemu Machine Protocol (QMP)
to check that the domain can be suspended (see xenopsd/xc/device_common.ml).
After checking with Qemu that the VM is can be suspended, the migration can begin.
Importing metadata
As for hooks, commands to source domain are sent using stunnel a daemon which
is used as a wrapper to manage SSL encryption communication between two hosts on the same
pool. To import the metadata, an XML RPC command is sent to the original domain.
Once imported, it will give us a reference id and will allow building the new domain
on the destination using the temporary VM uuid XXXXXXXX-XXXX-XXXX-XXXX-000000000001
where XXX... is the reference id of the original VM.
Memory setup
One of the first steps the setup of the VM’s memory: The backend checks that there
is no ballooning operation in progress. If so, the migration could fail.
Once memory has been checked, the daemon will get the state of the VM (running, halted, …) and
The backend retrieves the domain’s platform data (memory, vCPUs setc) from the Xenstore.
Once this is complete, we can restore VIF and create the domain.
The synchronisation of the memory is the first point of synchronisation and everything
is ready for VM migration.
Destination VM setup
After receiving memory we can set up the destination domain. If we have a vGPU we need to kick
off its migration process. We will need to wait for the acknowledgement that the
GPU entry has been successfully initialized before starting the main VM migration.
The receiver informs the sender using a handshake protocol
that everything is set up and ready for save/restore.
Destination VM restore
VM restore is a low level atomic operation VM.restore.
This operation is represented by a function call to backend.
It uses Xenguest, a low-level utility from XAPI toolstack, to interact with the Xen hypervisor
and libxc for sending a migration request to the emu-manager.
After sending the request results coming from emu-manager are collected
by the main thread. It blocks until results are received.
During the live migration, emu-manager helps in ensuring the correct state
transitions for the devices and handling the message passing for the VM as
it’s moved between hosts. This includes making sure that the state of the
VM’s virtual devices, like disks or network interfaces, is correctly moved over.
Destination VM rename
Once all operations are done, xenopsd renames the target VM from its temporary
name to its real UUID. This operation is a low-level atomic
VM.rename
which takes care of updating the Xenstore on the destination host.
Restoring devices
Restoring devices starts by activating VBD using the low level atomic operation
VBD.set_active. It is an update of Xenstore. VBDs that are read-write must
be plugged before read-only ones. Once activated the low level atomic operation
VBD.plug
is called. VDI are attached and activate.
Next devices are VIFs that are set as active VIF.set_active and plug VIF.plug.
If there are VGPUs we will set them as active now using the atomic VGPU.set_active.
Creating the device model
create_device_model
configures qemu-dm and starts it. This allows to manage PCI devices.
PCI plug
PCI.plug
is executed by the backend. It plugs a PCI device and advertises it to QEMU if this option is set. It is
the case for NVIDIA SR-IOV vGPUs.
Unpause
The libxenctrl call
xc_domain_unpause()
unpauses the domain, and it starts running.
sequenceDiagram
autonumber
participant tx as sender
participant rx0 as receiver thread 0
participant rx1 as receiver thread 1
participant rx2 as receiver thread 2
activate tx
tx->>rx0: VM.import_metadata
tx->>tx: Squash memory to dynamic-min
tx->>rx1: HTTP /migrate/vm
activate rx1
rx1->>rx1: VM_receive_memory<br/>VM_create (00000001)<br/>VM_restore_vifs
rx1->>tx: handshake (control channel)<br/>Synchronisation point 1
tx->>rx2: HTTP /migrate/mem
activate rx2
rx2->>tx: handshake (memory channel)<br/>Synchronisation point 1-mem
tx->>rx1: handshake (control channel)<br/>Synchronisation point 1-mem ACK
rx2->>rx1: memory fd
tx->>rx1: VM_save/VM_restore<br/>Synchronisation point 2
tx->>tx: VM_rename
rx1->>rx2: exit
deactivate rx2
tx->>rx1: handshake (control channel)<br/>Synchronisation point 3
rx1->>rx1: VM_rename<br/>VM_restore_devices<br/>VM_unpause<br/>VM_set_domain_action_request
rx1->>tx: handshake (control channel)<br/>Synchronisation point 4
deactivate rx1
tx->>tx: VM_shutdown<br/>VM_remove
deactivate tx
Networkd
The xcp-networkd daemon (hereafter simply called “networkd”) is a component in the xapi toolstack that is responsible for configuring network interfaces and virtual switches (bridges) on a host.
The code is in ocaml/networkd.
Principles
Distro-agnostic. Networkd is meant to work on at least CentOS/RHEL as well a Debian/Ubuntu based distros. It therefore should not use any network configuration features specific to those distros.
Stateless. By default, networkd should not maintain any state. If you ask networkd anything about a network interface or bridge, or any other network sub-system property, it will always query the underlying system (e.g. an IP address), rather than returning any cached state. However, if you want networkd to configure networking at host boot time, the you can ask it to remember your configuration you have set for any interface or bridge you choose.
Idempotent. It should be possible to call any networkd function multiple times without breaking things. For example, calling a function to set an IP address on an interface twice in a row should have the same outcome as calling it just once.
Do no harm. Networkd should only configure what you ask it to configure. This means that it can co-exist with other network managers.
Usage
Networkd is a daemon that is typically started at host-boot time. In the same way as the other daemons in the xapi toolstack, it is controlled by RPC requests. It typically receives requests from the xapi daemon, on behalf of which it configures host networking.
Networkd’s RCP API is fully described by the network_interface.ml file. The API has two main namespaces: Interface and Bridge, which are implemented in two modules in network_server.ml.
In line with other xapi daemons, all API functions take an argument of type debug_info (a string) as their first argument. The debug string appears in any log lines that are produced as a side effort of calling the function.
Network Interface API
The Interface API has functions to query and configure properties of Linux network devices, such as IP addresses, and bringing them up or down. Most Interface functions take a name string as a reference to a network interface as their second argument, which is expected to be the name of the Linux network device. There is also a special function, called Interface.make_config, that is able to configure a number of interfaces at once. It takes an argument called config of type (iface * interface_config_t) list, where iface is an interface name, and interface_config_t is a compound type containing the full configuration for an interface (as far as networkd is able to configure them), currently defined as follows:
When the function returns, it should have completely configured the interface, and have brought it up. The idempotency principle applies to this function, which means that it can be used to successively modify interface properties; any property that has not changed will effectively be ignored. In fact, Interface.make_config is the main function that xapi uses to configure interfaces, e.g. as a result of a PIF.plug or a PIF.reconfigure_ip call.
Also note the persistent property in the interface config. When an interface is made “persistent”, this means that any configuration that is set on it is remembered by networkd, and the interface config is written to disk. When networkd is started, it will read the persistent config and call Interface.make_config on it in order to apply it (see Startup below).
The full networkd API should be documented separately somewhere on this site.
Bridge API
The Bridge API functions are all about the management of virtual switches, also known as “bridges”. The shape of the Bridge API roughly follows that of the Open vSwitch in that it treats a bridge as a collection of “ports”, where a port can contain one or more “interfaces”.
NIC bonding and VLANs are all configured on the Bridge level. There are functions for creating and destroying bridges, adding and removing ports, and configuring bonds and VLANs. Like interfaces, bridges and ports are addressed by name in the Bridge functions. Analogous to the Interface function with the same name, there is a Bridge.make_config function, and bridges can be made persistent.
Networkd currently has two different backends: the “Linux bridge” backend and the “Open vSwitch” backend. The former is the “classic” backend based on the bridge module that is available in the Linux kernel, plus additional standard Linux functionality for NIC bonding and VLANs. The latter backend is newer and uses the Open vSwitch (OVS) for bridging as well as other functionality. Which backend is currently in use is defined by the file /etc/xensource/network.conf, which is read by networkd when it starts. The choice of backend (currently) only affects the Bridge API: every function in it has a separate implementation for each backend.
Low-level Interfaces
Networkd uses standard networking commands and interfaces that are available in most modern Linux distros, rather than relying on any distro-specific network tools (see the distro-agnostic principle). These are tools such as ip (iproute2), dhclient and brctl, as well as the sysfs files system, and netlink sockets. To control the OVS, the ovs-* command line tools are used. All low-level functions are called from network_utils.ml.
Configuration on Startup
Networkd, periodically as well as on shutdown, writes the current configuration of all bridges and interfaces (see above) in a JSON format to a file called networkd.db (currently in /var/lib/xcp). The contents of the file are completely described by the following type:
The gateway_interface and dns_interface in the config are global host-level options to define from which interfaces the default gateway and DNS configuration is taken. This is especially important when multiple interfaces are configured by DHCP.
When networkd starts up, it first reads network.conf to determine the network backend. It subsequently attempts to parse networkd.db, and tries to call Bridge.make_config and Interface.make_config on it, with a special options to only apply the config for persistent bridges and interfaces, as well as bridges related to those (for example, if a VLAN bridge is configured, then also its parent bridge must be configured).
Networkd also supports upgrades from older versions of XenServer that used a network configuration script called interface-configure. If networkd.db is not found on startup, then networkd attempts to call this tool (via the /etc/init.d/management-interface script) in order to set up networking at boot time. This is normally followed immediately by a call from xapi instructing networkd to take over.
Finally, if no network config (old or new) is found on disk at all, networkd looks for a XenServer “firstboot” data file, which is written by XenServer’s host installer, and tries to apply it to set up the management interface.
Monitoring
Besides the ability to configure bridges and network interfaces, networkd has facilities for monitoring interfaces and bonds. When networkd starts, a monitor thread is started, which does several things (see network_monitor_thread.ml):
Every 5 seconds, it gathers send/receive counters and link state of all network interfaces. It then writes these stats to a shared-memory file, to be picked up by other components such as xcp-rrdd and xapi (see documentation about “xenostats” elsewhere).
It monitors NIC bonds, and sends alerts through xapi in case of link state changes within a bond.
It uses ip monitor address to watch for an IP address changes, and if so, it calls xapi (Host.signal_networking_change) for it to update the IP addresses of the PIFs in its database that were configured by DHCP.
Subsections of Networkd
Host Network Device Ordering on Networkd
Purpose
One of the Toolstack’s functions is to maintain a pool of hosts. A pool can be
constructed by joining a host into an existing pool. One challenge in this
process is determining which pool-wide network a network device on the joining
host should connect to.
At first glance, this could be resolved by specifying a mapping between an
individual network device and a pool-wide network. However, this approach
would be burdensome for administrators when managing many hosts. It would be
more efficient if the Toolstack could determine this automatically.
To achieve this, the Toolstack components on two hosts need to independently
work out consistent identifications for the host network devices and connect
the network devices with the same identification to the same pool-wide network.
The identifications on a host can be considered as an order, with each network
device assigned a unique position in the order as its identification. Network
devices with the same position will connect to the same network.
The assumption
Why can the Toolstack components on two hosts independently work out an expected
order without any communication? This is possible only under the assumption that
the hosts have identical hardware, firmware, software, and the way
network devices are plugged into them. For example, an administrator will always
plug the network devices into the same PCI slot position on multiple hosts if
they want these network devices to connect to the same network.
The ordering is considered consistent if the positions of such network devices
(plugged into the same PCI slot position) in the generated orders are the same.
The biosdevname
Particularly, when the assumption above holds, a consistent initial order can be
worked out on multiple hosts independently with the help of biosdevname. The
“all_ethN” policy of the biosdevname utility can generate a device order based
on whether the device is embedded or not, PCI cards in ascending slot order, and
ports in ascending PCI bus/device/function order breadth-first. Since the hosts
are identical, the orders generated by the biosdevname are consistent across
the hosts.
An example of biosdevname’s output is as the following. The initial order can
be derived from the BIOS device field.
# biosdevname --policy all_ethN -d -x
BIOS device: eth0
Kernel name: enp5s0
Permanent MAC: 00:02:C9:ED:FD:F0
Assigned MAC : 00:02:C9:ED:FD:F0
Bus Info: 0000:05:00.0
...
BIOS device: eth1
Kernel name: enp5s1
Permanent MAC: 00:02:C9:ED:FD:F1
Assigned MAC : 00:02:C9:ED:FD:F1
Bus Info: 0000:05:01.0
...
However, the BIOS device of a particular network device may change with the
addition or removal of devices. For example:
# biosdevname --policy all_ethN -d -x
BIOS device: eth0
Kernel name: enp4s0
Permanent MAC: EC:F4:BB:E6:D7:BB
Assigned MAC : EC:F4:BB:E6:D7:BB
Bus Info: 0000:04:00.0
...
BIOS device: eth1
Kernel name: enp5s0
Permanent MAC: 00:02:C9:ED:FD:F0
Assigned MAC : 00:02:C9:ED:FD:F0
Bus Info: 0000:05:00.0
...
BIOS device: eth2
Kernel name: enp5s1
Permanent MAC: 00:02:C9:ED:FD:F1
Assigned MAC : 00:02:C9:ED:FD:F1
Bus Info: 0000:05:01.0
...
Therefore, the order derived from these values is used solely for determining
the initial order and the order of newly added devices.
Principles
Initially, the order is aligned with PCI slots. This is to make the connection
between cabling and order predictable: The network devices in identical PCI
slots have the same position. The rationale is that PCI slots are more
predictable than MAC addresses and correspond to physical locations.
Once a previous order has been established, the ordering should be maintained
as stable as possible despite changes to MAC addresses or PCI addresses. The
rationale is that the assumption is less likely to hold as long as the hosts are
experiencing updates and maintenance. Therefore, maintaining the stable order is
the best choice for automatic ordering.
Notation
mac:pci:position
!mac:pci:position
A network device is characterised by
MAC address, which is unique.
PCI slot, which is not unique and multiple network devices can share a PCI
slot. PCI addresses correspond to hardware PCI slots and thus are physically
observable.
position, the position assigned to this network device by xcp-networkd. At any
given time, no position is assigned twice but the sequence of positions may have
holes.
The !mac:pci:position notation indicates that this postion was previously
used but currently is free because the device it was assgined was removed.
On a Linux system, MAC and PCI addresses have specific formats. However, for
simplicity, symbolic names are used here: MAC addresses use lowercase letters,
PCI addresses use uppercase letters, and positions use numbers.
Scenarios
The initial order
As mentioned above, the biosdevname can be used to generate consistent orders
for the network devices on multiple hosts.
current input: a:A b:D c:C
initial order: a:A:0 c:C:1 b:D:2
This only works if the assumption of identical hardware, firmware, software, and
network device placement holds. And it is considered that the assumption will
hold for the majority of the use cases.
Otherwise, the order can be generated from a user’s configuration. The user can
specify the order explicilty for individual hosts. However, administrators would
prefer to avoid this as much as possible when managing many hosts.
user spec: a::0 c::1 b::2
current input: a:A b:D c:C
initial order: a:A:0 c:C:1 b:D:2
Keep the order as stable as possible
Once an initial order is created on an individual host, it should be kept as
stable as possible across host boot-ups and at runtime. For example, unless
there are hardware changes, the position of a network device in the initial
order should remain the same regardless of how many times the host is rebooted.
To achieve this, the initial order should be saved persistently on the host’s
local storage so it can be referenced in subsequent orderings. When performing
another ordering after the initial order has been saved, the position of a
currently unordered network device should be determined by finding its position
in the last saved order. The MAC address of the network device is a reliable
attribute for this purpose, as it is considered unique for each network device
globally.
Therefore, the network devices in the saved order should have their MAC
addresses saved together, effectively mapping each position to a MAC address.
When performing an ordering, the stable position can be found by searching the
last saved order using the MAC address.
last order: a:A:0 c:C:1 b:D:2
current input: a:A b:D c:C
new order: a:A:0 c:C:1 b:D:2
Name labels of the network devices are not considered reliable enough to
identify particular devices. For example, if the name labels are determined by
the PCI address via systemd, and a firmware update changes the PCI addresses of
the network devices, the name labels will also change.
The PCI addresses are not considered reliable as well. They may change due to
the firmeware update/setting changes or even plugging/unpluggig other devices.
last order: a:A:0 c:C:1 b:D:2
current input: a:A b:B c:E
new order: a:A:0 c:E:1 b:B:2
Replacement
However, what happens when the MAC address of an unordered network device cannot
be found in the last saved order? There are two possible scenarios:
It’s a newly added network device since the last ordering.
It’s a new device that replaces an existing network device.
Replacement is a supported scenario, as an administrator might replace a broken
network device with a new one.
This can be recognized by comparing the PCI address where the network device is
located. Therefore, the PCI address of each network device should also be saved
in the order. In this case, searching the PCI address in the order results in
one of the following:
Not found: This means the PCI address was not occupied during the last
ordering, indicating a newly added network device.
Found with a MAC address, but another device with this MAC address is still
present in the system: This suggests that the PCI address of an existing
network device (with the same MAC address) has changed since the last ordering.
This may be caused by either a device move or others like a firmware update. In
this case, the current unordered network device is considered newly added.
last order: a:A:0 c:C:1 b:D:2
current input: a:A b:B c:C d:D
new order: a:A:0 c:C:1 b:B:2 d:D:3
Found with a MAC address, and no current devices have this MAC address: This
indicates that a new network device has replaced the old one in the same PCI
slot.
The replacing network device should be assigned the same position as the
replaced one.
last order: a:A:0 c:C:1 b:D:2
current input: a:A c:C d:D
new order: a:A:0 c:C:1 d:D:2
Removed devices
A network device can be removed or unplugged since the last ordering. Its
position, MAC address, and PCI address are saved for future reference, and its
position will be reserved. This means there may be a gap in the order: a
position that was previously assigned to a network device is now vacant because
the device has been removed.
last order: a:A:0 c:C:1 b:D:2
current input: a:A b:D
new order: a:A:0 !c:C:1 d:D:2
Newly added devices
As long as the assumption holds, newly added devices since the last ordering
can be assigned positions consistently across multiple hosts. Newly added
devices will not be assigned the positions reserved for removed devices.
last order: a:A:0 !c:C:1 d:D:2
current input: a:A d:D e:E
new order: a:A:0 !c:C:1 d:D:2 e:E:3
Removed and then added back
It is a supported scenario for a removed device to be plugged back in,
regardless of whether it is in the same PCI slot or not. This can be recognized
by searching for the device in the saved removed devices using its MAC address.
The reserved position will be reassigned to the device when it is added back.
last order: a:A:0 !c:C:1 d:D:2
current input: a:A c:F d:D e:E
new order: a:A:0 c:F:1 d:D:2 e:E:3
Multinic functions
The multinic function is a special kind of network device. When this type of
physical device is plugged into a PCI slot, multiple network devices are
reported at a single PCI address. Additionally, the number of reported network
devices may change due to driver updates.
As long as the assumption holds, the initial order of these devices can be
generated automatically and kept stable by using MAC addresses to identify
individual devices. However, biosdevname cannot reliably generate an order for
all devices reported at one PCI address. For devices located at the same PCI
address, their MAC addresses are used to generate the initial order.
last order: a:A:0 b:A:1 c:A:2 d:A:3 m:M:4 n:N:5
current input: a:A b:A c:A d:A e:A f:A m:M n:N
new order: a:A:0 b:A:1 c:A:2 d:A:3 m:M:4 n:N:5 e:A:6 f:A:7
For example, suppose biosdevname generates an order for a multinic function
and other non-multinic devices. Within this order, the N devices of the
multinic function with MAC addresses mac[1], …, mac[N] are assigned positions
pos[1], …, pos[N] correspondingly. biosdevname cannot ensure that the device
with mac[1] is always assigned position pos[1]. Instead, it ensures that the
entire set of positions pos[1], …, pos[N] remains stable for the devices of
the multinic function. Therefore, to ensure the order follows the MAC address
order, the devices of the multinic function need to be sorted by their MAC
addresses within the set of positions.
last order: a:A:0 b:A:1 c:A:2 d:A:3 m:M:4
current input: e:A f:A g:A h:A m:M
new order: e:A:0 f:A:1 g:A:2 h:A:3 m:M:4
Rare cases that can not be handled automatically
In summary, to keep the order stable, the auto-generated order needs to be saved
for the next ordering. When performing an automatic ordering for the current
network devices, either the MAC address or the PCI address is used to recognize
the device that was assigned the same position in the last ordering. If neither
the MAC address nor the PCI address can be used to find a position from the last
ordering, the device is considered newly added and is assigned a new position.
However, following this sorting logic, the ordering result may not always be as
expected. In practice, this can be caused by various rare cases, such as
switching an existing network device to connect to another network, performing
firmware updates, changing firmware settings, or plugging/unplugging network
devices. It is not worth complicating the entire function for these rare cases.
Instead, the initial user’s configuration can be used to handle these rare
scenarios.
Squeezed
Squeezed is the XAPI Toolstack’s host memory manager (aka balloon driver).
Squeezed uses ballooning to move memory between running VMs, to avoid wasting
host memory.
Principles
Avoid wasting host memory: unused memory should be put to use by returning
it to VMs.
Memory should be shared in proportion to the configured policy.
Operate entirely at the level of domains (not VMs), and be independent of
Xen toolstack.
Subsections of Squeezed
Squeezed Architecture
Squeezed is the XAPI Toolstack’s host memory ballooning daemon. It
“balances” memory between VMs according to a policy written to Xenstore.
The following diagram shows the internals of Squeezed:
At the center of squeezed is an abstract model of a Xen host. The model
includes:
The amount of already-used host memory (used by fixed overheads such as Xen
and the crash kernel).
Per-domain memory policy specifically dynamic-min and dynamic-max which
together describe a range, within which the domain’s actual used memory
should remain.
Per-domain calibration data which allows us to compute the necessary balloon
target value to achieve a particular memory usage value.
Squeezed is a single-threaded program which receives commands from xenopsd over
a Unix domain socket. When Xenopsd wishes to start a new VM, squeezed will be
asked to create a “reservation”. Note this is different to the Xen notion of a
reservation. A squeezed reservation consists of an amount of memory squeezed
will guarantee to keep free labelled with an id. When Xenopsd later creates the
domain to notionally use the reservation, the reservation is “transferred” to
the domain before the domain is built.
Squeezed will also wake up every 30s and attempt to rebalance the memory on a
host. This is useful to correct imbalances caused by balloon drivers
temporarily failing to reach their targets. Note that ballooning is
fundamentally a co-operative process, so squeezed must handle cases where the
domains refuse to obey commands.
The “output” of squeezed is a list of “actions” which include:
Set domain x’s memory/target to a new value.
Set the maxmem of a domain to a new value (as a hard limit beyond which the
domain cannot allocate).
Design
Squeezed is a single host memory ballooning daemon. It helps by:
Allowing VM memory to be adjusted dynamically without having to reboot;
and
Avoiding wasting memory by keeping everything fully utilised, while retaining
the ability to take memory back to start new VMs.
The Toolstack interface is used by Xenopsd to free
memory for starting new VMs. Although the only known client is Xenopsd, the
interface can in theory be used by other clients. Multiple clients can safely
use the interface at the same time.
The internal structure consists of a
single-thread event loop. To see how it works end-to-end, consult the
example.
No software is ever perfect; to understand the flaws in Squeezed, please
consult the list of issues.
Environmental assumptions
The Squeezed daemon runs within a Xen domain 0 and
communicates to xenstored via a Unix domain socket. Therefore
Squeezed
is granted full access to xenstore, enabling it to modify every
domain’s memory/target.
The Squeezed daemon calls setmaxmem in order to cap the amount of memory
a domain can use. This relies on a patch to xen which allows maxmem to
be set lower than totpages See Section maxmem for more
information.
The Squeezed daemon
assumes that only domains which write control/feature-balloon into
xenstore can respond to ballooning requests. It will not ask any
other domains to balloon.
The Squeezed daemon
assumes that the memory used by a domain is: (i) that listed in
domain_getinfo as totpages; (ii) shadow as given by
shadow_allocation_get; and (iii) a small (few KiB) of
miscellaneous Xen structures
(e.g. for domains, vcpus) which are invisible.
The Squeezed daemon
assumes that a domain which is created with a particular
memory/target (and startmem, to within rounding error) will
reach a stable value of totpages before writing
control/feature-balloon. The daemon writes this value to
memory/memory-offset for future reference.
The Squeezed daemon
does not know or care exactly what causes the difference between
totpages and memory/target and it does not
expect it to remain constant across Xen releases. It
only expects the value to remain constant over the lifetime of a
domain.
The Squeezed daemon
assumes that the balloon driver has hit its target when difference
between memory/target and totpages equals the memory-offset
value.
Corrollary: to make a domain with a responsive balloon driver
currenty using totpages allocate or free
x
it suffices to
set memory/target to
x+totpages-memoryoffset
and wait for the
balloon driver to finish. See Section memory model for more
detail.
The Squeezed daemon must
maintain a “slush fund” of memory (currently 9MiB) which it must
prevent any domain from allocating. Since (i) some Xen operations (such
as domain creation) require memory within a physical address range
(e.g. less than 4GiB) and (ii) since Xen preferentially
allocates memory outside these ranges, it follows that by preventing
guests from allocating all host memory (even
transiently) we guarantee that memory from within these special
ranges is always available. Squeezed operates in
two phases: first causing memory to be freed; and
second causing memory to be allocated.
The Squeezed daemon
assumes that it may set memory/target to any value within range:
memory/dynamic-max to memory/dynamic-min
The Squeezed daemon
assumes that the probability of a domain booting successfully may be
increased by setting memory/target closer to memory/static-max.
The Squeezed daemon
assumes that, if a balloon driver has not made any visible progress
after 5 seconds, it is effectively inactive. Active
domains will be expected to pick up the slack.
Toolstack interface
The toolstack interface introduces the concept of a reservation.
A reservation is: an amount of host free memory tagged
with an associated reservation id. Note this is an
internal Squeezed concept and Xen is
completely unaware of it. When the daemon is moving memory between
domains, it always aims to keep
where s is the size of the “slush fund” (currently 9MiB) and
is the amount corresponding to the ith
reservation.
As an aside: Earlier versions of Squeezed always
associated memory with a Xen domain. Unfortunately
this required domains to be created before memory was freed which was
problematic because domain creation requires small amounts of contiguous
frames. Rather than implement some form of memory defragmentation,
Squeezed and Xenopsd were
modified to free memory before creating a domain. This necessitated
making memory reservations first-class stand-alone
entities.
Once a reservation is made (and the corresponding memory
is freed), it can be transferred to a domain created by a
toolstack. This associates the reservation with that
domain so that, if the domain is destroyed, the
reservation is also freed. Note that Squeezed is careful not
to count both a domain’s reservation and its totpages
during e.g. domain building: instead it considers the domain’s
allocation to be the maximum of reservation and
totpages.
The size of a reservation may either be specified exactly
by the caller or the caller may provide a memory range. If a range is
provided the daemon will allocate at least as much as the minimum value
provided and as much as possible up to the maximum. By allocating as
much memory as possible to the domain, the probability of a successful
boot is increased.
Clients of the Squeezed provide a string
name when they log in. All untransferred reservations made by a client
are automatically deleted when a client logs in. This prevents memory
leaks where a client crashes and loses track of its own reservation ids.
The interface looks like this:
string session_id login(
string client_name
)
string reservation_id reserve_memory(
string client_name,
int kib
)
int amount, string reservation_id reserve_memory_range(
string client_name,
int min,
int max
)
void delete_reservation(
string client_name,
string reservation_id
)
void transfer_reservation_to_domain(
string client_name,
string reservation_id,
int domid
)
The interface is currently implemented using a trivial RPC protocol
over a Unix domain socket in domain 0.
Ballooning policy
This section describes the very simple default policy currently
built-into Squeezed.
Every domain has a pair of values written into xenstore:
memory/dynamic-min and memory/dynamic-max with the following
meanings:
memory/dynamic-min the lowest value that Squeezed is allowed
to set memory/target. The administrator should make this as low as
possible but high enough to ensure that the applications inside the
domain actually work.
memory/dynamic-max
the highest value that Squeezed is allowed
to set memory/target. This can be used to dynamically cap the
amount of memory a domain can use.
If all balloon drivers are responsive then Squeezed daemon allocates
memory proportionally, so that each domain has the same value of:
So:
if memory is plentiful then all domains will have
memory/target=memory/dynamic-max
if memory is scarce then all domains will have
memory/target=memory/dynamic-min
Note that the values of memory/target suggested by the policy are
ideal values. In many real-life situations (e.g. when a balloon driver
fails to make progress and is declared inactive) the
memory/target values will be different.
Note that, by default, domain 0 has
memory/dynamic-min=memory/dynamic-max, effectively disabling
ballooning. Clearly a more sophisticated policy would be required here
since ballooning down domain 0 as extra domains are started would be
counterproductive while backends and control interfaces remain in
domain 0.
The memory model
Squeezed
considers a ballooning-aware domain (i.e. one which has written
the feature-balloon flag into xenstore) to be completely described by
the parameters:
dynamic-min: policy value written to memory/dynamic-min in xenstore by a
toolstack (see Section Ballooning policy)
dynamic-max: policy value written to memory/dynamic-max in xenstore by a
toolstack (see Section Ballooning policy)
target: balloon driver target written to memory/target in xenstore by
Squeezed.
totpages: instantaneous number of pages used by the domain as returned by
the hypercall domain_getinfo
memory-offset: constant difference between target and totpages when the
balloon driver believes no ballooning is necessary: where
memory-offset = totpages - target when the balloon driver believes it
has reached its target.
maxmem: upper limit on totpages: where totpages <= maxmem
For convenience we define a adjusted-target to be the target value necessary
to cause a domain currently using totpages to maintain this value
indefinitely so adjusted-target = totpages - memory-offset.
The Squeezed
daemon believes that:
a domain should be ballooning iff
adjusted-target <> target (unless it has become inactive)
a domain has hit its target iff
adjusted-target = target (to within 1 page);
if a domain has
target = x then, when ballooning
is complete, it will have
totpages = memory-offset + x; and therefore
to cause a domain to free y it sufficies to set
target := totpages - memory-offset - y.
The Squeezed
daemon considers non-ballooning aware domains (i.e. those which have not
written feature-balloon) to be represented by pairs of:
totpages: instantaneous number of pages used by the domain as returned by
domain_getinfo
reservation: memory initially freed for this domain by Squeezed after a
transfer_reservation_to_domid call
Note that non-ballooning aware domains will always have
startmem = target
since the domain will not be
instructed to balloon. Since a domain which is being built will have
0 <= totpages <= reservation, Squeezed computes
and subtracts this from its model of the host’s free memory, ensuring
that it doesn’t accidentally reallocate this memory for some other
purpose.
The Squeezed
daemon believes that:
all guest domains start out as non-ballooning aware domains where
target=reservation=startmem$;
some guest domains become ballooning-aware during their boot
sequence i.e. when they write feature-balloon
The Squeezed
daemon considers a host to be represented by:
ballooning domains: a set of domains which Squeezed will instruct
to balloon;
other domains: a set of booting domains and domains which have no
balloon drivers (or whose balloon drivers have failed)
a “slush fund” of low memory required for Xen
physinfo.free_pages total amount of memory instantanously free
(including both free_pages and scrub_pages)
reservations: batches of free memory which are not (yet) associated
with any domain
The Squeezed
daemon considers memory to be unused (i.e. not allocated for any useful
purpose) if it is neither in use by a domain nor reserved.
The main loop
The main loop is triggered by either:
the arrival of an allocation request on the toolstack interface; or
the policy engine – polled every 10s – deciding that a target
adjustment is needed.
Each iteration of the main loop generates the following actions:
Domains which were active but have failed to make progress towards
their target in 5s are declared inactive. These
domains then have:
maxmem set to the minimum of target and totpages.
Domains which were inactive but have started to make progress
towards their target are declared active. These
domains then have: maxmem set to target.
Domains which are currently active have new targets computed
according to the policy (see Section Ballooning policy). Note that
inactive domains are ignored and not expected to balloon.
Note that domains remain classified as inactive only
during one run of the main loop. Once the loop has terminated all
domains are optimistically assumed to be active again.
Therefore should a domain be classified as inactive once,
it will get many later chances to respond.
The targets are set in two phases.
The maxmem is used to prevent domains suddenly allocating
more memory than we want them to.
The main loop has a notion of a host free memory “target”, similar to
the existing domain memory target. When we are trying to free memory
(e.g. for starting a new VM), the host free memory “target” is
increased. When we are trying to distribute memory among guests
(e.g. after a domain has shutdown and freed lots of memory), the host
free memory “target” is low. Note the host free memory “target” is
always at least several MiB to ensure that some host free memory with
physical address less than 4GiB is free (see Two phase target setting for
related information).
The main loop terminates when all active domains have
reached their targets (this could be because all domains responded or
because they all wedged and became inactive); and the policy function
hasn’t suggested any new target changes. There are three possible
results:
Success if the host free memory is near enough its “target”;
Failure if the operation is simply impossible within the policy
limits (i.e. dynamic_min values are too high;
Failure if the operation failed because one or more domains became
inactive and this prevented us from reaching our host
free memory “target”.
Note that, since only active domains have their targets
set, the system effectively rewards domains which refuse to free memory
(inactive) and punishes those which do free memory
(active). This effect is countered by signalling to the
admin which domains/VMs aren’t responding so they can take corrective
action. To achieve this, the daemon monitors the list of
inactive domains and if a domain is
inactive for more than 20s it writes a flag into xenstore
memory/uncooperative. This key can be monitored and used to generate
an alert, if desired.
Two phase target setting
The following diagram shows how a system with two domains can evolve if domain
memory/target values are increased for some domains and decreased for
others, at the same time. Each graph shows two domains (domain 1 and
domain 2) and a host. For a domain, the square box shows its
adjusted-totpages and the arrow indicates the direction of the
memory/target. For the host the square box indicates total free
memory. Note the highlighted state where the host’s free memory is
temporarily exhausted
In the
initial state (at the top of the diagram), there are two domains, one
which has been requested to use more memory and the other requested to
use less memory. In effect the memory is to be transferred from one
domain to the other. In the final state (at the bottom of the diagram),
both domains have reached their respective targets, the memory has been
transferred and the host free memory is at the same value it was
initially. However the system will not move atomically from the initial
state to the final: there are a number of possible transient in-between
states, two of which have been drawn in the middle of the diagram. In
the left-most transient state the domain which was asked to
free memory has freed all the memory requested: this is
reflected in the large amount of host memory free. In the right-most
transient state the domain which was asked to allocate
memory has allocated all the memory requested: now the host’s free
memory has hit zero.
If the host’s free memory hits zero then Xen has been forced to
give all memory to guests, including memory less than 4GiB which is critical
for allocating certain structures. Even if we ask a domain to free
memory via the balloon driver there is no guarantee that it will free
the useful memory. This leads to an annoying failure mode
where operations such as creating a domain free due to ENOMEM despite
the fact that there is apparently lots of memory free.
The solution to this problem is to adopt a two-phase memory/target
setting policy. The Squeezed daemon forces
domains to free memory first before allowing domains to allocate,
in-effect forcing the system to move through the left-most state in the
diagram above.
Use of maxmem
The Xen
domain maxmem value is used to limit memory allocations by the domain.
The rules are:
if the domain has never been run and is paused then
maxmem is set to reservation (reservations were described
in the Toolstack interface section above);
these domains are probably still being built and we must let
them allocate their startmem
FIXME: this “never been run” concept pre-dates the
feature-balloon flag: perhaps we should use the
feature-balloon flag instead.
if the domain is running and the balloon driver is thought to be
working then maxmem is set to target; and
there may be a delay between lowering a target and the domain
noticing so we prevent the domain from allocating memory when it
should in fact be deallocating.
if the domain is running and the balloon driver is thought to be
inactive then
maxmem is set to the minimum of target and actual.
if the domain is using more memory than it should then we allow
it to make progress down towards its target; however
if the domain is using less memory than it should then we must
prevent it from suddenly waking up and allocating more since we
have probably just given it to someone else
FIXME: should we reduce the target to leave the domain in a
neutral state instead of asking it to allocate and fail forever?
Example operation
The diagram shows an initial system state comprising 3 domains on a
single host. The state is not ideal; the domains each have the same
policy settings (dynamic-min and dynamic-max) and yet are using
differing values of adjusted-totpages. In addition the host has more
memory free than desired. The second diagram shows the result of
computing ideal target values and the third diagram shows the result
after targets have been set and the balloon drivers have
responded.
The scenario above includes 3 domains (domain 1,
domain 2, domain 3) on a host. Each of the domains has a non-ideal
adjusted-totpages value.
Recall we also have the policy constraint that:
dynamic-min <= target <= dynamic-max
Hypothetically if we reduce target by
target-dynamic-min (i.e. by setting
target to dynamic-min) then we should reduce
totpages by the same amount, freeing this much memory on the host. In
the upper-most graph in the diagram above, the total amount of memory
which would be freed if we set each of the 3 domain’s
target to dynamic-min is:
d1 + d2 + d3. In this hypothetical
situation we would now have
x + s + d1 + d2 + d3 free on the host where
s is the host slush fund and x is completely unallocated. Since we
always want to keep the host free memory above s, we are free to
return x + d1 + d2 + d3 to guests. If we
use the default built-in proportional policy then, since all domains
have the same dynamic-min and dynamic-max, each gets the same
fraction of this free memory which we call g:
For each domain, the ideal balloon target is now
target = dynamic-min + g.
Squeezed does not set all the targets at once: this would allow the
allocating domains to race with the deallocating domains, potentially allowing
all low memory to be allocated. Therefore Squeezed sets the
targets in two phases.
The structure of the daemon
Squeezed is a single-threaded daemon which is started by an init.d
script. It sits waiting for incoming requests on its toolstack interface
and checks every 10s whether all domain targets are set to the ideal
values
(recall the Ballooning policy). If an allocation request
arrives or if the domain targets require adjusting then it calls into
the module
squeeze_xen.ml.
The module
src/squeeze_xen.ml
contains code which inspects the state of the host (through hypercalls
and reading xenstore) and creates a set of records describing the
current state of the host and all the domains. Note this snapshot of
state is not atomic – it is pieced together from multiple hypercalls and
xenstore reads – we assume that the errors generated are small and we
ignore them. These records are passed into the
squeeze.ml
module where they
are processed and converted into a list of actions i.e.
(i) updates to memory/target and; (ii) declarations that particular
domains have become inactive or active.
The rationale for separating the Xen interface from the
main ballooning logic was to make testing easier: the module
test/squeeze_test.ml
contains a simple simulator which allows various edge-cases to be
checked.
Issues
If a linux domU kernel has the netback, blkback or blktap modules
then they away pages via alloc_empty_pages_and_pagevec() during
boot. This interacts with the balloon driver to break the assumption
that, reducing the target by x from a neutral value should free
x amount of memory.
Polling the state of the host (particular the xenstore contents) is
a bit inefficient. Perhaps we should move the policy values
dynamic_min and dynamic_max to a separate place in the xenstore
tree and use watches instead.
The memory values given to the domain builder are in units of MiB.
We may wish to similarly quantise the target value or check that
the memory-offset calculation still works.
The Xen
patch queue reintroduces the lowmem emergency pool. This was an
attempt to prevent guests from allocating lowmem before we switched
to a two-phase target setting procedure. This patch can probably be
removed.
It seems unnecessarily evil to modify an inactive
domain’s maxmem leaving maxmem less than target, causing
the guest to attempt allocations forwever. It’s probably neater to
move the target at the same time.
Declaring a domain active just because it makes small
amounts of progress shouldn’t be enough. Otherwise a domain could
free 1 byte (or maybe 1 page) every 5s.
Likewise, declaring a domain “uncooperative” only if it has been
inactive for 20s means that a domain could alternate
between inactive for 19s and active
for 1s and not be declared “uncooperative”.
Document history
Version
Date
Change
0.2
10th Nov 2014
Update to markdown
0.1
9th Nov 2009
Initial version
Xapi-guard
The xapi-guard daemon is the component in the xapi toolstack that is responsible for handling persistence requests from VMs (domains).
Currently these are UEFI vars and vTPM updates.
The code is in ocaml/xapi-guard.
When the daemon managed only with UEFI updates it was called varstored-guard.
Some files and package names still use the previous name.
Principles
Calls from domains must be limited in privilege to do certain API calls, and
to read and write from their corresponding VM in xapi’s database only.
Xenopsd is able to control xapi-guard through message switch, this access is
not limited.
Listening to domain socket is restored whenever the daemon restarts to minimize disruption of running domains.
Disruptions to requests when xapi is unavailable is minimized.
The startup procedure is not blocked by the availability of xapi, and write requests from domains must not fail because xapi is unavailable.
Overview
Xapi-guard forwards calls from domains to xapi to persist UEFI variables, and update vTPMs.
To do this, it listens to 1 socket per service (varstored, or swtpm) per domain.
To create these sockets before the domains are running, it listens to a message-switch socket.
This socket listens to calls from xenopsd, which orchestrates the domain creation.
To protect the domains from xapi being unavailable transiently, xapi-guard provides an on-disk cache for vTPM writes.
This cache acts as a buffer and stores the requests temporarily until xapi can be contacted again.
This situation usually happens when xapi is being restarted as part of an update.
SWTPM, the vTPM daemon, reads the contents of the TPM from xapi-guard on startup, suspend, and resume.
During normal operation SWTPM does not send read requests from xapi-guard.
Structure
The cache module consists of two Lwt threads, one that writes to disk, and another one that reads from disk.
The writer is triggered when a VM writes to the vTPM.
It never blocks if xapi is unreachable, but responds as soon as the data has been stored either by xapi or on the local disk, such that the VM receives a timely response to the write request.
Both try to send the requests to xapi, depending on the state, to attempt write all the cached data back to xapi, and stop using the cache.
The threads communicate through a bounded queue, this is done to limit the amount of memory used.
This queue is a performance optimisation, where the writer informs the reader precisely which are the names of the cache files, such that the reader does not need to list the cache directory.
And a full queue does not mean data loss, just a loss of performance; vTPM writes are still cached.
This means that the cache operates in three modes:
Direct: during normal operation the disk is not used at all
Engaged: both threads use the queue to order events
Disengaged: A thread dumps request to disk while the other reads the cache
until it’s empty
---
title: Cache State
---
stateDiagram-v2
Disengaged
note right of Disengaged
Writer doesn't add requests to queue
Reader reads from cache and tries to push to xapi
end note
Direct
note left of Direct
Writer bypasses cache, send to xapi
Reader waits
end note
Engaged
note right of Engaged
Writer writes to cache and adds requests to queue
Reader reads from queue and tries to push to xapi
end note
[*] --> Disengaged
Disengaged --> Disengaged : Reader pushed pending TPMs to xapi, in the meantime TPMs appeared in the cache
Disengaged --> Direct : Reader pushed pending TPMs to xapi, cache is empty
Direct --> Direct : Writer receives TPM, sent to xapi
Direct --> Engaged : Writer receives TPM, error when sent to xapi
Engaged --> Direct : Reader sent TPM to xapi, finds an empty queue
Engaged --> Engaged : Writer receives TPM, queue is not full
Engaged --> Disengaged : Writer receives TPM, queue is full
Startup
At startup, there’s a dedicated routine to transform the existing contents of the cache.
This is currently done because the timestamp reference change on each boot.
This means that the existing contents might have timestamps considered more recent than timestamps of writes coming from running events, leading to missing content updates.
This must be avoided and instead the updates with offending timestamps are renamed to a timestamp taken from the current timestamp, ensuring a consistent
ordering.
The routine is also used to keep a minimal file tree: unrecognised files are deleted, temporary files created to ensure atomic writes are left untouched, and empty directories are deleted.
This mechanism can be changed in the future to migrate to other formats.
Design Documents
Key: RevisionProposedConfirmedReleased (vA.B)Unrecognised status
At XCP-ng, we are working on overcoming the 2TiB limitation for VM disks while
preserving essential features such as snapshots, copy-on-write capabilities, and
live migration.
To achieve this, we are introducing Qcow2 support in SMAPI and the blktap driver.
With the alpha release, we can:
- Create a VDI
- Snapshot it
- Export and import it to/from XVA
- Perform full backups
However, we currently cannot export a VDI to a Qcow2 file, nor import one.
The purpose of this design proposal is to outline a solution for implementing VDI
import/export in Qcow2 format.
Design Proposal
The import and export of VHD-based VDIs currently rely on vhd-tool, which is
responsible for streaming data between a VDI and a file. It supports both Raw and
VHD formats, but not Qcow2.
There is an existing tool called qcow-tool
originally packaged by MirageOS. It is no longer actively maintained, but it can
produce Qcow files readable by QEMU.
Currently, qcow-tool does not support streaming, but we propose to add this
capability. This means replicating the approach used in vhd-tool, where data is
pushed to a socket.
We have contacted the original developer, David Scott, and there are no objections
to us maintaining the tool if needed.
Therefore, the most appropriate way to enable Qcow2 import/export in XAPI is to
add streaming support to qcow-tool.
XenAPI changes
The workflow
The export and import of VDIs are handled by the XAPI HTTP server:
GET /export_raw_vdi
PUT /import_raw_vdi
The corresponding handlers are Export_raw_vdi.handler and
Import_raw_vdi.handler.
Since the format is checked in the handler, we need to add support for Qcow2,
as currently only Raw, Tar, and Vhd are supported.
This requires adding a new type in the Importexport.Format module and a new
content type: application/x-qemu-disk.
See mime-types format.
This allows the format to be properly decoded. Currently, all formats use a
wrapper called Vhd_tool_wrapper, which sets up parameters for vhd-tool.
We need to add a new wrapper for the Qcow2 format, which will instead use
qcow-tool, a tool that we will package (see the section below).
The new wrapper will be responsible for setting up parameters (source,
destination, etc.). Since it only manages Qcow2 files, we don’t need to pass
additional format information.
The format (qcow2) will be specified in the URI. For example:
We don’t need to propose different protocol and different format. As we will
not support different formats we just to handle data copy from socket into file
and from file to socket. Sockets and files will be managed into the
qcow_tool_wrapper. The forkhelpers.ml manages the list of file descriptors
and we will mimic what the vhd tool wrapper does to link a UUID to socket.
Design document
Revision
v3
Status
proposed
Add supported image formats in sm-list
Introduction
At XCP-ng, we are enhancing support for QCOW2 images in SMAPI. The primary
motivation for this change is to overcome the 2TB size limitation imposed
by the VHD format. By adding support for QCOW2, a Storage Repository (SR) will
be able to host disks in VHD and/or QCOW2 formats, depending on the SR type.
In the future, additional formats—such as VHDx—could also be supported.
We need a mechanism to expose to end users which image formats are supported
by a given SR. The proposal is to extend the SM API object with a new field
that clients (such as XenCenter, XenOrchestra, etc.) can use to determine the
available formats.
Design Proposal
To expose the available image formats to clients (e.g., XenCenter, XenOrchestra, etc.),
we propose adding a new field called supported_image_formats to the Storage Manager
(SM) module. This field will be included in the output of the SM.get_all_records call.
With this new information, listing all parameters of the SM object will return:
# xe sm-list params=all
Output of the command will look like (notice that CLI uses hyphens):
The supported_image_formats field will be populated by retrieving information
from the SMAPI drivers. Specifically, each driver will update its DRIVER_INFO
dictionary with a new key, supported_image_formats, which will contain a list
of strings representing the supported image formats
(for example: ["vhd", "raw", "qcow2"]). Although the formats are listed as a
list of strings, they are treated as a set-specifying the same format multiple
times has no effect.
Driver behavior without supported_image_formats
If a driver does not provide this information (as is currently the case with
existing drivers), the default value will be an empty list. This signifies
that the driver determines which format to use when creating VDI. During a migration,
the destination driver will choose the format of the VDI if none is explicitly
specified. This ensures backward compatibility with both current and future drivers.
Specifying image formats for VDIs creation
If the supported image format is exposed to the client, then, when creating new VDI,
user can specify the desired format via the sm_config parameter image-format=qcow2 (or
any format that is supported). If no format is specified, the driver will use its
preferred default format. If the specified format is not supported, an error will be
generated indicating that the SR does not support it. Here is how it can be achieved
using the XE CLI:
When migrating a VDI, an API client may need to specify the desired image format if
the destination SR supports multiple storage formats.
VDI pool migrate
To support this, a new parameter, dest_img_format, is introduced to
VDI.pool_migrate. This field accepts a string specifying the desired format (e.g., qcow2),
ensuring that the VDI is migrated in the correct format. The new signature of
VDI.pool_migrate will be
VDI ref pool_migrate (session ref, VDI ref, SR ref, string, (string -> string) map).
If the specified format is not supported or cannot be used (e.g., due to size limitations),
an error will be generated. Validation will be performed as early as possible to prevent
disruptions during migration. These checks can be performed by examining the XAPI database
to determine whether the SR provided as the destination has a corresponding SM object with
the expected format. If this is not the case, a format not found error will be returned.
If no format is specified by the client, the destination driver will determine the appropriate
format.
A VDI migration can also occur during a VM migration. In this case, we need to
be able to specify the expected destination format as well. Unlike VDI.pool_migrate,
which applies to a single VDI, VM migration may involve multiple VDIs.
The current signature of VM.migrate_send is (session ref, VM ref, (string -> string) map, bool, (VDI ref -> SR ref) map, (VIF ref -> network ref) map, (string -> string) map, (VGPU ref -> GPU_group ref) map). Thus there is already a parameter that maps each source
VDI to its destination SR. We propose to add a new parameter that allows specifying the
desired destination format for a given source VDI: (VDI ref -> string). It is
similar to the VDI-to-SR mapping. We will update the XE cli to support this new format.
It would be image_format:<source-vdi-uuid>=<destination-image-format>:
The destination image format would be a string such as vhd, qcow2, or another
supported format. It is optional to specify a format. If omitted, the driver
managing the destination SR will determine the appropriate format.
As with VDI pool migration, if this parameter is not supported by the SM driver,
a format not found error will be returned. The validation must happen before
sending a creation message to the SM driver, ideally at the same time as checking
whether all VDIs can be migrated.
To be able to check the format, we will need to modify VM.assert_can_migrate and
add the mapping from VDI references to their image formats, as is done in VM.migrate_send.
Impact
It should have no impact on existing storage repositories that do not provide any information
about the supported image format.
This change impacts the SM data model, and as such, the XAPI database version will
be incremented. It also impacts the API.
Data Model:
A new field (supported_image_formats) is added to the SM records.
A new parameter is added to VM.migrate_send: (VDI ref -> string) map
A new parameter is added to VM.assert_can_migrate: (VDI ref -> string) map
A new parameter is added to VDI.pool_migrate: string
Client Awareness: Clients like the xe CLI will now be able to query and display the supported image formats for a given SR.
Database Versioning: The XAPI database version will be updated to reflect this change.
When hosts use an aggregated local storage SR, then disks are going to be mirrored to several different hosts in the pool (RAID). This ensures that if a host goes down (e.g. due to a reboot after installing a hotfix or upgrade, or when “fenced” by the HA feature), all disk contents in the SR are still accessible. This also means that if all disks are mirrored to just two hosts (worst-case scenario), just one host may be down at any point in time to keep the SR fully available.
When a node comes back up after a reboot, it will resynchronise all its disks with the related mirrors on the other hosts in the pool. This syncing takes some time, and only after this is done, we may consider the host “up” again, and allow another host to be shut down.
Therefore, when installing a hotfix to a pool that uses aggregated local storage, or doing a rolling pool upgrade, we need to make sure that we do hosts one-by-one, and we wait for the storage syncing to finish before doing the next.
This design aims to provide guidance and protection around this by blocking hosts to be shut down or rebooted from the XenAPI except when safe, and setting the host.allowed_operations field accordingly.
XenAPI
If an aggregated local storage SR is in use, and one of the hosts is rebooting or down (for whatever reason), or resynchronising its storage, the operations reboot and shutdown will be removed from the host.allowed_operations field of all hosts in the pool that have a PBD for the SR.
This is a conservative approach in that assumes that this kind of SR tolerates only one node “failure”, and assumes no knowledge about how the SR distributes its mirrors. We may refine this in future, in order to allow some hosts to be down simultaneously.
The presence of the reboot operation in host.allowed_operations indicates whether the host.reboot XenAPI call is allowed or not (similarly for shutdown and host.shutdown). It will not, of course, prevent anyone from rebooting a host from the dom0 console or power switch.
Clients, such as XenCenter, can use host.allowed_operations, when applying an update to a pool, to guide them when it is safe to update and reboot the next host in the sequence.
In case host.reboot or host.shutdown is called while the storage is busy resyncing mirrors, the call will fail with a new error MIRROR_REBUILD_IN_PROGRESS.
Xapi
Xapi needs to be able to:
Determine whether aggregated local storage is in use; this just means that a PBD for such an SR present.
TBD: To avoid SR-specific code in xapi, the storage backend should tell us whether it is an aggregated local storage SR.
Determine whether the storage system is resynchronising its mirrors; it will need to be able to query the storage backend for this kind of information.
Xapi will poll for this and will reflect that a resync is happening by creating a Task for it (in the DB). This task can be used to track progress, if available.
The exact way to get the syncing information from the storage backend is SR specific. The check may be implemented in a separate script or binary that xapi calls from the polling thread. Ideally this would be integrated with the storage backend.
Update host.allowed_operations for all hosts in the pool according to the rules described above. This comes down to updating the function valid_operations in xapi_host_helpers.ml, and will need to use a combination of the functionality from the two points above, plus and indication of host liveness from host_metrics.live.
Trigger an update of the allowed operations when a host shuts down or reboots (due to a XenAPI call or otherwise), and when it has finished resynchronising when back up. Triggers must be in the following places (some may already be present, but are listed for completeness, and to confirm this):
Wherever host_metrics.live is updated to detect pool slaves going up and down (probably at least in Db_gc.check_host_liveness and Xapi_ha).
Immediately when a host.reboot or host.shutdown call is executed: Message_forwarding.Host.{reboot,shutdown,with_host_operation}.
When a storage resync is starting or finishing.
All of the above runs on the pool master (= SR master) only.
Assumptions
The above will be safe if the storage cluster is equal to the XenServer pool. In general, however, it may be desirable to have a storage cluster that is larger than the pool, have multiple XS pools on a single cluster, or even share the cluster with other kinds of nodes.
To ensure that the storage is “safe” in these scenarios, xapi needs to be able to ask the storage backend:
if a mirror is being rebuilt “somewhere” in the cluster, AND
if “some node” in the cluster is offline (even if the node is not in the XS pool).
If the cluster is equal to the pool, then xapi can do point 2 without asking the storage backend, which will simplify things. For the moment, we assume that the storage cluster is equal to the XS pool, to avoid making things too complicated (while still need to keep in mind that we may change this in future).
Design document
Revision
v1
Status
confirmed
Backtrace support
We want to make debugging easier by recording exception backtraces which are
reliable
cross-process (e.g. xapi to xenopsd)
cross-language
cross-host (e.g. master to slave)
We therefore need
to ensure that backtraces are captured in our OCaml and python code
a marshalling format for backtraces
conventions for storing and retrieving backtraces
Backtraces in OCaml
OCaml has fast exceptions which can be used for both
control flow i.e. fast jumps from inner scopes to outer scopes
reporting errors to users (e.g. the toplevel or an API user)
To keep the exceptions fast, exceptions and backtraces are decoupled:
there is a single active backtrace per-thread at any one time. If you
have caught an exception and then throw another exception, the backtrace
buffer will be reinitialised, destroying your previous records. For example
consider a ‘finally’ function:
let finally f cleanup =trylet result = f () in cleanup (); result
with e -> cleanup ();raise e (* <-- backtrace starts here now *)
This function performs some action (i.e. f ()) and guarantees to
perform some cleanup action (cleanup ()) whether or not an exception
is thrown. This is a common pattern to ensure resources are freed (e.g.
closing a socket or file descriptor). Unfortunately the raise e in
the exception handler loses the backtrace context: when the exception
gets to the toplevel, Printexc.get_backtrace () will point at the
finally rather than the real cause of the error.
We will use a variant of the solution proposed by
Jacques-Henri Jourdan
where we will record backtraces when we catch exceptions, before the
buffer is reinitialised. Our finally function will now look like this:
let finally f cleanup =trylet result = f () in cleanup (); result
with e -> Backtrace.is_important e; cleanup ();raise e
The function Backtrace.is_important e associates the exception e
with the current backtrace before it gets deleted.
Xapi always has high-level exception handlers or other wrappers around all the
threads it spawns. In particular Xapi tries really hard to associate threads
with active tasks, so it can prefix all log lines with a task id. This helps
admins see the related log lines even when there is lots of concurrent activity.
Xapi also tries very hard to label other threads with names for the same reason
(e.g. db_gc). Every thread should end up being wrapped in with_thread_named
which allows us to catch exceptions and log stacktraces from Backtrace.get
on the way out.
OCaml design guidelines
Making nice backtraces requires us to think when we write our exception raising
and handling code. In particular:
If a function handles an exception and re-raise it, you must call
Backtrace.is_important e with the exception to capture the backtrace first.
If a function raises a different exception (e.g. Not_found becoming a XenAPI
INTERNAL_ERROR) then you must use Backtrace.reraise <old> <new> to
ensure the backtrace is preserved.
All exceptions should be printable – if the generic printer doesn’t do a good
enough job then register a custom printer.
If you are the last person who will see an exception (because you aren’t going
to rethrow it) then you may log the backtrace via Debug.log_backtrace eif and only if you reasonably expect the resulting backtrace to be helpful
and not spammy.
If you aren’t the last person who will see an exception (because you are going
to rethrow it or another exception), then do not log the backtrace; the
next handler will do that.
All threads should have a final exception handler at the outermost level
for example Debug.with_thread_named will do this for you.
Backtraces in python
Python exceptions behave similarly to the OCaml ones: if you raise a new
exception while handling an exception, the backtrace buffer is overwritten.
Therefore the same considerations apply.
Python design guidelines
The function sys.exc_info()
can be used to capture the traceback associated with the last exception.
We must guarantee to call this before constructing another exception. In
particular, this does not work:
We need to be able to take an exception thrown from python code, gather
the backtrace, transmit it to an OCaml program (e.g. xenopsd) and glue
it onto the end of the OCaml backtrace. We will use a simple json marshalling
format for the raw backtrace data consisting of
a string summary of the error (e.g. an exception name)
a list of filenames
a corresponding list of lines
(Note we don’t use the more natural list of pairs as this confuses the
“rpclib” code generating library)
Backtraces will be written to syslog as usual. However it will also be
possible to retrieve the information via the CLI to allow diagnostic
tools to be written more easily.
The CLI
We add a global CLI argument “–trace” which requests the backtrace be
printed, if one is available:
# xe vm-start vm=hvm --trace
Error code: SR_BACKEND_FAILURE_202
Error parameters: , General backend error [opterr=exceptions must be old-style classes or derived from BaseException, not str],
Raised Server_error(SR_BACKEND_FAILURE_202, [ ; General backend error [opterr=exceptions must be old-style classes or derived from BaseException, not str]; ])
Backtrace:
0/50 EXT @ st30 Raised at file /opt/xensource/sm/SRCommand.py, line 110
1/50 EXT @ st30 Called from file /opt/xensource/sm/SRCommand.py, line 159
2/50 EXT @ st30 Called from file /opt/xensource/sm/SRCommand.py, line 263
3/50 EXT @ st30 Called from file /opt/xensource/sm/blktap2.py, line 1486
4/50 EXT @ st30 Called from file /opt/xensource/sm/blktap2.py, line 83
5/50 EXT @ st30 Called from file /opt/xensource/sm/blktap2.py, line 1519
6/50 EXT @ st30 Called from file /opt/xensource/sm/blktap2.py, line 1567
7/50 EXT @ st30 Called from file /opt/xensource/sm/blktap2.py, line 1065
8/50 EXT @ st30 Called from file /opt/xensource/sm/EXTSR.py, line 221
9/50 xenopsd-xc @ st30 Raised by primitive operation at file "lib/storage.ml", line 32, characters 3-26
10/50 xenopsd-xc @ st30 Called from file "lib/task_server.ml", line 176, characters 15-19
11/50 xenopsd-xc @ st30 Raised at file "lib/task_server.ml", line 184, characters 8-9
12/50 xenopsd-xc @ st30 Called from file "lib/storage.ml", line 57, characters 1-156
13/50 xenopsd-xc @ st30 Called from file "xc/xenops_server_xen.ml", line 254, characters 15-63
14/50 xenopsd-xc @ st30 Called from file "xc/xenops_server_xen.ml", line 1643, characters 15-76
15/50 xenopsd-xc @ st30 Called from file "lib/xenctrl.ml", line 127, characters 13-17
16/50 xenopsd-xc @ st30 Re-raised at file "lib/xenctrl.ml", line 127, characters 56-59
17/50 xenopsd-xc @ st30 Called from file "lib/xenops_server.ml", line 937, characters 3-54
18/50 xenopsd-xc @ st30 Called from file "lib/xenops_server.ml", line 1103, characters 4-71
19/50 xenopsd-xc @ st30 Called from file "list.ml", line 84, characters 24-34
20/50 xenopsd-xc @ st30 Called from file "lib/xenops_server.ml", line 1098, characters 2-367
21/50 xenopsd-xc @ st30 Called from file "lib/xenops_server.ml", line 1203, characters 3-46
22/50 xenopsd-xc @ st30 Called from file "lib/xenops_server.ml", line 1441, characters 3-9
23/50 xenopsd-xc @ st30 Raised at file "lib/xenops_server.ml", line 1452, characters 9-10
24/50 xenopsd-xc @ st30 Called from file "lib/xenops_server.ml", line 1458, characters 48-60
25/50 xenopsd-xc @ st30 Called from file "lib/task_server.ml", line 151, characters 15-26
26/50 xapi @ st30 Raised at file "xapi_xenops.ml", line 1719, characters 11-14
27/50 xapi @ st30 Called from file "lib/pervasiveext.ml", line 22, characters 3-9
28/50 xapi @ st30 Raised at file "xapi_xenops.ml", line 2005, characters 13-14
29/50 xapi @ st30 Called from file "lib/pervasiveext.ml", line 22, characters 3-9
30/50 xapi @ st30 Raised at file "xapi_xenops.ml", line 1785, characters 15-16
31/50 xapi @ st30 Called from file "message_forwarding.ml", line 233, characters 25-44
32/50 xapi @ st30 Called from file "message_forwarding.ml", line 915, characters 15-67
33/50 xapi @ st30 Called from file "lib/pervasiveext.ml", line 22, characters 3-9
34/50 xapi @ st30 Raised at file "lib/pervasiveext.ml", line 26, characters 9-12
35/50 xapi @ st30 Called from file "message_forwarding.ml", line 1205, characters 21-199
36/50 xapi @ st30 Called from file "lib/pervasiveext.ml", line 22, characters 3-9
37/50 xapi @ st30 Raised at file "lib/pervasiveext.ml", line 26, characters 9-12
38/50 xapi @ st30 Called from file "lib/pervasiveext.ml", line 22, characters 3-9
9/50 xapi @ st30 Raised at file "rbac.ml", line 236, characters 10-15
40/50 xapi @ st30 Called from file "server_helpers.ml", line 75, characters 11-41
41/50 xapi @ st30 Raised at file "cli_util.ml", line 78, characters 9-12
42/50 xapi @ st30 Called from file "lib/pervasiveext.ml", line 22, characters 3-9
43/50 xapi @ st30 Raised at file "lib/pervasiveext.ml", line 26, characters 9-12
44/50 xapi @ st30 Called from file "cli_operations.ml", line 1889, characters 2-6
45/50 xapi @ st30 Re-raised at file "cli_operations.ml", line 1898, characters 10-11
46/50 xapi @ st30 Called from file "cli_operations.ml", line 1821, characters 14-18
47/50 xapi @ st30 Called from file "cli_operations.ml", line 2109, characters 7-526
48/50 xapi @ st30 Called from file "xapi_cli.ml", line 113, characters 18-56
49/50 xapi @ st30 Called from file "lib/pervasiveext.ml", line 22, characters 3-9
One can automatically set “–trace” for a whole shell session as follows:
export XE_EXTRA_ARGS="--trace"
The XenAPI
We already store error information in the XenAPI “Task” object and so we
can store backtraces at the same time. We shall add a field “backtrace”
which will have type “string” but which will contain s-expression encoded
backtrace data. Clients should not attempt to parse this string: its
contents may change in future. The reason it is different from the json
mentioned before is that it also contains host and process information
supplied by Xapi, and may be extended in future to contain other diagnostic
information.
The Xenopsd API
We already store error information in the xenopsd API “Task” objects,
we can extend these to store the backtrace in an additional field (“backtrace”).
This field will have type “string” but will contain s-expression encoded
backtrace data.
The SMAPIv1 API
Errors in SMAPIv1 are returned as XMLRPC “Faults” containing a code and
a status line. Xapi transforms these into XenAPI exceptions usually of the
form SR_BACKEND_FAILURE_<code>. We can extend the SM backends to use the
XenAPI exception type directly: i.e. to marshal exceptions as dictionaries:
We can then define a new backtrace-carrying error:
code = SR_BACKEND_FAILURE_WITH_BACKTRACE
param1 = json-encoded backtrace
param2 = code
param3 = reason
which is internally transformed into SR_BACKEND_FAILURE_<code> and
the backtrace is appended to the current Task backtrace. From the client’s
point of view the final exception should look the same, but Xapi will have
a chance to see and log the whole backtrace.
As a side-effect, it is possible for SM plugins to throw XenAPI errors directly,
without interpretation by Xapi.
Design document
Revision
v2
Status
confirmed
Better VM revert
Overview
XenAPI allows users to rollback the state of a VM to a previous state, which is
stored in a snapshot, using the call VM.revert. Because there is no
VDI.revert call, VM.revert uses VDI.clone on the snapshot to duplicate
the contents of that disk and then use the new clone as the storage for the VM.
Because VDI.clone creates new VDI refs and uuids, some problematic
behaviours arise:
Clients such as
Apache CloudStack need to include complex
logic to keep track of the disks they are actively managing
Because the snapshot is cloned and the original vdi is deleted, VDI
references to the VDI become invalid, like VDI.snapshot_of. This means
that the database has to be combed through to change these references.
Because the database doesn’t support transactions this operation is not atomic
and can produce inconsistent database states.
Additionally, some filesystems support snapshots natively, doing the clone
procedure is much costlier than allowing the filesystem to do the revert.
We will fix these problems by:
introducing the new feature VDI_REVERT in SM interface (xapi_smint). This
allows backends to advertise that they support the new functionality
defining a new storage operation VDI.revert in storage_interface, which is
gated by the feature VDI_REVERT
proxying the storage operation to SMAPIv3 and SMAPv1 backends accordingly
adding VDI.revert to xapi_vdi which will call the storage operation if the
backend advertises it, and fallback to the previous method that uses
VDI.clone if it doesn’t advertise it, or issues are detected at runtime
that prevent it
changing the Xapi implementation of VM.revert to use VDI.revert
implement vdi_revert for common storage types, including File and LVM-based
SRs
adding unit and quick tests to xapi to test that VM.revert does not regress
destroys the VM’s VDI (disks only), referenced by the snapshot’s VDIs using
snapshot_of; as well as the suspend VDI.
clones the snapshot’s VDIs (disks and CDs), if one clone fails none remain.
searches the database for all snapshot_of references to the deleted VDIs
and replaces them with the referenced of the newly cloned snapshots.
clones the snapshot’s resume VDI
creates copies of all the cloned VBDs and associates them with the cloned VDIs
assigns the new resume VDI to the VM
XenAPI design
API
The function VDI.revert will be added, with arguments:
in: snapshot: Ref(VDI): the snapshot to which we want to revert
in: driver_params: Map(String,String): optional extra parameters
out: Ref(VDI) reference to the new VDI with the reverted contents
The function will extract the reference of VDI whose contents need to be
replaced. This is the snapshot’s snapshot_of field, then it will call the
storage function function VDI.revert to have its contents replaced with the
snapshot’s. The VDI object will not be modified, and the reference returned is
the VDI’s original reference.
If anything impedes the successful finish of an in-place revert, like the SM
backend does not advertising the feature VDI_REVERT, not implement the
feature, or the snapshot_of reference is invalid; an exception will be
raised.
Xapi Storage
The function VDI.revert is added, with the following arguments:
in: dbg: the task identifier, useful for tracing
in: sr: SR where the new VDI must be created
in: snapshot_info: metadata of the snapshot, the contents of which must be
made available in the VDI indicated by the snapshot_of field
SMAPIv1
The function vdi_revert is defined with the following arguments:
in: sr_uuid: the UUID of the SR containing both the VDI and the snapshot
in: vdi_uuid: the UUID of the snapshot whose contents must be duplicated
in: target_ref: reference of the target VDI whose contents must be replaced
The function will replace the contents of the target_ref VDI with the
contents of the vdi_uuid VDI without changing the identify of the target
(i.e. name-label, uuid and location are guaranteed to remain the same).
The vdi_uuid is preserved by this operation. The operation is obvoiusly
idempotent.
SMAPIv3
In an analogous way to SMAPIv1, the function Volume.revert is defined with the
following arguments:
in: dbg: the task identifier, useful for tracing
in: sr: the UUID of the SR containing both the VDI and the snapshot
in: snapshot: the UUID of the snapshot whose contents must be duplicated
in: vdi: the UUID of the VDI whose contents must be replaced
Xapi
add the capability VDI_REVERT so backends can advertise it
use VDI.revert in the VM.revert after the VDIs have been destroyed, and
before the snapshot’s VDIs have been cloned. If any of the reverts fail
because a Not_implemented exception is thrown, or the snapshot_of
contains an invalid reference, add the affected VDIs to the list to be cloned
and recovered, using the existing method
expose a new xe vdi-revert CLI command
SM changes
We will modify
SRCommand.py and VDI.py to add a new vdi_revert function which throws
a ’not implemented’ exception
FileSR.py to implement VDI.revert using a variant of the existing
snapshot/clone machinery
EXTSR.py and NFSSR.py to advertise the VDI_REVERT capability
LVHDSR.py to implement VDI.revert using a variant of the existing
snapshot/clone machinery
LVHDoISCSISR.py and LVHDoHBASR.py to advertise the VDI_REVERT capability
This document describes design details for the
PR-1006 requirements.
XAPI and XenAPI
Creating a Bond
Current Behaviour on Bond creation
Steps for a user to create a bond:
Shutdown all VMs with VIFs using the interfaces that will be bonded,
in order to unplug those VIFs.
Create a Network to be used by the bond: Network.create
Call Bond.create with a ref to this Network, a list of refs of
slave PIFs, and a MAC address to use.
Call PIF.reconfigure_ip to configure the bond master.
Call Host.management_reconfigure if one of the slaves is the
management interface. This command will call interface-reconfigure
to bring up the master and bring down the slave PIFs, thereby
activating the bond. Otherwise, call PIF.plug to activate the
bond.
Bond.create XenAPI call:
Remove duplicates in the list of slaves.
Validate the following:
Slaves must not be in a bond already.
Slaves must not be VLAN masters.
Slaves must be on the same host.
Network does not already have a PIF on the same host as the
slaves.
The given MAC is valid.
Create the master PIF object.
The device name of this PIF is bondx, with x the smallest
unused non-negative integer.
The MAC of the first-named slave is used if no MAC was
specified.
Create the Bond object, specifying a reference to the master. The
value of the PIF.master_of field on the master is dynamically
computed on request.
Set the PIF.bond_slave_of fields of the slaves. The value of the
Bond.slaves field is dynamically computed on request.
New Behaviour on Bond creation
Steps for a user to create a bond:
Create a Network to be used by the bond: Network.create
Call Bond.create with a ref to this Network, a list of refs of
slave PIFs, and a MAC address to use. The new bond will automatically be plugged if one of the slaves was
plugged.
In the following, for a host h, a VIF-to-move is a VIF associated
with a VM that is either
running, suspended or paused on h, OR
halted, and h is the only host that the VM can be started on.
The Bond.create XenAPI call is updated to do the following:
Remove duplicates in the list of slaves.
Validate the following, and raise an exception if any of these check
fails:
Slaves must not be in a bond already.
Slaves must not be VLAN masters.
Slaves must not be Tunnel access PIFs.
Slaves must be on the same host.
Network does not already have a PIF on the same host as the
slaves.
The given MAC is valid.
Try unplugging all currently attached VIFs of the set of VIFs that
need to be moved. Roll back and raise an exception of one of the
VIFs cannot be unplugged (e.g. due to the absence of PV drivers in
the VM).
Determine the primary slave: the management PIF (if among the
slaves), or the first slave with IP configuration.
Create the master PIF object.
The device name of this PIF is bondx, with x the smallest
unused non-negative integer.
The MAC of the primary slave is used if no MAC was specified.
Include the IP configuration of the primary slave.
If any of the slaves has PIF.disallow_unplug = true, this will
be copied to the master.
Create the Bond object, specifying a reference to the master. The
value of the PIF.master_of field on the master is dynamically
computed on request. Also a reference to the primary slave is
written to Bond.primary_slave on the new Bond object.
Set the PIF.bond_slave_of fields of the slaves. The value of the
Bond.slaves field is dynamically computed on request.
Move VLANs, plus the VIFs-to-move on them, to the master.
If all VLANs on the slaves have different tags, all VLANs will
be moved to the bond master, while the same Network is used. The
network effectively moves up to the bond and therefore no VIFs
need to be moved.
If multiple VLANs on different slaves have the same tag, they
necessarily have different Networks as well. Only one VLAN with
this tag is created on the bond master. All VIFs-to-move on the
remaining VLAN networks are moved to the Network that was moved
up.
Move Tunnels to the master. The tunnel Networks move up with the
tunnels. As tunnel keys are different for all tunnel networks, there
are no complications as in the VLAN case.
Move VIFs-to-move on the slaves to the master.
If one of the slaves is the current management interface, move
management to the master; the master will automatically be plugged.
If none of the slaves is the management interface, plug the master
if any of the slaves was plugged. In both cases, the slaves will
automatically be unplugged.
On all slaves, reset the IP configuration and set disallow_unplug
to false.
Note: “moving” a VIF, VLAN or tunnel means “re-creating somewhere else,
and destroying the old one”.
Destroying a Bond
Current Behaviour on Bond destruction
Steps for a user to destroy a bond:
If the management interface is on the bond, move it to another PIF
using PIF.reconfigure_ip and Host.management_reconfigure.
Otherwise, no PIF.unplug needs to be called on the bond master, as
Bond.destroy does this automatically.
Call Bond.destroy with a ref to the Bond object.
If desired, bring up the former slave PIFs by calls to PIF.plug
(this is does not happen automatically).
Bond.destroy XenAPI call:
Validate the following constraints:
No VLANs are attached to the bond master.
The bond master is not the management PIF.
Bring down the master PIF and clean up the underlying network
devices.
Remove the Bond and master PIF objects.
New Behaviour on Bond destruction
Steps for a user to destroy a bond:
Call Bond.destroy with a ref to the Bond object.
If desired, move VIFs/VLANs/tunnels/management from (former) primary
slave to other PIFs.
Bond.destroy XenAPI call is updated to do the following:
Try unplugging all currently attached VIFs of the set of VIFs that
need to be moved. Roll back and raise an exception of one of the
VIFs cannot be unplugged (e.g. due to the absence of PV drivers in
the VM).
Copy the IP configuration of the master to the primary slave.
Move VLANs, with their Networks, to the primary slave.
Move Tunnels, with their Networks, to the primary slave.
Move VIFs-to-move on the master to the primary slave.
If the master is the current management interface, move management
to the primary slave. The primary slave will automatically be
plugged.
If the master was plugged, plug the primary slave. This will
automatically clean up the underlying devices of the bond.
If the master has PIF.disallow_unplug = true, this will be copied
to the primary slave.
Remove the Bond and master PIF objects.
Using Bond Slaves
Current Behaviour for Bond Slaves
It possible to plug any existing PIF, even bond slaves. Any other
PIFs that cannot be attached at the same time as the PIF that is
being plugged, are automatically unplugged.
Similarly, it is possible to make a bond slave the management
interface. Any other PIFs that cannot be attached at the same time
as the PIF that is being plugged, are automatically unplugged.
It is possible to have a VIF on a Network associated with a bond
slave. When the VIF’s VM is started, or the VIF is hot-plugged, the
PIF is relies on is automatically plugged, and any other PIFs that
cannot be attached at the same time as this PIF are automatically
unplugged.
It is possible to have a VLAN on a bond slave, though the bond
(master) and the VLAN may not be simultaneously attached. This is
not currently enforced (which may be considered a bug).
New behaviour for Bond Slaves
It is no longer possible to plug a bond slave. The exception
CANNOT_PLUG_BOND_SLAVE is raised when trying to do so.
It is no longer possible to make a bond slave the management
interface. The exception CANNOT_PLUG_BOND_SLAVE is raised when
trying to do so.
It is still possible to have a VIF on the Network of a bond slave.
However, it is not possible to start such a VIF’s VM on a host, if
this would need a bond slave to be plugged. Trying this will result
in a CANNOT_PLUG_BOND_SLAVE exception. Likewise, it is not
possible to hot-plug such a VIF.
It is no longer possible to place a VLAN on a bond slave. The
exception CANNOT_ADD_VLAN_TO_BOND_SLAVE is raised when trying
to do so.
It is no longer possible to place a tunnel on a bond slave. The
exception CANNOT_ADD_TUNNEL_TO_BOND_SLAVE is raised when trying
to do so.
Actions on Start-up
Current Behaviour on Start-up
When a pool slave starts up, bonds and VLANs on the pool master are
replicated on the slave:
Create all VLANs that the master has, but the slave has not. VLANs
are identified by their tag, the device name of the slave PIF, and
the Networks of the master and slave PIFs.
Create all bonds that the master has, but the slave has not. If the
interfaces needed for the bond are not all available on the slave, a
partial bond is created. If some of these interface are already
bonded on the slave, this bond is destroyed first.
New Behaviour on Start-up
The current VLAN/tunnel/bond recreation code is retained, as it uses
the new Bond.create and Bond.destroy functions, and therefore does
what it needs to do.
Before VLAN/tunnel/bond recreation, any violations of the rules
defined in R2 are rectified, by moving VIFs, VLANs, tunnels or
management up to bonds.
CLI
The behaviour of the xe CLI commands bond-create, bond-destroy,
pif-plug, and host-management-reconfigure is changed to match their
associated XenAPI calls.
XenCenter
XenCenter already automatically moves the management interface when a
bond is created or destroyed. This is no longer necessary, as the
Bond.create/destroy calls already do this. XenCenter only needs to
copy any PIF.other_config keys that is needs between primary slave and
bond master.
Manual Tests
Create a bond of two interfaces…
without VIFs/VLANs/management on them;
with management on one of them;
with a VLAN on one of them;
with two VLANs on two different interfaces, having the same VLAN
tag;
with a VIF associated with a halted VM on one of them;
with a VIF associated with a running VM (with and without PV
drivers) on one of them.
Destroy a bond of two interfaces…
without VIFs/VLANs/management on it;
with management on it;
with a VLAN on it;
with a VIF associated with a halted VM on it;
with a VIF associated with a running VM (with and without PV
drivers) on it.
In a pool of two hosts, having VIFs/VLANs/management on the
interfaces of the pool slave, create a bond on the pool master, and
restart XAPI on the slave.
Restart XAPI on a host with a networking configuration that has
become illegal due to these requirements.
Design document
Revision
v2
Status
proposed
Code Coverage Profiling
We would like to add optional coverage profiling to existing OCaml
projects in the context of XenServer and XenAPI. This article
presents how we do it.
Binaries instrumented for coverage profiling in the XenServer project
need to run in an environment where several services act together as
they provide operating-system-level services. This makes it a little
harder than profiling code that can be profiled and executed in
isolation.
TL;DR
To build binaries with coverage profiling, do:
./configure --enable-coverage
make
Binaries will log coverage data to /tmp/bisect*.out from which a
coverage report can be generated in coverage/:
The open-source BisectPPX instrumentation framework uses extension
points (PPX) in the OCaml compiler to instrument code during
compilation. Instrumented code for a binary is then compiled as usual
and logs during execution data to in-memory data structures. Before an
instrumented binary terminates, it writes the logged data to a file.
This data can then be analysed with the bisect-ppx-report tool, to
produce a summary of annotated code that highlights what part of a
codebase was executed.
it is easy to integrate into the compilation pipeline (see below)
is specific to the OCaml language; an expression-oriented language
like OCaml doesn’t fit the traditional statement coverage well
it is actively maintained
is generates useful reports for interactive and non-interactive use
that help to improve code coverage
Red parts indicate code that wasn’t executed whereas green parts were.
Hovering over a dark green spot reveals how often that point was
executed.
The individual steps of instrumenting code with BisectPPX are greatly
abstracted by OCamlfind (OCaml’s library manager) and OCamlbuild
(OCaml’s compilation manager):
The fourth step generates a HTML report in coverage/. All it takes is
to declare to OCamlbuild that a module depends on bisect_ppx and it
will be instrumented during compilation. Behind the scenes ocamlfind
makes sure that the compiler uses a preprocessing step that instruments
the code.
Signal Handling
During execution the code instrumentation leads to the collection of
data. This code registers a function with at_exit that writes the data
to bisect*.out when exit is called. A binary can terminate without
calling exit and in that case the file would not be written. It is
therefore important to make sure that exit is called. If this does not
happen naturally, for example in the context of a daemon that is
terminated by receiving the TERM signal, a signal handler must be
installed:
let stop signal =
printf "caught signal %a\n" Debug.Pp.signal signal;
exit 0
Sys.set_signal Sys.sigterm (Sys.Signal_handle stop)
Dumping coverage information at runtime
By default coverage data can only be dumped at exit, which is inconvenient if you have a test-suite
that needs to reuse a long running daemon, and starting/stopping it each time is not feasible.
In such cases we need an API to dump coverage at runtime, which is provided by bisect_ppx >= 1.3.0.
However each daemon will need to set up a way to listen to an event that triggers this coverage dump,
furthermore it is desirable to make runtime coverage dumping compiled in conditionally to be absolutely sure
that production builds do not use coverage preprocessed code.
Hence instead of duplicating all this build logic in each daemon (xapi, xenopsd, etc.) provide this
functionality in a common library xapi-idl that:
logs a message on startup so we know it is active
sets BISECT_FILE environment variable to dump coverage in the appropriate place
listens on org.xen.xapi.coverage.<name> message queue for runtime coverage dump commands:
sending dump <Number> will cause runtime coverage to be dumped to a file
named bisect-<name>-<random>.<Number>.out
sending reset will cause the runtime coverage counters to be reset
Daemons that use Xcp_service.configure2 (e.g. xenopsd) will benefit from this runtime trigger automatically,
provided they are themselves preprocessed with bisect_ppx.
Since we are interested in collecting coverage data for system-wide test-suite runs we need a way to trigger
dumping of coverage data centrally, and a good candidate for that is xapi as the top-level daemon.
It will call Xcp_coverage.dispatcher_init (), which listens on org.xen.xapi.coverage.dispatch and
dispatches the coverage dump command to all message queues under org.xen.xapi.coverage.* except itself.
On production, and regular builds all of this is a no-op, ensured by using separate lib/coverage/disabled.ml and lib/coverage/enabled.ml
files which implement the same interface, and choosing which one to use at build time.
Where Data is Written
By default, BisectPPX writes data in a binary’s current working
directory as bisectXXXX.out. It doesn’t overwrite existing files and
files from several runs can be combined during analysis. However, this
name and the location can be inconvenient when multiple programs share a
directory.
BisectPPX’s default can be overridden with the BISECT_FILE
environment variable. This can happen on the command line:
BISECT_FILE=/tmp/example ./example.native
In the context of XenServer we could do this in startup scripts.
However, we added a bit of code
val Coverage.init: string -> unit
that sets the environment variable from inside the program. The files
are written to a temporary directory (respecting $TMP or using /tmp)
and uses the string-typed argument to include it in the name. To be
effective, this function must be called before the programs exits. For
clarity it is called at the begin of program execution.
Instrumenting an Oasis Project
While instrumentation is easy on the level of a small file or project it
is challenging in a bigger project. We decided to focus on projects that
are build with the Oasis build and packaging manager. These have a
well-defined structure and compilation process that is controlled by a
central _oasis file. This file describes for each library and binary
its dependencies at a package level. From this, Oasis generates a
configure script and compilation rules for the OCamlbuild system.
Oasis is designed that the generated files can be shipped without
requiring Oasis itself being available.
Goals for instrumentation are:
what files are instrumented should be obvious and easy to manage
instrumentation must be optional, yet easy to activate
avoid methods that require to keep several files in sync like multiple
_oasis files
avoid separate Git branches for instrumented and non-instrumented
code
In the ideal case, we could introduce a configuration switch
./configure --enable-coverage that would prepare compilation for
coverage instrumentation. While Oasis supports the creation of such
switches, they cannot be used to control build dependencies like
compiling a file with or without package bisec_ppx. We have chosen a
different method:
A Makefile target coverage augments the _tags file to include the
rules in file _tags.coverage that cause files to be instrumented:
make coverage # prepare
make # build
leads to the execution of this code during preparation:
When make coverage is not called, these rules are not active and
hence, code is not instrumented for coverage. We believe that this
solution to control instrumentation meets the goals from above. In
particular, what files are instrumented and when is controlled by very
few lines of declarative code that lives in the main repository of a
project.
Project Layout
The crucial files in an Oasis-controlled project that is set up for
coverage analysis are:
./_oasis - make "profiling" a build depdency
./_tags.coverage - what files get instrumented
./profiling/coverage.ml - support file, sets env var
./Makefile - target 'coverage'
The _oasis file bundles the files under profiling/ into an internal
library which executables then depend on:
# Support files for profiling
Library profiling
CompiledObject: best
Path: profiling
Install: false
Findlibname: profiling
Modules: Coverage
BuildDepends:
Executable set_domain_uuid
CompiledObject: best
Path: tools
ByteOpt: -warn-error +a-3
NativeOpt: -warn-error +a-3
MainIs: set_domain_uuid.ml
Install: false
BuildDepends:
xenctrl,
uuidm,
cmdliner,
profiling # <-- here
The Makefile target coverage primes the project for a profiling build:
# make coverage - prepares for building with coverage analysis
coverage: _tags _tags.coverage
test ! -f _tags.orig && mv _tags _tags.orig || true
cat _tags.coverage _tags.orig > _tags
Design document
Revision
v7
Status
released (7.0)
Revision history
v1
Initial version
v2
Add details about VM migration and import
v3
Included and excluded use cases
v4
Rolling Pool Upgrade use cases
v5
Lots of changes to simplify the design
v6
Use case refresh based on simplified design
v7
RPU refresh based on simplified design
CPU feature levelling 2.0
Executive Summary
The old XS 5.6-style Heterogeneous Pool feature that is based around hardware-level CPUID masking will be replaced by a safer and more flexible software-based levelling mechanism.
Changes made in XS 5.6 FP1 for the DR feature (added CPUID checks upon migration)
XS 6.1: migration checks extended for cross-pool scenario
High-level Interfaces and Behaviour
A VM can only be migrated safely from one host to another if both hosts offer the set of CPU features which the VM expects. If this is not the case, CPU features may appear or disappear as the VM is migrated, causing it to crash. The purpose of feature levelling is to hide features which the hosts do not have in common from the VM, so that it does not see any change in CPU capabilities when it is migrated.
Most pools start off with homogenous hardware, but over time it may become impossible to source new hosts with the same specifications as the ones already in the pool. The main use of feature levelling is to allow such newer, more capable hosts to be added to an existing pool while preserving the ability to migrate existing VMs to any host in the pool.
Principles for Migration
The CPU levelling feature aims to both:
Make VM migrations safe by ensuring that a VM will see the same CPU features before and after a migration.
Make VMs as mobile as possible, so that it can be freely migrated around in a XenServer pool.
To make migrations safe:
A migration request will be blocked if the destination host does not offer the some of the CPU features that the VM currently sees.
Any additional CPU features that the destination host is able to offer will be hidden from the VM.
Note: Due to the limitations of the old Heterogeneous Pools feature, we are not able to guarantee the safety of VMs that are migrated to a Levelling-v2 host from an older host, during a rolling pool upgrade. This is because such VMs may be using CPU features that were not captured in the old feature sets, of which we are therefore unaware. However, migrations between the same two hosts, but before the upgrade, may have already been unsafe. The promise is that we will not make migrations more unsafe during a rolling pool upgrade.
To make VMs mobile:
A VM that is started in a XenServer pool will be able to see only CPU features that are common to all hosts in the pool. The set of common CPU features is referred to in this document as the pool CPU feature level, or simply the pool level.
Use Cases for Pools
A user wants to add a new host to an existing XenServer pool. The new host has all the features of the existing hosts, plus extra features which the existing hosts do not. The new host will be allowed to join the pool, but its extra features will be hidden from VMs that are started on the host or migrated to it. The join does not require any host reboots.
A user wants to add a new host to an existing XenServer pool. The new host does not have all the features of the existing ones. XenCenter warns the user that adding the host to the pool is possible, but it would lower the pool’s CPU feature level. The user accepts this and continues the join. The join does not require any host reboots. VMs that are started anywhere on the pool, from now on, will only see the features of the new host (the lowest common denominator), such that they are migratable to any host in the pool, including the new one. VMs that were running before the pool join will not be migratable to the new host, because these VMs may be using features that the new host does not have. However, after a reboot, such VMs will be fully mobile.
A user wants to add a new host to an existing XenServer pool. The new host does not have all the features of the existing ones, and at the same time, it has certain features that the pool does not have (the feature sets overlap). This is essentially a combination of the two use cases above, where the pool’s CPU feature level will be downgraded to the intersection of the feature sets of the pool and the new host. The join does not require any host reboots.
A user wants to upgrade or repair the hardware of a host in an existing XenServer pool. After upgrade the host has all the features it used to have, plus extra features which other hosts in the pool do not have. The extra features are masked out and the host resumes its place in the pool when it is booted up again.
A user wants to upgrade or repair the hardware of a host in an existing XenServer pool. After upgrade the host has fewer features than it used to have. When the host is booted up again, the pool CPU’s feature level will be automatically lowered, and the user will be alerted of this fact (through the usual alerting mechanism).
A user wants to remove a host from an existing XenServer pool. The host will be removed as normal after any VMs on it have been migrated away. The feature set offered by the pool will be automatically re-levelled upwards in case the host which was removed was the least capable in the pool, and additional features common to the remaining hosts will be unmasked.
Rolling Pool Upgrade
A VM which was running on the pool before the upgrade is expected to continue to run afterwards. However, when the VM is migrated to an upgraded host, some of the CPU features it had been using might disappear, either because they are not offered by the host or because the new feature-levelling mechanism hides them. To have the best chance for such a VM to successfully migrate (see the note under “Principles for Migration”), it will be given a temporary VM-level feature set providing all of the destination’s CPU features that were unknown to XenServer before the upgrade. When the VM is rebooted it will inherit the pool-level feature set.
A VM which is started during the upgrade will be given the current pool-level feature set. The pool-level feature set may drop after the VM is started, as more hosts are upgraded and re-join the pool, however the VM is guaranteed to be able to migrate to any host which has already been upgraded. If the VM is started on the master, there is a risk that it may only be able to run on that host.
To allow the VMs with grandfathered-in flags to be migrated around in the pool, the intra pool VM migration pre-checks will compare the VM’s feature flags to the target host’s flags, not the pool flags. This will maximise the chance that a VM can be migrated somewhere in a heterogeneous pool, particularly in the case where only a few hosts in the pool do not have features which the VMs require.
To allow cross-pool migration, including to pool of a higher XenServer version, we will still check the VM’s requirements against the pool-level features of the target pool. This is to avoid the possibility that we migrate a VM to an ‘island’ in the other pool, from which it cannot be migrated any further.
XenAPI Changes
Fields
host.cpu_info is a field of type (string -> string) map that contains information about the CPUs in a host. It contains the following keys: cpu_count, socket_count, vendor, speed, modelname, family, model, stepping, flags, features, features_after_reboot, physical_features and maskable.
The following keys are specific to hardware-based CPU masking and will be removed: features_after_reboot, physical_features and maskable.
The features key will continue to hold the current CPU features that the host is able to use. In practise, these features will be available to Xen itself and dom0; guests may only see a subset. The current format is a string of four 32-bit words represented as four groups of 8 hexadecimal digits, separated by dashes. This will change to an arbitrary number of 32-bit words. Each bit at a particular position (starting from the left) still refers to a distinct CPU feature (1: feature is present; 0: feature is absent), and feature strings may be compared between hosts. The old format simply becomes a special (4 word) case of the new format, and bits in the same position may be compared between old and new feature strings.
The new key features_pv will be added, representing the subset of features that the host is able to offer to a PV guest.
The new key features_hvm will be added, representing the subset of features that the host is able to offer to an HVM guest.
A new field pool.cpu_info of type (string -> string) map (read only) will be added. It will contain:
vendor: The common CPU vendor across all hosts in the pool.
features_pv: The intersection of features_pv across all hosts in the pool, representing the feature set that a PV guest will see when started on the pool.
features_hvm: The intersection of features_hvm across all hosts in the pool, representing the feature set that an HVM guest will see when started on the pool.
cpu_count: the total number of CPU cores in the pool.
socket_count: the total number of CPU sockets in the pool.
The pool.other_config:cpuid_feature_mask override key will no longer have any effect on pool join or VM migration.
The field VM.last_boot_CPU_flags will be updated to the new format (see host.cpu_info:features). It will still contain the feature set that the VM was started with as well as the vendor (under the features and vendor keys respectively).
Messages
pool.join currently requires that the CPU vendor and feature set (according to host.cpu_info:vendor and host.cpu_info:features) of the joining host are equal to those of the pool master. This requirement will be loosened to mandate only equality in CPU vendor:
The join will be allowed if host.cpu_info:vendor equals pool.cpu_info:vendor.
This means that xapi will additionally allow hosts that have a more extensive feature set than the pool (as long as the CPU vendor is common). Such hosts are transparently down-levelled to the pool level (without needing reboots).
This further means that xapi will additionally allow hosts that have a less extensive feature set than the pool (as long as the CPU vendor is common). In this case, the pool is transparently down-levelled to the new host’s level (without needing reboots). Note that this does not affect any running VMs in any way; the mobility of running VMs will not be restricted, which can still migrate to any host they could migrate to before. It does mean that those running VMs will not be migratable to the new host.
The current error raised in case of a CPU mismatch is POOL_HOSTS_NOT_HOMOGENEOUS with reason argument "CPUs differ". This will remain the error that is raised if the pool join fails due to incompatible CPU vendors.
The pool.other_config:cpuid_feature_mask override key will no longer have any effect.
host.set_cpu_features and host.reset_cpu_features will be removed: it is no longer to use the old method of CPU feature masking (CPU feature sets are controlled automatically by xapi). Calls will fail with MESSAGE_REMOVED.
VM lifecycle operations will be updated internally to use the new feature fields, to ensure that:
Newly started VMs will be given CPU features according to the pool level for maximal mobility.
For safety, running VMs will maintain their feature set across migrations and suspend/resume cycles. CPU features will transparently be hidden from VMs.
Furthermore, migrate and resume will only be allowed in case the target host’s CPUs are capable enough, i.e. host.cpu_info:vendor = VM.last_boot_CPU_flags:vendor and host.cpu_info:features_{pv,hvm} ⊇ VM.last_boot_CPU_flags:features. A VM_INCOMPATIBLE_WITH_THIS_HOST error will be returned otherwise (as happens today).
For cross pool migrations, to ensure maximal mobility in the target pool, a stricter condition will apply: the VM must satisfy the pool CPU level rather than just the target host’s level: pool.cpu_info:vendor = VM.last_boot_CPU_flags:vendor and pool.cpu_info:features_{pv,hvm} ⊇ VM.last_boot_CPU_flags:features
CLI Changes
The following changes to the xe CLI will be made:
xe host-cpu-info (as well as xe host-param-list and friends) will return the fields of host.cpu_info as described above.
xe host-set-cpu-features and xe host-reset-cpu-features will be removed.
xe host-get-cpu-features will still return the value of host.cpu_info:features for a given host.
Low-level implementation
Xenctrl
The old xc_get_boot_cpufeatures hypercall will be removed, and replaced by two new functions, which are available to xenopsd through the Xenctrl module:
In particular, the get_featureset function will be used by xapi/xenopsd to ask Xen which are the widest sets of CPU features that it can offer to a VM (PV or HVM). I don’t think there is a use for get_levelling_caps yet.
Xenopsd
Update the type Host.cpu_info, which contains all the fields that need to go into the host.cpu_info field in the xapi DB. The type already exists but is unused. Add the function HOST.get_cpu_info to obtain an instance of the type. Some code from xapi and the cpuid.ml from xen-api-libs can be reused.
Add a platform key featureset (Vm.t.platformdata), which xenopsd will write to xenstore along with the other platform keys (no code change needed in xenopsd). Xenguest will pick this up when a domain is created, and will apply the CPUID policy to the domain. This has the effect of masking out features that the host may have, but which have a 0 in the feature set bitmap.
Review current cpuid-related functions in xc/domain.ml.
Xapi
Xapi startup
Update Create_misc.create_host_cpu function to use the new xenopsd call.
If the host features fall below pool level, e.g. due to a change in hardware: down-level the pool by updating pool.cpu_info.features_{pv,hvm}. Newly started VMs will inherit the new level; already running VMs will not be affected, but will not be able to migrate to this host.
To notify the admin of this event, an API alert (message) will be set: pool_cpu_features_downgraded.
VM start
Inherit feature set from pool (pool.cpu_info.features_{pv,hvm}) and set VM.last_boot_CPU_flags (cpuid_helpers.ml).
The domain will be started with this CPU feature set enabled, by writing the feature set string to platformdata (see above).
VM migrate and resume
There are already CPU compatiblity checks on migration, both in-pool and cross-pool, as well as resume. Xapi compares VM.last_boot_CPU_flags of the VM to-migrate with host.cpu_info of the receiving host. Migration is only allowed if the CPU vendors and the same, and host.cpu_info:features ⊇ VM.last_boot_CPU_flags:features. The check can be overridden by setting the force argument to true.
For in-pool migrations, these checks will be updated to use the appropriate features_pv or features_hvm field.
For cross-pool migrations. These checks will be updated to use pool.cpu_info (features_pv or features_hvm depending on how the VM was booted) rather than host.cpu_info.
If the above checks pass, then the VM.last_boot_CPU_flags will be maintained, and the new domain will be started with the same CPU feature set enabled, by writing the feature set string to platformdata (see above).
In case the VM is migrated to a host with a higher xapi software version (e.g. a migration from a host that does not have CPU levelling v2), the feature string may be longer. This may happen during a rolling pool upgrade or a cross-pool migration, or when a suspended VM is resume after an upgrade. In this case, the following safety rules apply:
Only the existing (shorter) feature string will be used to determine whether the migration will be allowed. This is the best we can do, because we are unaware of the state of the extended feature set on the older host.
The existing feature set in VM.last_boot_CPU_flags will be extended with the extra bits in host.cpu_info:features_{pv,hvm}, i.e. the widest feature set that can possibly be granted to the VM (just in case the VM was using any of these features before the migration).
Strictly speaking, a migration of a VM from host A to B that was allowed before B was upgraded, may no longer be allowed after the upgrade, due to stricter feature sets in the new implementation (from the xc_get_featureset hypercall). However, the CPU features that are switched off by the new implementation are features that a VM would not have been able to actually use. We therefore need a don’t-care feature set (similar to the old pool.other_config:cpuid_feature_mask key) with bits that we may ignore in migration checks, and switch off after the migration. This will be a xapi config file option.
XXX: Can we actually block a cross-pool migration at the receiver end??
VM import
The VM.last_boot_CPU_flags field must be upgraded to the new format (only really needed for VMs that were suspended while exported; preserve_power_state=true), as described above.
Pool join
Update pool join checks according to the rules above (see pool.join), i.e. remove the CPU features constraints.
Upgrade
The pool level (pool.cpu_info) will be initialised when the pool master upgrades, and automatically adjusted if needed (downwards) when slaves are upgraded, by each upgraded host’s started sequence (as above under “Xapi startup”).
The VM.last_boot_CPU_flags fields of running and suspended VMs will be “upgraded” to the new format on demand, when a VM is migrated to or resume on an upgraded host, as described above.
XenCenter integration
Don’t explicitly down-level upon join anymore
Become aware of new pool join rule
Update Rolling Pool Upgrade
Design document
Revision
v1
Status
proposed
Distributed database
All hosts in a pool use the shared database by sending queries to
the pool master. This creates
a performance bottleneck as the pool size increases
a reliability problem when the master fails.
The reliability problem can be ameliorated by running with HA enabled,
but this is not always possible.
Both problems can be addressed by observing that the database objects
correspond to distinct physical objects where eventual consistency is
perfectly ok. For example if host ‘A’ is running a VM and changes the
VM’s name, it doesn’t matter if it takes a while before the change shows
up on host ‘B’. If host ‘B’ changes its network configuration then it
doesn’t matter how long it takes host ‘A’ to notice. We would still like
the metadata to be replicated to cope with failure, but we can allow
changes to be committed locally and synchronised later.
Note the one exception to this pattern: the current SM plugins use database
fields to implement locks. This should be shifted to a special-purpose
lock acquire/release API.
Using git via Irmin
A git repository is a database of key=value pairs with branching history.
If we placed our host and VM metadata in git then we could commit
changes and pull and push them between replicas. The
Irmin library provides an easy programming
interface on top of git which we could link with the Xapi database layer.
Proposed new architecture
The diagram above shows two hosts: one a master and the other a regular host.
The XenAPI client has sent a request to the wrong host; normally this would
result in a HOST_IS_SLAVE error being sent to the client. In the new
world, the host is able to process the request, only contacting the master
if it is necessary to acquire a lock. Starting a VM would require a lock; but
rebooting or migrating an existing VM would not. Assuming the lock can
be acquired, then the operation is executed locally with all state updates
being made to a git topic branch.
Roughly we would have 1 topic branch per
pending XenAPI Task. Once the Task completes successfully, the topic branch
(containing the new VM state) is merged back into master.
Separately each
host will pull and push updates between each other for replication.
We would avoid merge conflicts by construction; either
a host’s configuration will always be “owned” by the host and it will be
an error for anyone else to merge updates to it
the master’s locking will guarantee that a VM is running on at most one
host at a time. It will be an error for anyone else to merge updates to it.
What we gain
We will gain the following
the master will only be a bottleneck when the number of VM locks gets
really large;
you will be able to connect XenCenter to hosts without a master and manage
them. Today such hosts are unmanageable.
the database will have a history and you’ll be able to “go back in time”
either for debugging or to recover from mistakes
bugs caused by concurrent threads (in separate Tasks) confusing each other
will be vanquished. A typical failure mode is: one active thread destroys
an object; a passive thread sees the object and then tries to read it
and gets a database failure instead. Since every thread is operating a
separate Task they will all have their own branch and will be isolated from
each other.
What we lose
We will lose the following
the ability to use the Xapi database as a “lock”
coherence between hosts: there will be no guarantee that an effect seen
by host ‘A’ will be seen immediately by host ‘B’. In particular this means
that clients should send all their commands and event.from calls to
the same host (although any host will do)
Stuff we need to build
A pull/push replicator: this would have to monitor the list
of hosts in the pool and distribute updates to them in some vaguely
efficient manner. Ideally we would avoid hassling the pool master and
use some more efficient topology: perhaps a tree?
A git diff to XenAPI event converter: whenever a host pulls
updates from another it needs to convert the diff into a set of touched
objects for any event.from to read. We could send the changeset hash
as the event.from token.
Irmin nested views: since Tasks can be nested (and git branches can be
nested) we need to make sure that Irmin views can be nested.
We need to go through the xapi code and convert all mixtures of database
access and XenAPI updates into pure database calls. With the previous system
it was better to use a XenAPI to remote large chunks of database effects to
the master than to perform them locally. It will now be better to run them
all locally and merge them at the end. Additionally since a Task will have
a local branch, it won’t be possible to see the state on a remote host
without triggering an early merge (which would harm efficiency)
We need to create a first-class locking API to use instead of the
VDI.sm_config locks.
$ git clone /xapi.db db
Cloning into 'db'...
done.
$ cd db; ls
xapi
$ ls xapi
console host_metrics PCI pool SR user VM
host network PIF session tables VBD VM_metrics
host_cpu PBD PIF_metrics SM task VDI
$ ls xapi/pool
OpaqueRef:39adc911-0c32-9e13-91a8-43a25939110b
$ ls xapi/pool/OpaqueRef\:39adc911-0c32-9e13-91a8-43a25939110b/
crash_dump_SR __mtime suspend_image_SR
__ctime name_description uuid
default_SR name_label vswitch_controller
ha_allow_overcommit other_config wlb_enabled
ha_enabled redo_log_enabled wlb_password
ha_host_failures_to_tolerate redo_log_vdi wlb_url
ha_overcommitted ref wlb_username
ha_plan_exists_for _ref wlb_verify_cert
master restrictions
$ ls xapi/pool/OpaqueRef\:39adc911-0c32-9e13-91a8-43a25939110b/other_config/
cpuid_feature_mask memory-ratio-hvm memory-ratio-pv
$ cat xapi/pool/OpaqueRef\:39adc911-0c32-9e13-91a8-43a25939110b/other_config/cpuid_feature_mask
ffffff7f-ffffffff-ffffffff-ffffffff
Notice how:
every object is a directory
every key/value pair is represented as a file
Design document
Revision
v1
Status
released (6.0.2)
Emergency Network Reset Design
This document describes design details for the PR-1032 requirements.
The design consists of four parts:
A new XenAPI call Host.reset_networking, which removes all the
PIFs, Bonds, VLANs and tunnels associated with the given host, and a
call PIF.scan_bios to bring back the PIFs with device names as
defined in the BIOS.
A xe-reset-networking script that can be executed on a XenServer
host, which prepares the reset and causes the host to reboot.
An xsconsole page that essentially does the same as
xe-reset-networking.
A new item in the XAPI start-up sequence, which when triggered by
xe-reset-networking, calls Host.reset_networking and re-creates
the PIFs.
Command-Line Utility
The xe-reset-networking script takes the following parameters:
Parameter
Description
-m, --master
The IP address of the master. Optional if the host is pool slave, ignored otherwise.
--device
Device name of management interface. Optional. If not specified, it is taken from the firstboot data.
--mode
IP configuration mode for management interface. Optional. Either dhcp or static (default is dhcp).
--ip
IP address for management interface. Required if --mode=static, ignored otherwise.
--netmask
Netmask for management interface. Required if --mode=static, ignored otherwise.
--gateway
Gateway for management interface. Optional; ignored if --mode=dhcp.
--dns
DNS server for management interface. Optional; ignored if --mode=dhcp.
DNS server for management interface. Optional; ignored if --mode=dhcp.
The script takes the following steps after processing the given
parameters:
Inform the user that the host will be restarted, and that any
running VMs should be shut down. Make the user confirm that they
really want to reset the networking by typing ‘yes’.
Read /etc/xensource/pool.conf to determine whether the host is a
pool master or pool slave.
If a pool slave, update the IP address in the pool.conf file to
the one given in the -m parameter, if present.
Shut down networking subsystem (service network stop).
If no management device is specified, take it from
/etc/firstboot.d/data/management.conf.
If XAPI is running, stop it.
Reconfigure the management interface and associated bridge by
interface-reconfigure --force.
Update MANAGEMENT_INTERFACE and clear CURRENT_INTERFACES in
/etc/xensource-inventory.
Create the file /tmp/network-reset to trigger XAPI to complete the
network reset after the reboot. This file should contain the full
configuration details of the management interface as key/value pairs
(format: <key>=<value>\n), and looks similar to the firstboot data
files. The file contains at least the keys DEVICE and MODE, and
IP, NETMASK, GATEWAY, or DNS when appropriate.
Reboot
XAPI
XenAPI
A new hidden API call:
Host.reset_networking
Parameter: host reference host
Calling this function removes all the PIF, Bond, VLAN and tunnel
objects associated with the given host from the master database.
All Network and VIF objects are maintained, as these do not
necessarily belong to a single host.
Start-up Sequence
After reboot, in the XAPI start-up sequence trigged by the presence of
/tmp/network-reset:
Read the desired management configuration from /tmp/network-reset.
Call Host.reset_networking with a ref to the localhost.
Call PIF.scan with a ref to the localhost to recreate the
(physical) PIFs.
Call PIF.reconfigure_ip to configure the management interface.
Call Host.management_reconfigure.
Delete /tmp/network-reset.
xsconsole
Add an “Emergency Network Reset” option under the “Network and
Management Interface” menu. Selecting this option will show some
explanation in the pane on the right-hand side. Pressing <Enter> will
bring up a dialogue to select the interfaces to use as management
interface after the reset. After choosing a device, the dialogue
continues with configuration options like in the “Configure Management
Interface” dialogue. After completing the dialogue, the same steps as
listed for xe-reset-networking are executed.
Notes
On a pool slave, the management interface should be the same as on
the master (the same device name, e.g. eth0).
Resetting the networking configuration on the master should be
ideally be followed by resets of the pool slaves as well, in order
to synchronise their configuration (especially bonds/VLANs/tunnels).
Furthermore, in case the IP address of the master has changed, as a
result of a network reset or Host.management_reconfigure, pool
slaves may also use the network reset functionality to reconnect to
the master on its new IP.
It has been possible to identify the NICs of a Host which can support FCoE.
This property can be listed in PIF object under capabilities field.
Introduction
FCoE supported on a NIC is a hardware property. With the help of dcbtool, we can identify which NIC support FCoE.
The new field capabilities will be Set(String) in PIF object. For FCoE capable NIC will have string “fcoe” in PIF capabilities field.
capabilities field will be ReadOnly, This field cannot be modified by user.
PIF Object
New field:
Field PIF.capabilities will be type Set(string).
Default value in PIF capabilities will have an empty set.
Xapi Changes
Set the field capabilities “fcoe” depending on output of xcp-networkd call get_capabilities.
Field capabilities “fcoe” can be set during introduce_internal on when creating a PIF.
Field capabilities “fcoe” can be updated during refresh_all on xapi startup.
The above field will be set everytime when xapi-restart.
XCP-Networkd Changes
New function:
String list string list get_capabilties (string)
Argument: device_name for the PIF.
This function calls method capable exposed by fcoe_driver.py as part of dom0.
It returns string list [“fcoe”] or [] depending on capable method output.
Defaults, Installation and Upgrade
Any newly introduced PIF will have its capabilities field as empty set until fcoe_driver method capable states FCoE is supported on the NIC.
It includes PIFs obtained after a fresh install of Xenserver, as well as PIFs created using PIF.introduce then PIF.scan.
During an upgrade Xapi Restart will call refresh_all which then populate the capabilities field as empty set.
Command Line Interface
The PIF.capabilities field is exposed through xe pif-list and xe pif-param-list as usual.
Design document
Revision
v1
Status
released (6.0)
GPU pass-through support
This document contains the software design for GPU pass-through. This
code was originally included in the version of Xapi used in XenServer 6.0.
Overview
Rather than modelling GPU pass-through from a PCI perspective, and
having the user manipulate PCI devices directly, we are taking a
higher-level view by introducing a dedicated graphics model. The
graphics model is similar to the networking and storage model, in which
virtual and physical devices are linked through an intermediate
abstraction layer (e.g. the “Network” class in the networking model).
The basic graphics model is as follows:
A host owns a number of physical GPU devices (pGPUs), each of
which is available for passing through to a VM.
A VM may have a virtual GPU device (vGPU), which means it expects
to have access to a GPU when it is running.
Identical pGPUs are grouped across a resource pool in GPU groups.
GPU groups are automatically created and maintained by XS.
A GPU group connects vGPUs to pGPUs in the same way as VIFs are
connected to PIFs by Network objects: for a VM v having a vGPU on
GPU group p to run on host h, host h must have a pGPU in GPU
group p and pass it through to VM v.
VM start and non-live migration rules are analogous to the network
API and follow the above rules.
In case a VM that has a vGPU is started, while no pGPU available, an
exception will occur and the VM won’t start. As a result, in order
to guarantee that a VM always has access to a pGPU, the number of
vGPUs should not exceed the number of pGPUs in a GPU group.
Currently, the following restrictions apply:
Hotplug is not supported.
Suspend/resume and checkpointing (memory snapshots) are not
supported.
Live migration (XenMotion) is not supported.
No more than one GPU per VM will be supported.
Only Windows guests will be supported.
XenAPI Changes
The design introduces a new generic class called PCI to capture state
and information about relevant PCI devices in a host. By default, xapi
would not create PCI objects for all PCI devices, but only for the ones
that are managed and configured by xapi; currently only GPU devices.
The PCI class has no fields specific to the type of the PCI device (e.g.
a graphics card or NIC). Instead, device specific objects will contain a
link to their underlying PCI device’s object.
The new XenAPI classes and changes to existing classes are detailed
below.
PCI class
Fields:
Name
Type
Description
uuid
string
Unique identifier/object reference.
class_id
string
PCI class ID (hidden field)
class_name
string
PCI class name (GPU, NIC, …)
vendor_id
string
Vendor ID (hidden field).
vendor_name
string
Vendor name.
device_id
string
Device ID (hidden field).
device_name
string
Device name.
host
host ref
The host that owns the PCI device.
pci_id
string
BDF (domain/Bus/Device/Function identifier) of the (physical) PCI function, e.g. “0000:00:1a.1”. The format is hhhh:hh:hh.h, where h is a hexadecimal digit.
functions
int
Number of (physical + virtual) functions; currently fixed at 1 (hidden field).
attached_VMs
VM ref set
List of VMs that have this PCI device “currently attached”, i.e. plugged, i.e. passed-through to (hidden field).
dependencies
PCI ref set
List of dependent PCI devices: all of these need to be passed-thru to the same VM (co-location).
other_config
(string -> string) map
Additional optional configuration (as usual).
Hidden fields are only for use by xapi internally, and not visible to
XenAPI users.
Messages: none.
PGPU class
A physical GPU device (pGPU).
Fields:
Name
Type
Description
uuid
string
Unique identifier/object reference.
PCI
PCI ref
Link to the underlying PCI device.
other_config
(string -> string) map
Additional optional configuration (as usual).
host
host ref
The host that owns the GPU.
GPU_group
GPU_group ref
GPU group the pGPU is contained in. Can be Null.
Messages: none.
GPU_group class
A group of identical GPUs across hosts. A VM that is associated with a
GPU group can use any of the GPUs in the group. A VM does not need to
install new GPU drivers if moving from one GPU to another one in the
same GPU group.
Fields:
Name
Type
Description
VGPUs
VGPU ref set
List of vGPUs in the group.
uuid
string
Unique identifier/object reference.
PGPUs
PGPU ref set
List of pGPUs in the group.
other_config
(string -> string) map
Additional optional configuration (as usual).
name_label
string
A human-readable name.
name_description
string
A notes field containing human-readable description.
GPU_types
string set
List of GPU types (vendor+device ID) that can be in this group (hidden field).
Messages: none.
VGPU class
A virtual GPU device (vGPU).
Fields:
Name
Type
Description
uuid
string
Unique identifier/object reference.
VM
VM ref
VM that owns the vGPU.
GPU_group
GPU_group ref
GPU group the vGPU is contained in.
currently_attached
bool
Reflects whether the virtual device is currently “connected” to a physical device.
device
string
Order in which the devices are plugged into the VM. Restricted to “0” for now.
other_config
(string -> string) map
Additional optional configuration (as usual).
Messages:
Prototype
Description
VGPU ref create (GPU_group ref, string, VM ref)
Manually assign the vGPU device to the VM given a device number, and link it to the given GPU group.
void destroy (VGPU ref)
Remove the association between the GPU group and the VM.
It is possible to assign more vGPUs to a group than number number of
pGPUs in the group. When a VM is started, a pGPU must be available; if
not, the VM will not start. Therefore, to guarantee that a VM has access
to a pGPU at any time, one must manually enforce that the number of
vGPUs in a GPU group does not exceed the number of pGPUs. XenCenter
might display a warning, or simply refuse to assign a vGPU, if this
constraint is violated. This is analogous to the handling of memory
availability in a pool: a VM may not be able to start if there is no
host having enough free memory.
VM class
Fields:
Deprecate (unused) PCI_bus field
Add field VGPU ref set VGPUs: List of vGPUs.
Add field PCI ref set attached_PCIs: List of PCI devices that are
“currently attached” (plugged, passed-through) (hidden field).
host class
Fields:
Add field PCI ref set PCIs: List of PCI devices.
Add field PGPU ref set PGPUs: List of physical GPU devices.
Add field (string -> string) map chipset_info, which contains at
least the key iommu. If "true", this key indicates whether the
host has IOMMU/VT-d support build in, and this functionality is
enabled by Xen; the value will be "false" otherwise.
Initialisation and Operations
Enabling IOMMU/VT-d
(This may not be needed in Xen 4.1. Confirm with Simon.)
PCI devices are matched on the combination of their pci_id,
vendor_id, and device_id.
First boot and any subsequent xapi start:
Find out from dmesg whether IOMMU support is present and enabled in
Xen, and set host.chipset_info:iommu accordingly.
Detect GPU devices currently present in the host. For each:
If there is no matching PGPU object yet, create a PGPU object,
and add it to a GPU group containing identical PGPUs, or a new
group.
If there is no matching PCI object yet, create one, and also
create or update the PCI objects for dependent devices.
Destroy all existing PCI objects of devices that are not currently
present in the host (i.e. objects for devices that have been
replaced or removed).
Destroy all existing PGPU objects of GPUs that are not currently
present in the host. Send a XenAPI alert to notify the user of this
fact.
Update the list of dependencies on all PCI objects.
Sync VGPU.currently_attached on all VGPU objects.
Upgrade
For any VMs that have VM.other_config:pci set to use a GPU, create an
appropriate vGPU, and remove the other_config option.
Generic PCI Interface
A generic PCI interface exposed to higher-level code, such as the
networking and GPU management modules within Xapi. This functionality
relies on Xenops.
The PCI module exposes the following functions:
Check whether a PCI device has free (unassigned) functions. This is
the case if the number of assignments in PCI.attached_VMs is
smaller than PCI.functions.
Plug a PCI function into a running VM.
Raise exception if there are no free functions.
Plug PCI device, as well as dependent PCI devices. The PCI
module must also tell device-specific modules to update the
currently_attached field on dependent VGPU objects etc.
Update PCI.attached_VMs.
Unplug a PCI function from a running VM.
Raise exception if the PCI function is not owned by (passed
through to) the VM.
Unplug PCI device, as well as dependent PCI devices. The PCI
module must also tell device-specific modules to update the
currently_attached field on dependent VGPU objects etc.
Update PCI.attached_VMs.
Construction and Destruction
VGPU.create:
Check license. Raise FEATURE_RESTRICTED if the GPU feature has not
been enabled.
Raise INVALID_DEVICE if the given device number is not “0”, or
DEVICE_ALREADY_EXISTS if (indeed) the device already exists. This
is a convenient way of enforcing that only one vGPU per VM is
supported, for now.
Create VGPU object in the DB.
Initialise VGPU.currently_attached = false.
Return a ref to the new object.
VGPU.destroy:
Raise OPERATION_NOT_ALLOWED if VGPU.currently_attached = true
and the VM is running.
Destroy VGPU object.
VM Operations
VM.start(_on):
If host.chipset_info:iommu = "false", raise VM_REQUIRES_IOMMU.
Raise FEATURE_REQUIRES_HVM (carrying the string “GPU passthrough
needs HVM”) if the VM is PV rather than HVM.
For each of the VM’s vGPUs:
Confirm that the given host has a pGPU in its associated GPU
group. If not, raise VM_REQUIRES_GPU.
Consult the generic PCI module for all pGPUs in the group to
find out whether a suitable PCI function is available. If a
physical device is not available, raise VM_REQUIRES_GPU.
Ask PCI module to plug an available pGPU into the VM’s domain
and set VGPU.currently_attached to true. As a side-effect,
any dependent PCI devices would be plugged.
VM.shutdown:
Ask PCI module to unplug all GPU devices.
Set VGPU.currently_attached to false for all the VM’s VGPUs.
VM.suspend, VM.resume(_on):
Raise VM_HAS_PCI_ATTACHED if the VM has any plugged VGPU
objects, as suspend/resume for VMs with GPUs is currently not
supported.
VM.pool_migrate:
Raise VM_HAS_PCI_ATTACHED if the VM has any plugged VGPU
objects, as live migration for VMs with GPUs is currently not
supported.
VM.clone, VM.copy, VM.snapshot:
Copy VGPU objects along with the VM.
VM.import, VM.export:
Include VGPU and GPU_group objects in the VM export format.
VM.checkpoint
Raise VM_HAS_PCI_ATTACHED if the VM has any plugged VGPU
objects, as checkpointing for VMs with GPUs is currently not
supported.
Pool Join and Eject
Pool join:
For each PGPU:
Copy it to the pool.
Add it to a GPU_group of identical PGPUs, or a new one.
Copy each VGPU to the pool together with the VM that owns it, and
add it to the GPU group containing the same PGPU as before the
join.
Step 1 is done automatically by the xapi startup code, and step 2 is
handled by the VM export/import code. Hence, no work needed.
Pool eject:
VGPU objects will be automatically GC’ed when the VMs are removed.
Xapi’s startup code recreates the PGPU and GPU_group objects.
Hence, no work needed.
Required Low-level Interface
Xapi needs a way to obtain a list of all PCI devices present on a host.
For each device, xapi needs to know:
The PCI ID (BDF).
The type of device (NIC, GPU, …) according to a well-defined and
stable list of device types (as in /usr/share/hwdata/pci.ids).
The device and vendor ID+name (currently, for PIFs, xapi looks up
the name in /usr/share/hwdata/pci.ids).
Which other devices/functions are required to be passed through to
the same VM (co-located), e.g. other functions of a compound PCI
device.
Documented interface changes between xapi and xenopsd for vGPU
v2
Added design for storing vGPU-to-pGPU allocation in xapi database
v3
Marked new xapi DB fields as internal-only
GPU support evolution
Introduction
As of XenServer 6.5, VMs can be provisioned with access to graphics processors
(either emulated or passed through) in four different ways. Virtualisation of
Intel graphics processors will exist as a fifth kind of graphics processing
available to VMs. These five situations all require the VM’s device model to be
created in subtly different ways:
Pure software emulation
qemu is launched either with no special parameter, if the basic Cirrus
graphics processor is required, otherwise qemu is launched with the
-std-vga flag.
Generic GPU passthrough
qemu is launched with the -priv flag to turn on privilege separation
qemu can additionally be passed the -std-vga flag to choose the
corresponding emulated graphics card.
Intel integrated GPU passthrough (GVT-d)
As well as the -priv flag, qemu must be launched with the -std-vga and
-gfx_passthru flags. The actual PCI passthrough is handled separately
via xen.
NVIDIA vGPU
qemu is launched with the -vgpu flag
a secondary display emulator, demu, is launched with the following parameters:
--domain - the VM’s domain ID
--vcpus - the number of vcpus available to the VM
--gpu - the PCI address of the physical GPU on which the emulated GPU will
run
--config - the path to the config file which contains detail of the GPU to
emulate
Intel vGPU (GVT-g)
here demu is not used, but instead qemu is launched with five parameters:
-xengt
-vgt_low_gm_sz - the low GM size in MiB
-vgt_high_gm_sz - the high GM size in MiB
-vgt_fence_sz - the number of fence registers
-priv
xenopsd
To handle all these possibilities, we will add some new types to xenopsd’s
interface:
module Pci = struct
type address = {
domain: int;
bus: int;
device: int;
fn: int;
}
...
end
module Vgpu = struct
type gvt_g = {
physical_pci_address: Pci.address;
low_gm_sz: int64;
high_gm_sz: int64;
fence_sz: int;
}
type nvidia = {
physical_pci_address: Pci.address;
config_file: string
}
type implementation =
| GVT_g of gvt_g
| Nvidia of nvidia
type id = string * string
type t = {
id: id;
position: int;
implementation: implementation;
}
type state = {
plugged: bool;
emulator_pid: int option;
}
end
module Vm = struct
type igd_passthrough of
| GVT_d
type video_card =
| Cirrus
| Standard_VGA
| Vgpu
| Igd_passthrough of igd_passthrough
...
end
module Metadata = struct
type t = {
vm: Vm.t;
vbds: Vbd.t list;
vifs: Vif.t list;
pcis: Pci.t list;
vgpus: Vgpu.t list;
domains: string option;
}
end
The video_card type is used to indicate to the function
Xenops_server_xen.VM.create_device_model_config how the VM’s emulated graphics
card will be implemented. A value of Vgpu indicates that the VM needs to be
started with one or more virtualised GPUs - the function will need to look at
the list of GPUs associated with the VM to work out exactly what parameters to
send to qemu.
If Vgpu.state.emulator_pid of a plugged vGPU is None, this indicates that
the emulation of the vGPU is being done by qemu rather than by a separate
emulator.
n.b. adding the vgpus field to Metadata.t will break backwards compatibility
with old versions of xenopsd, so some upgrade logic will be required.
This interface will allow us to support multiple vGPUs per VM in future if
necessary, although this may also require reworking the interface between
xenopsd, qemu and demu. For now, xenopsd will throw an exception if it is asked
to start a VM with more than one vGPU.
xapi
To support the above interface, xapi will convert all of a VM’s non-passthrough
GPUs into Vgpu.t objects when sending VM metadata to xenopsd.
In contrast to GVT-d, which can only be run on an Intel GPU which has been
has been hidden from dom0, GVT-g will only be allowed to run on a GPU which has
not been hidden from dom0.
If a GVT-g-capable GPU is detected, and it is not hidden from dom0, xapi will
create a set of VGPU_type objects to represent the vGPU presets which can run on
the physical GPU. Exactly how these presets are defined is TBD, but a likely
solution is via a set of config files as with NVIDIA vGPU.
Allocation of vGPUs to physical GPUs
For NVIDIA vGPU, when starting a VM, each vGPU attached to the VM is assigned
to a physical GPU as a result of capacity planning at the pool level. The
resulting configuration is stored in the VM.platform dictionary, under
specific keys:
vgpu_pci_id - the address of the physical GPU on which the vGPU will run
vgpu_config - the path to the vGPU config file which the emulator will use
Instead of storing the assignment in these fields, we will add a new
internal-only database field:
VGPU.scheduled_to_be_resident_on (API.ref_PGPU)
This will be set to the ref of the physical GPU on which the vGPU will run. From
here, xapi can easily obtain the GPU’s PCI address. Capacity planning will also
take into account which vGPUs are scheduled to be resident on a physical GPU,
which will avoid races resulting from many vGPU-enabled VMs being started at
once.
The path to the config file is already stored in the VGPU_type.internal_config
dictionary, under the key vgpu_config. xapi will use this value directly
rather than copying it to VM.platform.
To support other vGPU implementations, we will add another internal-only
database field:
For the GVT_g implementation, no config file is needed. Instead,
VGPU_type.internal_config will contain three key-value pairs, with the keys
vgt_low_gm_sz
vgt_high_gm_sz
vgt_fence_sz
The values of these pairs will be used to construct a value of type
Xenops_interface.Vgpu.gvt_g, which will be passed down to xenopsd.
Design document
Revision
v1
Status
released (6.5)
GRO and other properties of PIFs
It has been possible to enable and disable GRO and other “ethtool” features on
PIFs for a long time, but there was never an official API for it. Now there is.
Introduction
The former way to enable GRO via the CLI is as follows:
The other-config field is a grab-bag of options that are not clearly defined.
The options exposed through other-config are mostly experimental features, and
the interface is not considered stable. Furthermore, the field is read/write
and does not have any input validation, and cannot not trigger any actions
immediately. The latter is why it is needed to call pif-plug after setting
the ethtool-gro key, in order to actually make things happen.
New API
New field:
Field PIF.properties of type (string -> string) map.
Physical and bond PIFs have a gro key in their properties, with possible values on and off. There are currently no other properties defined.
VLAN and Tunnel PIFs do not have any properties. They implicitly inherit the properties from the PIF they are based upon (either a physical PIF or a bond).
For backwards compatibility, if there is a other-config:ethtool-gro key present on the PIF, it will be treated as an override of the gro key in PIF.properties.
First argument: the reference of the PIF to act on.
Second argument: the key to change in the properties field.
Third argument: the value to write.
The function can only be used on physical PIFs that are not bonded, and on bond PIFs. Attempts to call the function on bond slaves, VLAN PIFs, or Tunnel PIFs, fail with CANNOT_CHANGE_PIF_PROPERTIES.
Calls with invalid keys or values fail with INVALID_VALUE.
When called on a bond PIF, the key in the properties of the associated bond slaves will also be set to same value.
The function automatically causes the settings to be applied to the network devices (no additional plug is needed). This includes any VLANs that are on top of the PIF to-be-changed, as well as any bond slaves.
Defaults, Installation and Upgrade
Any newly introduced PIF will have its properties field set to "gro" -> "on". This includes PIFs obtained after a fresh installation of XenServer, as well as PIFs created using PIF.introduce or PIF.scan. In other words, GRO will be “on” by default.
An upgrade from a version of XenServer that does not have the PIF.properties field, will give every physical and bond PIF a properties field set to "gro" -> "on". In other words, GRO will be “on” by default after an upgrade.
Bonding
When creating a bond, the bond-slaves-to-be must all have equal PIF.properties. If not, the bond.create call will fail with INCOMPATIBLE_BOND_PROPERTIES.
When a bond is created successfully, the properties of the bond PIF will be equal to the properties of the bond slaves.
Command Line Interface
The PIF.properties field is exposed through xe pif-list and xe pif-param-list as usual.
The PIF.set_property call is exposed through xe pif-param-set. For example: xe pif-param-set uuid=<pif-uuid> properties:gro=off.
Design document
Revision
v1
Status
draft
Handling Microsoft Secure Boot Certificate Expiry
1. Background
Microsoft Secure Boot certificates from 2011 are reaching end-of-life, and legacy VMs may still contain only the old certificate set. XenServer needs an out-of-band mechanism to update per-VM UEFI Secure Boot variables safely and at scale.
Scope of this design:
Update certificate state tracking and update flow for VMs, snapshots, and templates
Provide API support for scheduling certificate updates on VM boot
Integrate xapi and varstored behavior for consistent state handling
2. System Overview
2.1 Out-of-band Update Mechanism
Certificate update is implemented as a dedicated API-driven workflow (not a plugin), so that:
The interface is documented and SDK-generated
RBAC can be assigned precisely
xapi can route requests and coordinate host-side behavior consistently
2.2 Certificate State Tracking
A new VM field is introduced:
VM.secureboot_certificates_state (enum, readonly)
States:
ok: No update required (including non-applicable VM types)
update_available: Update required
update_on_boot: Update scheduled for next boot
stateDiagram
update_available --> update_on_boot : Admin marks VM for update
update_on_boot --> ok : VM boots, update succeeds
update_on_boot --> update_on_boot : VM boots, update fails(retain state)
ok --> update_available : recompute state(e.g. legacy VM import)
2.3 RBAC
The new update API follows VM-admin-level access, aligned with existing NVRAM-related VM operations.
3. Design for Components
3.1 VM Certificate State Model
VM.secureboot_certificates_state applies to these VM-class objects,
VMs
Snapshots
Templates
Transition intent:
Admin marks a VM for update: update_available -> update_on_boot
VM boots and update succeeds: update_on_boot -> ok
VM boots and update fails: remains update_on_boot or is reset to update_available based on update result handling
mark=true: require current state update_available, then set update_on_boot
mark=false: require current state update_on_boot, then set update_available
Validation:
Reject invalid transitions with OPERATION_NOT_ALLOWED
3.3 DB Upgrade and Import Handling
On toolstack restart after upgrade:
Initialize secureboot_certificates_state for all VM records to ok
Re-evaluate NVRAM and set update_available where needed
Applied to:
VMs
Snapshots
Non-default templates
Default templates remain ok.
For VM import and cross-pool migration:
If imported metadata lacks secureboot_certificates_state, determine state from NVRAM and set it during import
If imported metadata contains secureboot_certificates_state, reserve the state during import
3.4 NVRAM and State Consistency
The certificate state must stay consistent with actual NVRAM content.
Key interface change:
Extend VM.set_NVRAM_EFI_variables with optional parameter update, we call it VM.set_NVRAM_EFI_variables_V2
Rules:
update=yes -> set state ok
update=no -> do not update state
omitted -> xapi runs certificate check helper and derives state
This ensures compatibility when old varstored instances are still running during rolling update windows.
3.5 Certificate Check Helper
A standalone program will be introduced, which xapi calls to determine the SecureBoot cert state
Inputs:
temp file path which contains NVRAM EFI-variables data
Behavior:
This program comes to use some common functions shared with varstored.
This program is launched by xapi, it is executed in a sandboxed and reduced privileges environment.
Xapi retrieves VM’s NVRAM content from database and passes it to this program via command-line arguments.
If this program outputs update_required, xapi sets VM.secureboot_certificates_state to be update_available.
If this program outputs update_ok, xapi sets VM.secureboot_certificates_state to be ok.
On toolstack restart, during DB upgrade, this program is invoked to compute VM.secureboot_certificates_state. Since xapi process has not completed initialization at that point, this program cannot call any services of xapi.
3.6 Boot-time Automatic Update Path
When varstored initializes a VM and sees secureboot_certificates_state=update_on_boot, varstored does,
Perform certificate update flow during boot-time initialization
Write updated NVRAM and synchronize state via VM.set_NVRAM_EFI_variables_V2
The VM.set_NVRAM_EFI_variables_V2 interface performs same as VM.set_NVRAM_EFI_variables, uses the existing varstored-guard process to make calls to xapi.
If VM.set_NVRAM_EFI_variables_V2 runs into error (e.g. there is something wrong with the communication with xapi),
xapi does not update VM NVRAM and VM.secureboot_certificates_state
VM boot gets stuck at the firmware initialization stage, if the issue is not fixed, rebooting the VM will still encounter the same problem
Once the issue is fixed, admin can continue the secureboot certificate upgrade by VM reboot
3.7 End-to-end Workflow
Upgrade packages (xapi-core, varstored, related components)
Restart toolstack
xapi DB upgrade initializes and recalculates secureboot_certificates_state
Admin marks selected VMs via VM.update_secureboot_certificates_on_boot
VM reboot triggers varstored certificate update
xapi updates state to reflect post-update NVRAM content
4. Out of Scope
User-notification mechanism for certificate expiry
Custom certificate workflow
Template/snapshot feature expansion beyond state tracking and conversion behavior
OS-specific test-process guidance
VM with Secure Boot PCR7 binding (e.g. Windows bitlocker), provide customer documentation to guide how to resolve such issues
Design document
Revision
v1
Status
released (5.6)
Heterogeneous pools
Notes
The cpuid instruction is used to obtain a CPU’s manufacturer,
family, model, stepping and features information.
The feature bitvector is 128 bits wide: 2 times 32 bits of base
features plus 2 times 32 bits of extended features, which are
referred to as base_ecx, base_edx, ext_ecx and ext_edx
(after the registers used by cpuid to store the results).
The feature bits can be masked by Intel FlexMigration and AMD
Extended Migration. This means that features can be made to appear
as absent. Hence, a CPU can appear as a less-capable CPU.
AMD Extended Migration is able to mask both base and extended
features.
Intel FlexMigration on Core 2 CPUs (Penryn) is able to mask
only the base features (base_ecx and base_edx). The
newer Nehalem and Westmere CPUs support extended-feature masking
as well.
A process in dom0 (e.g. xapi) is able to call cpuid to obtain the
(possibly modified) CPU info, or can obtain this information from
Xen. Masking is done only by Xen at boot time, before any domains
are loaded.
To apply a feature mask, a dom0 process may specify the mask in the
Xen command line in the file /boot/extlinux.conf. After a reboot,
the mask will be enforced.
It is not possible to obtain the original features from a dom0
process, if the features have been masked. Before applying the first
mask, the process could remember/store the original feature vector,
or obtain the information from Xen.
All CPU cores on a host can be assumed to be identical. Masking will
be done simultaneously on all cores in a host.
Whether a CPU supports FlexMigration/Extended Migration can (only)
be derived from the family/model/stepping information.
XS5.5 has an exception for the EST feature in base_ecx. This flag
is ignored on pool join.
Overview of XenAPI Changes
Fields
Currently, the datamodel has Host_cpu objects for each CPU core in a
host. As they are all identical, we are considering keeping just one CPU
record in the Host object itself, and deprecating the Host_cpu
class. For backwards compatibility, the Host_cpu objects will remain
as they are in MNR, but may be removed in subsequent releases.
Hence, there will be a new field called Host.cpu_info, a read-only
string-string map, containing the following fixed set of keys:
Key name
Description
cpu_count
The number of CPU cores in the host.
family
The family (number) of the CPU.
features
The current (possibly masked) feature vector, as given by cpuid. Format: "<base_ecx>-<base_edx>-<ext_ecx>-<ext_edx>", 4 groups of 8 hexadecimal digits, separated by dashes.
features_after_reboot
The feature vector to be used after rebooting the host. This field can be modified by calling Host.set_cpu_features. Same format as features.
flags
The flags of the physical CPU (a decoded version of the features field).
maskable
Indicating whether the CPU supports Intel FlexMigration or AMD Extended Migration. There are three possible values: "no" means that masking is not possible, "base" means that only base features can be masked, and "full" means that base as well as extended features can be masked.
model
The model number of the CPU.
modelname
The model name of the CPU.
physical_features
The original, unmasked features. Same format as features.
speed
The speed of the CPU.
stepping
The stepping of the CPU.
vendor
The manufacturer of the CPU.
Indicating whether the CPU supports Intel FlexMigration or AMD Extended
Migration. There are three possible values: "no" means that masking is
not possible, "base" means that only base features can be masked, and
"full" means that base as well as extended features can be masked.
Note: When the features and features_after_reboot are different,
XenCenter could display a warning saying that a reboot is needed to
enforce the feature masking.
The Pool.other_config:cpuid_feature_mask key is recognised. If this
key is present and if it contains a value in the same format as
Host.cpu_info:features, the value is used to mask the feature vectors
before comparisons during any pool join in the pool it is defined on.
This can be used to white-list certain feature flags, i.e. to ignore
them when adding a new host to a pool. The default it
ffffff7f-ffffffff-ffffffff-ffffffff, which white-lists the EST feature
for compatibility with XS 5.5 and earlier.
Messages
New messages:
Host.set_cpu_features
Parameters: Host reference host, new CPU feature vector
features.
Roles: only Pool Operator and Pool Admin.
Sets the feature vector to be used after a reboot
(Host.cpu_info:features_after_reboot), if features is valid.
Host.reset_cpu_features
Parameter: Host reference host.
Roles: only Pool Operator and Pool Admin.
Removes the feature mask, such that after a reboot all features
of the CPU are enabled.
XAPI
Back-end
Xen keeps the physical (unmasked) CPU features in memory when
starts, before applying any masks. Xen exposes the physical
features, as well as the current (possibly masked) features, to
dom0/xapi via the function xc_get_boot_cpufeatures in libxc.
A dom0 script /etc/xensource/libexec/xen-cmdline, which provides a
future-proof way of modifying the Xen command-line key/value pairs.
This script has the following options, where mask is one of
cpuid_mask_ecx, cpuid_mask_edx, cpuid_mask_ext_ecx or
cpuid_mask_ext_edx, and value is 0xhhhhhhhh (h is represents
a hex digit).:
--list-cpuid-masks
--set-cpuid-masks mask=value mask=value
--delete-cpuid-masks mask mask
A restrict_cpu_masking key has been added to the host licensing
restrictions map. This will be true when the Host.edition is
free, and false if it is enterprise or platinum.
Start-up
The Host.cpu_info field is refreshed:
The values for the keys cpu_count, vendor, speed, modelname,
flags, stepping, model, and family are obtained from
/etc/xensource/boot_time_cpus (and ultimately from
/proc/cpuinfo).
The values of the features and physical_features are obtained
from Xen and the features_after_reboot key is made equal to the
features field.
The value of the maskable key is determined by the CPU details.
for Intel Core2 (Penryn) CPUs:
family = 6 and (model = 1dh or (model = 17h and stepping >= 4))
(maskable = "base")
for Intel Nehalem/Westmere CPUs:
family = 6 and ((model = 1ah and stepping > 2) or model = 1eh or model = 25h or model = 2ch or model = 2eh or model = 2fh)
(maskable = "full")
for AMD CPUs: family >= 10h (maskable = "full")
Setting (Masking) and Resetting the CPU Features
The Host.set_cpu_features call:
checks whether the license of the host is Enterprise or
Platinum; throws FEATURE_RESTRICTED if not.
expects a string of 32 hexadecimal digits, optionally containing
spaces; throws INVALID_FEATURE_STRING if malformed.
checks whether the given feature vector can be formed by masking
the physical feature vector; throws INVALID_FEATURE_STRING if
not. Note that on Intel Core 2 CPUs, it is only possible to the
mask the base features!
checks whether the CPU supports FlexMigration/Extended
Migration; throws CPU_FEATURE_MASKING_NOT_SUPPORTED if not.
sets the value of features_after_reboot to the given feature
vector.
adds the new feature mask to the Xen command-line via the
xen-cmdline script. The mask is represented by one or more of
the following key/value pairs (where h represents a hex
digit):
cpuid_mask_ecx=0xhhhhhhhh
cpuid_mask_edx=0xhhhhhhhh
cpuid_mask_ext_ecx=0xhhhhhhhh
cpuid_mask_ext_edx=0xhhhhhhhh
The Host.reset_cpu_features call:
copies physical_features to features_after_reboot.
removes the feature mask from the Xen command-line via the
xen-cmdline script (if any).
Pool Join and Eject
Pool.join fails when the vendor and feature keys do not match,
and disregards any other key in Host.cpu_info.
However, as XS5.5 disregards the EST flag, there is a new way to
disregard/ignore feature flags on pool join, by setting a mask
in Pool.other_config:cpuid_feature_mask. The value of this
field should have the same format as Host.cpu_info:features.
When comparing the CPUID features of the pool and the joining
host for equality, this mask is applied before the comparison.
The default is ffffff7f-ffffffff-ffffffff-ffffffff, which
defines the EST feature, bit 7 of the base ecx flags, as “don’t
care”.
Pool.eject clears the database (as usual), and additionally
removes the feature mask from /boot/extlinux.conf (if any).
CLI
New commands:
host-cpu-info
Parameters: uuid (optional, uses localhost if absent).
Lists Host.cpu_info associated with the host.
host-get-cpu-features
Parameters: uuid (optional, uses localhost if absent).
Returns the value of Host.cpu_info:features] associated with
the host.
host-set-cpu-features
Parameters: features (string of 32 hexadecimal digits,
optionally containing spaces or dashes), uuid (optional, uses
localhost if absent).
Calls Host.set_cpu_features.
host-reset-cpu-features
Parameters: uuid (optional, uses localhost if absent).
Calls Host.reset_cpu_features.
The following commands will be deprecated: host-cpu-list,
host-cpu-param-get, host-cpu-param-list.
WARNING:
If the user is able to set any mask they like, they may end up disabling
CPU features that are required by dom0 (and probably other guest OSes),
resulting in a kernel panic when the machine restarts. Hence, using the
set function is potentially dangerous.
It is apparently not easy to find out exactly which flags are safe to
mask and which aren’t, so we cannot prevent an API/CLI user from making
mistakes in this way. However, using XenCenter would always be safe, as
XC always copies features masks from real hosts.
If a machine ends up in such a bad state, there is a way to get out of
it. At the boot prompt (before Xen starts), you can type “menu.c32”,
select a boot option and alter the Xen command-line to remove the
feature masks, after which the machine will again boot normally (note:
in our set-up, there is first a PXE boot prompt; the second prompt is
the one we mean here).
The API/CLI documentation should stress the potential danger of using
this functionality, and explain how to get out of trouble again.
Design document
Revision
v1
Status
proposed
Host NTP and time config API
Host NTP and time
Background
There are no APIs to config the NTP and timezone on the host. Previously, users
had to login on the host via ssh and configure NTP and time manually. The goal
of this feature is to introduce new APIs in XAPI to support NTP and time
configuration, especially in the scenario that users disable ssh service on the
host. XAPI can also store the NTP and timezone configuration in XAPI DB to provide
cache for the getter APIs.
Use cases
User can set time zone of the host via XenAPI
User can get valid time zones list to set via XenAPI
User can get the current time zone of the host via XenAPI
User can set custom NTP servers via XenAPI
User can get the current custom NTP servers via XenAPI
User can enable/disable NTP service via XenAPI
User can get the current NTP service enabled or disabled via XenAPI
User can set NTP to use DHCP assigned servers via XenAPI
User can set NTP to use custom servers via XenAPI
User can set NTP to use default NTP servers via XenAPI
User can get the DHCP assigned NTP servers via XenAPI
User can get status of current NTP servers via XenAPI
User can get NTP sync status via XenAPI
User can set host’s time when NTP is disabled via XenAPI
NTP configuration on the host
New fields: host.ntp_mode, enum host_ntp_mode(DHCP, Custom, Factory, Disabled) host.ntp_custom_servers, string set
New APIs: host.set_ntp_mode, host.set_ntp_custom_servers, host.get_ntp_mode,
host.get_ntp_custom_servers, host.get_ntp_servers_status
Abstract the NTP configuration to 4 modes.
DHCP: set NTP to use DHCP assigned NTP servers
Custom: set NTP to use custom NTP servers
Factory: set NTP to use factory NTP servers
Disabled: disable NTP service
DHCP mode
In this mode, NTP uses the DHCP assigned NTP servers as sources.
How the NTP and DHCP interaction?
On the host, dhclient executes /etc/dhcp/dhclient.d/chrony.sh to update the
ntp servers when network event happens.
chrony.sh writes ntp servers to /run/chrony-dhcp/$interface.sources
Chonryd include the dir /run/chrony-dhcp by sourcedir /run/chrony-dhcp in
the conf file
chrony.sh runs chronyc reload sources to reload NTP sources
Then NTP sources can be updated automatically in the DHCP mode
How to switch DHCP mode?
Dhclient stores dhcp lease in /var/lib/xcp/dhclient-$interface.leases, see
module Dhclient in /ocaml/networkd/lib/network_utils.ml.
When switch the NTP mode to DHCP, XAPI
check ntp server item in the lease and fills it in chrony-dhcp files
Add the exec permission of chrony.sh
Remove all the NTP source items(Custom or Factory) in chronyd conf
Restart chronyd
When switch ntp mode from dhcp to others, XAPI
Remove the chrony-dhcp files
Remove the exec permission of chrony.sh
Add NTP source items(Custom or Factory) in chronyd conf
Restart chronyd
Custom mode
In this mode, NTP uses host.ntp_custom_servers as sources.
When switch the NTP mode to Custom, XAPI
Remove NTP source items in chronyd conf
Add host.ntp_custom_servers as NTP source items in chronyd conf
Restart chronyd
When host.ntp_custom_servers changes and host.ntp_mode is Custom, set chronyd
conf with new custom servers and restart chronyd.
Factory mode
In this mode, ntp uses factory-ntp-servers in XAPI config file. Generally the
factory-ntp-servers will be defined by the product.
Disabled mode
This mode disables NTP service on the host.
Others
host.get_ntp_servers_status calls chronyc -c sources to get ntp servers status.
Output parse:
Source mode: '^' = server, '=' = peer, '#' = local clock.
Source state: '*' = current synced, '+' = combined, '-' = not combined,
'?' = unreachable, 'x' = time may be in error, '~' = time too variable
Timezone configuration on the host
New field: host.timezone, string
New APIs: host.set_timezone, host.get_timezone, host.list_timezones
The timezone is in IANA timezone database format. Timezone on the host can be
get by realpath /etc/localtime which is linked to timezone file under
/usr/share/zoneinfo/. It can set by link/etc/localtime to
/usr/share/zoneinfo/<timezone>. All the valid timezones are actually the files
under /usr/share/zoneinfo/.
Comparing to using a fixed UTC offset, the benefit is:
User-friendly: familiar region names and same with most system facilities.
Handles daylight saving time (DST) automatically
They are equivalent to the timedatectl commands
timedatectl set-timezone
timedatectl status | grep "Time zone"
timedatectl list-timezones
Time on the host
New API: host.get_ntp_synchronized, host.set_servertime
host.get_ntp_synchronized shows if the system time is synchronized with NTP
source.
host.set_servertime offers an API to set the server time when NTP disabled.
it accepts a RFC3339 datetime format timestamp with timezone, i.e. ends with ‘Z’
to represent the UTC or explicit UTC offset like ‘+05:00’.
Dbsync and restriction
For the new fields in this doc, on XAPI start, dbsync will get the real host
status and sync to XAPI DB to make the real host status and XAPI DB consistent.
Upgrade case can also be benefited from the dbsync.
If the user changes the config behind XAPI, like modify the chronyd conf directly
via ssh, the real status on the host and XAPI DB come to inconsistent and may
lead to unpredicted result, unless restart XAPI.
Passthrough of discrete GPUs has been
available since XenServer 6.0.
With some extensions, we will also be able to support passthrough of integrated
GPUs.
Whether an integrated GPU will be accessible to dom0 or available to
passthrough to guests must be configurable via XenAPI.
Passthrough of an integrated GPU requires an extra flag to be sent to qemu.
as well as new API calls used to modify the state of these fields:
PGPU.enable_dom0_access
PGPU.disable_dom0_access
host.enable_display
host.disable_display
Each of these API calls will return the new state of the field e.g. calling
host.disable_display on a host with display = enabled will return
disable_on_reboot.
Disabling dom0 access will modify the xen commandline (using the xen-cmdline
tool) such that dom0 will not be able to access the GPU on next boot.
Calling host.disable_display will modify the xen and dom0 commandlines such
that neither will attempt to send console output to the system display device.
A state diagram for the fields PGPU.dom0_access and host.display is shown
below:
While it is possible for these two fields to be modified independently, a
client must disable both the host display and dom0 access to the system display
device before that device can be passed through to a guest.
Note that when a client enables or disables either of these fields, the change
can be cancelled until the host is rebooted.
Handling vga_arbiter
Currently, xapi will not create a PGPU object for the PCI device with address
reported by /dev/vga_arbiter. This is to prevent a GPU in use by dom0 from
from being passed through to a guest. This behaviour will be changed - instead
of not creating a PGPU object at all, xapi will create a PGPU, but its
supported_VGPU_types field will be empty.
However, the PGPU’s supported_VGPU_types will be populated as normal if:
dom0 access to the GPU is disabled.
The host’s display is disabled.
The vendor ID of the device is contained in a whitelist provided by xapi’s
config file.
A read-only field will be added:
PGPU.is_system_display_device bool
This will be true for a PGPU iff /dev/vga_arbiter reports the PGPU as the
system display device for the host on which the PGPU is installed.
Interfacing with xenopsd
When starting a VM attached to an integrated GPU, the VM config sent to xenopsd
will contain a video_card of type IGD_passthrough. This will override the type
determined from VM.platform:vga. xapi will consider a GPU to be integrated if
both:
It resides on bus 0.
The vendor ID of the device is contained in a whitelist provided by xapi’s
config file.
When xenopsd starts qemu for a VM with a video_card of type IGD_passthrough,
it will pass the flags “-std-vga” AND “-gfx_passthru”.
Design document
Revision
v1
Status
draft
LLDP support
Overview
LLDP is a link-layer discovery protocol used by network devices to advertise their identity, capabilities, and neighbor information on a local network.
This design adds supported LLDP capability to XAPI and networkd so that a host can advertise its identity and selected system information to directly connected switches, and can also retrieve selected LLDP neighbor information from those switches.
The primary use case is host-to-switch verification.
The following are introduced by this design:
pool-wide and per-PIF LLDP configuration through XenAPI
LLDP advertisement on physical NICs
retrieval of selected received LLDP neighbor fields through PIF_metrics
protection against enabling LLDP by default on NIC drivers known to conflict with storage-related functionality
The implementation uses XAPI for configuration, networkd for per-host application of configuration, and lldpd as the LLDP agent in dom0 user space.
XAPI stores LLDP configuration in the database and exposes LLDP neighbor data through XenAPI.
networkd configures the LLDP agent to apply LLDP configuration for individual physical NICs and queries the LLDP agent for received LLDP TLVs.
lldpd runs as a daemon process in dom0 user space. It receives and sends LLDPDUs via PF_PACKET + SOCK_RAW sockets. It is actively maintained by upstream as the time being.
XAPI database changes
The following fields are added to the XAPI database.
pool.lldp_enabled
Type: bool
When true, LLDP is enabled on the NIC associated with each managed physical PIF on every host in the pool.
When false, LLDP is disabled on the NIC associated with each managed physical PIF on every host in the pool.
This setting does not apply to other types of PIFs, such as non-managed PIFs, bond PIFs, VLAN PIFs, tunnel PIFs, or SR-IOV PIFs.
PIF.lldp_mode determines the final effective state on individul PIF.
LLDP receiving and advertising are always enabled or disabled together.
Default after update/RPU from a version/release without LLDP support to a version/release with LLDP support: false
Default after fresh install: true
PIF.lldp_mode
Type: enum pif_lldp_mode
Values:
default: follow pool.lldp_enabled;
enabled: LLDP is enabled on the NIC associated with the managed physical PIF;
disabled: LLDP is disabled on the NIC associated with the managed physical PIF.
This setting does not apply to other types of PIFs, such as non-managed PIFs, bond PIFs, VLAN PIFs, tunnel PIFs, or SR-IOV PIFs.
Default after update/RPU from a version/release without LLDP support to a version/release with LLDP support: default.
Default after fresh install: default.
pool.lldp_multicast_address
Type: enum lldp_multicast_address
Values:
nearestbridge: 01:80:C2:00:00:0E
nearestnontpmrbridge: 01:80:C2:00:00:03
nearestcustomerbridge: 01:80:C2:00:00:00
This value controls the multicast MAC address used for LLDP transmission.
After a change, it is applied when pool.set_lldp_enabled or PIF.set_lldp_mode is called with force=true.
This value is not considered to change often. Changing it does not trigger any application action for simplicity.
Default after update/RPU from a version/release without LLDP support to a version/release with LLDP support: nearestbridge.
Default after fresh install: nearestbridge.
PIF_metrics.lldp_neighbor
Type: map(string, string)
Stores the received LLDP TLVs from the corresponding PIF.
Default: empty
XenAPI changes
The following new APIs are added.
pool.set_lldp_enabled
Parameters:
self: the pool reference;
value: true or false;
force: bool, default false.
Behavior:
if force=false and value = pool.lldp_enabled, do nothing;
otherwise, set pool.lldp_enabled to value, apply LLDP configuration to every physical PIF in the pool by calling PIF.plug to each host;
return a map of failed PIFs and error strings.
PIF.set_lldp_mode
Parameters:
self: the PIF reference;
value: default, enabled, or disabled;
force: bool, default false.
Behavior:
if force=false and value= PIF.lldp_mode, do nothing;
otherwise set PIF.lldp_mode to value, apply LLDP configuration to the physical NIC represented by the PIF by calling PIF.plug to the host.
The networkd database
The interface_config_t record in the networkd database is extended with LLDP configuration. networkd can configure LLDP independently using its own database when XAPI is unavailable, for example during host boot.
The default enabled setting is false to minimize impact without high-level configuration from XAPI or the user. This database can be updated as XAPI pushes configurtions to networkd through networkd calls.
type lldp_multicast_address =|Nearestbridge|Nearestnontpmrbridge|Nearestcustomerbridge[@@deriving rpcty]type lldp ={ force:bool[@default false](* Override the blocking list when true. See below. *); chassis_id:string[@default ""]; system_name:string[@default ""]; system_description:string[@default ""]; enabled:bool[@default false];; address: lldp_multicast_address list[@default [Nearestbridge]];}[@@deriving rpcty]type interface_config_t ={... lldp: lldp option [@default None];}
Safety
Some NICs share hardware with storage functions such as CNA and hardware FCoE. Enabling LLDP on these NICs may affect those storage functions.
This is especially important when the storage function provides the boot disk of a host.
For safety, LLDP is disabled by default on NICs which are managed by drivers in a known blocking list when enablement comes from the pool-level default.
Users may still enable LLDP on such NICs through per-PIF XenAPI after confirming that it is safe in practice.
The blocking mechanism is based on the NIC driver. Other approaches, such as PCI bus/device location or PCI device ID, are either unreliable or too complex.
Blocking list
networkd uses a per-host NIC-driver blocking list which is persisted under files under /etc/xensource/lldp-nic-driver-blocklist.d/ with content like:
bnx2x
enic
qede
It’s a directory to allow other components like host install drop custom drivers to avoid impact on installation.
Configuration matrix
The effective LLDP state on a NIC is determined by pool.lldp_enabled, PIF.lldp_mode, and whether the NIC driver is in the blocking list used by networkd.
pool.lldp_enabled
PIF.lldp_mode
parameter passed to networkd
NIC driver in blocking list
effective LLDP state
true
default
true
no
enabled
true
default
true
yes
disabled
false
default
false
*
disabled
*
enabled
true
*
enabled
*
disabled
false
*
disabled
Advertised LLDP TLVs
When LLDP is enabled on a physical NIC, the LLDP agent advertises the following TLVs.
TLV
Value
Chassis ID
Host UUID (shared by all individual interfaces)
Port ID
Interface MAC address
Port Description
Interface name
System Name
XAPI host.name_label
System Description
XAPI host.name_description
Management Address
Management IP address
System Capabilities
Bridge
TTL
Default value from the LLDP agent
Some advertised values follow the default behavior of lldpd, while others are configured by networkd when preparing the LLDP agent configuration.
Report received LLDP TLVs
networkd periodically queries statistics for individual NICs and writes them to the in-memory file /dev/shm/network_stats. The file format is defined in ocaml/xapi-idl/network/network_stats.ml and is extended with a new field, lldp_neighbor.
networkd queries lldpd for the LLDP TLVs recevied on individual NICs and writes them into /dev/shm/network_stats.
Monitor_dbcalls.monitor_dbcall_thread in XAPI reads the in-memory file /dev/shm/network_stats periodically, and exposes the data through PIF_metrics.lldp_neighbor by storing them in XenAPI map form.
Scenarios
Fresh install
During the first host boot, networkd does not enable LLDP on physical interfaces because the default value of lldp.enabled in interface_config_t is false.
After XAPI starts, network-init scans physical interfaces (PIF.scan), creates PIF objects, and brings them up through Nm.bring_pif_up.
During this process, XAPI pushes its built-in configuration to networkd to enable LLDP on individual NICs. networkd may still keep LLDP disabled on some NICs based on the built-in blocking list.
Update or RPU
After update or RPU from a version/release without LLDP support to a version/release with LLDP support, the default values of the new fields (pool.lldp_enabled and PIF.lldp_mode) cause networkd to keep LLDP disabled on all NICs.
Pool join
The PIF.lldp_mode of PIFs on the joining host has the default value. The joining host shares the pool-level pool.lldp_enabled setting.
These configurations are pushed to networkd via PIF.scan during the first-boot network-init service on the joining host.
Pool eject
pool.lldp_enabled, PIF.lldp_mode, and the networkd database revert to the values used just like after fresh install.
Design document
Revision
v1
Status
proposed
Local database
All hosts in a pool use the shared database by sending queries to
the pool master. This creates a performance bottleneck as the pool
size increases. All hosts in a pool receive a database backup from
the master periodically, every couple of hours. This creates a
reliability problem as updates may be lost if the master fails during
the window before the backup.
The reliability problem can be avoided by running with HA or the redo
log enabled, but this is not always possible.
We propose to:
adapt the existing event machinery to allow every host to maintain
an up-to-date database replica;
actively cache the database locally on each host and satisfy read
operations from the cache. Most database operations are reads so
this should reduce the number of RPCs across the network.
We will create a database-level variant of the existing XenAPI event.from
API. The new RPC will block until a database event is generated, and then
the events will be returned using the existing “redo-log” event types. We
will add a few second delay into the RPC to batch the updates.
We will replace the pool database download logic with an event.from-like
loop which fetches all the events from the master’s database and applies
them to the local copy. The first call will naturally return the full database
contents.
We will turn on the existing “in memory db cache” mechanism on all hosts,
not just the master. This will be where the database updates will go.
The result should be that every host will have a /var/xapi/state.db file,
with writes going to the master first and then filtering down to all slaves.
Using the replica as a cache
We will re-use the Disaster Recovery multiple
database mechanism to allow slaves to access their local database. We will
change the defalult database “context” to snapshot the local database,
perform reads locally and write-through to the master.
We will add an HTTP header to all forwarded XenAPI calls from the master which
will include the current database generation count. When a forwarded XenAPI
operation is received, the slave will deliberately wait until the local cache
is at least as new as this, so that we always use fresh metadata for XenAPI
calls (e.g. the VM.start uses the absolute latest VM memory size).
We will document the new database coherence policy, i.e. that writes on a host
will not immediately be seen by reads on another host. We believe that this
is only a problem when we are using the database for locking and are attempting
to hand over a lock to another host. We are already using XenAPI calls forwarded
to the master for some of this, but may need to do a bit more of this; in
particular the storage backends may need some updating.
Design document
Revision
v3
Status
proposed
Revision history
v1
Initial version
v2
Addition of `networkd_db` update for Upgrade
v3
More info on `networkd_db` and API Errors
Management Interface on VLAN
This document describes design details for the
REQ-42: Support Use of VLAN on XAPI Management Interface.
XAPI and XCP-Networkd
Creating a VLAN
Creating a VLAN is already there, Lisiting the steps to create a VLAN which is used later in the document.
Steps:
Check the PIFs created on a Host for physical devices eth0, eth1.
xe pif-list params=uuid physical=true host-uuid=UUID this will list pif-UUID
Create a new network for the VLAN interface.
xe network-create name-label=VLAN1
It returns a new network-UUID
Create a VLAN PIF.
xe vlan-create pif-uuid=pif-UUID network-uuid=network-UUID vlan=VLAN-ID
It returns a new VLAN PIF new-pif-UUID
Plug the VLAN PIF.
xe pif-plug uuid=new-pif-UUID
Configure IP on the VLAN PIF.
xe pif-reconfigure-ip uuid=new-pif-UUID mode= IP= netmask= gateway= DNS= This will configure IP on the PIF, here mode is must and other parametrs are needed on selecting mode=static
Similarly, creating a vlan pif can be achieved by corresponding XenAPI calls.
Recognise VLAN config from management.conf
For a newly installed host, If host installer was asked to put the management interface on given VLAN.
We will expect a new entry VLAN=ID under /etc/firstboot.d/data/management.conf.
Listing current contents of management.conf which will be used later in the document.
LABEL=eth0 -> Represents Pyhsical device on which Management Interface must reside.
MODE=dhcp||static -> Represents IP configuration mode for the Management Interface. There can be other parameters like IP, NETMASK, GATEWAY and DNS when we have static mode.
VLAN=ID -> New entry for specifying VLAN TAG going to be configured on device LABEL.
Management interface going to be configured on this VLAN ID with specified mode.
Firstboot script need to recognise VLAN config
Firstboot script /etc/firstboot.d/30-prepare-networking need to be updated for configuring
management interface to be on provided VLAN ID.
Steps to be followed:
PIF.scan performed in the script must have created the PIFs for the underlying pyhsical devices.
Get the PIF UUID for physical device LABEL.
Repeat the steps mentioned in Creating a VLAN, i.e. network-create, vlan-create and pif-plug. Now we have a new PIF for the VLAN.
Perform pif-reconfigure-ip for the new VLAN PIF.
Perform host-management-reconfigure using new VLAN PIF.
XCP-Networkd need to recognise VLAN config during startup
XCP-Networkd during first boot and boot after pool eject gets the initial network setup from the management.conf and xensource-inventory file to update the network.db for management interface info.
XCP-Networkd must honour the new VLAN config.
Steps to be followed:
During startup read_config step tries to read the /var/lib/xcp/networkd.db file which is not yet created just after host installation.
Since networkd.db read throws Read_Error, it tries to read network.dbcache which is also not available hence it goes to read read_management_conf file.
There can be two possible MODE static or dhcp taken from management.conf.
bridge_name is taken as MANAGEMENT_INTERFACE from xensource-inventory, further bridge_config and interface_config are build based on MODE.
Call Bridge.make_config() and Interface.make_config() are performed with respective bridge_config and interface_config.
Updating networkd_db program
networkd_db provides the management interface info to the host installer during upgrade.
It reads /var/lib/xcp/networkd.db file to output the Management Interface information. Here we need to update the networkd_db to output the VLAN information when vlan bridge is a input.
Steps to be followed:
Currently VLAN interface IP information is provided correctly on passing VLAN bridge as input.
networkd_db -iface xapi0 this will list mode as dhcp or static, if mode=static then it will provide ipaddr and netmask too.
We need to udpate this program to provide VLAN ID and parent bridge info on passing VLAN bridge as input.
networkd_db -bridge xapi0 It should output the VLAN info like:
interfaces=vlan=vlanIDparent=xenbr0 using the parent bridge user can identify the physical interfaces.
Here we will extract VLAN and parent bridge from bridge_config under networkd.db.
Additional VLAN parameter for Emergency Network Reset
Detail design is mentioned on http://xapi-project.github.io/xapi/design/emergency-network-reset.html
For using xe-reset-networking utility to configure management interface on VLAN, We need to add one more parameter --vlan=vlanID to the utility.
There are certain parameters need to be passed to this utility: –master, –device, –mode, –ip, –netmask, –gateway, –dns and new one –vlan.
VLAN parameter addition to xe-reset-networking
Steps to be followed:
Check if VLANID is passed then let bridge=xapi0.
Write the bridge=xapi0 into xensource-inventory file, This should work as Xapi check avialable bridges while creating networks.
Write the VLAN=vlanID into management.conf and /tmp/network-reset.
Modify check_network_reset under xapi.ml to perform steps Creating a VLAN and perform management_reconfigure on vlan pif.
Step Creating a VLAN must have created the VLAN record in Xapi DB similar to firstboot script.
If no VLANID is specified then retain the current one, This utility must take the management interface info from networkd_db program and handle the VLAN config.
VLAN parameter addition to xsconsole Emergency Network Reset
Under Emergency Network Reset option under the Network and Management Interface menu.
Selecting this option will show some explanation in the pane on the right-hand side.
Pressing will bring up a dialogue to select the interfaces to use as management interface after the reset.
After choosing a device, the dialogue continues with configuration options like in the Configure Management Interface dialogue.
There will be an additionall option for VLAN in the dialogue.
After completing the dialogue, the same steps as listed for xe-reset-networking are executed.
Updating Pool Join/Eject operations
Pool Join while Pool having Management Interface on a VLAN
Currently pool-join fails if VLANs are present on the host joining a pool.
We need to allow pool-join only if Pool and host joining a pool both has management interface on same VLAN.
Steps to be followed:
Under pre_join_checks update function assert_only_physical_pifs to check Pool master management_interface is on same VLAN.
Call Host.get_management_interface on Pool master and get the vlanID, match it with localhost management_interface VLAN ID.
If it matches then allow pool-join.
In case if there are multiple VLANs on host joining a pool, fail the pool-join gracefully.
After the pool-join, Host xapi db will get sync from pool master xapi db, This will be fine to have management interface on VLAN.
Pool Eject while host ejected having Management Interface on a VLAN
Currently managament interface VLAN config on host is not been retained in xensource-inventory or management.conf file.
We need to retain the vlanID under config files.
Steps to be followed:
Under call Pool.eject we need to update write_first_boot_management_interface_configuration_file function.
Check if management_interface is on VLAN then get the VLANID from the pif.
Update the VLANID into the managament.conf file and the bridge into xensource-inventory file.
In order to be retained by XCP-Networkd on startup after the host is ejected.
New API for Pool Management Reconfigure
Currently there is no Pool Level API to reconfigure management_interface for all of the Hosts in a Pool at once.
API Pool.management_reconfigure will be needed in order to reconfigure manamegemnt_interface on all hosts in a Pool to the same Network either VLAN or Physical.
Current behaviour to change the Management Interface on Host
Currently call Host.management_reconfigure with VLAN pif-uuid can change the management_interface to specified VLAN.
Listing the steps to understand the workflow of management_interface reconfigure. We will be using Host.management_reconfigure call inside the new API.
Steps performed during management_reconfigure:
bring_pif_up get called for the pif.
xensource-inventory get updated with the latest info of interface.
3 update-mh-info updates the management_mac into xenstore.
Http server gets restarted, even though xapi listen on all IP addresses, This new interface as _the_ management interface is used by slaves to connect to pool master.
on_dom0_networking_change refreshes console URIs for the new IP address.
Xapi db is updated with new management interface info.
Management Reconfigure on Pool from Physical Network to VLAN Network or from VLAN Network to Other VLAN Network or from VLAN Network to Physical Network
Listing steps to be performed manually on each Host or Pool as a prerequisite to use the New API.
We need to make sure that new network which is going to be a management interface has PIFs configured on each Host.
In case of pyhsical network we will assume pifs are configured on each host, In case of vlan network we need to create vlan pifs on each Host.
We would assume that VLAN is available on the switch/network.
Manual steps to be performed before calling new API:
Create a vlan network on pool via network.create, In case of pyhsical NICs network must be present.
Create a vlan pif on each host via VLAN.create using above network ref, physical PIF ref and vlanID, Not needed in case of pyhsical network.
Or An Alternate call pool.create_VLAN providing device and above network will create vlan PIFs for all hosts in a pool.
Perform PIF.reconfigure_ip for each new Network PIF on each Host.
If User wishes to change the management interface manually on each Host in a Pool, We should allow it, There will be a guideline for that:
User can individually change management interface on each host calling Host.management_reconfigure using pifs on physical devices or vlan pifs.
This must be perfomed on slaves first and lastly on Master, As changing management_interface on master will disconnect slaves from master then further calls Host.management_reconfigure cannot be performed till master recover slaves via call pool.recover_slaves.
API Details
Pool.management_reconfigure
Parameter: network reference network.
Calling this function configures management_interface on each host of a pool.
For the network provided it will check pifs are present on each Host,
In case of VLAN network it will check vlan pifs on provided network are present on each Host of Pool.
Check IP is configured on above pifs on each Host.
If PIFs are not present or IP is not configured on PIFs this call must fail gracefully, Asking user to configure them.
Call Host.management_reconfigure on each slave then lastly on master.
Call pool.recover_slaves on master inorder to recover slaves which might have lost the connection to master.
API errors
Possible API errors that may be raised by pool.management_reconfigure:
INTERFACE_HAS_NO_IP : the specified PIF (pif parameter) has no IP configuration. The new API checks for all PIFs on the new Network has IP configured. There might be a case when user has forgotten to configure IP on PIF on one or many of the Hosts in a Pool.
New API ERROR:
REQUIRED_PIF_NOT_PRESENT : the specified Network (network parameter) has no PIF present on the host in pool. There might be a case when user has forgotten to create vlan pif on one or many of the Hosts in a Pool.
CP-Tickets
CP-14027
CP-14028
CP-14029
CP-14030
CP-14031
CP-14032
CP-14033
Design document
Revision
v1
Status
proposed
Migration Stream Compression inside XenGuest
Migration Stream Compression inside XenGuest
To reduce VM migration time, we want to compress the VM migration data
stream. This document describes a new approach that might replace an
existing feature, described first below.
Existing Stream Compression
Xapi implements external migration stream compression. This uses an
external zstd process each to compress (source) and decompress
(destination) the VM and GPU streams, restively. The compression is
transparent to the underlying daemons like XenGuest and vgpu/demu. It is
controlled by an optional boolean parameter compress to the VM.migrate
API/XE call. When not explicitly provided, a boolean pool parameter
Pool.migration_compression is used. The current default (false) is to
not use use compression for migration. A pool-level default simplifies
managing the policy to use for migration compared to a host-level
default.
This feature requires to communicate the use of compression to the
receiving host such that it can set up the decompression; this is done
using cookies. Both VM and GPU memory is compressed during VM migration.
Benchmarking found that this compression scheme is only beneficial when
using slow networks (like 10Gb Ethernet). It comes with considerable
internal overhead from using processes and pipe communication for the
compression and decompression work. That is the reason stream
compression is not enabled by default.
The main implementation of the feature (with some changes added later)
is in commit:
f14fb91137197f24a4784612dd0f2d863ee22fb1
CP-39640/CP-39157 Add stream compression for VM migration
XenGuest-based Stream Compression
This design is about adding an alternative stream compression. This one
is implemented inside XenGuest such that the stream it produces is
internally using compression. XenGuest is not using an external process
for this and hence incurs less overhead because no process
intercommunication is required. Benchmarking confirmed the performance
advantage of this architecture.
The use of compression on the source side needs to be signaled by
Xenopsd via a command line argument to emu0manager and XenGuest. On the
receiving side XenGuest will recognise the compressed stream and does
not require special signaling.
Xapi only permits migration from older to newer versions of the Xapi
Toolstack. This implies that no older XenGuest version will ever receive
a potentially compressed stream that it would not be equipped to handle.
For backward compatibility, xapi still needs to be able to receive a
compressed migration stream using external compression - even if future
Xapi implementation chose no longer to create them.
Currently only the stream created by XenGuest would use compression, but
not the stream containing GPU data created by vgpu/demu. This might
change in the future when we decide to implement in-stream compression
there, too.
Theoretically, internal compression implemented in XenGuest and existing
external compression are independent and could be used both. However,
this would apply a compression to an already compressed stream, which is
unlikely to be effective and we don’t plan to support this feature.
API Design
VM.pool_migrate API and xe vm-migrate remain unchanged. Both accept
an optional boolean value that indicates whether to use compression or
not. In the absence of this parameter, the default is taken from
Pool.migration_compression (which is currently false).
The compression method used when Pool.migration_compression=true is
not controlled by the API or the customer but is controlled by a
default in xenopsd which can be changed in xenopd.conf for testing.
In summary, this means the API and XE CLI interface remain unchanged.
Implementation
Outside the changes described here, the following other components are
affected:
EMU Manager needs to accept a new flag to indicated that compression
is used during migration.
XenGuest needs to accept a flag passed by EMU Manager to use
compression.
Upgrade
Xapi will always accept stream/external compressed migration streams but
might stop using them for migration.
Outlook
We might add internal compression to vGPU migration in the future. The
API would be unaffected by this.
The current design forces all destinations to accept all compression
streams because compatibility is not negotiate between source and
destination. This is a general problem and not limited to compression.
We could expose a general table to clients that lists features
supported by xenopsd such that any other xenopsd would send data in
the preferred format.
Design document
Revision
v1
Status
proposed
Migration Stream Encryption with kernel TLS (kTLS)
Migration Stream Encryption with kernel TLS (kTLS)
VM-migrate sends the guest memory over a TLS connection so the data is
encrypted on the wire. Today that TLS is provided by stunnel, an external
process. This document describes an alternative that keeps the same TLS
security but removes stunnel from the sender’s data path, using the kernel’s
own TLS (kTLS), and so makes vm-migrate and host-evacuate faster.
Existing transport: stunnel
stunnel is an external process that terminates TLS for the xenguest migration
stream. As it is a separate process from xenguest, the dom0 kernel has to pipe
the plaintext between the two, so every byte of guest RAM is copied through an
extra userspace hop and encrypted in userspace. That wastes dom0 cpu and memory
throughput, so the result is a slower vm-migrate, and therefore a slower
host-evacuate for the user. The slowdown is worst exactly when dom0 cpu is the
bottleneck.
stunnel cannot be removed by linking it into xenguest, as it is not a library:
it is a configuration wrapper around OpenSSL.
Solution: kTLS on the sender
The data pipe between xenguest and stunnel disappears if the kernel does the
bulk TLS encryption in place, on the same socket xenguest already writes to.
Linux 6.6 supports this through kTLS: once the symmetric key is installed on a
socket with setsockopt(SOL_TLS, ...), the kernel encrypts/decrypts every
subsequent read/write transparently, using AES-NI, producing the same
byte stream stunnel produces today.
Phase 1 changes only the sender host and already provides the speed-up (see
Performance), while proving the kTLS sender interoperates with the unchanged
stunnel receiver on the destination. Benefits:
significant speed-up: host-evacuate is around 1.5x faster for 10 parallel
VMs, for less dom0 cpu (see Performance).
xenguest is unmodified: no libssl in xenguest, so no extra xen-devel
upstreaming, maintenance or security reviews on xenguest/libxenguest.
same TLS security as stunnel: a small ktls-helper does the OpenSSL
handshake with the same key size, cipher, certificate and verification stunnel
uses, then asks the kernel to take over the bulk encryption.
backwards-compatible & conservative: stunnel stays the default; kTLS is an
option, introduced gradually until it is proven in the field.
Principles
P1. kernel data pipes between userspace processes add latency and cut data
throughput in dom0.
P2. keep the existing security guarantees.
P3. backwards-compatibility.
P4. guarded new features.
Use cases
U1. Admin configuration:
U1.1. a new migration_ktls option selects the faster datapath for
vm-migrate and host-evacuate (P1, P2).
U1.2. the option can be reverted to the original stunnel datapath (P3).
U2. Admin usage when the option is selected:
U2.1. vm-migrate is faster, or at least the same (P1).
U2.2. host-evacuate is faster, or at least the same (P1).
U2.3. vm-migrate and host-evacuate still work between hosts configured
with different options (P3).
U3. Over time the option may graduate to become the default for vm-migrate
and host-evacuate (P4).
Requirements
R1. Admin configuration:
R1.1.1. Host-level: xe-enable-experimental-feature migration_ktls sets
/etc/xenserver/features.d/migration_ktls to 1 on the host, enabling the
option there.
R1.1.2. Pool-level: when every host has the entry, the matching
restrict_migration_ktls shown by xe pool-list params=restrictions
reads false.
R1.1.3. Pool-level (future): a helper xe pool-experimental-feature-set name=migration_ktls sets the entry on each host of the pool.
R2. Admin usage:
R2.1. vm-migrate: when the option is enabled, xenopsd uses
ktls-helper instead of stunnel to set up kTLS transport for
xenguest (see Design).
R2.2. host-evacuate: the vm-migrate operations it drives inherit R2.1.
R3. Future: once kTLS is the default, a XenAPI field
pool.migration_transport could expose ktls (default) or stunnel.
Implementation note: R1.1.1 describes the intended activation. The current
implementation does not yet read features.d/migration_ktls; it selects the
transport per host from xenopsd.conf instead:
migration-tls = "ktls" # use the helper
migration-tls = "stunnel" # explicit default
migration-tls = "" # currently defaults to "stunnel"
Wiring xe-enable-experimental-feature migration_ktls to this xenopsd.conf
option (so the host flag drives R1.1.1/R1.1.2) is outstanding.
Design
Considered designs
The goal is to remove the plaintext data pipe between stunnel and xenguest.
Design
Summary
Analysis
A: TLS inside xenguest/libxenguest
link libssl into xenguest; xenguest does SSL_connect/SSL_accept and SSL_read/SSL_write directly. Needs an SNI dispatcher (eg. sniproxy) on the receiver to share port 443.
Removes the pipe, but embeds TLS in xenguest: lots of changes, lots of xen-devel upstreaming, and ongoing security-maintenance on xenguest/libxenguest. Too expensive to create and maintain.
B: xenguest as a stunnel SNI backend
use stunnel’s SNI dispatch to route migration traffic to xenguest.
Easy (stunnel config only), but the plaintext pipe between stunnel and the backend remains, so it defeats the goal.
C: kTLS via a small TLS helper
ktls-helper does the OpenSSL handshake, asks OpenSSL to enable kTLS on the socket, and hands the kTLS socket fd to xenopsd over SCM_RIGHTS. xenguest then sees only plaintext; the kernel encrypts transparently.
xenguest is unmodified, stunnel leaves the sender data path, the helper reuses stunnel’s OpenSSL config/keys/certificates, and kTLS can later be offloaded to hardware NICs.
Conclusion: design C (kTLS) seems superior, as it reaches the goal with fewer
changes, is toolstack-only (no xen-devel upstream loop, no future xenguest
security maintenance), is a small focused tool rather than a change to the
highly-complex xenguest, leaves the stunnel option in place, and opens the way
to kTLS hardware offload later.
kTLS sender
Performance: the kernel encrypts the migration stream in the xenguest context,
so dom0 no longer copies the whole guest RAM between xenguest and stunnel. The
effect is largest where dom0 cpu, not the wire, is the bottleneck.
Security: the helper uses OpenSSL exactly as stunnel does, so the bulk kTLS
stream is byte-identical to stunnel’s and is accepted by the unchanged
destination stunnel.
same handshake: TLS 1.2, with the cipher list and ECDHE curve taken from the
pool TLS policy (Stunnel.Openssl, the same source the stunnel client reads),
renegotiation disabled, authenticated with SSL_VERIFY_PEER
against the destination’s pool-internal certificate (CN = host uuid,
SNI = pool).
single source of truth: the helper’s verification is derived from the same
configuration the stunnel fallback would use, so --cert-bundle-file/--sni come from it
and --no-verify is sent only when verification is disabled pool-wide. SNI is
always sent, so the destination serves its pool-internal certificate either
way.
the TLS 1.2 pin is necessary for kTLS, as a TLS 1.3 post-handshake
KeyUpdate cannot be carried by the kernel kTLS data path.
no new security code in xenguest: after the handshake OpenSSL installs the
symmetric key in the kernel, and everything xenguest writes as plaintext is
encrypted transparently.
the helper hands the socket over only after confirming the kernel actually
enabled kTLS in both directions (BIO_get_ktls_send and BIO_get_ktls_recv),
as the migration channel is bidirectional; otherwise it errors and the sender
falls back to stunnel.
Backwards-compatibility: the new behaviour is hidden behind the per-host option,
and a kTLS sender works with a stunnel receiver, so the worst case is exactly
today’s behaviour.
The helper
ktls-helper does only what stunnel cannot, then gets out of the way:
perform the TLS handshake with OpenSSL (same protocol/cipher/cert/verification
as stunnel).
ask OpenSSL to enable kTLS on the socket.
confirm the kernel took over send and receive (BIO_get_ktls_send/_recv);
if not, error so the sender falls back to stunnel.
hand the now-encrypting socket to xenopsd over SCM_RIGHTS, then exit.
The helper is not a proxy and is not in the data path: it is a short-lived “set
up the encrypted socket, hand it over, get out of the way” step. xenopsd brokers
the fd to xenguest just as it brokers the stunnel fd today, and xenguest writes
the migration stream as plaintext while the kernel encrypts each write in
place.
Why stunnel cannot remove the data pipe
stunnel is a general-purpose TLS proxy, and a proxy must receive plaintext on
one side to encrypt it on the other, so the xenguest -> stunnel plaintext hop is
structural and cannot be removed while stunnel is in the path. stunnel has no
pass-through mode and cannot hand its encrypted socket to another process, so its
bulk encryption stays in userspace.
An alternative considered but rejected was to make stunnel use kTLS and then pull
its kernel-encrypting socket out of the stunnel process with pidfd_getfd(2).
This has lots of issues: it needs ptrace-level privilege over stunnel and racy
fd-table scraping; there is no clean ownership handoff, as the TLS sequence
number and any partial record are per-socket and two writers corrupt the stream;
and nobody owns the TLS control path, so an inbound TLS 1.3 KeyUpdate stalls the
receive side. The safe form of “hand a kTLS socket to the datapath” is precisely
the dedicated helper above.
Performance
Single host-evacuate, 10 VMs migrating in parallel, sender kTLS vs sender
stunnel, same host pair. The hosts have Intel Xeon Gold 6430 cpus (128 pCPU,
16 dom0 vCPUs) on a 25 GbE link, and each guest is Windows Server 2019 with
64 GB RAM and 12 vCPUs. The improvement grows with guest load, as a busier
guest has more memory to transmit and pushes dom0 cpu harder:
Guest load
stunnel
kTLS
Improvement
idle
185s
163s
1.13x
medium (windows apps)
249s
171s
1.46x
high (synthetic page thrasher)
1341s
835s
1.60x
host-evacuate improvement is around 1.5x for 10 parallel VMs, for
lower dom0 cpu (eg. on the medium load, mean dom0 cpu drops from ~0.73 to ~0.53
of the 16 dom0 vCPUs). The improvement is smaller for idle guests, as dom0 is
then not the bottleneck.
Implementation
The sender path is in xenopsd. Outside the helper itself, the change is small:
ocaml/ktls-helper/helper/ — the standalone C helper, with its
Makefile and README. It is built on its own (make) and deployed to
/usr/libexec/xapi/ktls-helper.
ocaml/xenopsd/lib/migrate_connect.ml — a drop-in replacement for
Open_uri.with_open_uri that spawns the helper when migration-tls = "ktls"
and falls back to Open_uri otherwise.
ocaml/xenopsd/lib/xenops_server.ml — the three migration fd call sites
(vm, mem, vgpu) in the VM_migrate branch go through Migrate_connect.
ocaml/xenopsd/lib/xenopsd.ml, ocaml/xenopsd/xc/xc_resources.ml,
ocaml/xenopsd/xenopsd.conf — register the migration-tls option and the
xenopsd-tls-helper resource, and document them.
Fallback: the sender falls back to stunnel only when the kTLS path fails to
produce the fd (helper spawn, TLS handshake, kTLS install or SCM_RIGHTS). It logs
a single warn line and uses stunnel for that one connection, so the migration
still proceeds. Once the fd is handed to the migration, any later exception is a
migration-layer failure and propagates unchanged, as silently retrying it over a
fresh stunnel socket would re-enter the in-progress receive on the destination
and corrupt its state.
Upgrade
The kTLS sender produces the same TLS stream as stunnel and the receiver is
unchanged, so a kTLS-enabled host migrates to a stunnel host with no
coordination. xapi only permits migration from older to newer toolstacks, so a
newer kTLS sender is never required by an older receiver. The option is off by
default, so an upgrade changes nothing until an admin enables it.
Applicability
Phase 1 covers the sender side of the guest-memory migration stream (the vm,
mem and vgpu fds in VM_migrate). It leaves the receiver and the other TLS
users unchanged: SMAPIv1 storage migration uses sparse_dd and SMAPIv3 uses
stunnel, both untouched, as are RRD and other stunnel traffic. Phase 2 (the
kTLS receiver) would extend the same treatment to the destination.
Outlook
Phase 2: a kTLS receiver, so the destination also drops stunnel from the data
path. It needs an SNI dispatcher (eg. sniproxy) to share port 443 between the
receiver and the existing stunnel endpoint.
kTLS hardware-offload NICs (CONFIG_TLS_DEVICE=y in kernel) could move the bulk
encryption off the cpu. This depends on the NIC and the network topology: the
offload applies where the migration socket terminates in a TLS-capable NIC (for
example a raw or bonded NIC), but not where the traffic is bridged (kernel or Open
vSwitch). The gain grows with line rate: at 100 GbE and above, software AES-GCM
(even with AES-NI/AVX2 or VAES/AVX-512) becomes the bottleneck on a single core.
pool.migration_transport (R3) once kTLS becomes the default.
mutual TLS (client-certificate auth) and destination-hostname pinning exceed
the stunnel migration client and can be done with the Phase 2 receiver work.
Design document
Revision
v2
Status
confirmed
Revision history
v1
Initial revision
v2
Short-term simplications and scope reduction
Multiple Cluster Managers
Introduction
Xapi currently uses a cluster manager called xhad. Sometimes other software comes with its own built-in way of managing clusters, which would clash with xhad (example: xhad could choose to fence node ‘a’ while the other system could fence node ‘b’ resulting in a total failure). To integrate xapi with this other software we have 2 choices:
modify the other software to take membership information from xapi; or
modify xapi to take membership information from this other software.
This document proposes a way to do the latter.
XenAPI changes
New field
We will add the following new field:
pool.ha_cluster_stack of type string (read-only)
If HA is enabled, this field reflects which cluster stack is in use.
Set to "xhad" on upgrade, which implies that so far we have used XenServer’s own cluster stack, called xhad.
Cluster-stack choice
We assume for now that a particular cluster manager will be mandated (only) by certain types of clustered storage, recognisable by SR type (e.g. OCFS2 or Melio). The SR backend will be able to inform xapi if the SR needs a particular cluster stack, and if so, what is the name of the stack.
When pool.enable_ha is called, xapi will determine which cluster stack to use based on the presence or absence of such SRs:
If an SR that needs its own cluster stack is attached to the pool, then xapi will use that cluster stack.
If no SR that needs a particular cluster stack is attached to the pool, then xapi will use xhad.
If multiple SRs that need a particular cluster stack exist, then the storage parts of xapi must ensure that no two such SRs are ever attached to a pool at the same time.
New errors
We will add the following API error that may be raised by pool.enable_ha:
INCOMPATIBLE_STATEFILE_SR: the specified SRs (heartbeat_srs parameter) are not of the right type to hold the HA statefile for the cluster_stack that will be used. For example, there is a Melio SR attached to the pool, and therefore the required cluster stack is the Melio one, but the given heartbeat SR is not a Melio SR. The single parameter will be the name of the required SR type.
The following new API error may be raised by PBD.plug:
INCOMPATIBLE_CLUSTER_STACK_ACTIVE: the operation cannot be performed because an incompatible cluster stack is active. The single parameter will be the name of the required cluster stack. This could happen (or example) if you tried to create an OCFS2 SR with XenServer HA already enabled.
Future extensions
In future, we may add a parameter to explicitly choose the cluster stack:
New parameter to pool.enable_ha called cluster_stack of type string which will have the default value of empty string (meaning: let the implementation choose).
With the additional parameter, pool.enable_ha may raise two new errors:
UNKNOWN_CLUSTER_STACK:
The operation cannot be performed because the requested cluster stack does not exist. The user should check the name was entered correctly and, failing that, check to see if the software is installed. The exception will have a single parameter: the name of the cluster stack which was not found.
CLUSTER_STACK_CONSTRAINT: HA cannot be enabled with the provided cluster stack because some third-party software is already active which requires a different cluster stack setting. The two parameters are: a reference to an object (such as an SR) which has created the restriction, and the name of the cluster stack that this object requires.
Implementation
The xapi.conf file will have a new field: cluster-stack-root which will have the default value /usr/libexec/xapi/cluster-stack. The existing xhad scripts and tools will be moved to /usr/libexec/xapi/cluster-stack/xhad/. A hypothetical cluster stack called foo would be placed in /usr/libexec/xapi/cluster-stack/foo/.
In Pool.enable_ha with cluster_stack="foo" we will verify that the subdirectory <cluster-stack-root>/foo exists. If it does not exist, then the call will fail with UNKNOWN_CLUSTER_STACK.
Alternative cluster stacks will need to conform to the exact same interface as xhad.
Design document
Revision
v1
Status
proposed
Multiple device emulators
Xen’s ioreq-server feature allows for several device emulator
processes to be attached to the same domain, each emulating different
sets of virtual hardware. This makes it possible, for example, to
emulate network devices in a separate process for improved security
and isolation, or to provide special purpose emulators for particular
virtual hardware devices.
ioreq-server is currently used in XenServer to support vGPU, where it
is configured via the legacy toolstack interface. These changes will make
multiple emulators usable in open source Xen via the new libxl interface.
libxl changes
The singleton device_model_version, device_model_stubdomain and
device_model fields in the b_info structure will be replaced by a list of
(version, stubdomain, model, arguments) tuples, one for each emulator.
libxl_domain_create_new() will be changed to spawn a new device model
for each entry in the list.
It may also be useful to spawn the device models separately and only
attach them during domain creation. This could be supported by
making each device_model entry a union of pid | parameter_tuple.
If such an entry specifies a parameter tuple, it is processed as above;
if it specifies a pid, libxl_domain_create_new(), the existing device
model with that pid is attached instead.
QEMU changes
Patches to make QEMU register with Xen as an ioreq-server have been
submitted upstream, but not yet applied.
QEMU’s --machine none and --nodefaults options should make it
possible to create an empty machine and add just a host bus, PCI bus
and device. This has not yet been fully demonstrated, so QEMU changes
may be required.
Xen changes
Until now, ioreq-server has only been used to connect one extra
device model, in addition to the default one. Multiple emulators
should work, but there is a chance that bugs will be discovered.
Interfacing with xenopsd
This functionality will only be available through the experimental
Xenlight-based xenopsd.
the VM_build clause in the atomics_of_operation function will be
changed to fill in the list of emulators to be created (or attached)
in the b_info struct
Host Configuration
vGPU support is implemented mostly in xenopsd, so no Xapi changes are
required to support vGPU through the generic device model mechanism.
Changes would be required if we decided to expose the additional device
models through the API, but in the near future it is more likely that
any additional device models will be dealt with entirely by xenopsd.
Design document
Revision
v1
Status
proposed
NUMA
NUMA
NUMA stands for Non-Uniform Memory Access and describes that RAM access
for CPUs in a large system is not equally fast for all of them. CPUs
are grouped into so-called nodes and each node has fast access to RAM
that is considered local to its node and slower access to other RAM.
Conceptually, a node is a container that bundles some CPUs and RAM and
there is an associated cost when accessing RAM in a different node. In
the context of CPU virtualisation assigning vCPUs to NUMA nodes is an
optimisation strategy to reduce memory latency. This document describes
a design to make NUMA-related assignments for Xen domains (hence, VMs)
visible to the user. Below we refer to these assignments and
optimisations collectively as NUMA for simplicity.
Xen 4.20 implements NUMA optimisation. We want to expose the following
NUMA-related properties of VMs to API clients, and in particualar
XenCenter. Each one is represented by a new field in XAPI’s VM_metrics
data model:
RO VM_metrics.numa_optimised: boolean: if the VM is
optimised for NUMA
RO VM_metrics.numa_nodes: integer: number of NUMA nodes of the host
the VM is using
MRO VM_metrics.numa_node_memory: int -> int map; mapping a NUMA node
(int) to an amount of memory (bytes) in that node.
Required NUMA support is only available in Xen 4.20. Some parts of the
code will have to be managed by patches.
XAPI High-Level Implementation
As far as Xapi clients are concerned, we implement new fields in the
VM_metrics class of the data model and surface the values in the CLI
via records.ml; we could decide to make numa_optimised visible by
default in xe vm-list.
Introducing new fields requires defaults; these would be:
numa_optimised: false
numa_nodes: 0
numa_node_memory: []
The data model ensures that the values are visible to API clients.
XAPI Low-Level Implementation
NUMA properties are observed by Xenopsd and Xapi learns about them as
part of the Client.VM.stat call implemented by Xenopsd. Xapi makes
these calls frequently and we will update the Xapi VM fields related to
NUMA simply as part of processing the result of such a call in Xapi.
For this to work, we extend the return type of VM.stat in
xenops_types.ml, type Vm.state
with three fields:
numa_optimised: bool
numa_nodes: int
numa_node_memory: (int, int64) list
matching the semantics from above.
Xenopsd Implementation
Xenopsd implements the VM.stat return value in
Xenops_server_sen.get_state
where the three fields would be set. Xenopsds relies on bindings to Xen to
observe NUMA-related properties of a domain.
Given that NUMA related functionality is only available for Xen 4.20, we
probably will have to maintain a patch in xapi.spec for compatibility
with earlier Xen versions.
The (existing) C bindings and changes come in two forms: new functions
and an extension of a type used by and existing function.
We are not reporting nr_nodes directly but use it to determine the
value of numa_optimised for a domain/VM:
numa_optimised =
(VM.numa_nodes = 1)
or (VM.numa_nodes < physinfo.Xenctrl.nr_nodes)
Details
The three new fields that become part of type VM.state are updated as
part of get_state() using the primitives above.
Design document
Revision
v1
Status
proposed
OCFS2 storage
OCFS2 is a (host-)clustered filesystem which runs on top of a shared raw block
device. Hosts using OCFS2 form a cluster using a combination of network and
storage heartbeats and host fencing to avoid split-brain.
The following diagram shows the proposed architecture with xapi:
Please note the following:
OCFS2 is configured to use global heartbeats rather than per-mount heartbeats
because we quite often have many SRs and therefore many mountpoints
The OCFS2 global heartbeat should be collocated on the same SR as the XenServer
HA SR so that we depend on fewer SRs (the storage is a single point of failure
for OCFS2)
The OCFS2 global heartbeat should itself be a raw VDI within an LVHDSR.
Every host can be in at-most-one OCFS2 cluster i.e. the host cluster membership
is a per-host thing rather than a per-SR thing. Therefore xapi will be
modified to configure the cluster and manage the cluster node numbers.
Every SR will be a filesystem mount, managed by a SM plugin called “OCFS2”.
Xapi HA uses the xhad process which runs in userspace but in the realtime
scheduling class so it has priority over all other userspace tasks. xhad
sends heartbeats via the ha_statefile VDI and via UDP, and uses the
Xen watchdog for host fencing.
OCFS2 HA uses the o2cb kernel driver which sends heartbeats via the
o2cb_statefile and via TCP, fencing the host by panicing domain 0.
Managing O2CB
OCFS2 uses the O2CB “cluster stack” which is similar to our xhad. To configure
O2CB we need to
assign each host an integer node number (from zero)
on pool/cluster join: update the configuration on every node to include the
new node. In OCFS2 this can be done online.
on pool/cluster leave/eject: update the configuration on every node to exclude
the old node. In OCFS2 this needs to be done offline.
In the current Xapi toolstack there is a single global implicit cluster called a “Pool”
which is used for: resource locking; “clustered” storage repositories and fault handling (in HA). In the long term we will allow these types of clusters to be
managed separately or all together, depending on the sophistication of the
admin and the complexity of their environment. We will take a small step in that
direction by keeping the OCFS2 O2CB cluster management code at “arms length”
from the Xapi Pool.join code.
In
xcp-idl
we will define a new API category called “Cluster” (in addition to the
categories for
Xen domains
, ballooning
, stats
,
networking
and
storage
). These APIs will only be called by Xapi on localhost. In particular they will
not be called across-hosts and therefore do not have to be backward compatible.
These are “cluster plugin APIs”.
We will define the following APIs:
Plugin:Membership.create: add a host to a cluster. On exit the local host cluster software
will know about the new host but it may need to be restarted before the
change takes effect
in:hostname:string: the hostname of the management domain
in:uuid:string: a UUID identifying the host
in:id:int: the lowest available unique integer identifying the host
where an integer will never be re-used unless it is guaranteed that
all nodes have forgotten any previous state associated with it
in:address:string list: a list of addresses through which the host
can be contacted
out: Task.id
Plugin:Membership.destroy: removes a named host from the cluster. On exit the local
host software will know about the change but it may need to be restarted
before it can take effect
in:uuid:string: the UUID of the host to remove
Plugin:Cluster.query: queries the state of the cluster
out:maintenance_required:bool: true if there is some outstanding configuration
change which cannot take effect until the cluster is restarted.
out:hosts: a list of all known hosts together with a state including:
whether they are known to be alive or dead; or whether they are currently
“excluded” because the cluster software needs to be restarted
Plugin:Cluster.start: turn on the cluster software and let the local host join
Plugin:Cluster.stop: turn off the cluster software
Xapi will be modified to:
add table Cluster which will have columns
name: string: this is the name of the Cluster plugin (TODO: use same
terminology as SM?)
configuration: Map(String,String): this will contain any cluster-global
information, overrides for default values etc.
enabled: Bool: this is true when the cluster “should” be running. It
may require maintenance to synchronise changes across the hosts.
maintenance_required: Bool: this is true when the cluster needs to
be placed into maintenance mode to resync its configuration
add method XenAPI:Cluster.enable which sets enabled=true and waits for all
hosts to report Membership.enabled=true.
add method XenAPI:Cluster.disable which sets enabled=false and waits for all
hosts to report Membership.enabled=false.
add table Membership which will have columns
id: int: automatically generated lowest available unique integer
starting from 0
cluster: Ref(Cluster): the type of cluster. This will never be NULL.
host: Ref(host): the host which is a member of the cluster. This may
be NULL.
left: Date: if not 1/1/1970 this means the time at which the host
left the cluster.
maintenance_required: Bool: this is true when the Host believes the
cluster needs to be placed into maintenance mode.
add field Host.memberships: Set(Ref(Membership))
extend enum vdi_type to include o2cb_statefile as well as ha_statefile
add method Pool.enable_o2cb with arguments
in: heartbeat_sr: Ref(SR): the SR to use for global heartbeats
in: configuration: Map(String,String): available for future configuration tweaks
Like Pool.enable_ha this will find or create the heartbeat VDI, create the
Cluster entry and the Membership entries. All Memberships will have
maintenance_required=true reflecting the fact that the desired cluster
state is out-of-sync with the actual cluster state.
add method XenAPI:Membership.enable
in: self:Host: the host to modify
in: cluster:Cluster: the cluster.
add method XenAPI:Membership.disable
in: self:Host: the host to modify
in: cluster:Cluster: the cluster name.
add a cluster monitor thread which
watches the Host.memberships field and calls Plugin:Membership.create and
Plugin:Membership.destroy to keep the local cluster software up-to-date
when any host in the pool changes its configuration
calls Plugin:Cluster.query after an Plugin:Membership:create or
Plugin:Membership.destroy to see whether the
SR needs maintenance
when all hosts have a last start time later than a Membership
record’s left date, deletes the Membership.
modify XenAPI:Pool.join to resync with the master’s Host.memberships list.
modify XenAPI:Pool.eject to
call Membership.disable in the cluster plugin to stop the o2cb service
call Membership.destroy in the cluster plugin to remove every other host
from the local configuration
remove the Host metadata from the pool
set XenAPI:Membership.left to NOW()
modify XenAPI:Host.forget to
remove the Host metadata from the pool
set XenAPI:Membership.left to NOW()
set XenAPI:Cluster.maintenance_required to true
A Cluster plugin called “o2cb” will be added which
on Plugin:Membership.destroy
comment out the relevant node id in cluster.conf
set the ’needs a restart’ flag
on Plugin:Membership.create
if the provided node id is too high: return an error. This means the
cluster needs to be rebooted to free node ids.
if the node id is not too high: rewrite the cluster.conf using
the “online” tool.
on Plugin:Cluster.start: find the VDI with type=o2cb_statefile;
add this to the “static-vdis” list; chkconfig the service on. We
will use the global heartbeat mode of o2cb.
on Plugin:Cluster.stop: stop the service; chkconfig the service off;
remove the “static-vdis” entry; leave the VDI itself alone
keeps track of the current ’live’ cluster.conf which allows it to
report the cluster service as ’needing a restart’ (which implies
we need maintenance mode)
Summary of differences between this and xHA:
we allow for the possibility that hosts can join and leave, without
necessarily taking the whole cluster down. In the case of o2cb we
should be able to have join work live and only eject requires
maintenance mode
rather than write explicit RPCs to update cluster configuration state
we instead use an event watch and resync pattern, which is hopefully
more robust to network glitches while a reconfiguration is in progress.
Managing xhad
We need to ensure o2cb and xhad do not try to conflict by fencing
hosts at the same time. We shall:
use the default o2cb timeouts (hosts fence if no I/O in 60s): this
needs to be short because disk I/O on otherwise working hosts can
be blocked while another host is failing/ has failed.
make the xhad host fence timeouts much longer: 300s. It’s much more
important that this is reliable than fast. We will make this change
globally and not just when using OCFS2.
In the xhad config we will cap the HeartbeatInterval and StatefileInterval
at 5s (the default otherwise would be 31s). This means that 60 heartbeat
messages have to be lost before xhad concludes that the host has failed.
SM plugin
The SM plugin OCFS2 will be a file-based plugin.
TODO: which file format by default?
The SM plugin will first check whether the o2cb cluster is active and fail
operations if it is not.
I/O paths
When either HA or OCFS O2CB “fences” the host it will look to the admin like
a host crash and reboot. We need to (in priority order)
help the admin prevent fences by monitoring their I/O paths
and fixing issues before they lead to trouble
when a fence/crash does happen, help the admin
tell the difference between an I/O error (admin to fix) and a software
bug (which should be reported)
understand how to make their system more reliable
Monitoring I/O paths
If heartbeat I/O fails for more than 60s when running o2cb then the host will fence.
This can happen either
for a good reason: for example the host software may have deadlocked or someone may
have pulled out a network cable.
for a bad reason: for example a network bond link failure may have been ignored
and then the second link failed; or the heartbeat thread may have been starved of
I/O bandwidth by other processes
Since the consequences of fencing are severe – all VMs on the host crash simultaneously –
it is important to avoid the host fencing for bad reasons.
We should recommend that all users
use network bonding for their network heartbeat
use multipath for their storage heartbeat
Furthermore we need to help users monitor their I/O paths. It’s no good if they use
a bonded network but fail to notice when one of the paths have failed.
The current XenServer HA implementation generates the following I/O-related alerts:
HA_HEARTBEAT_APPROACHING_TIMEOUT (priority 5 “informational”): when half the
network heartbeat timeout has been reached.
HA_STATEFILE_APPROACHING_TIMEOUT (priority 5 “informational”): when half the
storage heartbeat timeout has been reached.
HA_NETWORK_BONDING_ERROR (priority 3 “service degraded”): when one of the bond
links have failed.
HA_STATEFILE_LOST (priority 2 “service loss imminent”): when the storage heartbeat
has completely failed and only the network heartbeat is left.
MULTIPATH_PERIODIC_ALERT (priority 3 “service degrated”): when one of the multipath
links have failed.
Unfortunately alerts are triggered on “edges” i.e. when state changes, and not on “levels”
so it is difficult to see whether the link is currently broken.
We should define datasources suitable for use by xcp-rrdd to expose the current state
(and the history) of the I/O paths as follows:
pif_<name>_paths_failed: the total number of paths which we know have failed.
pif_<name>_paths_total: the total number of paths which are configured.
sr_<name>_paths_failed: the total number of storage paths which we know have failed.
sr_<name>_paths_total: the total number of storage paths which are configured.
The pif datasources should be generated by xcp-networkd which already has a
network bond monitoring thread.
THe sr datasources should be generated by xcp-rrdd plugins since there is no
storage daemon to generate them.
We should create RRDs using the MAX consolidation function, otherwise information
about failures will be lost by averaging.
XenCenter (and any diagnostic tools) should warn when the system is at risk of fencing
in particular if any of the following are true:
pif_<name>_paths_failed is non-zero
sr_<name>_paths_failed is non-zero
pif_<name>_paths_total is less than 2
sr_<name>_paths_total is less than 2
XenCenter (and any diagnostic tools) should warn if any of the following have been
true over the past 7 days:
pif_<name>_paths_failed is non-zero
sr_<name>_paths_failed is non-zero
Heartbeat “QoS”
The network and storage paths used by heartbeats must remain responsive otherwise
the host will fence (i.e. the host and all VMs will crash).
Outstanding issue: how slow can multipathd get? How does it scale with the number of
LUNs.
Post-crash diagnostics
When a host crashes the effect on the user is severe: all the VMs will also
crash. In cases where the host crashed for a bad reason (such as a single failure
after a configuration error) we must help the user understand how they can
avoid the same situation happening again.
We must make sure the crash kernel runs reliably when xhad and o2cb
fence the host.
Xcp-rrdd will be modified to store RRDs in an mmap(2)d file sin the dom0
filesystem (rather than in-memory). Xcp-rrdd will call msync(2) every 5s
to ensure the historical records have hit the disk. We should use the same
on-disk format as RRDtool (or as close to it as makes sense) because it has
already been optimised to minimise the amount of I/O.
Xapi will be modified to run a crash-dump analyser program xen-crash-analyse.
xen-crash-analyse will:
parse the Xen and dom0 stacks and diagnose whether
the dom0 kernel was panic’ed by o2cb
the Xen watchdog was fired by xhad
anything else: this would indicate a bug that should be reported
in cases where the system was fenced by o2cb or xhad then the analyser
will read the archived RRDs and look for recent evidence of a path failure
or of a bad configuration (i.e. one where the total number of paths is 1)
will parse the xhad.log and look for evidence of heartbeats “approaching
timeout”
TODO: depending on what information we can determine from the analyser, we
will want to record some of it in the Host_crash_dump database table.
XenCenter will be modified to explain why the host crashed and explain what
the user should do to fix it, specifically:
if the host crashed for no obvious reason then consider this a software
bug and recommend a bugtool/system-status-report is taken and uploaded somewhere
if the host crashed because of o2cb or xhad then either
if there is evidence of path failures in the RRDs: recommend the user
increase the number of paths or investigate whether some of the equipment
(NICs or switches or HBAs or SANs) is unreliable
if there is evidence of insufficient paths: recommend the user add more
paths
Network configuration
The documentation should strongly recommend
the management network is bonded
the management network is dedicated i.e. used only for management traffic
(including heartbeats)
the OCFS2 storage is multipathed
xcp-networkd will be modified to change the behaviour of the DHCP client.
Currently the dhclient will wait for a response and eventually background
itself. This is a big problem since DHCP can reset the hostname, and this can
break o2cb. Therefore we must insist that PIF.reconfigure_ip becomes
fully synchronous, supporting timeout and cancellation. Once the call returns
– whether through success or failure – there must not be anything in the
background which will change the system’s hostname.
TODO: figure out whether we need to request “maintenance mode” for hostname
changes.
Maintenance mode
The purpose of “maintenance mode” is to take a host out of service and leave
it in a state where it’s safe to fiddle with it without affecting services
in VMs.
XenCenter currently does the following:
Host.disable: prevents new VMs starting here
makes a list of all the VMs running on the host
Host.evacuate: move the running VMs somewhere else
The problems with maintenance mode are:
it’s not safe to fiddle with the host network configuration with storage
still attached. For NFS this risks deadlocking the SR. For OCFS2 this
risks fencing the host.
it’s not safe to fiddle with the storage or network configuration if HA
is running because the host will be fenced. It’s not safe to disable fencing
unless we guarantee to reboot the host on exit from maintenance mode.
We should also
PBD.unplug: all storage. This allows the network to be safely reconfigured.
If the network is configured when NFS storage is plugged then the SR can
permanently deadlock; if the network is configured when OCFS2 storage is
plugged then the host can crash.
TODO: should we add a Host.prepare_for_maintenance (better name TBD)
to take care of all this without XenCenter having to script it. This would also
help CLI and powershell users do the right thing.
TODO: should we insist that the host is rebooted to leave maintenance
mode? This would make maintenance mode more reliable and allow us to integrate
maintenance mode with xHA (where maintenance mode is a “staged reboot”)
TODO: should we leave all clusters as part of maintenance mode? We
probably need to do this to avoid fencing.
Walk-through: adding OCFS2 storage
Assume you have an existing Pool of 2 hosts. First the client will set up
the O2CB cluster, choosing where to put the global heartbeat volume. The
client should check that the I/O paths have all been setup correctly with
bonding and multipath and prompt the user to fix any obvious problems.
Internally within Pool.enable_o2cb Xapi will set up the cluster metadata
on every host in the pool:
At this point all hosts have in-sync cluster.conf files but all cluster
services are disabled. We also have requires_mainenance=true on all
Membership entries and the global Cluster has enabled=false.
The client will now try to enable the cluster with Cluster.enable:
Now all hosts are in the cluster and the SR can be created using the standard
SM APIs.
Walk-through: remove a host
Assume you have an existing Pool of 2 hosts with o2cb clustering enabled
and at least one ocfs2 filesystem mounted. If the host is online then
XenAPI:Pool.eject will:
Note that:
All hosts will have modified their o2cbcluster.conf to comment out
the former host
The Membership table still remembers the node number of the ejected host–
this cannot be re-used until the SR is taken down for maintenance.
All hosts can see the difference between their current cluster.conf
and the one they would use if they restarted the cluster service, so all
hosts report that the cluster must be taken offline i.e. requires_maintence=true.
Summary of the impact on the admin
OCFS2 is fundamentally a different type of storage to all existing storage
types supported by xapi. OCFS2 relies upon O2CB, which provides
Host-level High Availability. All HA implementations
(including O2CB and xhad) impose restrictions on the server admin to
prevent unnecessary host “fencing” (i.e. crashing). Once we have OCFS2 as
a feature, we will have to live with these restrictions which previously only
applied when HA was explicitly enabled. To reduce complexity we will not try
to enforce restrictions only when OCFS2 is being used or is likely to be used.
Impact even if not using OCFS2
“Maintenance mode” now includes detaching all storage.
Host network reconfiguration can only be done in maintenance mode
XenServer HA enable takes longer
XenServer HA failure detection takes longer
Network configuration with DHCP must be fully synchronous i.e. it wil block
until the DHCP server responds. On a timeout, the change will not be made.
Impact when using OCFS2
Sometimes a host will not be able to join the pool without taking the
pool into maintenance mode
Every VM will have to be XSM’ed (is that a verb?) to the new OCFS2 storage.
This means that VMs with more than 2 snapshots will have their snapshots
deleted; it means you need to provision another storage target, temporarily
doubling your storage needs; and it will take a long time.
There will now be 2 different reasons why a host has fenced which the
admin needs to understand.
Design document
Revision
v1
Status
proposed
patches in VDIs
“Patches” are signed binary blobs which can be queried and applied.
They are stored in the dom0 filesystem under /var/patch. Unfortunately
the patches can be quite large – imagine a repo full of RPMs – and
the dom0 filesystem is usually quite small, so it can be difficult
to upload and apply some patches.
Instead of writing patches to the dom0 filesystem, we shall write them
to disk images (VDIs) instead. We can then take advantage of features like
shared storage
cross-host VDI.copy
to manage the patches.
XenAPI changes
Add a field pool_patch.VDI of type Ref(VDI). When a new patch is
stored in a VDI, it will be referenced here. Older patches and cleaned
patches will have invalid references here.
The HTTP handler for uploading patches will choose an SR to stream the
patch into. It will prefer to use the pool.default_SR and fall back
to choosing an SR on the master whose driver supports the VDI_CLONE
capability: we want the ability to fast clone patches, one per host
concurrently installing them. A VDI will be created whose size is 4x
the apparent size of the patch, defaulting to 4GiB if we have no size
information (i.e. no content-length header)
pool_patch.clean_on_host will be deprecated. It will still try to
clean a patch from the local filesystem but this is pointless for
the new VDI patch uploads.
pool_patch.clean will be deprecated. It will still try to clean a patch
from the local filesystem of the master but this is pointless for the
new VDI patch uploads.
pool_patch.pool_clean will be deprecated. It will destroy any associated
patch VDI. Users will be encouraged to call VDI.destroy instead.
Changes beneath the XenAPI
pool_patch records will only be deleted if both the filename field
refers to a missing file on the master and the VDI field is a dangling
reference
Patches stored in VDIs will be stored within a filesystem, like we used
to do with suspend images. This is needed because (a) we want to execute
the patches and block devices cannot be executed; and (b) we can use
spare space in the VDI as temporary scratch space during the patch
application process. Within the VDI we will call patches patch rather
than using a complicated filename.
When a host wishes to apply a patch it will call VDI.copy to duplicate
the VDI to a locally-accessible SR, mount the filesystem and execute it.
If the patch is still in the master’s dom0 filesystem then it will fall
back to the HTTP handler.
Summary of the impact on the admin
There will no longer be a size limit on hotfixes imposed by the mechanism
itself.
There must be enough free space in an SR connected to the host to be able
to apply a patch on that host.
Design document
Revision
v1
Status
proposed
PCI passthrough support
Introduction
GPU passthrough is already available in XAPI, this document proposes to also
offer passthrough for all PCI devices through XAPI.
Design proposal
New methods for PCI object:
PCI.enable_dom0_access
PCI.disable_dom0_access
PCI.get_dom0_access_status: compares the outputs of /opt/xensource/libexec/xen-cmdline
and /proc/cmdline to produce one of the four values that can be currently contained
in the PGPU.dom0_access field:
disabled
disabled_on_reboot
enabled
enabled_on_reboot
How do determine the expected dom0 access state:
If the device id is present in both pciback.hide of /proc/cmdline and xen-cmdline: enabled
If the device id is present not in both pciback.hide of /proc/cmdline and xen-cmdline: disabled
If the device id is present in the pciback.hide of /proc/cmdline but not in the one of xen-cmdline: disabled_on_reboot
If the device id is not present in the pciback.hide of /proc/cmdline but is in the one of xen-cmdline: enabled_on_reboot
A function rather than a field makes the data always accurate and even accounts for
changes made by users outside XAPI, directly through /opt/xensource/libexec/xen-cmdline
With these generic methods available, the following field and methods will be deprecated:
PGPU.enable_dom0_access
PGPU.disable_dom0_access
PGPU.dom0_access (DB field)
They would still be usable and up to date with the same info as for the PCI methods.
Test cases
hide a PCI:
call PCI.disable_dom0_access on an enabled PCI
check the PCI goes in state disabled_on_reboot
reboot the host
check the PCI goes in state disabled
unhide a PCI:
call PCI.enable_dom0_access on an disabled PCI
check the PCI goes in state enabled_on_reboot
reboot the host
check the PCI goes in state enabled
get a PCI dom0 access state:
on a enabled PCI, make sure the get_dom0_access_status returns enabled
hide the PCI
make sure the get_dom0_access_status returns disabled_on_reboot
reboot
make sure the get_dom0_access_status returns disabled
unhide the PCI
make sure the get_dom0_access_status returns enabled_on_reboot
reboot
make sure the get_dom0_access_status returns enabled
Check PCI/PGPU dom0 access coherence:
hide a PCI belonging to a PGPU and make sure both states remains coherent at every step
unhide a PCI belonging to a PGPU and make sure both states remains coherent at every step
hide a PGPU and make sure its and its PCI’s states remains coherent at every step
unhide a PGPU and make sure its and its PCI’s states remains coherent at every step
Design document
Revision
v1
Status
proposed
Pool-wide SSH
Background
The SMAPIv3 plugin architecture requires that storage plugins are able to work
in the absence of xapi. Amongst other benefits, this allows them to be tested
in isolation, are able to be shared more widely than just within the XenServer
community and will cause less load on xapi’s database.
However, many of the currently existing SMAPIv1 backends require inter-host
operations to be performed. This is achieved via the use of the Xen-API call
‘host.call_plugin’, which allows an API user to execute a pre-installed plugin
on any pool member. This is important for operations such as coalesce / snapshot
where the active data path for a VM somewhere in the pool needs to be refreshed
in order to complete the operation. In order to use this, the RPM in which the
SM backend lives is used to deliver a plugin script into /etc/xapi.d/plugins,
and this executes the required function when the API call is made.
In order to support these use-cases without xapi running, a new mechanism needs
to be provided to allow the execution of required functionality on remote hosts.
The canonical method for remotely executing scripts is ssh - the secure shell.
This design proposal is setting out how xapi might manage the public and
private keys to enable passwordless authentication of ssh sessions between all
hosts in a pool.
Modifications to the host
On firstboot (and after being ejected), the host should generate a
host key (already done I believe), and an authentication key for the
user (root/xapi?).
Modifications to xapi
Three new fields will be added to the host object:
host.ssh_public_host_key : string: This is the host key that identifies the host
during the initial ssh key exchange protocol. This should be added to the
‘known_hosts’ field of any other host wishing to ssh to this host.
host.ssh_public_authentication_key : string: This field is the public
key used for authentication when sshing from the root account on that host -
host A. This can be added to host B’s authorized_keys file in order to
allow passwordless logins from host A to host B.
host.ssh_ready : bool: A boolean flag indicating that the configuration
files in use by the ssh server/client on the host are up to date.
One new field will be added to the pool record:
pool.revoked_authentication_keys : string list: This field records all
authentication keys that have been used by hosts in the past. It is updated
when a host is ejected from the pool.
Pool Join
On pool join, the master creates the record for the new host and populates the
two public key fields with values supplied by the joining host. It then sets
the ssh_ready field on all other hosts to false.
On each host in the pool, a thread is watching for updates to the
ssh_ready value for the local host. When this is set to false, the host
then adds the keys from xapi’s database to the appropriate places in the ssh
configuration files and restarts sshd. Once this is done, the host sets the
ssh_ready field to ’true’
Pool Eject
On pool eject, the host’s ssh_public_host_key is lost, but the authetication key is added to a list of revoked keys on the pool object. This allows all other hosts to remove the key from the authorized_keys list when they next sync, which in the usual case is immediately the database is modified due to the event watch thread. If the host is offline though, the authorized_keys file will be updated the next time the host comes online.
Questions
Do we want a new user? e.g. ‘xapi’ - how would we then use this user to execute privileged things? setuid binaries?
Is keeping the revoked_keys list useful? If we ‘control the world’ of the authorized_keys file, we could just remove anything that’s currently in there that xapi doesn’t know about
Design document
Revision
v1
Status
proposed
Process events from xenopsd in a timely manner
Background
There is a significant delay between the VM being unpaused and XAPI reporting it
as started during a bootstorm.
It can happen that the VM is able to send UDP packets already, but XAPI still reports it as not started for minutes.
XAPI currently processes all events from xenopsd in a single thread, the unpause
events get queued up behind a lot of other events generated by the already
running VMs.
We need to ensure that unpause events from xenopsd get processed in a timely
manner, even if XAPI is busy processing other events.
Timely processing of events
If we process the events in a Round-Robin fashion then unpause events are reported in a timely fashion.
We need to ensure that events operating on the same VM are not processed in parallel.
Xenopsd already has code that does exactly this, the purpose of the xapi-work-queues refactoring PR is to
reuse this code in XAPI by creating a shared package between xenopsd and xapi: xapi-work-queues.
A worker pool has a limited number of worker threads.
Each worker pops one tagged item from the queue in a round-robin fashion.
While the item is executed the tag temporarily doesn’t participate in round-robin scheduling.
If during execution more items get queued with the same tag they get redirected to a private queue.
Once the item finishes execution the tag will participate in RR scheduling again.
This ensures that items with the same tag do not get executed in parallel,
and that a tag with a lot of items does not starve the execution of other tags.
Known limitations: The active per-VM events should be a small number, this is already ensured in the push_with_coalesce / should_keep code on the xenopsd side. Events to XAPI from xenopsd should already arrive coalesced.
We have had several customer incidents in the past that have been attributed to
“overloading” Xapi. This effectively means that a client is making requests at
a rate that Xapi cannot handle. This can result in very bad response times (“we
tried to shut down 20 VMs and this took 2 hours!”) and general system
instability and unavailability.
In some cases, there is a mix of “well behaved” clients and others that are
either misconfigured or make improper use of the API, hammering the pool and
breaking use of the good guys. For example, a dodgy monitoring service may
lock out the control software, or slow down VM lifecycle operations.
Part of the problem is that Xapi and xenopsd are not very good at handling
load, in particular in a pool where the coordinator is often a bottleneck. A
lot of work has already been done make the Toolstack cope better under load.
This is important and a lot more can be done in this space.
However, even a very efficient Toolstack can be overloaded by a particularly
determined client, unless the client is deliberate slowed down in some way.
Hence, a way of throttling clients is needed in addition to performance
improvements, as a complimentary approach.
Last year, thread prioritisation was tried. This could be revisited, but we
also need an approach that allows us to pose hard constraints on clients. For
example, as an admin, I want to configure Xapi to give my control panel
unlimited access, but explicitly limit how much Monitoring App X can do.
The proposal here is to do a simpler kind of per-client rate limiting at the
API level. The objective is to introduce a simple mechanism to slow down
individual clients which are overloading the system. This design intentionally
enforces rate limits on a per-client basis rather than capping total system
throughput. System-wide admission control or global load shedding is explicitly
out of scope and would require separate mechanisms.
Approach
Rate limiting
The idea is to use a Token Bucket algorithm, where each client gets its own
Token Bucket with specific parameters to rate limit its requests. The Token
Bucket algorithm has two basic parameters:
The capacity: the maximum number of tokens that fit in the bucket.
The fill rate: the number of tokens per second that get added to the bucket (up
to its capacity).
Serving requests consumes tokens for the bucket - the token cost will be
proportional to the amount of work that the request requires. For example, a
simple DB call like VM.get_power_state may cost 1 token, while a VM.start call
may cost 100 tokens.
The basic principle is that for a client to get a request accepted, it needs to
have enough tokens in the bucket. If there are not enough tokens, then the
request will be queued until there are enough - the bucket is constantly
refilled, so all requests eventually get served. When a request is accepted, its
required number of tokens are taken out of the bucket.
Therefore, the bucket’s fill rate determines the long-term average rate at
which requests are served. For example, if the rate is 1 token/second, then on
average 1 DB call per second can be made.
The capacity is related to the maximum “burst size”. For example, a capacity of
100 tokens means that, if the bucket is full, the client can make 100 DB calls
in quick succession, before it is slowed done to match the rate.
One instance of a Token Bucket would apply to all calls from a given client,
potentially made on multiple connections.
Client classification
In order to let pool administrators know who they should be rate limiting, we
will also introduce a Caller datamodel class which tracks all requests made
to Xapi.
Callers will be a high-level way of tracking clients. We allow callers to be
identified by a number of different parameters: AD user, IP address,
originator, user agent. When an unknown caller makes a request to Xapi, we
record their data in a new row. The pool administrator will be able to merge
related callers together and assign them labels.
The caller classification allows wildcards for any field, though we require
that at least one field be specified. This lets us, for example, combine all
accesses from the Xapi python API by specifying the user-agent .
A rate limiter can be associated with any number of callers, and the parameters
of the rate limiter can either be derived from the usage patterns of the
callers or selected from a number of preset profiles.
Statistics
In order to assist with rate limiting, we can store statistics about callers.
We identify two kinds of statistics: volatile and stable. Volatile statistics
change over time without any input, e.g. sliding windows. These will be stored
in RRDs. By contrast, stable statistics only vary at most once per request, and
so are safe to store in the main database.
Volatile statistics:
Tokens used over the last (5 minutes/hour/day).
Most common requests over the last (5 minutes/hour/day).
Stable statistics:
Last request timestamp
API design
Caller Datamodel
We propose two new datamodel tables: Caller, which stores the data associated with each caller, and Rate limit, which identifies one or more callers with a rate limiter.
Caller:
Mutability
Name
Type
Description
RO
uuid
String
Unique identifier for the caller
RW
name_label
String
User-assigned label for the caller
RW
name_description
String
User-assigned description for the caller
RO
user_agent
String
user agent matching pattern
RO
client_ip
String
Client IP address matching pattern
RO
last_access
DateTime
Last time the caller made a request
SRW
groups
Set String
Set of labels used for cumulative metrics
RO
rate_limit
Ref Rate_limit
Associated rate limiter - can be null
Callers identify the origin of incoming requests, and they serve a dual purpose
of metrics gathering and providing a target for rate limiting. We allow users to query
the metrics for an individual caller, or for all callers belonging to a given
group. A new caller record will be added automatically whenever a request from
an unknown origin is made to Xapi, and callers can also be added manually by
users.
Rate limit:
Mutability
Name
Type
Description
RO
uuid
String
Unique identifier for the rate limiter
RW
name_label
String
User-assigned label for the rate limiter
RW
name_description
String
User-assigned description for the rate limiter
SRO
callers
Set (Ref Caller)
Callers associated with this rate limiter
RO
burst_size
Float
Amount of tokens that can be consumed in one burst
RO
fill_rate
Float
Tokens added to the bucket per second
A rate limit can be applied to a group of callers, which then have a collective
rate limit applied. Each caller can have at most one rate limiter applied,
which then becomes stored in its rate_limit field. We have two distinct
notions of groups here: rate limits store groups of callers, but groups of
callers are also represented in their groups field. We do this to allow for a
decoupling of rate limiting and data reporting, and to simplify the underlying
code by storing direct references to objects where possible.
API functions
We define the following API functions for the caller datamodel:
Caller.create(name_label, name_description, user_agent, client_ip): Create a new caller.
Caller.set_name_label(caller, name_label): Set name label on the caller
Caller.destroy(caller): Destroy the caller
Caller.add_group(caller, group): Add caller to group
Caller.remove_group(caller, group): Remove caller from group
Caller.query_usage(caller, time_period): Obtain usage statistics for an individual caller
Caller.query_group_usage(group, time_period): Obtain usage statistics for a group of callers
And the following functions for the rate limiter datamodel:
Rate_limit.create(name_label, callers, burst_size, fill_rate): Create a
rate limiter with the supplied parameters.
Rate_limit.add_caller(rate_limit, caller): Add a caller to the callers set
Rate_limit.remove_caller(rate_limit, caller): Remove a caller from the callers set
Rate_limit.set_burst_size(rate_limit, burst_size): Set the burst size for the
rate limiter
Rate_limit.set_fill_rate(rate_limit, burst_size): Set the fill rate for the
rate limiter
Rate_limit.destroy(rate_limit): Destroy the rate limiter - should also
clear the rate_limit field from its associated callers
Matching semantics
When a request arrives, Xapi matches the request’s metadata against the
Caller table. Each field in a Caller record is a pattern matched against
the corresponding field in the request using prefix matching: a pattern
matches iff it is a prefix of the request’s field value. Prefix patterns are
specified by terminating with *. A pattern without * matches only exact
equals. A record matches a request iff all fields match.
We treat logging and rate limiting differently:
Logging: All caller records that match with an incoming request track the
request.
Rate limiting: Only the most specific match (which has rate limiting
enabled) for any given request will trigger rate limiting and deduct tokens
from its token bucket.
The most specific match is the matching Caller record with the longest
total prefix length across all fields. For example, a record that matches
user_agent with a full value is more specific than one that matches only a
short prefix. We resolve ties through a lexicographic ordering amongst fields:
IP address first, then user agent.
This results in the statistics being stored by callers tracking everything that
matches, but only the most specific rate limiter to any given request will be
triggered.
Note that this means overlapping records define independent rate limiters
rather than a shared budget. For example, if foo* is limited to 10 req/s and
foo is limited to 5 req/s, then a request whose user-agent is exactly foo
will only deduct from the foo bucket (the more specific match), while
requests matching foo* but not foo (e.g. foobar) deduct from the foo*
bucket. The total sustained rate across both groups can therefore reach 15
req/s. This is the expected behaviour of two separate rate limiters; sharing a
single budget across overlapping patterns with different limits is not
supported.
Caller lifecycle
Users can proactively create callers with wildcards to identify groups of
callers.
When a call comes in, a new Caller is automatically created if no existing
fully specified record (no wildcards) matches. We want to store the details
of all unique origins, even if they fall under a wildcard pattern.
Toolstack startup behavior: On toolstack startup, an in-memory data structure
is created from the database fields which stores all the rate limiters and
callers, as described in the implementation section. Token buckets are
initialised full (i.e. each caller starts with a fresh burst budget) rather
than being persisted across restarts. Volatile usage statistics surfaced via
Caller.query_usage and Caller.query_group_usage are backed by RRDs, so
historical data over the queried time period survives toolstack restarts.
Stable statistics (e.g. last_access) are read from the database and are
therefore also preserved.
XAPI integration
Calls into Xapi are intercepted at two points:
RPC calls are intercepted at dispatch, in the do_dispatch function within
xapi/server_helpers.ml. At this point, we already have a session available if
the caller is logged in, and we know which Xapi call is being made.
Other calls are intercepted by instrumenting the HTTP handlers as they are
added to the HTTP server in the add_handler function within
xapi/xapi_http.ml. Here we have less information, so the rate limiting is less
fine-grained, though there is scope to integrate more closely with the handlers
should it be necessary.
Both caller and rate limiter are implemented internally via a single table
which maps caller -> caller_metrics.t * (rate_limit_data.t option). If a rate
limiter is being applied, then the cost of the call must come out of the
associated token bucket, and if there are not enough tokens in the bucket then
the response is delayed until the bucket is refilled.
An exception to this is async RPC calls, which always respond immediately but
the work that they initiate does get added to the rate limiting queue.
Library
The internals of this are all implemented in a new library: libs/rate-limit,
which contains modules for token buckets, rate limiting queues, client
classification, and LRU cache, together with comprehensive unit tests.
Token bucket
Token buckets enforce rate limiting by storing tokens that get depleted on
request and are refilled over time. They have two parameters
Burst size: amount of tokens that the bucket can hold when full
Fill rate: amount of tokens added to the bucket every second
In our implementation, we split the buckets into two types:
type state ={tokens:float; last_refill: Mtime.span}type t ={ burst_size:float; fill_rate:float(* Tokens per second *); state: state Atomic.t
}
The main type, type t, stores the token bucket parameters together with an
atomically wrapped state for thread safety. The state type itself contains the
token count at last refill, together with the last refill time.
By keeping track of the last refill time, we refill the tokens only when a new
request comes in. We provide two functions for consuming: one is non-blocking
and returns a boolean for whether the consume was successful, and the other
blocks until the tokens have been consumed.
Rate limit queue
A token bucket enforces an overall request rate but provides no guarantees
about ordering or fairness under contention. When multiple callers compete for
tokens, whichever thread or process happens to run first can repeatedly consume
newly refilled tokens, while others may be delayed indefinitely. Under sustained
load, this can lead to starvation for less aggressively scheduled or slower
clients.
To alleviate this, we keep rate limited requests in a queue which get processed
as the token bucket is refilled over time:
type t ={ bucket: Token_bucket.t
; process_queue:(float*(unit->unit)) Queue.t (* contains token cost and callback *); process_queue_lock: Mutex.t
; worker_thread_cond: Condition.t
; should_terminate:bool ref (* signal termination to worker thread *); worker_thread: Thread.t
}
The worker thread is responsible for executing the callbacks in the process
queue when their time arrives. As above, we provide two functions for consuming
from the token bucket; submit_async returns immediately and places a function
to be executed at a later time in the queue, while submit_sync blocks until
its function is executed by the rate limiter but may return a value.
Client table
We define a Key module to identify clients. This contains only user_agent and
client_ip at present, but can be expanded to cover AD user and originator, for
example.
moduleKey=structtype t ={user_agent:string; client_ip:string}
This module implements a match : t -> t -> bool function, which treats empty
strings as wildcards – for example match {"", "1.1.1.1"} {"firefox", "1.1.1.1"}
will succeed. In order to store all recorded users, we use a simple association
list with a cache:
To administer guest VMs it can be useful to connect to them over Remote Desktop Protocol (RDP). XenCenter supports this; it has an integrated RDP client.
First it is necessary to turn on the RDP service in the guest.
This can be controlled from XenCenter. Several layers are involved. This description starts in the guest and works up the stack to XenCenter.
This feature was completed in the first quarter of 2015, and released in Service Pack 1 for XenServer 6.5.
The guest agent
The XenServer guest agent installed in Windows VMs can turn the RDP service on and off, and can report whether it is running.
Interaction with the agent is done through some Xenstore keys:
The guest agent running in domain N writes two xenstore nodes when it starts up:
/local/domain/N/control/feature-ts = 1
/local/domain/N/control/feature-ts2 = 1
This indicates support for the rest of the functionality described below.
(The “…ts2” flag is new for this feature; older versions of the guest agent wrote the “…ts” flag and had support for only a subset of the functionality (no firewall modification), and had a bug in updating .../data/ts.)
To indicate whether RDP is running, the guest agent writes the string “1” (running) or “0” (disabled) to xenstore node
/local/domain/N/data/ts.
It does this on start-up, and also in response to the deletion of that node.
The guest agent also watches xenstore node /local/domain/N/control/ts and it turns RDP on and off in response to “1” or “0” (respectively) being written to that node. The agent acknowledges the request by deleting the node, and afterwards it deletes local/domain/N/data/ts, thus triggering itself to update that node as described above.
When the guest agent turns the RDP service on/off, it also modifies the standard Windows firewall to allow/forbid incoming connections to the RDP port. This is the same as the firewall change that happens automatically when the RDP service is turned on/off through the standard Windows GUI.
XAPI etc.
xenopsd sets up watches on xenstore nodes including the control tree and data/ts, and prompts xapi to react by updating the relevant VM guest metrics record, which is available through a XenAPI call.
XenAPI includes a new message (function call) which can be used to ask the guest agent to turn RDP on and off.
This is VM.call_plugin (analogous to Host.call_plugin) in the hope that it can be used for other purposes in the future, even though for now it does not really call a plugin.
To use it, supply plugin="guest-agent-operation" and either fn="request_rdp_on" or fn="request_rdp_off".
The function strings are named with “request” (rather than, say, “enable_rdp” or “turn_rdp_on”) to make it clear that xapi only makes a request of the guest: when one of these calls returns successfully this means only that the appropriate string (1 or 0) was written to the control/ts node and it is up to the guest whether it responds.
XenCenter
Behaviour on older XenServer versions that do not support RDP control
Note that the current behaviour depends on some global options: “Enable Remote Desktop console scanning” and “Automatically switch to the Remote Desktop console when it becomes available”.
When tools are not installed:
As of XenCenter 6.5, the RDP button is absent.
When tools are installed but RDP is not switched on in the guest:
If “Enable Remote Desktop console scanning” is on:
The RDP button is present but greyed out. (It seems to sometimes read “Switch to Remote Desktop” and sometimes read “Looking for guest console…”: I haven’t yet worked out the difference).
We scan the RDP port to detect when RDP is turned on
If “Enable Remote Desktop console scanning” is off:
The RDP button is enabled and reads “Switch to Remote Desktop”
When tools are installed and RDP is switched on in the guest:
If “Enable Remote Desktop console scanning” is on:
The RDP button is enabled and reads “Switch to Remote Desktop”
If “Automatically switch” is on, we switch to RDP immediately we detect it
If “Enable Remote Desktop console scanning” is off:
As above, the RDP button is enabled and reads “Switch to Remote Desktop”
New behaviour on XenServer versions that support RDP control
This new XenCenter behaviour is only for XenServer versions that support RDP control, with guests with the new guest agent: behaviour must be unchanged if the server or guest-agent is older.
There should be no change in the behaviour for Linux guests, either PV or HVM varieties: this must be tested.
We should never scan the RDP port; instead we should watch for a change in the relevant variable in guest_metrics.
The XenCenter option “Enable Remote Desktop console scanning” should change to read “Enable Remote Desktop console scanning (XenServer 6.5 and earlier)”
The XenCenter option “Automatically switch to the Remote Desktop console when it becomes available” should be enabled even when “Enable Remote Desktop console scanning” is off.
When tools are not installed:
As above, the RDP button should be absent.
When tools are installed but RDP is not switched on in the guest:
The RDP button should be enabled and read “Turn on Remote Desktop”
If pressed, it should launch a dialog with the following wording: “Would you like to turn on Remote Desktop in this VM, and then connect to it over Remote Desktop? [Yes] [No]”
That button should turn on RDP, wait for RDP to become enabled, and switch to an RDP connection. It should do this even if “Automatically switch” is off.
When tools are installed and RDP is switched on in the guest:
The RDP button should be enabled and read “Switch to Remote Desktop”
If “Automatically switch” is on, we should switch to RDP immediately
There is no need for us to provide UI to switch RDP off again
We should also test the case where RDP has been switched on in the guest before the tools are installed.
Design document
Revision
v1
Status
released (7,0)
RRDD archival redesign
Introduction
Current problems with rrdd:
rrdd stores knowledge about whether it is running on a master or a slave
This determines the host to which rrdd will archive a VM’s rrd when the VM’s
domain disappears - rrdd will always try to archive to the master. However,
when a host joins a pool as a slave rrdd is not restarted so this knowledge is
out of date. When a VM shuts down on the slave rrdd will archive the rrd
locally. When starting this VM again the master xapi will attempt to push any
locally-existing rrd to the host on which the VM is being started, but since
no rrd archive exists on the master the slave rrdd will end up creating a new
rrd and the previous rrd will be lost.
rrdd handles rebooting VMs unpredictably
When rebooting a VM, there is a chance rrdd will attempt to update that VM’s rrd
during the brief period when there is no domain for that VM. If this happens,
rrdd will archive the VM’s rrd to the master, and then create a new rrd for the
VM when it sees the new domain. If rrdd doesn’t attempt to update that VM’s rrd
during this period, rrdd will continue to add data for the new domain to the old
rrd.
Proposal
To solve these problems, we will remove some of the intelligence from rrdd and
make it into more of a slave process of xapi. This will entail removing all
knowledge from rrdd of whether it is running on a master or a slave, and also
modifying rrdd to only start monitoring a VM when it is told to, and only
archiving an rrd (to a specified address) when it is told to. This matches the
way xenopsd only manages domains which it has been told to manage.
Design
For most VM lifecycle operations, xapi and rrdd processes (sometimes across more
than one host) cooperate to start or stop recording a VM’s metrics and/or to
restore or backup the VM’s archived metrics. Below we will describe, for each
relevant VM operation, how the VM’s rrd is currently handled, and how we propose
it will be handled after the redesign.
VM.destroy
The master xapi makes a remove_rrd call to the local rrdd, which causes rrdd to
to delete the VM’s archived rrd from disk. This behaviour will remain unchanged.
VM.start(_on) and VM.resume(_on)
The master xapi makes a push_rrd call to the local rrdd, which causes rrdd to
send any locally-archived rrd for the VM in question to the rrdd of the host on
which the VM is starting. This behaviour will remain unchanged.
VM.shutdown and VM.suspend
Every update cycle rrdd compares its list of registered VMs to the list of
domains actually running on the host. Any registered VMs which do not have a
corresponding domain have their rrds archived to the rrdd running on the host
believed to be the master. We will change this behaviour by stopping rrdd from
doing the archiving itself; instead we will expose a new function in rrdd’s
interface:
val archive_rrd : vm_uuid:string -> remote_address:string -> unit
This will cause rrdd to remove the specified rrd from its table of registered
VMs, and archive the rrd to the specified host. When a VM has finished shutting
down or suspending, the xapi process on the host on which the VM was running
will call archive_rrd to ask the local rrdd to archive back to the master rrdd.
VM.reboot
Removing rrdd’s ability to automatically archive the rrds for disappeared
domains will have the bonus effect of fixing how the rrds of rebooting VMs are
handled, as we don’t want the rrds of rebooting VMs to be archived at all.
VM.checkpoint
This will be handled automatically, as internally VM.checkpoint carries out a
VM.suspend followed by a VM.resume.
VM.pool_migrate and VM.migrate_send
The source host’s xapi makes a migrate_rrd call to the local rrd, with a
destination address and an optional session ID. The session ID is only required
for cross-pool migration. The local rrdd sends the rrd for that VM to the
destination host’s rrdd as an HTTP PUT. This behaviour will remain unchanged.
Design document
Revision
v1
Status
released (7.0)
Revision history
v1
Initial version
RRDD plugin protocol v2
Motivation
rrdd plugins currently report datasources via a shared-memory file, using the
following format:
The JSON data itself, encoding the values and metadata associated with the
reported datasources.
Example
{
"timestamp": 1339685573.245,
"data_sources": {
"cpu-temp-cpu0": {
"description": "Temperature of CPU 0",
"type": "absolute",
"units": "degC",
"value": "64.33"
"value_type": "float",
},
"cpu-temp-cpu1": {
"description": "Temperature of CPU 1",
"type": "absolute",
"units": "degC",
"value": "62.14"
"value_type": "float",
}
}
}
The disadvantage of this protocol is that rrdd has to parse the entire JSON
structure each tick, even though most of the time only the values will change.
For this reason a new protocol is proposed.
Protocol V2
value
bits
format
notes
header string
(string length)*8
string
“DATASOURCES” as in the V1 protocol
data checksum
32
int32
binary-encoded crc32 of the concatenation of the encoded timestamp and datasource values
metadata checksum
32
int32
binary-encoded crc32 of the metadata string (see below)
number of datasources
32
int32
only needed if the metadata has changed - otherwise RRDD can use a cached value
timestamp
64
double
Unix epoch
datasource values
n * 64
int64 | double
n is the number of datasources exported by the plugin, type dependent on the setting in the metadata for value_type [int64|float]
metadata length
32
int32
metadata
(string length)*8
string
All integers/double are bigendian. The metadata will have the same JSON-based format as
in the V1 protocol, minus the timestamp and value key-value pair for each
datasource.
field
values
notes
required
description
string
Description of the datasource
no
owner
host | vm | sr
The object to which the data relates
no, default host
value_type
int64 | float
The type of the datasource
yes
type
absolute | derive | gauge
The type of measurement being sent. Absolute for counters which are reset on reading, derive stores the derivative of the recorded values (useful for metrics which continually increase like amount of data written since start), gauge for things like temperature
no, default absolute
default
true | false
Whether the source is default enabled or not
no, default false
units
The units the data should be displayed in
no
min
The minimum value for the datasource
no, default -infinity
max
The maximum value for the datasource
no, default +infinity
Example
{
"datasources": {
"memory_reclaimed": {
"description":"Host memory reclaimed by squeezed",
"owner":"host",
"value_type":"int64",
"type":"absolute",
"default":"true",
"units":"B",
"min":"-inf",
"max":"inf"
},
"memory_reclaimed_max": {
"description":"Host memory that could be reclaimed by squeezed",
"owner":"host",
"value_type":"int64",
"type":"absolute",
"default":"true",
"units":"B",
"min":"-inf",
"max":"inf"
},
{
"cpu-temp-cpu0": {
"description": "Temperature of CPU 0",
"owner":"host",
"value_type": "float",
"type": "absolute",
"default":"true",
"units": "degC",
"min":"-inf",
"max":"inf"
},
"cpu-temp-cpu1": {
"description": "Temperature of CPU 1",
"owner":"host",
"value_type": "float",
"type": "absolute",
"default":"true",
"units": "degC",
"min":"-inf",
"max":"inf"
}
}
}
The above formatting is not required, but added here for readability.
Reading algorithm
if header != expected_header:
raise InvalidHeader()
if data_checksum == last_data_checksum:
raise NoUpdate()
if data_checksum != crc32(encoded_timestamp_and_values):
raise InvalidChecksum()
if metadata_checksum == last_metadata_checksum:
for datasource, value in cached_datasources, values:
update(datasource, value)
else:
if metadata_checksum != crc32(metadata):
raise InvalidChecksum()
cached_datasources = create_datasources(metadata)
for datasource, value in cached_datasources, values:
update(datasource, value)
This means that for a normal update, RRDD will only have to read the header plus
the first (16 + 16 + 4 + 8 + 8*n) bytes of data, where n is the number of
datasources exported by the plugin. If the metadata changes RRDD will have to
read all the data (and parse the metadata).
Design document
Revision
v1
Status
proposed
Revision history
v1
Initial version
RRDD plugin protocol v3
Motivation
rrdd plugins protocol v2 report datasources via shared-memory file, however it
has various limitations :
metrics are unique by their names, thus it is not possible cannot have
several metrics that shares a same name (e.g vCPU usage per vm)
only number metrics are supported, for example we can’t expose string
metrics (e.g CPU Model)
Therefore, it implies various limitations on plugins and limits
OpenMetrics support for the metrics daemon.
Moreover, it may not be practical for plugin developpers and parser implementations :
json implementations may not keep insersion order on maps, which can cause
issues to expose datasource values as it is sensitive to the order of the metadata map
header length is not constant and depends on datasource count, which complicates parsing
it still requires a quite advanced parser to convert between bytes and numbers according to metadata
A simpler protocol is proposed, based on OpenMetrics binary format to ease plugin and parser implementations.
Protocol V3
For this protocol, we still use a shared-memory file, but significantly change the structure of the file.
value
bits
format
notes
header string
12*8=96
string
“OPENMETRICS1” which is one byte longer than “DATASOURCES”, intentionally made at 12 bytes for alignment purposes
data checksum
32
uint32
Checksum of the concatenation of the rest of the header (from timestamp) and the payload data
timestamp
64
uint64
Unix epoch
payload length
32
uint32
Payload length
payload data
8*(payload length)
binary
OpenMetrics encoded metrics data (protocol-buffers format)
All values are big-endian.
The header size is constant (28 bytes) that implementation can rely on (read
the entire header in one go, simplify usage of memory mapping).
As opposed to protocol v2 but alike protocol v1, metadata is included along
metrics in OpenMetrics format.
owner attribute for metric should be exposed using a OpenMetrics label instead (named owner).
Multiple metrics that shares the same name should be exposed under the same
Metric Family and be differenciated by labels (e.g owner).
Reading algorithm
if header != expected_header:
raise InvalidHeader()
if data_checksum == last_data_checksum:
raise NoUpdate()
if timestamp == last_timestamp:
raise NoUpdate()
if data_checksum != crc32(concat_header_end_payload):
raise InvalidChecksum()
metrics = parse_openmetrics(payload_data)
for family in metrics:
if family_exists(family):
update_family(family)
else create_family(family)
track_removed_families(metrics)
Renaming VMSS fields and APIs. API message_create superseeds vmss_create_alerts.
v3
Remove VMSS alarm_config details and use existing pool wide alarm config
v4
Renaming field from retention-value to retained-snapshots and schedule-snapshot to scheduled-snapshot
v5
Add new API task_set_status
Schedule Snapshot Design
The scheduled snapshot feature will utilize the existing architecture of VMPR. In terms of functionality, scheduled snapshot is basically VMPR without its archiving capability.
Introduction
Schedule snapshot will be a new object in xapi as VMSS.
A pool can have multiple VMSS.
Multiple VMs can be a part of VMSS but a VM cannot be a part of multiple VMSS.
A VMSS takes VMs snapshot with type [snapshot, checkpoint, snapshot_with_quiesce].
VMSS takes snapshot of VMs on configured intervals:
hourly -> On every day, Each hour, Mins [0;15;30;45]
daily -> On every day, Hour [0 to 23], Mins [0;15;30;45]
weekly -> Days [Monday,Tuesday,Wednesday,Thursday,Friday,Saturday,Sunday], Hour[0 to 23], Mins [0;15;30;45]
VMSS will have a limit on retaining number of VM snapshots in range [1 to 10].
Datapath Design
There will be a cron job for VMSS.
VMSS plugin will go through all the scheduled snapshot policies in the pool and check if any of them are due.
If a snapshot is due then : Go through all the VM objects in XAPI associated with this scheduled snapshot policy and create a new snapshot.
If the snapshot operation fails, create a notification alert for the event and move to the next VM.
Check if an older snapshot now needs to be deleted to comply with the retained snapshots defined in the scheduled policy.
If we need to delete any existing snapshots, delete the oldest snapshot created via scheduled policy.
Set the last-run timestamp in the scheduled policy.
Xapi Changes
There is a new record for VM Scheduled Snapshot with new fields.
New fields:
name-label type String : Name label for VMSS.
name-description type String : Name description for VMSS.
enabled type Bool : Enable/Disable VMSS to take snapshot.
type type Enum [snapshot; checkpoint; snapshot_with_quiesce] : Type of snapshot VMSS takes.
retained-snapshots type Int64 : Number of snapshots limit for a VM, max limit is 10 and default is 7.
frequency type Enum [hourly; daily; weekly] : Frequency of taking snapshot of VMs.
schedule type Map(String,String) with (key, value) pair:
hour : 0 to 23
min : [0;15;30;45]
days : [Monday,Tuesday,Wednesday,Thursday,Friday,Saturday,Sunday]
last-run-time type Date : DateTime of last execution of VMSS.
VMs type VM refs : List of VMs part of VMSS.
New fields to VM record:
scheduled-snapshot type VMSS ref : VM part of VMSS.
is-vmss-snapshot type Bool : If snapshot created from VMSS.
New APIs
vmss_snapshot_now (Ref vmss, Pool_Operater) -> String : This call executes the scheduled snapshot immediately.
vmss_set_retained_snapshots (Ref vmss, Int value, Pool_Operater) -> unit : Set the value of vmss retained snapshots, max is 10.
vmss_set_frequency (Ref vmss, String “value”, Pool_Operater) -> unit : Set the value of the vmss frequency field.
vmss_set_type (Ref vmss, String “value”, Pool_Operater) -> unit : Set the snapshot type of the vmss type field.
vmss_set_scheduled (Ref vmss, Map(String,String) “value”, Pool_Operater) -> unit : Set the vmss scheduled to take snapshot.
vmss_add_to_schedule (Ref vmss, String “key”, String “value”, Pool_Operater) -> unit : Add key value pair to VMSS schedule.
vmss_remove_from_schedule (Ref vmss, String “key”, Pool_Operater) -> unit : Remove key from VMSS schedule.
vmss_set_last_run_time (Ref vmss, DateTime “value”, Local_Root) -> unit : Set the last run time for VMSS.
task_set_status (Ref task, status_type “value”, READ_ONLY) -> unit : Set the status of task owned by same user, Pool_Operator can set status for any tasks.
New CLIs
vmss-create (required : “name-label”;“type”;“frequency”, optional : “name-description”;“enabled”;“schedule:”;“retained-snapshots”) -> unit : Creates VM scheduled snapshot.
vmss-destroy (required : uuid) -> unit : Destroys a VM scheduled snapshot.
Design document
Revision
v1
Status
draft
Secure LDAP (LDAPS) Support for External Authentication
Terminology
Term
Meaning
AD
Windows Active Directory
samba/winbind
Client used in xapi to talk to AD
DC
Windows AD domain controller
ldap/ldaps
Lightweight Directory Access Protocol / over SSL
Joining host
The host joining to a pool
1. Background
To integrate XenServer with AD, XenServer performs LDAP queries in the following use cases:
Enable external authentication/Join domain: Samba LDAP queries DC details
Session revalidation: xapi queries user details (e.g., whether user is still valid, password expired, etc.) to decide whether to destroy a session
Currently XenServer uses plain LDAP queries, which is a concern for some enterprise customers.
2. Xapi Database
2.1 External Auth Configuration
External auth details are stored in the host (table) → external_auth_configuration (field). For example:
A new field ldaps (bool, optional) will be added to external_auth_configuration field to state whether LDAPS should be used instead of LDAP. If not set, LDAP will be used for backward compatibility.
To enforce security, if customer uses self-signed certificate, they need to upload the root CA certificate to XenServer, so XenServer can verify the certificate/public key used talking to DC for LDAPS.
The trusted-certificates.md design enhanced the Certificate table and introduced a new field purpose for security, which limits the certificate only for specific purpose. ldaps will be added to purpose field as a value for LDAPS.
3. Interfaces
3.1 pool.enable_external_auth
3.1.1 Interface
To enable external auth, the current API arguments are as follows:
pool (Ref _pool): The pool whose external authentication should be enabled
config (Map (String, String)): A list of key-values containing the configuration data
service_name (String): The name of the service
auth_type (String): The type of authentication (e.g., AD for Active Directory)
This API signature does not change. Regarding the config map, one new option is added:
config:ldaps: whether LDAPS is required, default to false
Set client ldap sasl wrapping to ldaps if true, seal otherwise
This item will be stored in database in section 2.1
Given ldaps default to false, this feature is NOT enabled until explicitly set.
3.1.2 Error code
Following new error codes added to indicate ldaps enable related error
POOL_AUTH_ENABLE_FAILED_NO_TRUSTED_CERTS: no trusted certs can be used for ldaps, refer to 4.1.2 for trusted certs finding.
POOL_AUTH_ENABLE_FAILED_INVALID_TRUSTED_CERTS: found trusted certs, but none of the trusted certs can be used to connect to DC.
POOL_AUTH_ENABLE_FAILED_SETUP_TLS_CONNECTION: failed to set up TLS connection to DC (e.g. GnuTLS handshake failure such as tstream_tls_sync_setup: GNUTLS ERROR). The error message contains the underlying details reported by winbind.
Note: Current error code handling infrastructure requires the error code prefix with POOL_AUTH_ENABLE_FAILED.
3.2 Set/Get Pool LDAPS Status
3.2.1 pool.external_auth_set_ldaps
3.2.1.1 Interface
User can specify LDAPS during join domain as in 3.1.
For the existing joined domain, user can switch between LDAP and LDAPS with this new API. Args as follows:
pool (Ref _pool): pool to set LDAPS
ldaps (Bool): whether LDAPS is required
force (Bool): whether to set ldaps even when ldaps is currently set
This API will set the ldaps in database (Refer to 2.1).
This API performs following sanity check and rejects update if check fails:
AD has already been enabled
ldaps has already been enabled without force
Find proper certificate (Refer to 4.1 for the details)
Do a ldaps query to embedded user krbtgt for the joined domain
Note:
This API allow re-entry with force to perform an extra ldaps ping for debug purpose
This API will not do the LDAPS query on the trusted domains, as xapi does not have trusted domain details
The joined domain likely has multiple DCs. LDAPS query tries every DC of the domain. Check pass if LDAPS query succeeds on any DC of the domain. This implies iterate and locate a DC supporting LDAPS (with proper certificate trust setup) before LDAPS query. However, this does not introduce performance problems as the LDAPS query happens in backend and refreshes result into XAPI DB
Pool coordinator dispatches this API request to every host, and only succeeds if all hosts pass the check. All succeed host will revert to the original status if this API failed
This API needs to be synced with other APIs. For example, authenticate_username_password should fail if this API is performing checking and configuration
This API only impact whether ldap traffic use TLS, it does not impact existing machine account and credentials
This API will refresh winbind configuration (Refer to 4.1).
So following xe command can be used to switch between LDAP and LDAPS:
AUTH_NO_TRUSTED_CERTS: no trusted certs found to enable ldaps, refer to 4.1.2 for trusted certs finding.
AUTH_INVALID_TRUSTED_CERTS: found trusted certs, but none of the trusted certs can be used to connect to DC.
AUTH_SETUP_TLS_CONNECTION: failed to set up TLS CONNECTION to DC (e.g. GnuTLS handshake failure such as tstream_tls_sync_setup: GNUTLS ERROR). The error message contains the underlying details reported by winbind.
AUTH_IS_DISABLED: AD is not enabled.
AUTH_SET_LDAPS_FAILED: Failed to set ldaps, the error message contains the details like ldap query on domain failed.
3.2.2 Get Pool LDAPS Status
xapi generates a get message for each field automatically. To query the LDAPS status, client only needs to query the get method of host (class) → external-auth-configuration (field), and parse the result. The example as follows:
If the certificate for LDAPS in DC is signed by a private CA (vs a trusted public CA), user needs to import their Root or Intermediate CA certificate into XenServer.
pool.install_trusted_certificate can install the certificate with following parameters, refer to trusted-certificates.md for the details:
session (ref session_id): reference to a valid session
self (ref Pool): reference to the pool
ca (boolean): should always be true for ldaps. xapi should reject this CA otherwise
cert (string): the trusted certificate in PEM format
purpose (string list): the purposes of this cert. It can be one of following:
contain ldaps if for specific this specific purpose
empty set, thus would take as general purpose CA. It will be used for ldaps if no ldaps specific purpose found
Note: If the DCs (of joining domain and trusted domain in use) are signed by different CAs, all the CAs need to be uploaded to XenServer.
4. Configuration Item
To enforce LDAPS, following are required:
Samba needs to be updated to 4.21+ (Already done)
LDAPS needs to be enabled in smb.conf
4.1 Samba Configuration
4.1.1 smb.conf
To enforce LDAPS, xapi just passthrough the configuration to winbind. Following configuration needs to be updated to /etc/samba/smb.conf, details refer to smb.conf:
Switch between ldap and ldaps will flip client ldap sasl wrapping between seal and ldaps
tls cafile points to a CA bundle used to verify DC certs. Details refer to 4.1.2
tls priority is following stunnel TLS configuration, this result to TLS 1.2 with cipher suite TLS_ECDHE_RSA_AES_128_GCM_SHA256, TLS_ECDHE_RSA_AES_256_GCM_SHA384, Windows Server 2012 and later as DC support it
NONE: starts with empty set
+VERS-TLS1.2: Enbale TLS 1.2
+AES-256-GCM:+AES-128-GCM: Enable AES-256-GCM and AES-128-GCM cipher
+AEAD: Enable AEAD MAC, required for GCM
+ECDHE-RSA: Enable ECDHE-RSA key exchange
+SIGN-ALL: Enable all signature algorithms, this will limit to TLS1.2
+GROUP-SECP384R1: Enable secp384r1 curve
+COMP-NULL: No compression (required in modern TLS)
Use /etc/trusted-certs/ca-bundle-ldaps.pem if exists
Fall back to /etc/trusted-certs/ca-bundle-general.pem if exists and previous not match
Report error if none of above match
Note: The selection/configuration is only refreshed on following cases:
xapi (re)start
pool.external_auth_set_ldaps API
(Re)join domain
5. Session Revalidate
xapi LDAP queries domain user status (if user has been added to manage XenServer) at configurable interval, and destroys the session created by domain user if user no longer in healthy status.
However, the LDAP query may fail due to various issues as follows:
Temporary network issues
CA certificate is not properly configured, or expired, etc.
Instead of destroying user session for stability, a warning will be printed in xensource.log
Note:
The backend session revalidate check only performs on pool coordinator, thus the backend LDAP(S) query check only on coordinator
external_auth_set_ldaps perform LDAP(S) query check on every host
6. Pool Join/Leave
6.1 pool.join
6.1.1 AD Pre-checks
Currently the pool.join pre-check checks the following:
external_auth_type: whether joined AD
external_auth_service_name: whether joined the same domain
The pre-check is good enough, no matter whether ldaps is in use, as this ensures host can talk to AD. There are following cases:
pool with AD, joining host with same AD: check pass as before this design
pool without AD, joining host without AD: check pass as before this design
pool without AD, joining host with AD: check failed as before this design
pool with AD, joining host without AD:
LDAPS not enabled: joining host needs to join to same AD as before this design
LDAPS enabled: joining host needs to enable AD without certificate check, details refer to 6.1.2
6.1.2 Join Host to Pool with LDAPS Enabled
When joining a host without AD to a pool with LDAPS enabled, the host may not have the (CA) certificate for the domain. It can be trivial to enforce customer to upload the CA certificate to every joining host, thus client would help to orchestrate certificates.
The workflow:
sequenceDiagram
participant user as User
participant client as Client
participant join as Joining host
participant coor as Pool Coordinator
participant dc as AD/DC
user->>client: pool.join
Note over client: precheck
alt precheck failed
client-->>user: precheck failed
end
Note over client,coor: sync trusted CA certs from coordinator to joining host
client->>join: pool.sync_trusted_certificates_from
join->>coor: pool.exchange_trusted_certificates_on_join
coor-->>join:
join-->>client:
user->>client: join domain username/password
client->>join: join domain username/password
join->>dc: join domain
dc-->>join:
join-->>client:
client->>join: pool.join
Note over join,coor: join pool ops<br/>certs sync
join-->>client:
client-->>user: pool.join succeed
Detailed Steps:
Client calls pool.sync_trusted_certificates_from to joiner host. The call will
a. download all trusted certificates from the pool, and
b. install the trusted certificates into the joiner host.
Client trigger pool.join again with domain username and password
After pool.join:
If pool.join failed, Client call pool.uninstall_trusted_certificate on joining host to revert the certs
If pool.join succeed, do nothing as pool.join would sync the certs anyway
6.2 pool.leave
pool.disable_external_auth is called during pool leave, thus the ldaps status is cleaned.
Xapi accesses storage through “plugins” which currently use a protocol
called “SMAPIv1”. This protocol has a number of problems:
the protocol has many missing features, and this leads to people
using the XenAPI from within a plugin, which is racy, difficult to
get right, unscalable and makes component testing impossible.
the protocol expects plugin authors to have a deep knowledge of the
Xen storage datapath (tapdisk, blkback etc) and the storage.
the protocol is undocumented.
We shall create a new revision of the protocol (“SMAPIv3”) to address these
problems.
The following diagram shows the new control plane:
Requests from xapi are filtered through the existing storage_access
layer which is responsible for managing the mapping between VM VBDs and
VDIs.
Each plugin is represented by a named queue, with APIs for
querying the state of each queue
explicitly cancelling or replying to messages
Legacy SMAPIv1 plugins will be processed via the existing storage_access.SMAPIv1
module. Newer SMAPIv3 plugins will be handled by a new xapi-storage-script
service.
The SMAPIv3 APIs will be defined in an IDL format in a separate repo.
xapi-storage-script
The xapi-storage-script will run as a service and will
use inotify to monitor a well-known path in dom0
when a directory is created, check whether it contains storage plugins by
executing a Plugin.query
assuming the directory contains plugins, it will register the queue name
and start listening for messages
when messages from xapi or the CLI are received, it will generate the SMAPIv3
.json message and fork the relevant script.
SMAPIv3 IDL
The IDL will support
documentation for all functions, parameters and results
this will be extended to be a XenAPI-style versioning scheme in future
generating hyperlinked HTML documentation, published on github
generating libraries for python and OCaml
the libraries will include marshalling, unmarshalling, type-checking
and command-line parsing and help generation
Diagnostic tools
It will be possible to view the contents of the queue associated with any
plugin, and see whether
the queue is being served or not (perhaps the xapi-storage-script has
crashed)
there are unanswered messages (perhaps one of the messages has caused
a deadlock in the implementation?)
It will be possible to
delete/clear queues/messages
download a message-sequence chart of the last N messages for inclusion in
bugtools.
Anatomy of a plugin
The following diagram shows what a plugin would look like:
At present (early March 2015) the datamodel defines a VM as having a “platform” string-string map, in which two keys are interpreted as specifying a PCI device which should be emulated for the VM. Those keys are “device_id” and “revision” (with int values represented as decimal strings).
Limitations:
Hardcoded defaults are used for the vendor ID and all other parameters except device_id and revision.
Only one emulated PCI device can be specified.
When instructing qemu to emulate PCI devices, qemu accepts twelve parameters for each device.
Future guest-agent features rely on additional emulated PCI devices. We cannot know in advance the full details of all the devices that will be needed, but we can predict some.
We need a way to configure VMs such that they will be given additional emulated PCI devices.
Design
In the datamodel, there will be a new type of object for emulated PCI devices.
Tentative name: “emulated_pci_device”
Fields to be passed through to qemu are the following, all static read-only, and all ints except devicename:
devicename (string)
vendorid
deviceid
command
status
revision
classcode
headertype
subvendorid
subsystemid
interruptline
interruptpin
We also need a “built_in” flag: see below.
Allow creation of these objects through the API (and CLI).
(It would be nice, but by no means essential, to be able to create one by specifying an existing one as a basis, along with one or more altered fields, e.g. “Make a new one just like that existing one except with interruptpin=9.”)
Create some of these devices to be defined as standard in XenServer, along the same lines as the VM templates. Those ones should have built_in=true.
Allow destruction of these objects through the API (and CLI), but not if they are in use or if they have built_in=true.
A VM will have a list of zero or more of these emulated-pci-device objects. (OPEN QUESTION: Should we forbid having more than one of a given device?)
Provide API (and CLI) commands to add and remove one of these devices from a VM (identifying the VM and device by uuid or other identifier such as name).
The CLI should allow performing this on multiple VMs in one go, based on a selector or filter for the VMs. We have this concept already in the CLI in commands such as vm-start.
In the function that adds an emulated PCI device to a VM, we must check if this is the first device to be added, and must refuse if the VM’s Virtual Hardware Platform Version is too low. (Or should we just raise the version automatically if needed?)
When starting a VM, check its list of emulated pci devices and pass the details through to qemu (via xenopsd).
Added details about the VDI's binary format and size, and the SR capability name.
v3
Tar was not needed after all!
v4
Add details about discovering the VDI using a new vdi_type.
v5
Add details about the http handlers and interaction with xapi's database
v6
Add details about the framing of the data within the VDI
v7
Redesign semantics of the rrd_updates handler
v8
Redesign semantics of the rrd_updates handler (again)
v9
Magic number change in framing format of vdi
v10
Add details of new APIs added to xapi and xcp-rrdd
v11
Remove unneeded API calls
SR-Level RRDs
Introduction
Xapi has RRDs to track VM- and host-level metrics. There is a desire to have SR-level RRDs as a new category, because SR stats are not specific to a certain VM or host. Examples are size and free space on the SR. While recording SR metrics is relatively straightforward within the current RRD system, the main question is where to archive them, which is what this design aims to address.
Stats Collection
All SR types, including the existing ones, should be able to have RRDs defined for them. Some RRDs, such as a “free space” one, may make sense for multiple (if not all) SR types. However, the way to measure something like free space will be SR specific. Furthermore, it should be possible for each type of SR to have its own specialised RRDs.
It follows that each SR will need its own xcp-rrdd plugin, which runs on the SR master and defines and collects the stats. For the new thin-lvhd SR this could be xenvmd itself. The plugin registers itself with xcp-rrdd, so that the latter records the live stats from the plugin into RRDs.
Archiving
SR-level RRDs will be archived in the SR itself, in a VDI, rather than in the local filesystem of the SR master. This way, we don’t need to worry about master failover.
The VDI will be 4MB in size. This is a little more space than we would need for the RRDs we have in mind at the moment, but will give us enough headroom for the foreseeable future. It will not have a filesystem on it for simplicity and performance. There will only be one RRD archive file for each SR (possibly containing data for multiple metrics), which is gzipped by xcp-rrdd, and can be copied onto the VDI.
There will be a simple framing format for the data on the VDI. This will be as follows:
Offset
Type
Name
Comment
0
32 bit network-order int
magic
Magic number = 0x7ada7ada
4
32 bit network-order int
version
1
8
32 bit network-order int
length
length of payload
12
gzipped data
data
Xapi will be in charge of the lifecycle of this VDI, not the plugin or xcp-rrdd, which will make it a little easier to manage them. Only xapi will attach/detach and read from/write to this VDI. We will keep xcp-rrdd as simple as possible, and have it archive to its standard path in the local file system. Xapi will then copy the RRDs in and out of the VDI.
A new value "rrd" in the vdi_type enum of the datamodel will be defined, and the VDI.type of the VDI will be set to that value. The storage backend will write the VDI type to the LVM metadata of the VDI, so that xapi can discover the VDI containing the SR-level RRDs when attaching an SR to a new pool. This means that SR-level RRDs are currently restricted to LVM SRs.
Because we will not write plugins for all SRs at once, and therefore do not need xapi to set up the VDI for all SRs, we will add an SR “capability” for the backends to be able to tell xapi whether it has the ability to record stats and will need storage for them. The capability name will be: SR_STATS.
Management of the SR-stats VDI
The SR-stats VDI will be attached/detached on PBD.plug/unplug on the SR master.
On PBD.plug on the SR master, if the SR has the stats capability, xapi:
Creates a stats VDI if not already there (search for an existing one based on the VDI type).
Attaches the stats VDI if it did already exist, and copies the RRDs to the local file system (standard location in the filesystem; asks xcp-rrdd where to put them).
Informs xcp-rrdd about the RRDs so that it will load the RRDs and add newly recorded data to them (needs a function like push_rrd_local for VM-level RRDs).
Detaches stats VDI.
On PBD.unplug on the SR master, if the SR has the stats capability xapi:
Tells xcp-rrdd to archive the RRDs for the SR, which it will do to the local filesystem.
Attaches the stats VDI, copies the RRDs into it, detaches VDI.
Periodic Archiving
Xapi’s periodic scheduler regularly triggers xcp-rrdd to archive the host and VM RRDs. It will need to do this for the SR ones as well. Furthermore, xapi will need to attach the stats VDI and copy the RRD archives into it (as on PBD.unplug).
Exporting
There will be a new handler for downloading an SR RRD:
RRD updates are handled via a single handler for the host, VM and SR UUIDs
RRD updates for the host, VMs and SRs are handled by a a single handler at
/rrd_updates. Exactly what is returned will be determined by the parameters
passed to this handler.
Whether the host RRD updates are returned is governed by the presence of
host=true in the parameters. host=<anything else> or the absence of the
host key will mean the host RRD is not returned.
Whether the VM RRD updates are returned is governed by the vm_uuid key in the
URL parameters. vm_uuid=all will return RRD updates for all VM RRDs.
vm_uuid=xxx will return the RRD updates for the VM with uuid xxx only.
If vm_uuid is none (or any other string which is not a valid VM UUID) then
the handler will return no VM RRD updates. If the vm_uuid key is absent, RRD
updates for all VMs will be returned.
Whether the SR RRD updates are returned is governed by the sr_uuid key in the
URL parameters. sr_uuid=all will return RRD updates for all SR RRDs.
sr_uuid=xxx will return the RRD updates for the SR with uuid xxx only.
If sr_uuid is none (or any other string which is not a valid SR UUID) then
the handler will return no SR RRD updates. If the sr_uuid key is absent, no
SR RRD updates will be returned.
It will be possible to mix and match these parameters; for example to return
RRD updates for the host and all VMs, the URL to use would be:
While behaviour is defined if any of the keys host, vm_uuid and sr_uuid is
missing, this is for backwards compatibility and it is recommended that clients
specify each parameter explicitly.
Database updating.
If the SR is presenting a data source called ‘physical_utilisation’,
xapi will record this periodically in its database. In order to do
this, xapi will fork a thread that, every n minutes (2 suggested, but
open to suggestions here), will query the attached SRs, then query
RRDD for the latest data source for these, and update the database.
The utilisation of VDIs will not be updated in this way until
scalability worries for RRDs are addressed.
Xapi will cache whether it is SR master for every attached SR and only
attempt to update if it is the SR master.
New APIs.
xcp-rrdd:
Get the filesystem location where sr rrds are archived: val sr_rrds_path : uid:string -> string
Archive the sr rrds to the filesystem: val archive_sr_rrd : sr_uuid:string -> unit
Load the sr rrds from the filesystem: val push_sr_rrd : sr_uuid:string -> unit
Design document
Revision
v3
Status
proposed
thin LVHD storage
LVHD is a block-based storage system built on top of Xapi and LVM. LVHD
disks are represented as LVM LVs with vhd-format data inside. When a
disk is snapshotted, the LVM LV is “deflated” to the minimum-possible
size, just big enough to store the current vhd data. All other disks are
stored “inflated” i.e. consuming the maximum amount of storage space.
This proposal describes how we could add dynamic thin-provisioning to
LVHD such that
disks only consume the space they need (plus an adjustable small
overhead)
when a disk needs more space, the allocation can be done locally
in the common-case; in particular there is no network RPC needed
when the resource pool master host has failed, allocations can still
continue, up to some limit, allowing time for the master host to be
recovered; in particular there is no need for very low HA timeouts.
we can (in future) support in-kernel block allocation through the
device mapper dm-thin target.
The following diagram shows the “Allocation plane”:
All VM disk writes are channelled through tapdisk which keeps track
of the remaining reserved space within the device mapper device. When
the free space drops below a “low-water mark”, tapdisk sends a message
to a local per-SR daemon called local-allocator and requests more
space.
The local-allocator maintains a free pool of blocks available for
allocation locally (hence the name). It will pick some blocks and
transactionally send the update to the xenvmd process running
on the SRmaster via the shared ring (labelled ToLVM queue in the diagram)
and update the device mapper tables locally.
There is one xenvmd process per SR on the SRmaster. xenvmd receives
local allocations from all the host shared rings (labelled ToLVM queue
in the diagram) and combines them together, appending them to a redo-log
also on shared storage. When xenvmd notices that a host’s free space
(represented in the metadata as another LV) is low it allocates new free blocks
and pushes these to the host via another shared ring (labelled FromLVM queue
in the diagram).
The xenvmd process maintains a cache of the current VG metadata for
fast query and update. All updates are appended to the redo-log to ensure
they operate in O(1) time. The redo log updates are periodically flushed
to the primary LVM metadata.
Since the operations are stored in the redo-log and will only be removed
after the real metadata has been written, the implication is that it is
possible for the operations to be performed more than once. This will
occur if the xenvmd process exits between flushing to the real metadata
and acknowledging the operations as completed. For this to work as expected,
every individual operation stored in the redo-log must be idempotent.
Note on running out of blocks
Note that, while the host has plenty of free blocks, local allocations should
be fast. If the master fails and the local free pool starts running out
and tapdisk asks for more blocks, then the local allocator won’t be able
to provide them.
tapdisk should start to slow
I/O in order to provide the local allocator more time.
Eventually if tapdisk runs
out of space before the local allocator can satisfy the request then
guest I/O will block. Note Windows VMs will start to crash if guest
I/O blocks for more than 70s. Linux VMs, no matter PV or HVM, may suffer
from “block for more than 120 seconds” issue due to slow I/O. This
known issue is that, slow I/O during dirty pages writeback/flush may
cause memory starvation, then other userland process or kernel threads
would be blocked.
The following diagram shows the control-plane:
When thin-provisioning is enabled we will be modifying the LVM metadata at
an increased rate. We will cache the current metadata in the xenvmd process
and funnel all queries through it, rather than “peeking” at the metadata
on-disk. Note it will still be possible to peek at the on-disk metadata but it
will be out-of-date. Peeking can still be used to query the PV state of the volume
group.
The xenvm CLI uses a simple
RPC interface to query the xenvmd process, tunnelled through xapi over
the management network. The RPC interface can be used for
activating volumes locally: xenvm will query the LV segments and program
device mapper
deactivating volumes locally
listing LVs, PVs etc
Note that current LVHD requires the management network for these control-plane
functions.
When the SM backend wishes to query or update volume group metadata it should use the
xenvm CLI while thin-provisioning is enabled.
The xenvmd process shall use a redo-log to ensure that metadata updates are
persisted in constant time and flushed lazily to the regular metadata area.
Tunnelling through xapi will be done by POSTing to the localhost URI
/services/xenvmd/<SR uuid>
Xapi will the either proxy the request transparently to the SRmaster, or issue an
http level redirect that the xenvm CLI would need to follow.
If the xenvmd process is not running on the host on which it should
be, xapi will start it.
Components: roles and responsibilities
xenvmd:
one per plugged SRmaster PBD
owns the LVM metadata
provides a fast query/update API so we can (for example) create lots of LVs very fast
allocates free blocks to hosts when they are running low
receives block allocations from hosts and incorporates them in the LVM metadata
can safely flush all updates and downgrade to regular LVM
xenvm:
a CLI which talks the xenvmd protocol to query / update LVs
can be run on any host, calls (except “format” and “upgrade”) are forwarded by xapi
can “format” a LUN to prepare it for xenvmd
can “upgrade” a LUN to prepare it for xenvmd
local_allocator:
one per plugged PBD
exposes a simple interface to tapdisk for requesting more space
receives free block allocations via a queue on the shared disk from xenvmd
sends block allocations to xenvmd and updates the device mapper target locally
tapdisk:
monitors the free space inside LVs and requests more space when running out
slows down I/O when nearly out of space
xapi:
provides authenticated communication tunnels
ensures the xenvmd daemons are only running on the correct hosts.
SM:
writes the configuration file for xenvmd (though doesn’t start it)
has an on/off switch for thin-provisioning
can use either normal LVM or the xenvm CLI
membership_monitor
configures and manages the connections between xenvmd and the local_allocator
Queues on the shared disk
The local_allocator communicates with xenvmd via a pair
of queues on the shared disk. Using the disk rather than the network means
that VMs will continue to run even if the management network is not working.
In particular
if the (management) network fails, VMs continue to run on SAN storage
if a host changes IP address, nothing needs to be reconfigured
if xapi fails, VMs continue to run.
Logical messages in the queues
The local_allocator needs to tell the xenvmd which blocks have
been allocated to which guest LV. xenvmd needs to tell the
local_allocator which blocks have become free. Since we are based on
LVM, a “block” is an extent, and an “allocation” is a segment i.e. the
placing of a physical extent at a logical extent in the logical volume.
The local_allocator needs to send a message with logical contents:
volume: a human-readable name of the LV
segments: a list of LVM segments which says
“place physical extent x at logical extent y using a linear mapping”.
Note this message is idempotent.
The xenvmd needs to send a message with logical contents:
extents: a list of physical extents which are free for the host to use
Although
for internal housekeeping xenvmd will want to assign these
physical extents to logical extents within the host’s free LV, the
local_allocator
doesn’t need to know the logical extents. It only needs to know
the set of blocks which it is free to allocate.
Starting up the local_allocator
What happens when a local_allocator (re)starts, after a
process crash, respawn
host crash, reboot?
When the local_allocator starts up, there are 2 cases:
the host has just rebooted, there are no attached disks and no running VMs
the process has just crashed, there are attached disks and running VMs
Case 1 is uninteresting. In case 2 there may have been an allocation in
progress when the process crashed and this must be completed. Therefore
the operation is journalled in a local filesystem in a directory which
is deliberately deleted on host reboot (Case 1). The allocation operation
consists of:
pushing the allocation to xenvmd on the SRmaster
updating the device mapper
Note that both parts of the allocation operation are idempotent and hence
the whole operation is idempotent. The journalling will guarantee it executes
at-least-once.
When the local_allocator starts up it needs to discover the list of
free blocks. Rather than have 2 code paths, it’s best to treat everything
as if it is a cold start (i.e. no local caches already populated) and to
ask the master to resync the free block list. The resync is performed by
executing a “suspend” and “resume” of the free block queue, and requiring
the remote allocator to:
pop all block allocations and incorporate these updates
send the complete set of free blocks “now” (i.e. while the queue is
suspended) to the local allocator.
Starting xenvmd
xenvmd needs to know
the device containing the volume group
the hosts to “connect” to via the shared queues
The device containing the volume group should be written to a config
file when the SR is plugged.
xenvmd does not remember which hosts it is listening to across crashes,
restarts or master failovers. The membership_monitor will keep the
xenvmd list in sync with the PBD.currently_attached fields.
Shutting down the local_allocator
The local_allocator should be able to crash at any time and recover
afterwards. If the user requests a PBD.unplug we can perform a
clean shutdown by:
signalling xenvmd to suspend the block allocation queue
arranging for the local_allocator to acknowledge the suspension and exit
when the xenvmd sees the acknowlegement, we know that the
local_allocator is offline and it doesn’t need to poll the queue any more
Downgrading metadata
xenvmd can be terminated at any time and restarted, since all compound
operations are journalled.
Downgrade is a special case of shutdown.
To downgrade, we need to stop all hosts allocating and ensure all updates
are flushed to the global LVM metadata. xenvmd can shutdown
by:
shutting down all local_allocators (see previous section)
flushing all outstanding block allocations to the LVM redo log
flushing the LVM redo log to the global LVM metadata
Queues as rings
We can use a simple ring protocol to represent the queues on the disk.
Each queue will have a single consumer and single producer and reside within
a single logical volume.
To make diagnostics simpler, we can require the ring to only support push
and pop of whole messages i.e. there can be no partial reads or partial
writes. This means that the producer and consumer pointers will always
point to valid message boundaries.
One possible format used by the prototype is as follows:
sector 0: a magic string
sector 1: producer state
sector 2: consumer state
sector 3…: data
Within the producer state sector we can have:
octets 0-7: producer offset: a little-endian 64-bit integer
octet 8: 1 means “suspend acknowledged”; 0 otherwise
Within the consumer state sector we can have:
octets 0-7: consumer offset: a little-endian 64-bit integer
octet 8: 1 means “suspend requested”; 0 otherwise
The consumer and producer pointers point to message boundaries. Each
message is prefixed with a 4 byte length and padded to the next 4-byte
boundary.
To push a message onto the ring we need to
check whether the message is too big to ever fit: this is a permanent
error
check whether the message is too big to fit given the current free
space: this is a transient error
write the message into the ring
advance the producer pointer
To pop a message from the ring we need to
check whether there is unconsumed space: if not this is a transient
error
read the message from the ring and process it
advance the consumer pointer
Journals as queues
When we journal an operation we want to guarantee to execute it never
or at-least-once. We can re-use the queue implementation by pushing
a description of the work item to the queue and waiting for the
item to be popped, processed and finally consumed by advancing the
consumer pointer. The journal code needs to check for unconsumed data
during startup, and to process it before continuing.
Suspending and resuming queues
During startup (resync the free blocks) and shutdown (flush the allocations)
we need to suspend and resume queues. The ring protocol can be extended
to allow the consumer to suspend the ring by:
the consumer asserts the “suspend requested” bit
the producer push function checks the bit and writes “suspend acknowledged”
the producer also periodically polls the queue state and writes
“suspend acknowledged” (to catch the case where no items are to be pushed)
after the producer has acknowledged it will guarantee to push no more
items
when the consumer polls the producer’s state and spots the “suspend acknowledged”,
it concludes that the queue is now suspended.
The key detail is that the handshake on the ring causes the two sides
to synchronise and both agree that the ring is now suspended/ resumed.
Modelling the suspend/resume protocol
To check that the suspend/resume protocol works well enough to be used
to resynchronise the free blocks list on a slave, a simple
promela model was created. We model the queue state as
2 boolean flags:
and an abstract representation of the data within the ring:
/* the queue may have no data (none); a delta or a full sync.
the full sync is performed immediately on resume. */
mtype = { sync delta none }
mtype inflight_data = none
There is a “producer” and a “consumer” process which run forever,
exchanging data and suspending and resuming whenever they want.
The special data item sync is only sent immediately after a resume
and we check that we never desynchronise with asserts:
:: (inflight_data != none) ->
/* In steady state we receive deltas */
assert (suspend_ack == false);
assert (inflight_data == delta);
inflight_data = none
i.e. when we are receiving data normally (outside of the suspend/resume
code) we aren’t suspended and we expect deltas, not full syncs.
The model-checker spin
verifies this property holds.
Interaction with HA
Consider what will happen if a host fails when HA is disabled:
if the host is a slave: the VMs running on the host will crash but
no other host is affected.
if the host is a master: allocation requests from running VMs will
continue provided enough free blocks are cached on the hosts. If a
host eventually runs out of free blocks, then guest I/O will start to
block and VMs may eventually crash.
Therefore we recommend that users enable HA and only disable it
for short periods of time. Note that, unlike other thin-provisioning
implementations, we will allow HA to be disabled.
Host-local LVs
When a host calls SMAPI sr_attach, it will use xenvm to tell xenvmd on the
SRmaster to connect to the local_allocator on the host. The xenvmd
daemon will create the volumes for queues and a volume to represent the
“free blocks” which a host is allowed to allocate.
Monitoring
The xenvmd process should export RRD datasources over shared
memory named
sr_<SR uuid>_<host uuid>_free: the number of free blocks in
the local cache. It’s useful to look at this and verify that it doesn’t
usually hit zero, since that’s when allocations will start to block.
For this reason we should use the MIN consolidation function.
sr_<SR uuid>_<host uuid>_requests: a counter of the number
of satisfied allocation requests. If this number is too high then the quantum
of allocation should be increased. For this reason we should use the
MAX consolidation function.
sr_<SR uuid>_<host uuid>_allocations: a counter of the number of
bytes being allocated. If the allocation rate is too high compared with
the number of free blocks divided by the HA timeout period then the
SRmaster-allocator should be reconfigured to supply more blocks with the host.
Modifications to tapdisk
TODO: to be updated by Germano
tapdisk will be modified to
on open: discover the current maximum size of the file/LV (for a file
we assume there is no limit for now)
read a low-water mark value from a config file /etc/tapdisk3.conf
read a very-low-water mark value from a config file /etc/tapdisk3.conf
read a Unix domain socket path from a config file /etc/tapdisk3.conf
when there is less free space available than the low-water mark: connect
to Unix domain socket and write an “extend” request
upon receiving the “extend” response, re-read the maximum size of the
file/LV
when there is less free space available than the very-low-water mark:
start to slow I/O responses and write a single ’error’ line to the log.
The extend request
TODO: to be updated by Germano
The request has the following format:
Octet offsets
Name
Description
0,1
tl
Total length (including this field) of message (in network byte order)
2
type
The value ‘0’ indicating an extend request
3
nl
The length of the LV name in octets, including NULL terminator
4,..,4+nl-1
name
The LV name
4+nl,..,12+nl-1
vdi_size
The virtual size of the logical VDI (in network byte order)
12+nl,..,20+nl-1
lv_size
The current size of the LV (in network byte order)
20+nl,..,28+nl-1
cur_size
The current size of the vhd metadata (in network byte order)
The extend response
The response is a single byte value “0” which is a signal to re-examime
the LV size. The request will block indefinitely until it succeeds. The
request will block for a long time if
the SR has genuinely run out of space. The admin should observe the
existing free space graphs/alerts and perform an SR resize.
the master has failed and HA is disabled. The admin should re-enable
HA or fix the problem manually.
The local_allocator
There is one local_allocator process per plugged PBD.
The process will be
spawned by the SM sr_attach call, and shutdown from the sr_detach call.
The local_allocator accepts the following configuration (via a config file):
socket: path to a local Unix domain socket. This is where the local_allocator
listens for requests from tapdisk
allocation_quantum: number of megabytes to allocate to each tapdisk on request
local_journal: path to a block device or file used for local journalling. This
should be deleted on reboot.
free_pool: name of the LV used to store the host’s free blocks
devices: list of local block devices containing the PVs
to_LVM: name of the LV containing the queue of block allocations sent to xenvmd
from_LVM: name of the LV containing the queue of messages sent from xenvmd.
There are two types of messages:
Free blocks to put into the free pool
Cap requests to remove blocks from the free pool.
When the local_allocator process starts up it will read the host local
journal and
re-execute any pending allocation requests from tapdisk
suspend and resume the from_LVM queue to trigger a full retransmit
of free blocks from xenvmd
The procedure for handling an allocation request from tapdisk is:
if there aren’t enough free blocks in the free pool, wait polling the
from_LVM queue
choose a range of blocks to assign to the tapdisk LV from the free LV
write the operation (i.e. exactly what we are about to do) to the journal.
This ensures that it will be repeated if the allocator crashes and restarts.
Note that, since the operation may be repeated multiple times, it must be
idempotent.
push the block assignment to the toLVM queue
suspend the device mapper device
add/modify the device mapper target
resume the device mapper device
remove the operation from the local journal (i.e. there’s no need to repeat
it now)
reply to tapdisk
Shutting down the local-allocator
The SM sr_detach called from PBD.unplug will use the xenvm CLI to request
that xenvmd disconnects from a host. The procedure is:
SM calls xenvm disconnect host
xenvm sends an RPC to xenvmd tunnelled through xapi
xenvmd suspends the to_LVM queue
the local_allocator acknowledges the suspend and exits
xenvmd flushes all updates from the to_LVM queue and stops listening
xenvmd
xenvmd is a daemon running per SRmaster PBD, started in sr_attach and
terminated in sr_detach. xenvmd has a config file containing:
socket: Unix domain socket where xenvmd listens for requests from
xenvm tunnelled by xapi
host_allocation_quantum: number of megabytes to hand to a host at a time
host_low_water_mark: threshold below which we will hand blocks to a host
devices: local devices containing the PVs
xenvmd continually
peeks updates from all the to_LVM queues
calculates how much free space each host still has
if the size of a host’s free pool drops below some threshold:
choose some free blocks
if the size of a host’s free pool goes above some threshold:
request a cap of the host’s free pool
writes the change it is going to make to a journal stored in an LV
pops the updates from the to_LVM queues
pushes the updates to the from_LVM queues
pushes updates to the LVM redo-log
periodically flush the LVM redo-log to the LVM metadata area
The membership monitor
The role of the membership monitor is to keep the list of xenvmd connections
in sync with the PBD.currently_attached fields.
We shall
install a host-pre-declare-dead script to use xenvm to send an RPC
to xenvmd to forcibly flush (without acknowledgement) the to_LVM queue
and destroy the LVs.
modify XenAPI Host.declare_dead to call host-pre-declare-dead before
the VMs are unlocked
add a host-pre-forget hook type which will be called just before a Host
is forgotten
install a host-pre-forget script to use xenvm to call xenvmd to
destroy the host’s local LVs
Modifications to LVHD SR
sr_attach should:
if an SRmaster, update the MGT major version number to prevent
Write the xenvmd configuration file (on all hosts, not just SRmaster)
spawn local_allocator
sr_detach should:
call xenvm to request the shutdown of local_allocator
vdi_deactivate should:
call xenvm to request the flushing of all the to_LVM queues to the
redo log
vdi_activate should:
if necessary, call xenvm to deflate the LV to the minimum size (with some slack)
Note that it is possible to attach and detach the individual hosts in any order
but when the SRmaster is unplugged then there will be no “refilling” of the host
local free LVs; it will behave as if the master host has failed.
Modifications to xapi
Xapi needs to learn how to forward xenvm connections to the SR master.
Xapi needs to start and stop xenvmd at the appropriate times
We must disable unplugging the PBDs for shared SRs on the pool master
if any other slave has its PBD plugging. This is actually fixing an
issue that exists today - LVHD SRs require the master PBD to be
plugged to do many operations.
Xapi should provide a mechanism by which the xenvmd process can be killed
once the last PBD for an SR has been unplugged.
Enabling thin provisioning
Thin provisioning will be automatically enabled on upgrade. When the SRmaster
plugs in PBD the MGT major version number will be bumped to prevent old
hosts from plugging in the SR and getting confused.
When a VDI is activated, it will be deflated to the new low size.
Disabling thin provisioning
We shall make a tool which will
allow someone to downgrade their pool after enabling thin provisioning
allow developers to test the upgrade logic without fully downgrading their
hosts
The tool will
check if there is enough space to fully inflate all non-snapshot leaves
unplug all the non-SRmaster PBDs
unplug the SRmaster PBD. As a side-effect all pending LVM updates will be
written to the LVM metadata.
modify the MGT volume to have the lower metadata version
fully inflate all non-snapshot leaves
Walk-through: upgrade
Rolling upgrade should work in the usual way. As soon as the pool master has been
upgraded, hosts will be able to use thin provisioning when new VDIs are attached.
A VM suspend/resume/reboot or migrate will be needed to turn on thin provisioning
for existing running VMs.
Walk-through: downgrade
A pool may be safely downgraded to a previous version without thin provisioning
provided that the downgrade tool is run. If the tool hasn’t run then the old
pool will refuse to attach the SR because the metadata has been upgraded.
Walk-through: after a host failure
If HA is enabled:
xhad elects a new master if necessary
Xapi on the master will start xenvmd processes for shared thin-lvhd SRs
the xhad tells Xapi which hosts are alive and which have failed.
Xapi runs the host-pre-declare-dead scripts for every failed host
the host-pre-declare-dead tells xenvmd to flush the to_LVM updates
Xapi unlocks the VMs and restarts them on new hosts.
If HA is not enabled:
The admin should verify the host is definitely dead
If the dead host was the master, a new master must be designated. This will
start the xenvmd processes for the shared thin-lvhd SRs.
the admin must tell Xapi which hosts have failed with xe host-declare-dead
Xapi runs the host-pre-declare-dead scripts for every failed host
the host-pre-declare-dead tells xenvmd to flush the to_LVM updates
Xapi unlocks the VMs
the admin may now restart the VMs on new hosts.
Walk-through: co-operative master transition
The admin calls Pool.designate_new_master. This initiates a two-phase
commit of the new master. As part of this, the slaves will restart,
and on restart each host’s xapi will kill any xenvmd that should only
run on the pool master. The new designated master will then restart itself
and start up the xenvmd process on itself.
Future use of dm-thin?
Dm-thin also uses 2 local LVs: one for the “thin pool” and one for the metadata.
After replaying our journal we could potentially delete our host local LVs and
switch over to dm-thin.
Summary of the impact on the admin
If the VM workload performs a lot of disk allocation, then the admin should
enable HA.
The admin must not downgrade the pool without first cleanly detaching the
storage.
Extra metadata is needed to track thin provisioing, reducing the amount of
space available for user volumes.
If an SR is completely full then it will not be possible to enable thin
provisioning.
There will be more fragmentation, but the extent size is large (4MiB) so it
shouldn’t be too bad.
Ring protocols
Each ring consists of 3 sectors of metadata followed by the data area. The
contents of the first 3 sectors are:
Sector, Octet offsets
Name
Type
Description
0,0-30
signature
string
Signature (“mirage shared-block-device 1.0”)
1,0-7
producer
uint64
Pointer to the end of data written by the producer
1,8
suspend_ack
uint8
Suspend acknowledgement byte
2,0-7
consumer
uint64
Pointer to the end of data read by the consumer
2,8
suspend
uint8
Suspend request byte
Note. producer and consumer pointers are stored in little endian
format.
The pointers are free running byte offsets rounded up to the next
4-byte boundary, and the position of the actual data is found by
finding the remainder when dividing by the size of the data area. The
producer pointer points to the first free byte, and the consumer
pointer points to the byte after the last data consumed. The actual
payload is preceded by a 4-byte length field, stored in little endian
format. When writing a 1 byte payload, the next value of the producer
pointer will therefore be 8 bytes on from the previous - 4 for the
length (which will contain [0x01,0x00,0x00,0x00]), 1 byte for the
payload, and 3 bytes padding.
A ring is suspended and resumed by the consumer. To suspend, the
consumer first checks that the producer and consumer agree on the
current suspend status. If they do not, the ring cannot be
suspended. The consumer then writes the byte 0x02 into byte 8 of
sector 2. The consumer must then wait for the producer to acknowledge
the suspend, which it will do by writing 0x02 into byte 8 of sector 1.
The FromLVM ring
Two different types of message can be sent on the FromLVM ring.
The FreeAllocation message contains the blocks for the free pool.
Example message:
This is a message to add two new sets of extents to the free pool. A
span of length 12249 extents starting at extent 12326, and a span of
length 1 starting from extent 11, both within the physical volume
‘pv0’. The generation count of this message is ‘2’. The semantics of
the generation is that the local allocator must record the generation
of the last message it received since the FromLVM ring was resumed,
and ignore any message with a generated less than or equal to the last
message received.
The CapRequest message contains a request to cap the free pool at
a maximum size.
Example message:
(CapRequest((cap 6127)(name host1-freeme)))
Pretty-printed:
(CapRequest
(
(cap 6127)
(name host1-freeme)
)
)
This is a request to cap the free pool at a maximum size of 6127
extents. The ’name’ parameter reflects the name of the LV into which
the extents should be transferred.
The ToLVM Ring
The ToLVM ring only contains 1 type of message. Example:
This message is extending an LV named ’test5’ by giving it 32 extents
starting at extent 1, coming from PV ‘pv0’ starting at extent
12328. The ‘cls’ field should always be ‘Linear’ - this is the only
acceptable value.
Cap requests
Xenvmd will try to keep the free pools of the hosts within a range
set as a fraction of free space. There are 3 parameters adjustable
via the config file:
low_water_mark_factor
medium_water_mark_factor
high_water_mark_factor
These three are all numbers between 0 and 1. Xenvmd will sum the free
size and the sizes of all hosts’ free pools to find the total
effective free size in the VG, F. It will then subtract the sizes of
any pending desired space from in-flight create or resize calls s. This
will then be divided by the number of hosts connected, n, and
multiplied by the three factors above to find the 3 absolute values
for the high, medium and low watermarks.
{high, medium, low} * (F - s) / n
When xenvmd notices that a host’s free pool size has dropped below
the low watermark, it will be topped up such that the size is equal
to the medium watermark. If xenvmd notices that a host’s free pool
size is above the high watermark, it will issue a ‘cap request’ to
the host’s local allocator, which will then respond by allocating
from its free pool into the fake LV, which xenvmd will then delete
as soon as it gets the update.
Xenvmd keeps track of the last update it has sent to the local
allocator, and will not resend the same request twice, unless it
is restarted.
Xenserver has used TLS-encrypted communications between xapi daemons in a pool since its first release.
However it does not use TLS certificates to authenticate the servers it connects to.
This allows possible attackers opportunities to impersonate servers when the pools’ management network is compromised.
In order to enable certificate verification, certificate exchange as well as proper set up to trust them must be provided by xapi.
This is currently done by allowing users to generate, sign and install the certificates themselves; and then enable the Common Criteria mode.
This requires a CA and has a high barrier of entry.
Using the same certificates for intra-host communication creates friction between what the user needs and what the host needs.
Instead of trying to reconcile these two uses with one set of certificates, host will serve two certificates: one for API calls from external clients, which is the one that can be changed by the users; and one that is use for intra-pool communications.
The TLS server in the host can select which certificate to serve depending on the service name the client requests when opening a TLS connection.
This mechanism is called Server Name Identification or SNI in short.
Last but not least the update bearing these changes must not disrupt pool operations while or after being applied.
Glossary
Term
Meaning
SNI
Server Name Identification. This TLS protocol extension allows a server to select a certificate during the initial TLS handshake depending on a client-provided name. This usually allows a single reverse-proxy to serve several HTTPS websites.
Host certificate
Certificate that a host sends clients when the latter initiate a connection with the former. The clients may close the connection depending on the properties of this certificate and whether they have decided to trust it previously.
Trusted certificate
Certificate that a computer uses to verify whether a host certificate is valid. If the host certificate’s chain of trust does not include a trusted certificate it will be considered invalid.
Default Certificate
Xenserver hosts present this certificate to clients which do not request an SNI. Users are allowed to install their own custom certificate.
Pool Certificate
Xenserver hosts present this certificate to clients which request xapi:poolas the SNI. They are used for host-to-host communications.
Common Criteria
Common Criteria for Information Technology Security Evaluation is a certification on computer security.
Certificates and Identity management
Currently Xenserver hosts generate self-signed certificates with the IP or FQDN as their subjects, users may also choose to install certificates.
When installing these certificates only the cryptographic algorithms used to generate the certificates (private key and hash) are validated and no properties about them are required.
This means that using user-installed certificates for intra-pool communication may prove difficult as restrictions regarding FQDN and chain validation need to be ensured before enabling TLS certificate checking or the pool communications will break down.
Instead a different certificate is used only for pool communication.
This allows to decouple whatever requirements users might have for the certificates they install to the requirements needed for secure pool communication.
This has several benefits:
Frees the pool from ensuring a sound hostname resolution on the internal communications.
Allows the pool to rotate the certificates when it deems necessary. (in particular expiration, or forced invalidation)
Hosts never share a host certificate, and their private keys never get transmitted.
In general, the project is able to more safely change the parameters of intra-pool communication without disrupting how users use custom certificates.
To be able to establish trust in a pool, hosts must distribute the certificates to the rest of the pool members.
Once that is done servers can verify whether they are connecting to another host in the pool by comparing the server certificate with the certificates in the trust root.
Certificate pinning is available and would allow more stringent checks, but it doesn’t seem a necessity: hosts in a pool already share secret that allows them to have full control of the pool.
To be able to select a host certificate depending whether the connections is intra-pool or comes from API clients SNI will be used.
This allows clients to ask for a service when establishing a TLS connection.
This allows the server to choose the certificate they want to offer when negotiating the connection with the client.
The hosts will exploit this to request a particular service when they establish a connection with other hosts in the pool.
When initiating a connection to another host in the pool, a server will create requests for TLS connections with the server_name xapi:pool with the name_typeDNS, this goes against RFC-6066 as this server_name is not resolvable.
This still works because we control the implementation in both peers of the connection and can follow the same convention.
In addition connections to the WLB appliance will continue to be validated using the current scheme of user-installed CA certificates.
This means that hosts connecting to the appliance will need a special case to only trust user-installed certificated when establishing the connection.
Conversely pool connections will ignore these certificates.
Name
Filesystem location
User-configurable
Used for
Host Default
/etc/xensource/xapi-ssl.pem
yes (using API)
Hosts serve it to normal API clients
Host Pool
/etc/xensource/xapi-pool-tls.pem
no
Hosts serve to clients requesting “xapi:pool” as the SNI
Trusted Default
/etc/stunnel/certs/
yes (using API)
Certificates that users can install for trusting appliances
Trusted Pool
/etc/stunnel/certs-pool/
no
Certificates that are managed by the pool for host-to-host communications
Default Bundle
/etc/stunnel/xapi-stunnel-ca-bundle.pem
no
Bundle of certificates that hosts use to verify appliances (in particular WLB), this is kept in sync with “Trusted Default”
Pool Bundle
/etc/stunnel/xapi-pool-ca-bundle.pem
no
Bundle of certificates that hosts use to verify other hosts on pool communications, this is kept in sync with “Trusted Pool”
Cryptography of certificates
The certificates until now have been signed using sha256WithRSAEncryption:
Pre-8.0 releases use 1024-bit RSA keys.
8.0, 8.1 and 8.2 use 2048-bit RSA keys.
The Default Certificates served to API clients will continue to use sha256WithRSAEncryption with 2048-bit RSA keys. The Pool certificates will use the same algorithms for consistency.
The self-signed certificates until now have used a mix of IP and hostname claims:
All released versions:
Subject and issuer have CN FQDN if the hostname is different from localhost, or CN management IP
Subject Alternate Names extension contains all the domain names as DNS names
Next release:
Subject and issuer have CN management IP
SAN extension contains all domain names as DNS names and the management IP as IP
The Pool certificates do not contain claims about IPs nor hostnames as this may change during runtime and depending on their validity may make pool communication more brittle.
Instead the only claim they have is that their Issuer and their Subject are CN Host UUID, along with a serial number.
Self-signed certificates produced until now have had validity periods of 3650 days (~10 years).
The Pool certificates will have the same validity period.
Server Components
HTTPS Connections between hosts usually involve the xapi daemons and stunnel processes:
When a xapi daemon needs to initiate a connection with another host it starts an HTTP connection with a local stunnel process.
The stunnel processes wrap http connections inside a TLS connection, allowing HTTPS to be used when hosts communicate
This means that stunnel needs to be set up correctly to verify certificates when connecting to other hosts.
Some aspects like CA certificates are already managed, but certificate pinning is not.
Use Cases
There are several use cases that need to be modified in order correctly manage trust between hosts.
Opening a connection with a pool host
This is the main use case for the feature, the rest of use cases that need changes are modified to support this one.
Currently a Xenserver host connecting to another host within the pool does not try to authenticate the receiving server when opening a TLS connection.
(The receiving server authenticates the originating server by xapi authentication, see below)
Stunnel will be configured to verify the peer certificate against the CA certificates that are present in the host.
The CA certificates must be correctly set up when a host joins the pool to correctly establish trust.
The previous behaviour for WLB must be kept as the WLB connection must be checked against the user-friendly CA certificates.
Receiving an incoming TLS connection
All incoming connections authenticate the client using credentials, this does not need the addition of certificates.
(username and password, pool secret)
The hosts must present the certificate file to incoming connections so the client can authenticate them.
This is already managed by xapi, it configures stunnel to present the configured host certificate.
The configuration has to be changed so stunnel responds to SNI requests containing the string xapi:pool to serve the internal certificate instead of the client-installed one.
U1. Host Installation
On xapi startup an additional certificate is created now for pool operations.
It’s added to the trusted pool certificates.
The certificate’s only claim is the host’s UUID.
No IP nor hostname information is kept as the clients only check for the certificate presence in the trust root.
U2. Pool Join
This use-case is delicate as it is the point where trust is established between hosts.
This is done with a call from the joiner to the pool coordinator where the certificate of the coordinator is not verified.
In this call the joiner transmits its certificate to the coordinator and the coordinator returns a list of the pool members’ UUIDs and certificates.
This means that in the policy used is trust on first use.
To deal with parallel pool joins, hosts download all the Pool certificates in the pool from the coordinator after all restarts.
The connection is initiated by a client, just like before, there is no change in the API as all the information needed to start the join is already provided (pool username and password, IP of coordinator)
sequenceDiagram
participant clnt as Client
participant join as Joiner
participant coor as Coordinator
participant memb as Member
clnt->>join: pool.join coordinator_ip coordinator_username coordinator_password
join->>coor:login_with_password coordinator_ip coordinator_username coordinator_password
Note over join: pre_join_checks
join->>join: remote_pool_has_tls_enabled = self_pool_has_tls_enabled
alt are different
Note over join: interrupt join, raise error
end
Note right of join: certificate distribution
coor-->>join:
join->>coor: pool.internal_certificate_list_content
coor-->>join:
join->>coor: pool.upload_identity_host_certificate joiner_certificate uuid
coor->>memb: pool.internal_certificates_sync
memb-->>coor:
loop for every <user CA certificate> in Joiner
join->>coor: Pool.install_ca_certitificate <user CA certificate>
coor-->>join:
end
loop for every <user CRL> in Joiner
join->>coor: Pool.install_crl <user CRL>
coor-->>join:
end
join->>coor: host.add joiner
coor-->>join:
join->>join: restart_as_slave
join->>coor: pool.user_certificates_sync
join->>coor: host.copy_primary_host_certs
U3. Pool Eject
During pool eject the pool must remove the host certificate of the ejected member from the internal trust root, this must be done by the xapi daemon of the coordinator.
The ejected member will recreate both server certificates to replicate a new installation.
This can be triggered by deleting the certificates and their private keys in the host before rebooting, the current boot scripts automatically generates a new self-signed certificate if the file is not present.
Additionally, both the user and the internal trust roots will be cleared before rebooting as well.
U4. Pool Upgrade
When a pool has finished upgrading to the version with certificate checking the database reflects that the feature is turned off, this is done as part of the database upgrade procedure in xen-api.
The internal certificate is created on restart.
It is added to the internal trusted certificates directory.
The distribution of certificate will happens when the tls verification is turned on, afterwards.
U5. Host certificate state inspection
In order to give information about the validity and useful information of installed user-facing certificates to API clients as well as the certificates used for internal purposes, 2 fields are added to certificate records in xapi’s datamodel and database:
type: indicates which of the 3 kind of certificates is the certificate. If it’s a user-installed trusted CA certificate, a server certificate served to clients that do not use SNI, and a server certificate served when the SNI xapi:pool is used. The exact values are ca, host and host-internal, respectively.
name: the human-readable name given by the user. This fields is only present on trusted CA certificates and allows the pool operators to better recognise the certificates.
Additionally, now the _host field contains a null reference if the certificate is a corporate CA (a ca certificate).
The fields will get exposed in the CLI whenever a certificate record is listed, this needs a xapi-cli-server to be modified to show the new field.
U6. Migrating a VM to another pool
To enable a frictionless migration when pools have tls verification enabled, the host certificate of the host receiving the vm is sent to the sender.
This is done by adding the certificate of the receiving host as well as its pool coordinator to the return value of the function migrate_receive function.
The sender can then add the certificate to the folder of CA certificates that stunnel uses to verify the server in a TLS connection.
When the transaction finishes, whether it fails or succeeds the CA certificate is deleted.
The certificate is stored in a temporary location so xapi can clean up the file when it starts up, in case after the host fences or power cycles while the migration is in progress.
Xapi invokes sparse_dd with the filename correct trusted bundle as a parameter so it can verify the vhd-server running on the other host.
Xapi also invokes xcp-rrdd to migrate the VM metrics.
xcp-rrdd is passed the 2 certificates to verify the remote hosts when sending the metrics.
Clients should not be aware of this change and require no change.
Xapi-cli-server, the server of xe embedded into xapi, connects to the remote coordinator using TLS to be able to initiate the migration.
Currently no verification is done. A certificate is required to initiate the connection to verify the remote server.
In u6.3 and u6.4 no changes seem necessary.
U7. Change a host’s name
The Pool certificates do not depend on hostnames.
Changing the hostnames does not affect TLS certificate verification in a pool.
U8. Installing a certificate (corporate CA)
Installation of corporate CA can be done with current API.
Certificates are added to the database as CA certificates.
U9. Resetting a certificate (to self-signed certificate)
This needs a reimplementation of the current API to reset host certificate, this time allowing the operation to happen when the host is not on emergency node and to be able to do it remotely.
U10. Enabling certificate verification
A new API call is introduced to enable tls certificate verification: Pool.enable_tls_verification.
This is used by the CLI command pool-enable-tls-verification.
The call causes the coordinator of the pool to install the Pool certificates of all the members in its internal trust root.
Then calls the api for each member to install all of these certificates.
After this public key exchange is done, TLS certificate verification is enabled on the members, with the coordinator being the last to enable it.
When there are issues that block enabling the feature, the call returns an error specific to that problem:
HA must not be enabled, as it can interrupt the procedure when certificates are distributed
Pool operations that can disrupt the certificate exchange block this operation: These operations are listed in here
There was an issue with the certificate exchange in the pool.
The coordinator enabling verification last is done to ensure that if there is any issue enabling the coordinator host can still connect to members and rollback the setting.
A new field is added to the pool: tls_verification_enabled. This enables clients to query whether TLS verification is enabled.
U11. Disabling certificate verification
A new emergency command is added emergency-host-disable-tls-verification.
This command disables tls-verification for the xapi daemon in a host.
This allows the host to communicate with other hosts in the pool.
After that, the admin can regenerate the certificates using the new host-refresh-server-certificate in the hosts with invalid certificates, finally they can reenable tls certificate checking using the call emergency-host-reenable-tls-verification.
The documentation will include instructions for administrators on how to reset certificates and manually installing the host certificates as CA certificates to recover pools.
This means they will not have to disable TLS and compromise on security.
U12. Being aware of certificate expiry
Stockholm hosts provide alerts 30 days before hosts certificates expire, it must be changed to alert about users’ CA certificates expiring.
Pool certificates need to be cycled when the certificate expiry is approaching.
Alerts are introduced to warn the administrator this task must be done, or risk the operation of the pool.
A new API is introduced to create certificates for all members in a pool and replace the existing internal certificates with these.
This call imposes the same requirements in a pool as the pool secret rotation: It cannot be run in a pool unless all the host are online, it can only be started by the coordinator, the coordinator is in a valid state, HA is disabled, no RPU is in progress, and no pool operations are in progress.
The API call is Pool.rotate_internal_certificates.
It is exposed by xe as pool-rotate-internal-certificates.
Changes
Xapi startup has to account for host changes that affect this feature and modify the filesystem and pool database accordingly.
Public certificate changed: On first boot, after a pool join and when doing emergency repairs the server certificate record of the host may not match to the contents in the filesystem. A check is to be introduced that detects if the database does not associate a certificate with the host or if the certificate’s public key in the database and the filesystem are different. If that’s the case the database is updated with the certificate in the filesystem.
Pool certificate not present: In the same way the public certificate served is generated on startup, the internal certificate must be generated if the certificate is not present in the filesystem.
Pool certificate changed: On first boot, after a pool join and after having done emergency repairs the internal server certificate record may not match the contents of the filesystem. A check is to be introduced that detects if the database does not associate a certificate with the host or if the certificate’s public key in the database and the filesystem are different. This check is made aware whether the host is joining a pool or is on first-boot, it does this by counting the amount of hosts in the pool from the database. In the case where it’s joining a pool it simply updated the database record with the correct information from the filesystem as the filesystem contents have been put in place before the restart. In the case of first boot the public part of the certificate is copied to the directory and the bundle for internally-trusted certificates: /etc/stunnel/certs-pool/ and /etc/stunnel/xapi-pool-ca-bundle.pem.
The xapi database records for certificates must be changed according with the additions explained before.
API
Additions
Pool.tls_verification_enabled: this is a field that indicates whether TLS verification is enabled.
Pool.enable_tls_verification: this call is allowed for role _R_POOL_ADMIN. It’s not allowed to run if HA is enabled nor pool operations are in progress. All the hosts in the pool transmit their certificate to the coordinator and the coordinator then distributes the certificates to all members of the pool. Once that is done the coordinator tries to initiate a session with all the pool members with TLS verification enabled. If it’s successful TLS verification is enabled for the whole pool, otherwise the error COULD_NOT_VERIFY_HOST [member UUID] is emmited.
TLS_VERIFICATION_ENABLE_IN_PROGRESS is a new error that is produced when trying to do other pool operations while enabling TLS verification is in progress
Host.emergency_disable_tls_verification: this called is allowed for role _R_LOCAL_ROOT_ONLY: it’s an emergency command and acts locally. It forces connections in xapi to stop verifying the peers on outgoing connections. It generates an alert to warn the administrators of this uncommon state.
Host.emergency_reenable_tls_verification: this call is allowed for role _R_LOCAL_ROOT_ONLY: it’s an emergency command and acts locally. It changes the configuration so xapi verifies connections by default after being switched off with the previous command.
Pool.install_ca_certificate: rename of Pool.certificate_install, add the ca certificate to the database.
Pool.uninstall_ca_certificate: rename of Pool.certificate_uninstall, removes the certificate from the database.
Host.reset_server_certificate: replaces Host.emergency_reset_server_certificate, now it’s allowed for role _R_POOL_ADMIN. It adds a record for the generated Default Certificate to the database while removing the previous record, if any.
Pool.rotate_internal_certificates: This call generates new Pool certificates, and substitutes the previous certificates with these. See the certificate expiry section for more details.
Modifications:
Pool.join: certificates must be correctly distributed. API Error POOL_JOINING_HOST_TLS_VERIFICATION_MISMATCH is returned if the tls_verification of the two pools doesn’t match.
Pool.eject: all certificates must be deleted from the ejected host’s filesystem and the ejected host’s certificate must be deleted from the pool’s trust root.
Host.install_server_certificate: the certificate type host for the record must be added to denote it’s a Standard Certificate.
Deprecations:
pool.certificate_install
pool.certificate_uninstall
pool.certificate_list
pool.wlb_verify_cert: This setting is superseeded by pool.enable_tls_verification. It cannot be removed, however. When updating from a previous version when this setting is on, TLS connections to WLB must still verify the external host. When the global setting is enabled this setting is ignored.
host.emergency_reset_server_certificate: host.reset_server_certificate should be used instead as this call does not modify the database.
CLI
Following API additions:
pool-enable-tls-verification
pool-install-ca-certificate
pool-uninstall-ca-certificate
pool-internal-certificates-rotation
host-reset-server-certificate
host-emergency-disable-tls-verification (emits a warning when verification is off and the pool-level is on)
host-emergency-reenable-tls-verification
And removals:
host-emergency-server-certificate
Feature Flags
This feature needs clients to behave differently when initiating pool joins, to allow them to choose behaviour the toolstack will expose a new feature flag ‘Certificate_verification’. This flag will be part of the express edition as it’s meant to aid detection of a feature and not block access to it.
Alerts
Several alerts are introduced:
POOL_CA_CERTIFICATE_EXPIRING_30, POOL_CA_CERTIFICATE_EXPIRING_14, POOL_CA_CERTIFICATE_EXPIRING_07, POOL_CA_CERTIFICATE_EXPIRED: Similar to host certificates, now the user-installable pool’s CA certificates are monitored for expiry dates and alerts are generated about them. The body for this type of message is:
<body><message>The trusted TLS server certificate {is expiring soon|has expired}.</message><date>20210302T02:00:01Z</date></body>
HOST_INTERNAL_CERTIFICATE_EXPIRING_30, HOST_INTERNAL_CERTIFICATE_EXPIRING_14, HOST_INTERNAL_CERTIFICATE_EXPIRING_07, HOST_INTERNAL_CERTIFICATE_EXPIRED: Similar to host certificates, the newly-introduced hosts’ internal server certificates are monitored for expiry dates and alerts are generated about them. The body for this type of message is:
<body><message>The TLS server certificate for internal communications {is expiring soon|has expired}.</message><date>20210302T02:00:01Z</date></body>
TLS_VERIFICATION_EMERGENCY_DISABLED: The host is in emergency mode and is not enforcing tls verification anymore, the situation that forced the disabling must be fixed and the verification enabled ASAP.
<body><host>HOST-UUID</host></body>
FAILED_LOGIN_ATTEMPTS: An hourly alert that contains the number of failed attempts and the 3 most common origins for these failed alerts. The body for this type of message is:
Trusted certificates for identity validation in TLS connections
Overview
In various use cases, TLS connections are established on the host on which XAPI runs.
When establishing a TLS connection, the peer identity needs to be validated.
This is done using either a root CA certificate to perform certificate chain validation, or a pinned certificate for validation with certificate pinning.
The root CA certificates and pinned certificates involved in this process are referred to as trusted certificates.
When a trusted certificate is installed, the local endpoint can validate the peer identity during TLS connection establishment.
Certificate chain validation is a general-purpose, standards-based approach but requires additional steps, such as getting the peer’s certificate signed by a CA.
In contrast, certificate pinning offers a quicker way to set up trust in some cases without the overhead of CA signing.
For example, when establishing a TLS connection, the peer endpoint presenting a self-signed server certificate, the local endpoint, after explicit user confirmation, can set up the trust by pinning the server certificate for this peer.
For subsequent connections, the local endpoint validates the peer against the pinned certificate.
This allows the use case to start in quicker and easier way without prior CA signing and without compromising security.
As the unified API for the whole system, XAPI also exposes interfaces for users to install and manage trusted certificates that are used by system components for different purposes.
The base design described in pool-certificates.md defines the database, API, and trust store in the filesystem for managing trusted certificates.
This document introduces the following enhancements to that design:
Explicit separation of root CA certificates and pinned certificates:
In the base design, both certificate types share the same database schema, APIs, and are stored together in a single bundle file.
This makes it difficult to determine the appropriate validation approach based on the certificate type.
The improvement introduces a type value to separate root CA certificates and pinned certificates explicitly.
Add a “purpose” attribute for trusted certificates:
According to the base design, only certificates used for internal TLS connections among XAPI processes within a pool are stored separately.
All other trusted certificates are grouped in a single bundle, which may include certificates for multiple purposes.
By introducing a “purpose” attribute, certificates can be organized by their intended use, improving clarity and reducing ambiguity.
Use Cases
An XAPI client establishes a TLS connection to an XAPI service.
This case is outside the scope of trusted certificates managed by XAPI and is included here only for completeness.
An XAPI process on one host initiates a TLS connection to an XAPI process on another host within the same pool.
This case is covered in the base design and is listed here for completeness.
An XAPI process initiates a TLS connection to an external service, such as an appliance.
This case benefits from the improvements introduced in this design.
A non-XAPI process (like licensing agent) running on a host managed by XAPI initiates a TLS connection to an external service, such as a License Server.
This case benefits from the improvements introduced in this design as well.
Changes
Database schema
The Certificate class in database is defined to represent general certificates, including trusted certificates.
One existing class field “type” supports the following enumeration values:
“ca”: trusted certificates including both root CA and pinned.
“host”: identity certificate of a host for communication with entities outside the pool.
“host_internal”: identity certificate of a host for communication with other pool members.
Two improvements in this design:
A new value “pinned” is introduced in this design so that the existing “ca” now represents trusted root CA only.
The new “pinned” will represent trusted pinned certificates.
A new enumeration type “purpose” is introduced to indicate the intended usage of a trusted certificate.
A new Certificate class field “purpose” (a set of values of enumeration type “purpose”) will be added to represent all applicable purposes of a trusted certificate.
By default, this set is empty which corresponds to the existing “ca” certificates for general purpose.
API
pool.install_ca_certificate
This is an existing API to install a trusted certificate into the pool with its arguments being defined as:
session (ref session_id): reference to a valid session;
name (string): the name of the certificate;
cert (string): the certificate in PEM format.
Prior to this design, the API’s name parameter represents the certificate file name as persisted on the dom0 file system.
In this design, this API will be deprecated because it exposes implementation details that should remain internal and hidden from users.
The new “pool.install_trusted_certificate” should be used instead.
For the same reason, “pool.uninstall_ca_certificate” will also be deprecated.
pool.install_trusted_certificate
This is a new API introduced in this design with its arguments being defined as:
session (ref session_id): reference to a valid session;
self (ref Pool): reference to the pool;
ca (boolean): the trusted certificate is a root CA certificate used to verify a chain (true), or a pinned certificate used for certificate pinning (false);
cert (string): the trusted certificate in PEM format;
purpose (string list): the purposes of the trusted certificate.
This new API is used to install trusted certificate.
When purpose is an empty set, it stands for a root CA certificate for general purpose.
The purpose can not be an empty set when the ca is false, because each pinned certificate is specific to a single server and therefore unsuitable for a shared trusted certificate for general purpose.
It returns void when succeed. Otherwise, return corresponding API error.
pool.uninstall_trusted_certificate
This is a new API introduced in this design to uninstall a trusted certificate with its arguments being defined as:
session (ref session_id): reference to a valid session;
certificate (ref Certificate): reference to the trusted certificate;
It returns void when succeed. Otherwise, return corresponding API error.
pool.join
According to the base design, trusted certificates are exchanged between the pool and the joining host during the pre‑join phase.
This design basically preserves that behavior to ensure the joiner works correctly both before and after joining the pool.
However, a number of modifications have been introduced compared with the base design.
sequenceDiagram
participant clnt as Client
participant join as Joiner
participant coor as Coordinator
participant memb as Member
clnt->>join: Pool.join coordinator_ip coordinator_username coordinator_password
join->>coor:login_with_password rpc_no_verify coordinator_ip coordinator_username coordinator_password
coor-->>join:
Note over join: pre_join_checks
rect rgba(0,0,0,0.05)
join->>join: assert_tls_verification_matches
alt fails
Note over join: interrupt join, raise error
end
end
Note over join: exchnage trusted intra-pool host identity certificates
rect rgba(0,0,0,0.05)
join->>coor: Pool.exchange_certificates_on_join <Joiner's trusted host identity cert>
coor->>coor: Cert_distrib.exchange_certificates_with_joiner start
coor->>memb: Host.cert_distrib_atom Write
memb-->>coor:
coor->>coor: Cert_distrib.get_local_pool_certs
coor-->>coor: Cert_distrib.exchange_certificates_with_joiner done
coor-->>join: <trusted host identity certs in pool>
join->>join: Cert_distrib.import_joining_pool_certs <trusted host identity certs in pool>
end
join->>coor:login_with_password rpc_verify coordinator_ip coordinator_username coordinator_password
coor-->>join:
Note over join: exchange legacy ca certificates
rect rgba(0,0,0,0.05)
join->>coor: Pool.exchange_ca_certificates_on_join <Joiner's legacy ca certs>
coor->>coor: Cert_distrib.exchange_ca_certificates_with_joiner
coor-->>join: <legacy ca certs in pool>
join->>join: Cert_distrib.import_joining_pool_ca_certificates <legacy ca certs in pool>
end
Note over join: exchange trusted certificates
rect rgba(0,0,0,0.05)
join->>coor: Pool.exchange_trusted_certificates_on_join <Joiner's trusted certs>
loop for every <trusted> in Joiner
coor->>coor: Pool.install_trusted_certificate start
coor->>memb: Host.cert_distrib_atom Write
memb-->>coor:
coor->>memb: Host.certificate_sync
memb-->>coor:
coor-->>coor: Pool.install_trusted_certificate done
end
coor->>coor: Cert_distrib.collect_trusted_certs
coor-->>join: <trusted certs in pool>
loop for every <trusted> in pool
join->>join: Pool.install_trusted_certificate
end
end
Note over join: exchange CRLs
rect rgba(0,0,0,0.05)
join->>coor: Pool.exchange_crls_on_join <Joiner's CRLs>
loop for every <CRL> in Joiner
coor->>coor: Pool.crl_install start
coor->>memb: Host.cert_distrib_atom Write
memb-->>coor:
coor->>memb: Host.certificate_sync
memb-->>coor:
coor-->>coor: Pool.crl_install done
end
coor->>coor: Cert_distrib.collect_crls
coor-->>join: <CLRs in pool>
loop for every <CRL> in pool
join->>join: Pool.crl_install
end
end
join->>coor: Host.add joiner
coor-->>join:
join->>join: restart_as_slave
Note over join: Copy all certificates from coordinator
rect rgba(0,0,0,0.05)
join->>coor: Host.copy_primary_host_certs
coor->>join: Host.cert_distrib_atom Write
join-->>coor:
coor->>join: Host.cert_distrib_atom GenBundle
join-->>coor:
coor-->>join: return from Host.copy_primary_host_certs
end
pool.eject
The trusted certificates will be removed from any host which is being eject from the pool.
Other APIs of managing trusted certificates
The install/uninstall APIs above are not the only ways of managing the trusted certificates.
A particular API, e.g. “pool.set_wlb_url”, may also install the trusted certificate used to validate the WLB server on subsequent TLS connections.
However, regardless of the entry point, all trusted certificates must be represented by a Certificate database object and stored in the same way described below as if installed by the install APIs.
Trust store
The trusted certificates are stored in individual hosts’ filesystems.
The existing stores defined in the base design are:
Name
Filesystem location
User-configurable
Used for
Trusted Default
/etc/stunnel/certs/
yes (using API)
Certificates that users can install for trusting appliances
Trusted Pool
/etc/stunnel/certs-pool/
no
Certificates that are managed by the pool for host-to-host communications
Default Bundle
/etc/stunnel/xapi-stunnel-ca-bundle.pem
no
Bundle of certificates that hosts use to verify appliances (in particular WLB), this is kept in sync with “Trusted Default”
Pool Bundle
/etc/stunnel/xapi-pool-ca-bundle.pem
no
Bundle of certificates that hosts use to verify other hosts on pool communications, this is kept in sync with “Trusted Pool”
Regarding the “User-configurable”, when it is “yes”, it means a user can only install and remove the file with “name” parameter of “pool.install_ca_certificate” ; when it is “no”, it means the user can’t install or remove it even via APIs. In any cases, a user can’t change the certificate files directly.
When a trusted certificate is being installed via “pool.install_ca_certificate”, the trusted certificate will be stored in the “Trusted Default” and “Default Bundle”.
This design doesn’t change this for backwards compatibility. But the API “pool.install_ca_certificate” will be marked as deprecated.
The pool “Trusted Pool” and “Pool Bundle” are for host-to-host TLS communications within a pool. This design doesn’t change them.
The stores for the certificates installed via “pool.install_trusted_certificate” are defined as:
Name
Filesystem location
Used for
Trusted General CA
/etc/trusted-certs/ca-general/
Trusted root CA certificates that users can install to validate a peer’s identity when establishing a TLS connection for general purpose.
Trusted Peer
/etc/trusted-certs/pinned-<PURPOSE>/
Trusted pinned certificates that users can install to validate a peer’s identity when establishing a TLS connection for <PURPOSE>.
Trusted CA
/etc/trusted-certs/ca-<PURPOSE>/
Trusted root CA certificates that users can install to validate a peer’s identity when establishing a TLS connection for <PURPOSE>.
General Bundle
/etc/trusted-certs/ca-bundle-general.pem
Bundle of trusted root CA certificates under /etc/trusted-certs/ca-general/ to verify a peer’s identity when establishing a TLS connection for general purpose.
Peer Bundle
/etc/trusted-certs/pinned-bundle-<PURPOSE>.pem
Bundle of trusted pinned certificates under /etc/trusted-certs/pinned-<PURPOSE>/ to verify a peer’s identity when establishing a TLS connection for <PURPOSE>.
CA Bundle
/etc/trusted-certs/ca-bundle-<PURPOSE>.pem
Bundle of trusted root CA certificates under /etc/trusted-certs/ca-<PURPOSE>/ to verify a peer’s identity when establishing a TLS connection for <PURPOSE>.
The filesystem location is derived from the <PURPOSE>. Each <PURPOSE> string corresponds to a predefined value of the “purpose” type in the database, implemented as predefined constants.
The certificate file names under filesystem locations of “Trusted General CA”, “Trusted Peer” and “Trusted CA” will be the UUIDs of the Certificate objects.
Precedence order of choosing trust stores
The “Peer Bundle”, “CA Bundle”, and “Default Bundle” can be directly used when establishing TLS connections.
The endpoint to validate the peer’s identity must unambiguously choose only one non-empty bundle from them with the following precedence order:
“Peer Bundle”
“CA Bundle”
“General Bundle”
No more attempts on remaining bundles when validation with the selected one fails (the server certificate is not trusted by the selected bundle).
For example, if “Peer Bundle” doesn’t exist and the “CA Bundle” (if not empty) is selected to do the validation, the endpoint should not try with “General Bundle” even when the validation with “CA Bundle” failed.
Design document
Revision
v1
Status
released (5.6 fp1)
Tunnelling API design
To isolate network traffic between VMs (e.g. for security reasons) one can use
VLANs. The number of possible VLANs on a network, however, is limited, and
setting up a VLAN requires configuring the physical switches in the network.
GRE tunnels provide a similar, though more flexible solution. This document
proposes a design that integrates the use of tunnelling in the XenAPI. The
design relies on the recent introduction of the Open vSwitch, and
requires an Open vSwitch
(OpenFlow) controller
(further referred to as
the controller) to set up and maintain the actual GRE tunnels.
We suggest following the way VLANs are modelled in the datamodel. Introducing a
VLAN involves creating a Network object for the VLAN, that VIFs can connect to.
The VLAN.create API call takes references to a PIF and Network to use and a
VLAN tag, and creates a VLAN object and a PIF object. We propose something
similar for tunnels; the resulting objects and relations for two hosts would
look like this:
(string -> string) map status (read/write); owned by the controller, containing at least the
key active, and key and error when appropriate (see below)
(string -> string) map other_config (read/write)
New fields in PIF class (automatically linked to the corresponding tunnel
fields):
PIF ref set tunnel_access_PIF_of (read-only)
PIF ref set tunnel_transport_PIF_of (read-only)
Messages
tunnel ref create (PIF ref, network ref)
void destroy (tunnel ref)
Backends
For clients to determine which network backend is in use (to decide whether
tunnelling functionality is enabled) a key network_backend is added to the
Host.software_version map on each host. The value of this key can be:
bridge: the Linux bridging backend is in use;
openvswitch: the [Open vSwitch] backend is in use.
Notes
The user is responsible for creating tunnel and network objects, associating
VIFs with the right networks, and configuring the physical PIFs, all using
the XenAPI/CLI/XC.
The tunnel.status field is owned by the controller. It
may be possible to define an RBAC role for the controller, such that only the
controller is able to write to it.
The tunnel.create message does not take
a tunnel identifier (GRE key). The controller is responsible for assigning
the right keys transparently. When a tunnel has been set up, the controller
will write its key to tunnel.status:key, and it will set
tunnel.status:active to "true" in the same field.
In case a tunnel could
not be set up, an error code (to be defined) will be written to
tunnel.status:error, and tunnel.status:active will be "false".
Xapi
tunnel.create
Fails with OPENVSWITCH_NOT_ACTIVE if the Open vSwitch networking sub-system
is not active (the host uses linux bridging).
Fails with IS_TUNNEL_ACCESS_PIF if the specified transport PIF is a tunnel access PIF.
Takes care of creating and connecting the new tunnel and PIF objects.
Sets a random MAC on the access PIF.
IP configuration of the tunnel
access PIF is left blank. (The IP configuration on a PIF is normally used for
the interface in dom0. In this case, there is no tunnel interface for dom0 to
use. Such functionality may be added in future.)
The tunnel.status:active
field is initialised to "false", indicating that no actual tunnelling
infrastructure has been set up yet.
Calls PIF.plug on the new tunnel access PIF.
tunnel.destroy
Calls PIF.unplug on the tunnel access PIF. Destroys the tunnel and
tunnel access PIF objects.
PIF.plug on a tunnel access PIF
Fails with TRANSPORT_PIF_NOT_CONFIGURED if the underlying transport PIF has
PIF.ip_configuration_mode = None, as this interface needs to be configured
for the tunnelling to work. Otherwise, the transport PIF will be plugged.
Xapi requests interface-reconfigure to “bring up” the tunnel access PIF,
which causes it to create a local bridge.
No link will be made between the
new bridge and the physical interface by interface-reconfigure. The
controller is responsible for setting up these links. If the controller is
not available, no links can be created, and the tunnel network degrades to an
internal network (only intra-host connectivity).
PIF.currently_attached is set to true.
PIF.unplug on a tunnel access PIF
Xapi requests interface-reconfigure to “bring down” the tunnel PIF, which
causes it to destroy the local bridge.
PIF.currently_attached is set to false.
PIF.unplug on a tunnel transport PIF
Calls PIF.unplug on the associated tunnel access PIF(s).
PIF.forget on a tunnel access of transport PIF
Fails with PIF_TUNNEL_STILL_EXISTS.
VLAN.create
Tunnels can only exist on top of physical/VLAN/Bond PIFs, and not the other
way around. VLAN.create fails with IS_TUNNEL_ACCESS_PIF if given an
underlying PIF that is a tunnel access PIF.
Pool join
As for VLANs, when a host joins a pool, it will inherit the tunnels that are
present on the pool master.
Any tunnels (tunnel and access PIF objects)
configured on the host are removed, which will leave their networks
disconnected (the networks become internal networks). As a joining host is
always a single host, there is no real use for having had tunnels on it, so
this probably will never be an issue.
The controller
The controller tracks the tunnel class to determine which bridges/networks
require GRE tunnelling.
On start-up, it calls tunnel.get_all to obtain the information about all
tunnels.
Registers for events on the tunnel class to stay up-to-date.
A tunnel network is organised as a star topology. The controller is free to
decide which host will be the central host (“switching host”).
If the
current switching host goes down, a new one will be selected, and GRE tunnels
will be reconstructed.
The controller creates GRE tunnels connecting each
existing Open vSwitch bridge that is associated with the same tunnel network,
after assigning the network a unique GRE key.
The controller destroys GRE
tunnels if associated Open vSwitch bridges are destroyed. If the destroyed
bridge was on the switching host, and other hosts are still using the same
tunnel network, a new switching host will be selected, and GRE tunnels will
be reconstructed.
The controller sets tunnel.status:active to "true" for
all tunnel links that have been set up, and "false" if links are broken.
The controller writes an appropriate error code (to be defined) to
tunnel.status:error in case something went wrong.
When an access PIF is
plugged, and the controller succeeds to set up the tunnelling infrastructure,
it writes the GRE key to tunnel.status:key on the associated tunnel object
(at the same time tunnel.status:active will be set to "true").
When the
tunnel infrastructure is not up and running, the controller may remove the
key tunnel.status:key (optional; the key should anyway be disregarded if
tunnel.status:active is "false").
CLI
New xe commands (analogous to xe vlan-):
tunnel-create
tunnel-destroy
tunnel-list
tunnel-param-get
tunnel-param-list
Design document
Revision
v2
Status
released (8.2)
User-installable host certificates
Introduction
It is often necessary to replace the TLS certificate used to secure
communications to Xenservers hosts, for example to allow a XenAPI user such as
Citrix Virtual Apps and Desktops (CVAD) to validate that the host is genuine
and not impersonating the actual host.
Historically there has not been a supported mechanism to do this, and as a
result users have had to rely on guides written by third parties that show how
to manually replace the xapi-ssl.pem file on a host. This process is
error-prone, and if a mistake is made, can result in an unusable system.
This design provides a fully supported mechanism to allow replacing the
certificates.
Design proposal
It is expected that an API caller will provide, in a single API call, a private
key, and one or more certificates for use on the host. The key will be provided
in PKCS #8 format, and the certificates in X509 format, both in
base-64-encoded PEM containers.
Multiple certificates can be provided to cater for the case where an
intermediate certificate or certificates are required for the caller to be able
to verify the certificate back to a trusted root (best practice for Certificate
Authorities is to have an ‘offline’ root, and issue certificates from an
intermediate Certificate Authority). In this situation, it is expected (and
common practice among other tools) that the first certificate provided in the
chain is the host’s unique server certificate, and subsequent certificates form
the chain.
To detect mistakes a user may make, certain checks will be carried out on the
provided key and certificate(s) before they are used on the host. If all checks
pass, the key and certificate(s) will be written to the host, at which stage a
signal will be sent to stunnel that will cause it to start serving the new
certificate.
Certificate Installation
API Additions
Xapi must provide an API call through Host RPC API to install host
certificates:
let install_server_certificate = call
~lifecycle:[Published, rel_stockholm,""]~name:"install_server_certificate"~doc:"Install the TLS server certificate."~versioned_params:[{ param_type=Ref_host; param_name="host"; param_doc="The host"; param_release=stockholm_release; param_default=None};{ param_type=String; param_name="certificate"; param_doc="The server certificate, in PEM form"; param_release=stockholm_release; param_default=None};{ param_type=String; param_name="private_key"; param_doc="The unencrypted private key used to sign the certificate, \
in PKCS#8 form"; param_release=stockholm_release; param_default=None};{ param_type=String; param_name="certificate_chain"; param_doc="The certificate chain, in PEM form"; param_release=stockholm_release; param_default=Some(VString"")}]~allowed_roles:_R_POOL_ADMIN
()
This call should be implemented within xapi, using the already-existing crypto
libraries available to it.
Analogous to the API call, a new CLI call host-server-certificate-install
must be introduced, which takes the parameters certificate, key and
certificate-chain - these parameters are expected to be filenames, from which
the key and certificate(s) must be read, and passed to the
install_server_certificate RPC call.
The CLI will be defined as:
"host-server-certificate-install",{ reqd=["certificate";"private-key"]; optn=["certificate-chain"]; help="Install a server TLS certificate on a host"; implementation=With_fd Cli_operations.host_install_server_certificate; flags=[Host_selectors];};
Validation
Xapi must perform the following validation steps on the provided key and
certificate. If any validation step fails, the API call must return an error
with the specified error code, providing any associated text:
Private Key
Validate that it is a pem-encoded PKCS#8 key, use error
SERVER_CERTIFICATE_KEY_INVALID [] and exposed as
“The provided key is not in a pem-encoded PKCS#8 format.”
Validate that the algorithm of the key is RSA, use error
SERVER_CERTIFICATE_KEY_ALGORITHM_NOT_SUPPORTED, [<algorithms's ASN.1 OID>]
and exposed as “The provided key uses an unsupported algorithm.”
Validate that the key length is ≥ 2048, and ≤ 4096 bits, use error
SERVER_CERTIFICATE_KEY_RSA_LENGTH_NOT_SUPPORTED, [length] and exposed as
“The provided RSA key does not have a length between 2048 and 4096.”
The library used does not support multi-prime RSA keys, when it’s
encountered use error SERVER_CERTIFICATE_KEY_RSA_MULTI_NOT_SUPPORTED [] and
exposed as “The provided RSA key is using more than 2 primes, expecting only
2”
Server Certificate
Validate that it is a pem-encoded X509 certificate, use error
SERVER_CERTIFICATE_INVALID [] and exposed as “The provided certificate is not
in a pem-encoded X509.”
Validate that the public key of the certificate matches the public key from
the private key, using error SERVER_CERTIFICATE_KEY_MISMATCH [] and exposing
it as “The provided key does not match the provided certificate’s public key.”
Validate that the certificate is currently valid. (ensure all time
comparisons are done using UTC, and any times presented in errors are using
ISO8601 format):
Ensure the certificate’s not_before date is ≤ NOW
SERVER_CERTIFICATE_NOT_VALID_YET, [<NOW>; <not_before>] and exposed as
“The provided certificate certificate is not valid yet.”
Ensure the certificate’s not_after date is > NOW
SERVER_CERTIFICATE_EXPIRED, [<NOW>; <not_after>] and exposed as “The
provided certificate has expired.”
Validate that the certificate signature algorithm is SHA-256
SERVER_CERTIFICATE_SIGNATURE_NOT_SUPPORTED [] and exposed as
“The provided certificate is not using the SHA256 (SHA2) signature algorithm.”
Intermediate Certificates
Validate that it is an X509 certificate, use
SERVER_CERTIFICATE_CHAIN_INVALID [] and exposed as “The provided
intermediate certificates are not in a pem-encoded X509.”
Filesystem Interaction
If validation has been completed successfully, a temporary file must be created
with permissions 0x400 containing the key and certificate(s), in that order,
separated by an empty line.
This file must then be atomically moved to /etc/xensource/xapi-ssl.pem in
order to ensure the integrity of the contents. This may be done using rename
with the origin and destination in the same mount-point.
Alerting
A daily task must be added. This task must check the expiry date of the first
certificate present in /etc/xensource/xapi-ssl.pem, and if it is within 30
days of expiry, generate a message to alert the administrator that the
certificate is due to expire shortly.
The body of the message should contain:
<body>
<message>
The TLS server certificate is expiring soon
</message>
<date>
<expiry date in ISO8601 'YYYY-MM-DDThh:mm:ssZ' format>`
</date>
</body>
The priority of the message should be based on the number of days to expiry as
follows:
Number of days
Priority
0-7
1
8-14
2
14+
3
The other fields of the message should be:
Field
Value
name
HOST_SERVER_CERTIFICATE_EXPIRING
class
Host
obj-uuid
< Host UUID >
Any existing HOST_SERVER_CERTIFICATE_EXPIRING messages with this host’s UUID
should be removed to avoid a build-up of messages.
Additionally, the task may also produce messages for expired server
certificates which must use the name HOST_SERVER_CERTIFICATE_EXPIRED.
This kind of message must contain the message “The TLS server certificate has
expired.” as well as the expiry date, like the expiring messages.
They also may replace the existing expiring messages in a host.
Expose Certificate metadata
Currently xapi exposes a CLI command to print the certificate being used to
verify external hosts. We would like to also expose through the API and the
CLI useful metadata about the certificates in use by each host.
The new class is meant to cover server certificates and trusted certificates.
Schema
A new class, Certificate, will be added with the following schema:
Field
Type
Notes
uuid
type
CA
Certificate trusted by all hosts
Host
Certificate that the host presents to normal clients
name
String
Name, only present for trusted certificates
host
Ref _host
Host where the certificate is installed
not_before
DateTime
Date after which the certificate is valid
not_after
DateTime
Date before which the certificate is valid
fingerprint_sha256
String
The certificate’s SHA256 fingerprint / hash
fingerprint_sha1
String
The certificate’s SHA1 fingerprint / hash
CLI / API
There are currently-existing CLI parameters for certificates:
pool-certificate-{install,uninstall,list,sync},
pool-crl-{install,uninstall,list} and host-get-server-certificate.
The new command must show the metadata of installed server certificates in
the pool.
It must be able to show all of them in the same call, and be able to filter
the certificates per-host.
To make it easy to separate it from the previous calls and to reflect that
certificates are a class type in xapi the call will be named certificate-list
and it will accept the parameter host-uuid=<uuid>.
Recovery mechanism
In the case a certificate is let to expire TLS clients connecting to the host
will refuse to establish the connection.
This means that the host is going to be unable to be managed using the xapi
API (Xencenter, or a CVAD control plane)
There needs to be a mechanism to recover from this situation.
A CLI command must be provided to install a self-signed certificate, in the
same way it is generated during the setup process at the moment.
The command will be host-emergency-reset-server-certificate.
This command is never to be forwarded to another host and will call openssl to
create a new RSA private key
The command must notify stunnel to make sure stunnel uses the newly-created
certificate.
Miscellaneous
The auto-generated xapi-ssl.pem currently contains Diffie-Hellman (DH)
Parameters, specifically 512 bits worth. We no longer support any ciphers which
require DH parameters, so these are no longer needed, and it is acceptable for
them to be lost as part of installing a new certificate/key pair.
The generation should also be modified to avoid creating these for new
installations.
When xapi starts, it may create a number of VGPU_type objects. These act as
VGPU presets, and exactly which VGPU_type objects are created depends on the
installed hardware and in certain cases the presence of certain files in dom0.
When deciding which VGPU_type objects need to be created, xapi needs to
determine whether a suitable VGPU_type object already exists, as there should
never be duplicates. At the moment the combination of vendor name and model name
is used as a primary key, but this is not ideal as these values are subject to
change. We therefore need a way of creating a primary key to uniquely identify
VGPU_type objects.
Identifier
We will add a new read-only field to the database:
VGPU_type.identifier (string)
This field will contain a string representation of the parameters required to
uniquely identify a VGPU_type. The parameters required can be summed up with the
following OCaml type:
type nvidia_id = {
pdev_id : int;
psubdev_id : int option;
vdev_id : int;
vsubdev_id : int;
}
type gvt_g_id = {
pdev_id : int;
low_gm_sz : int64;
high_gm_sz : int64;
fence_sz : int64;
monitor_config_file : string option;
}
type t =
| Passthrough
| Nvidia of nvidia_id
| GVT_g of gvt_g_id
When converting this type to a string, the string will always be prefixed with
0001: enabling future versioning of the serialisation format.
For passthrough, the string will simply be:
0001:passthrough
For NVIDIA, the string will be nvidia followed by the four device IDs
serialised as four-digit hex values, separated by commas. If psubdev_id is
None, the empty string will be used e.g.
For GVT-g, the string will be gvt-g followed by the physical device ID encoded
as four-digit hex, followed by low_gm_sz, high_gm_sz and fence_sz encoded
as hex, followed by monitor_config_file (or the empty string if it is None)
e.g.
Having this string in the database will allow us to do a simple lookup to test
whether a certain VGPU_type already exists. Although it is not currently
required, this string can also be converted back to the type from which it was
generated.
When deciding whether to create VGPU_type objects, xapi will generate the
identifier string and use it to look for existing VGPU_type objects in the
database. If none are found, xapi will look for existing VGPU_type objects with
the tuple of model name and vendor name. If still none are found, xapi will
create a new VGPU_type object.
Design document
Revision
v1
Status
released (7.0)
Virtual Hardware Platform Version
Background and goal
Some VMs can only be run on hosts of sufficiently recent versions.
We want a clean way to ensure that xapi only tries to run a guest VM on a host that supports the “virtual hardware platform” required by the VM.
Suggested design
In the datamodel, VM has a new integer field “hardware_platform_version” which defaults to zero.
In the datamodel, Host has a corresponding new integer-list field “virtual_hardware_platform_versions” which defaults to list containing a single zero element (i.e. [0] or [0L] in OCaml notation). The zero represents the implicit version supported by older hosts that lack the code to handle the Virtual Hardware Platform Version concept.
When a host boots it populates its own entry from a hardcoded value, currently [0; 1] i.e. a list containing the two integer elements 0 and 1. (Alternatively this could come from a config file.)
If this new version-handling functionality is introduced in a hotfix, at some point the pool master will have the new functionality while at least one slave does not. An old slave-host that does not yet have software to handle this feature will not set its DB entry, which will therefore remain as [0] (maintained in the DB by the master).
The existing test for whether a VM can run on (or migrate to) a host must include a check that the VM’s virtual hardware platform version is in the host’s list of supported versions.
When a VM is made to start using a feature that is available only in a certain virtual hardware platform version, xapi must set the VM’s hardware_platform_version to the maximum of that version-number and its current value (i.e. raise if needed).
For the version we could consider some type other than integer, but a strict ordering is needed.
First use-case
Version 1 denotes support for a certain feature:
When a VM starts, if a certain flag is set in VM.platform then XenServer will provide an emulated PCI device which will trigger the guest Windows OS to seek drivers for the device, or updates for those drivers. Thus updated drivers can be obtained through the standard Windows Update mechanism.
If the PCI device is removed, the guest OS will fail to boot. A VM using this feature must not be migrated to or started on a XenServer that lacks support for the feature.
Therefore at VM start, we can look at whether this feature is being used; if it is, then if the VM’s Virtual Hardware Platform Version is less than 1 we should raise it to 1.
Limitation
Consider a VM that requires version 1 or higher. Suppose it is exported, then imported into an old host that does not support this feature. Then the host will not check the versions but will attempt to run the VM, which will then have difficulties.
The only way to prevent this would be to make a backwards-incompatible change to the VM metadata (e.g. a new item in an enum) so that the old hosts cannot read it, but that seems like a bad idea.
VLAN filtering is a Layer 2 network segmentation mechanism that controls how Ethernet frames are forwarded across switch ports based on VLAN membership.
It enables a single physical switching infrastructure to support multiple isolated broadcast domains while maintaining traffic separation and policy enforcement.
When VLAN filtering is enabled, the switch evaluates incoming frames against configured VLAN rules before allowing traffic to traverse the network.
Frames are sent either tagged (IEEE 802.1Q) or untagged depending on port configuration requirements.
VLAN filtering is commonly used to isolate network segments, and provides only partial view of a trunk link to VM.
Use Cases
The general use case is providing trunk to some VM in multi-tenants configuration.
For example, having a VM firewall with VLAN trunking but seeing only a subset of the VLANs present on the trunk.
As examples, the following configurations could be considered,
with one host having a PIF interface with the following VLANs [10,11,12,13] on it :
VM-A with VIF as trunk port in xenbr0 bridge, trunks=[] : VM-A sees all tagged packets so from VLANs 10 to 13 (what we are able to do currently)
VM-B with VIF as access port in xenbr0 bridge, tag=10 : VM-B sees untagged packets from VLAN 10 (what we are able to do currently)
VM-C with VIF as trunk port in xenbr0 bridge, trunks=[10,11] : VM-C sees tagged packets from VLANs 10 and 11
VM-D with VIF as trunk port in xenbr0 bridge, trunks=[11,12] : VM-D sees tagged packets from VLANs 11 and 12
VM-E with VIF as trunk port in xenbr0 bridge, trunks=[10] : VM-E sees tagged packets from VLAN 10
Changes
Database schema
The VIF class would be extended with a new attribute:
“trunks” (set int, default to empty): the 802.1Q VLANs that this port trunks (if available) ; if it is empty, then the port trunks all VLANs.
API
This is a new API introduced to manage trunks attribute.
VIF.add_trunks
self (ref VIF): reference to a valid VIF;
value (int): The 802.1Q VLAN which will be associated with the VIF.
VIF.remove_trunks
self (ref VIF): reference to a valid VIF;
value (int): the 802.1Q VLAN which will be removed from the VIF.
VIF.set_trunks
self (ref VIF): reference to a valid VIF;
value (set int): The 802.1Q VLANs which will be associated with the VIF.
Behavior change
When a VIF is created, trunks attribute on VIF is synchronized to trunks attribute on Port table in OpenvSwitch.
As the empty list is the current default in OpenvSwitch,
it doesn’t introduce changes from current behaviour when default value is used.
The trunks attribute on Port table is kept synchronized with trunks attribute on VIF during all the lifecycle of the port.
trunks: set of up to 4,096 integers, in range 0 to 4,095
For a trunk, native-tagged, or native-untagged port, the 802.1Q VLAN or VLANs that this port trunks;
if it is empty, then the port trunks all VLANs.
Must be empty if this is an access port.
The type of the port is defined by vlan_mode column on the Port table.
As in XAPI we don’t set it, we are using the default mode defined as following:
If tag contains a value, the port is an access port. The trunks column should be empty.
Otherwise, the port is a trunk port. The trunks column value is honored if it is present.
The tag in OpenvSwitch is derived from the PIF’s VLAN tag on the VIF’s Network.
For consistency with OpenvSwitch, the trunks attribute is so expected to be empty if tag is also set.
In XAPI term it means that a VIF with not empty trunks attribute could only be associated to not VLAN Network (Network with PIF with VLAN = -1).
This introduces a validation constraint preventing incompatible configurations:
A VIF with non-empty trunks cannot be associated with a Network backed by a VLAN-tagged PIF (PIF.vLAN ≠ -1).
If a VIF is already associated with a Network backed by a VLAN-tagged PIF, its trunks attribute must remain empty.
A VLAN-tagged PIF (PIF.vLAN ≠ -1) cannot be associated with a Network that contains a VIF with non-empty trunks.
Impacts
Update from older version
All VIFs will get a new trunks attribute which will be the default value (empty set).
It doesn’t introduce any behavior changes.
VM start
For each created VIF, the value of trunks attribute will be set to trunks attribute on OpenvSwitch Port table.
VM migration
If the VM is migrated, the trunks attribute on OpenvSwitch Port table on the new host is keep in synchronization with the value of trunks attribute.
VIF attribute changes
On trunks attribute change, the value will be set to trunks attribute on OpenvSwitch Port table.
The change is effective immediately and transparently (without replugging the VIF).
Possible designs
The proposed design was chosen after considering the following elements.
They are taken up here to present the possible options and reasons for choosing to use VIF.
Using VIF
pros
simplest implementation path : only a new attribute on VIF to synchronize with OpenvSwitch Port configuration
per-VIF granularity is a feature here : each VM gets its own filtered view, matching the multi-tenant use case
no need to change existing XAPI invariants (one PIF, one Network, see below)
the attribute lives on the object that actually needs the filter — no scaffolding objects required
cons
doesn’t reuse XAPI’s existing VLAN model (VLAN -> tagged PIF -> Network chain), so the concept is somewhat duplicated
configuration is scoped to a single VIF : sharing the same trunk policy across multiple VIFs would require manual duplication
visibility is more limited than a dedicated Network : admins looking at network-level configuration won’t immediately see which VLANs are being filtered
Using Network
pros
natural scoping : the trunk policy would be easily discoverable
consistent with how other per-network settings (MTU, locking mode, etc.) are already attached
cons
a single PIF would need to be a member of several Networks simultaneously, which is conceptually problematic (a PIF normally belongs to exactly one Network)
would require rethinking or relaxing the “one PIF, one Network” invariant in XAPI
Using PIF
pros
PIF already has a VLAN-aware model via vlan-slave-of (the set of VLANs attached to that PIF)
could express the “filtered view of available VLANs” at the physical interface level
cons
we would need several PIF backends on the same physical device (one PIF per trunk view), which contradicts the one-backing-device model
does not fit well with VLAN tagging or bonding on top of the PIF ; would need additional restrictions (e.g. blocking VLAN or Bond creation on a PIF that already has trunked views)
Using new object
pros
clean semantic : a dedicated object expresses “a PIF + a subset of VLANs” without overloading existing entities
could naturally group multiple VIFs under the same trunk policy (like a Network does)
cons
seems overkill for the use case : adds a new object type, new API surface, and new lifecycle concerns
would force creating a VLAN PIF / Network for each trunk subset, adding scaffolding noise for what is essentially a per-VIF filter
Conclusion
It was chosen to put trunks attribute on VIF as:
it is simple design solution
an installation usage trunks will not have many VIFs sharing the same configuration
The well suited alternative would be to create a new object (like VLAN or Bond) for holding the trunk information, but it seems overkill for the purpose.
Other alternatives would need more changes in current XAPI invariants.
Glossary
VLAN (Virtual LAN) : A logical subdivision of a physical network that isolates traffic at Layer 2. VLANs are identified by a 12-bit ID (range 0–4095).
VLAN tag : A 4-byte field inserted into an Ethernet frame by the switch, containing a 12-bit VLAN ID (0–4095).
802.1Q : IEEE standard defining a system of VLAN tagging for Ethernet frames — adds a VLAN identifier to Ethernet frames to segregate traffic at Layer 2.
Access port : An OVS port type that carries traffic for a single VLAN. The trunks column must be empty; the tag column specifies the VLAN. Packets are untagged.
Trunk port : An OVS port type that carries traffic for multiple VLANs. The trunks column specifies which VLANs are allowed; if empty, all VLANs are allowed. Packets are tagged.
Trunk link : A physical or virtual link that carries traffic for multiple VLANs simultaneously. Packets are tagged.
Design document
Revision
v2
Status
proposed
XenPrep
Background
Windows guests should have XenServer-specific drivers installed. As of mid-2015 these have been always been installed and upgraded by an essentially manual process involving an ISO carrying the drivers. We have a plan to enable automation through the standard Windows Update mechanism. This will involve a new additional virtual PCI device being provided to the VM, to trigger Windows Update to fetch drivers for the device.
There are many existing Windows guests that have drivers installed already. These drivers must be uninstalled before the new drivers are installed (and ideally before the new PCI device is added). To make this easier, we are planning a XenAPI call that will cause the removal of the old drivers and the addition of the new PCI device.
Since this is only to help with updating old guests, the call may well be removed at some point in the future.
Brief high-level design
The XenAPI call will be called VM.xenprep_start. It will update the VM record to note that the process has started, and will insert a special ISO into the VM’s virtual CD drive.
That ISO will contain a tool which will be set up to auto-run (if auto-run is enabled in the guest). The tool will:
Lock the CD drive so other Windows programs cannot eject the disc.
Uninstall the old drivers.
Eject the CD to signal success.
Shut down the VM.
XenServer will interpret the ejection of the CD as a success signal, and when the VM shuts down without the special ISO in the drive, XenServer will:
Update the VM record:
Remove the mark that shows that the xenprep process is in progress
Give it the new PCI device: set VM.auto_update_drivers to true.
If VM.virtual_hardware_platform_version is less than 2, then set it to 2.
Start the VM.
More details of the xapi-project parts
(The tool that runs in the guest is out of scope for this document.)
Start
The XenAPI call VM.xenprep_start will throw a power-state error if the VM is not running.
For RBAC roles, it will be available to “VM Operator” and above.
It will:
Insert the xenprep ISO into the VM’s virtual CD drive.
Write VM.other_config key xenprep_progress=ISO_inserted to record the fact that the xenprep process has been initiated.
If xenprep_start is called on a VM already undergoing xenprep, the call will return successfully but will not do anything.
If the VM does not have an empty virtual CD drive, the call will fail with a suitable error.
Cancellation
While xenprep is in progress, any request to eject the xenprep ISO (except from inside the guest) will be rejected with a new error “VBD_XENPREP_CD_IN_USE”.
There will be a new XenAPI call VM.xenprep_abort which will:
Remove the xenprep_progress entry from VM.other_config.
Make a best-effort attempt to eject the CD. (The guest might prevent ejection.)
This is not intended for cancellation while the xenprep tool is running, but rather for use before it starts, for example if auto-run is disabled or if the VM has a non-Windows OS.
Completion
Aim: when the guest shuts down after ejecting the CD, XenServer will start the guest again with the new PCI device.
Xapi works through the queue of events it receives from xenopsd. It is possible that by the time xapi processes the cd-eject event, the guest might have shut down already.
When the shutdown (not reboot) event is handled, we shall check whether we need to do anything xenprep-related. If
The VM other_config map has xenprep_progress as either of ISO_inserted or shutdown, and
The xenprep ISO is no longer in the drive
then we must (in the specified order)
Update the VM record:
In VM.other_config set xenprep_progress=shutdown
If VM.virtual_hardware_platform_version is less than 2, then set it to 2.
Give it the new PCI device: set VM.auto_update_drivers to true.
Initiate VM start.
Remove xenprep_progress from VM.other_config
The most relevant code is probably the update_vm function in ocaml/xapi/xapi_xenops.ml in the xen-api repo (or in some function called from there).
Python
Introduction
Most Python3 scripts and plugins shall be located below the python3 directory.
The structure of the directory is as follows:
python3/bin: This contains files installed in /opt/xensource/bin
and are meant to be run by users
python3/libexec: This contains files installed in /opt/xensource/libexec
and are meant to only be run by xapi and other daemons.
python3/packages: Contains files to be installed in python’s site-packages
are meant to be modules and packages to be imported by other scripts
or executed via python3 -m
python3/plugins: This contains files that
are meant to be xapi plugins
python3/tests: Tests for testing and covering the Python scripts and plugins
Dependencies for development and testing
In GitHub CI and local testing, we can use pre-commit to execute the tests.
It provides a dedicated, clearly defined and always consistent Python environment.
The easiest way to run all tests and checks is to simply run pre-commit.
The example commands below assume that you have Python3 in your PATH.
Currently, Python 3.11 is required for it:
pip3 install pre-commit
pre-commit run -av
# Or, to just run the pytest hook:pre-commit run -av pytest
Note: By default, CentOS 8 provides Python 3.6, whereas some tests need Python >= 3.7
Alternatively, you can of course tests in any suitable environment,
given that you install the supported versions of all dependencies.
You can find the dependencies in the list additional_dependencies of the pytest hook
in the pre-commit configuration file .pre-commit-config.yaml.
Example pytest hook from .pre-commit-config.yaml (expand)
hooks:
- id: pytestfiles: python3/name: check that the Python3 test suite in passesentry: sh -c 'coverage run && coverage xml &&coverage html && coverage report &&diff-cover --ignore-whitespace --compare-branch=origin/master --show-uncovered --format html:.git/coverage-diff.html --fail-under 50 .git/coverage3.11.xml'require_serial: truepass_filenames: falselanguage: pythontypes: [python]additional_dependencies:
- coverage - diff-cover - future - opentelemetry-api - opentelemetry-exporter-zipkin-json - opentelemetry-sdk - pytest-mock - mock - wrapt - XenAPI
Coverage
Code moved to the python3 directory tree shall have good code coverage using
tests that are executed, verified and covered using pytest and Coverage.py.
The coverage tool and pytest are configured in pyproject.toml and
coverage run is configured to run pytest by default.
coverage run collects coverage from the run and stores it in its database.
The most simple command line to run and report coverage to stdout is:
coverage run && coverage report
Other commands also used in the pytest hook example above (expand)
coverage xml: Generates an XML report from the coverage database to
.git/coverage3.11.xml. It is needed for upload to https://codecov.io
coverage html: Generates an HTML report from the coverage database to
.git/coverage_html/
We configure the file paths used for the generated database and other coverage
configuration in the sections [tool.coverage.run] and [tool.coverage.report]
of pyproject.toml.
Pytest
If your Python environment has the dependencies for the tests installed, you
can run pytest in this environment without any arguments to use the defaults.
For development, pytest can also only run one test (expand)
To run a specific pytest command, run pytest and pass the test case to it (example):
pytest python3/tests/test_perfmon.py
coverage run -m pytest python3/tests/test_perfmon.py && coverage report
RRDD
The xcp-rrdd daemon (hereafter simply called “rrdd”) is a component in the
xapi toolstack that is responsible for collecting metrics, storing them as
“Round-Robin Databases” (RRDs) and exposing these to clients.
The code is in ocaml/xcp-rrdd.
Subsections of RRDD
Design document
Revision
v1
Status
released (7,0)
RRDD archival redesign
Introduction
Current problems with rrdd:
rrdd stores knowledge about whether it is running on a master or a slave
This determines the host to which rrdd will archive a VM’s rrd when the VM’s
domain disappears - rrdd will always try to archive to the master. However,
when a host joins a pool as a slave rrdd is not restarted so this knowledge is
out of date. When a VM shuts down on the slave rrdd will archive the rrd
locally. When starting this VM again the master xapi will attempt to push any
locally-existing rrd to the host on which the VM is being started, but since
no rrd archive exists on the master the slave rrdd will end up creating a new
rrd and the previous rrd will be lost.
rrdd handles rebooting VMs unpredictably
When rebooting a VM, there is a chance rrdd will attempt to update that VM’s rrd
during the brief period when there is no domain for that VM. If this happens,
rrdd will archive the VM’s rrd to the master, and then create a new rrd for the
VM when it sees the new domain. If rrdd doesn’t attempt to update that VM’s rrd
during this period, rrdd will continue to add data for the new domain to the old
rrd.
Proposal
To solve these problems, we will remove some of the intelligence from rrdd and
make it into more of a slave process of xapi. This will entail removing all
knowledge from rrdd of whether it is running on a master or a slave, and also
modifying rrdd to only start monitoring a VM when it is told to, and only
archiving an rrd (to a specified address) when it is told to. This matches the
way xenopsd only manages domains which it has been told to manage.
Design
For most VM lifecycle operations, xapi and rrdd processes (sometimes across more
than one host) cooperate to start or stop recording a VM’s metrics and/or to
restore or backup the VM’s archived metrics. Below we will describe, for each
relevant VM operation, how the VM’s rrd is currently handled, and how we propose
it will be handled after the redesign.
VM.destroy
The master xapi makes a remove_rrd call to the local rrdd, which causes rrdd to
to delete the VM’s archived rrd from disk. This behaviour will remain unchanged.
VM.start(_on) and VM.resume(_on)
The master xapi makes a push_rrd call to the local rrdd, which causes rrdd to
send any locally-archived rrd for the VM in question to the rrdd of the host on
which the VM is starting. This behaviour will remain unchanged.
VM.shutdown and VM.suspend
Every update cycle rrdd compares its list of registered VMs to the list of
domains actually running on the host. Any registered VMs which do not have a
corresponding domain have their rrds archived to the rrdd running on the host
believed to be the master. We will change this behaviour by stopping rrdd from
doing the archiving itself; instead we will expose a new function in rrdd’s
interface:
val archive_rrd : vm_uuid:string -> remote_address:string -> unit
This will cause rrdd to remove the specified rrd from its table of registered
VMs, and archive the rrd to the specified host. When a VM has finished shutting
down or suspending, the xapi process on the host on which the VM was running
will call archive_rrd to ask the local rrdd to archive back to the master rrdd.
VM.reboot
Removing rrdd’s ability to automatically archive the rrds for disappeared
domains will have the bonus effect of fixing how the rrds of rebooting VMs are
handled, as we don’t want the rrds of rebooting VMs to be archived at all.
VM.checkpoint
This will be handled automatically, as internally VM.checkpoint carries out a
VM.suspend followed by a VM.resume.
VM.pool_migrate and VM.migrate_send
The source host’s xapi makes a migrate_rrd call to the local rrd, with a
destination address and an optional session ID. The session ID is only required
for cross-pool migration. The local rrdd sends the rrd for that VM to the
destination host’s rrdd as an HTTP PUT. This behaviour will remain unchanged.
Design document
Revision
v1
Status
released (7.0)
Revision history
v1
Initial version
RRDD plugin protocol v2
Motivation
rrdd plugins currently report datasources via a shared-memory file, using the
following format:
The JSON data itself, encoding the values and metadata associated with the
reported datasources.
Example
{
"timestamp": 1339685573.245,
"data_sources": {
"cpu-temp-cpu0": {
"description": "Temperature of CPU 0",
"type": "absolute",
"units": "degC",
"value": "64.33"
"value_type": "float",
},
"cpu-temp-cpu1": {
"description": "Temperature of CPU 1",
"type": "absolute",
"units": "degC",
"value": "62.14"
"value_type": "float",
}
}
}
The disadvantage of this protocol is that rrdd has to parse the entire JSON
structure each tick, even though most of the time only the values will change.
For this reason a new protocol is proposed.
Protocol V2
value
bits
format
notes
header string
(string length)*8
string
“DATASOURCES” as in the V1 protocol
data checksum
32
int32
binary-encoded crc32 of the concatenation of the encoded timestamp and datasource values
metadata checksum
32
int32
binary-encoded crc32 of the metadata string (see below)
number of datasources
32
int32
only needed if the metadata has changed - otherwise RRDD can use a cached value
timestamp
64
double
Unix epoch
datasource values
n * 64
int64 | double
n is the number of datasources exported by the plugin, type dependent on the setting in the metadata for value_type [int64|float]
metadata length
32
int32
metadata
(string length)*8
string
All integers/double are bigendian. The metadata will have the same JSON-based format as
in the V1 protocol, minus the timestamp and value key-value pair for each
datasource.
field
values
notes
required
description
string
Description of the datasource
no
owner
host | vm | sr
The object to which the data relates
no, default host
value_type
int64 | float
The type of the datasource
yes
type
absolute | derive | gauge
The type of measurement being sent. Absolute for counters which are reset on reading, derive stores the derivative of the recorded values (useful for metrics which continually increase like amount of data written since start), gauge for things like temperature
no, default absolute
default
true | false
Whether the source is default enabled or not
no, default false
units
The units the data should be displayed in
no
min
The minimum value for the datasource
no, default -infinity
max
The maximum value for the datasource
no, default +infinity
Example
{
"datasources": {
"memory_reclaimed": {
"description":"Host memory reclaimed by squeezed",
"owner":"host",
"value_type":"int64",
"type":"absolute",
"default":"true",
"units":"B",
"min":"-inf",
"max":"inf"
},
"memory_reclaimed_max": {
"description":"Host memory that could be reclaimed by squeezed",
"owner":"host",
"value_type":"int64",
"type":"absolute",
"default":"true",
"units":"B",
"min":"-inf",
"max":"inf"
},
{
"cpu-temp-cpu0": {
"description": "Temperature of CPU 0",
"owner":"host",
"value_type": "float",
"type": "absolute",
"default":"true",
"units": "degC",
"min":"-inf",
"max":"inf"
},
"cpu-temp-cpu1": {
"description": "Temperature of CPU 1",
"owner":"host",
"value_type": "float",
"type": "absolute",
"default":"true",
"units": "degC",
"min":"-inf",
"max":"inf"
}
}
}
The above formatting is not required, but added here for readability.
Reading algorithm
if header != expected_header:
raise InvalidHeader()
if data_checksum == last_data_checksum:
raise NoUpdate()
if data_checksum != crc32(encoded_timestamp_and_values):
raise InvalidChecksum()
if metadata_checksum == last_metadata_checksum:
for datasource, value in cached_datasources, values:
update(datasource, value)
else:
if metadata_checksum != crc32(metadata):
raise InvalidChecksum()
cached_datasources = create_datasources(metadata)
for datasource, value in cached_datasources, values:
update(datasource, value)
This means that for a normal update, RRDD will only have to read the header plus
the first (16 + 16 + 4 + 8 + 8*n) bytes of data, where n is the number of
datasources exported by the plugin. If the metadata changes RRDD will have to
read all the data (and parse the metadata).
Added details about the VDI's binary format and size, and the SR capability name.
v3
Tar was not needed after all!
v4
Add details about discovering the VDI using a new vdi_type.
v5
Add details about the http handlers and interaction with xapi's database
v6
Add details about the framing of the data within the VDI
v7
Redesign semantics of the rrd_updates handler
v8
Redesign semantics of the rrd_updates handler (again)
v9
Magic number change in framing format of vdi
v10
Add details of new APIs added to xapi and xcp-rrdd
v11
Remove unneeded API calls
SR-Level RRDs
Introduction
Xapi has RRDs to track VM- and host-level metrics. There is a desire to have SR-level RRDs as a new category, because SR stats are not specific to a certain VM or host. Examples are size and free space on the SR. While recording SR metrics is relatively straightforward within the current RRD system, the main question is where to archive them, which is what this design aims to address.
Stats Collection
All SR types, including the existing ones, should be able to have RRDs defined for them. Some RRDs, such as a “free space” one, may make sense for multiple (if not all) SR types. However, the way to measure something like free space will be SR specific. Furthermore, it should be possible for each type of SR to have its own specialised RRDs.
It follows that each SR will need its own xcp-rrdd plugin, which runs on the SR master and defines and collects the stats. For the new thin-lvhd SR this could be xenvmd itself. The plugin registers itself with xcp-rrdd, so that the latter records the live stats from the plugin into RRDs.
Archiving
SR-level RRDs will be archived in the SR itself, in a VDI, rather than in the local filesystem of the SR master. This way, we don’t need to worry about master failover.
The VDI will be 4MB in size. This is a little more space than we would need for the RRDs we have in mind at the moment, but will give us enough headroom for the foreseeable future. It will not have a filesystem on it for simplicity and performance. There will only be one RRD archive file for each SR (possibly containing data for multiple metrics), which is gzipped by xcp-rrdd, and can be copied onto the VDI.
There will be a simple framing format for the data on the VDI. This will be as follows:
Offset
Type
Name
Comment
0
32 bit network-order int
magic
Magic number = 0x7ada7ada
4
32 bit network-order int
version
1
8
32 bit network-order int
length
length of payload
12
gzipped data
data
Xapi will be in charge of the lifecycle of this VDI, not the plugin or xcp-rrdd, which will make it a little easier to manage them. Only xapi will attach/detach and read from/write to this VDI. We will keep xcp-rrdd as simple as possible, and have it archive to its standard path in the local file system. Xapi will then copy the RRDs in and out of the VDI.
A new value "rrd" in the vdi_type enum of the datamodel will be defined, and the VDI.type of the VDI will be set to that value. The storage backend will write the VDI type to the LVM metadata of the VDI, so that xapi can discover the VDI containing the SR-level RRDs when attaching an SR to a new pool. This means that SR-level RRDs are currently restricted to LVM SRs.
Because we will not write plugins for all SRs at once, and therefore do not need xapi to set up the VDI for all SRs, we will add an SR “capability” for the backends to be able to tell xapi whether it has the ability to record stats and will need storage for them. The capability name will be: SR_STATS.
Management of the SR-stats VDI
The SR-stats VDI will be attached/detached on PBD.plug/unplug on the SR master.
On PBD.plug on the SR master, if the SR has the stats capability, xapi:
Creates a stats VDI if not already there (search for an existing one based on the VDI type).
Attaches the stats VDI if it did already exist, and copies the RRDs to the local file system (standard location in the filesystem; asks xcp-rrdd where to put them).
Informs xcp-rrdd about the RRDs so that it will load the RRDs and add newly recorded data to them (needs a function like push_rrd_local for VM-level RRDs).
Detaches stats VDI.
On PBD.unplug on the SR master, if the SR has the stats capability xapi:
Tells xcp-rrdd to archive the RRDs for the SR, which it will do to the local filesystem.
Attaches the stats VDI, copies the RRDs into it, detaches VDI.
Periodic Archiving
Xapi’s periodic scheduler regularly triggers xcp-rrdd to archive the host and VM RRDs. It will need to do this for the SR ones as well. Furthermore, xapi will need to attach the stats VDI and copy the RRD archives into it (as on PBD.unplug).
Exporting
There will be a new handler for downloading an SR RRD:
RRD updates are handled via a single handler for the host, VM and SR UUIDs
RRD updates for the host, VMs and SRs are handled by a a single handler at
/rrd_updates. Exactly what is returned will be determined by the parameters
passed to this handler.
Whether the host RRD updates are returned is governed by the presence of
host=true in the parameters. host=<anything else> or the absence of the
host key will mean the host RRD is not returned.
Whether the VM RRD updates are returned is governed by the vm_uuid key in the
URL parameters. vm_uuid=all will return RRD updates for all VM RRDs.
vm_uuid=xxx will return the RRD updates for the VM with uuid xxx only.
If vm_uuid is none (or any other string which is not a valid VM UUID) then
the handler will return no VM RRD updates. If the vm_uuid key is absent, RRD
updates for all VMs will be returned.
Whether the SR RRD updates are returned is governed by the sr_uuid key in the
URL parameters. sr_uuid=all will return RRD updates for all SR RRDs.
sr_uuid=xxx will return the RRD updates for the SR with uuid xxx only.
If sr_uuid is none (or any other string which is not a valid SR UUID) then
the handler will return no SR RRD updates. If the sr_uuid key is absent, no
SR RRD updates will be returned.
It will be possible to mix and match these parameters; for example to return
RRD updates for the host and all VMs, the URL to use would be:
While behaviour is defined if any of the keys host, vm_uuid and sr_uuid is
missing, this is for backwards compatibility and it is recommended that clients
specify each parameter explicitly.
Database updating.
If the SR is presenting a data source called ‘physical_utilisation’,
xapi will record this periodically in its database. In order to do
this, xapi will fork a thread that, every n minutes (2 suggested, but
open to suggestions here), will query the attached SRs, then query
RRDD for the latest data source for these, and update the database.
The utilisation of VDIs will not be updated in this way until
scalability worries for RRDs are addressed.
Xapi will cache whether it is SR master for every attached SR and only
attempt to update if it is the SR master.
New APIs.
xcp-rrdd:
Get the filesystem location where sr rrds are archived: val sr_rrds_path : uid:string -> string
Archive the sr rrds to the filesystem: val archive_sr_rrd : sr_uuid:string -> unit
Load the sr rrds from the filesystem: val push_sr_rrd : sr_uuid:string -> unit
This document contains a description of the Xen Management API - an interface for
remotely configuring and controlling virtualised guests running on a
Xen-enabled host.
The API is presented here as a set of Remote Procedure Calls (RPCs).
There are two supported wire formats, one based upon
XML-RPC
and one based upon JSON-RPC (v1.0 and v2.0 are both
recognized). No specific language bindings are prescribed, although examples
are given in the Python programming language.
Although we adopt some terminology from object-oriented programming,
future client language bindings may or may not be object-oriented.
The API reference uses the terminology classes and objects.
For our purposes a class is simply a hierarchical namespace;
an object is an instance of a class with its fields set to
specific values. Objects are persistent and exist on the server-side.
Clients may obtain opaque references to these server-side objects and then
access their fields via get/set RPCs.
For each class we specify a list of fields along with their types and
qualifiers. A qualifier is one of:
RO/runtime: the field is Read Only. Furthermore, its value is
automatically computed at runtime. For example, current CPU load and disk IO
throughput.
RO/constructor: the field must be manually set when a new object is
created, but is then Read Only for the duration of the object’s life.
For example, the maximum memory addressable by a guest is set
before the guest boots.
RW: the field is Read/Write. For example, the name of a VM.
Types
The following types are used to specify methods and fields in the API Reference:
(k -> v) map: Mapping from values of type k to values of type v.
e enum: Enumeration type with name e. Enums are defined in the API
reference together with classes that use them.
Note that there are a number of cases where refs are doubly linked.
For example, a VM has a field called VIFs of type VIF ref set;
this field lists the network interfaces attached to a particular VM.
Similarly, the VIF class has a field called VM of type VM ref
which references the VM to which the interface is connected.
These two fields are bound together, in the sense that
creating a new VIF causes the VIFs field of the corresponding
VM object to be updated automatically.
The API reference lists explicitly the fields that are
bound together in this way. It also contains a diagram that shows
relationships between classes. In this diagram an edge signifies the
existence of a pair of fields that are bound together, using standard
crows-foot notation to signify the type of relationship (e.g.
one-many, many-many).
RPCs associated with fields
Each field, f, has an RPC accessor associated with it that returns f’s value:
get_f (r): takes a ref, r that refers to an object and returns the value
of f.
Each field, f, with qualifier RW and whose outermost type is set has the
following additional RPCs associated with it:
add_f(r, v): adds a new element v to the set.
Note that sets cannot contain duplicate values, hence this operation has
no action in the case that v is already in the set.
remove_f(r, v): removes element v from the set.
Each field, f, with qualifier RW and whose outermost type is map has the
following additional RPCs associated with it:
add_to_f(r, k, v): adds new pair k -> v to the mapping stored in f in
object r. Attempting to add a new pair for duplicate key, k, fails with a
MAP_DUPLICATE_KEY error.
remove_from_f(r, k): removes the pair with key k
from the mapping stored in f in object r.
Each field whose outermost type is neither set nor map, but whose
qualifier is RW has an RPC accessor associated with it that sets its value:
set_f(r, v): sets the field f on object r to value v.
RPCs associated with classes
Most classes have a constructor RPC named create that
takes as parameters all fields marked RW and RO/constructor. The result
of this RPC is that a new persistent object is created on the server-side
with the specified field values.
Each class has a get_by_uuid(uuid) RPC that returns the object
of that class that has the specified uuid.
Each class that has a name_label field has a
get_by_name_label(name_label) RPC that returns a set of objects of that
class that have the specified name_label.
Most classes have a destroy(r) RPC that explicitly deletes
the persistent object specified by r from the system. This is a
non-cascading delete - if the object being removed is referenced by another
object then the destroy call will fail.
Apart from the RPCs enumerated above, most classes have additional RPCs
associated with them. For example, the VM class has RPCs for cloning,
suspending, starting etc. Such additional RPCs are described explicitly
in the API reference.
Wire Protocol
API calls are sent over a network to a Xen-enabled host using an RPC protocol.
Here we describe how the higher-level types used in our API Reference are mapped
to primitive RPC types, covering the two supported wire formats
XML-RPC and JSON-RPC.
XML-RPC Protocol
We specify the signatures of API functions in the following style:
(VM ref set) VM.get_all()
This specifies that the function with name VM.get_all takes
no parameters and returns a set of VM ref.
These types are mapped onto XML-RPC types in a straight-forward manner:
the types float, bool, datetime, and string map directly to the XML-RPC
<double>, <boolean>, <dateTime.iso8601>, and <string> elements.
all ref types are opaque references, encoded as the
XML-RPC’s <string> type. Users of the API should not make assumptions
about the concrete form of these strings and should not expect them to
remain valid after the client’s session with the server has terminated.
fields named uuid of type string are mapped to
the XML-RPC <string> type. The string itself is the OSF
DCE UUID presentation format (as output by uuidgen).
int is assumed to be 64-bit in our API and is encoded as a string
of decimal digits (rather than using XML-RPC’s built-in 32-bit <i4> type).
values of enum types are encoded as strings. For example, the value
destroy of enum on_normal_exit, would be conveyed as:
<value><string>destroy</string></value>
for all our types, t, our type t set simply maps to XML-RPC’s <array>
type, so, for example, a value of type string set would be transmitted like
this:
for types k and v, our type (k -> v) map maps onto an
XML-RPC <struct>, with the key as the name of the struct. Note that the
(k -> v) map type is only valid when k is a string, ref, or
int, and in each case the keys of the maps are stringified as
above. For example, the (string -> float) map containing the mappings
Mike -> 2.3 and John -> 1.2 would be represented as:
The return value of an RPC call is an XML-RPC <struct>.
The first element of the struct is named Status; it contains a string value
indicating whether the result of the call was a Success or a Failure.
If the Status is Success then the struct contains a second element named
Value:
The element of the struct named Value contains the function’s return value.
If the Status is Failure then the struct contains a second element named
ErrorDescription:
The element of the struct named ErrorDescription contains an array of string
values. The first element of the array is an error code; the rest of the
elements are strings representing error parameters relating to that code.
For example, an XML-RPC return value from the host.get_resident_VMs function
may look like this:
We specify the signatures of API functions in the following style:
(VM ref set) VM.get_all()
This specifies that the function with name VM.get_all takes no parameters and
returns a set of VM ref. These types are mapped onto JSON-RPC types in the
following manner:
the types float and bool map directly to the JSON types number and
boolean, while datetime and string are represented as the JSON string
type.
all ref types are opaque references, encoded as the JSON string type.
Users of the API should not make assumptions about the concrete form of these
strings and should not expect them to remain valid after the client’s session
with the server has terminated.
fields named uuid of type string are mapped to the JSON string type. The
string itself is the OSF DCE UUID presentation format (as output by uuidgen).
int is assumed to be 64-bit in our API and is encoded as a JSON number
without decimal point or exponent, preserved as a string.
values of enum types are encoded as the JSON string type. For example, the
value destroy of enum on_normal_exit, would be conveyed as:
"destroy"
for all our types, t, our type t set simply maps to the JSON array
type, so, for example, a value of type string set would be transmitted like
this:
[ "CX8", "PSE36", "FPU" ]
for types k and v, our type (k -> v) map maps onto a JSON object which
contains members with name k and value v. Note that the
(k -> v) map type is only valid when k is a string, ref, or
int, and in each case the keys of the maps are stringified as
above. For example, the (string -> float) map containing the mappings
Mike -> 2.3 and John -> 1.2 would be represented as:
{
"Mike": 2.3,
"John": 1.2 }
our void type is transmitted as an empty string.
Both versions 1.0 and 2.0 of the JSON-RPC wire format are recognised and,
depending on your client library, you can use either of them.
JSON-RPC v1.0
JSON-RPC v1.0 Requests
An API call is represented by sending a single JSON object to the server, which
contains the members method, params, and id.
method: A JSON string containing the name of the function to be invoked.
params: A JSON array of values, which represents the parameters of the
function to be invoked.
id: A JSON string or integer representing the call id. Note that,
diverging from the JSON-RPC v1.0 specification the API does not accept
notification requests (requests without responses), i.e. the id cannot be
null.
For example, the body of a JSON-RPC v1.0 request to retrieve the resident VMs of
a host may look like this:
In the above example, the first element of the params array is the reference
of the open session to the host, while the second is the host reference.
JSON-RPC v1.0 Return Values
The return value of a JSON-RPC v1.0 call is a single JSON object containing
the members result, error, and id.
result: If the call is successful, it is a JSON value (string, array
etc.) representing the return value of the invoked function. If an error has
occurred, it is null.
error: If the call is successful, it is null. If the call has failed, it
a JSON array of string values. The first element of the array is an error
code; the remainder of the array are strings representing error parameters
relating to that code.
id: The call id. It is a JSON string or integer and it is the same id
as the request it is responding to.
For example, a JSON-RPC v1.0 return value from the host.get_resident_VMs
function may look like this:
An API call is represented by sending a single JSON object to the server, which
contains the members jsonrpc, method, params, and id.
jsonrpc: A JSON string specifying the version of the JSON-RPC protocol. It
is exactly “2.0”.
method: A JSON string containing the name of the function to be invoked.
params: A JSON array of values, which represents the parameters of the
function to be invoked. Although the JSON-RPC v2.0 specification allows this
member to be omitted, in practice all API calls accept at least one parameter.
id: A JSON string or integer representing the call id. Note that,
diverging from the JSON-RPC v2.0 specification it cannot be null. Neither can
it be omitted because the API does not accept notification requests
(requests without responses).
For example, the body of a JSON-RPC v2.0 request to retrieve the VMs resident on
a host may look like this:
As before, the first element of the parameter array is the reference
of the open session to the host, while the second is the host reference.
JSON-RPC v2.0 Return Values
The return value of a JSON-RPC v2.0 call is a single JSON object containing the
members jsonrpc, either result or error depending on the outcome of the
call, and id.
jsonrpc: A JSON string specifying the version of the JSON-RPC protocol. It
is exactly “2.0”.
result: If the call is successful, it is a JSON value (string, array etc.)
representing the return value of the invoked function. If an error has
occurred, it does not exist.
error: If the call is successful, it does not exist. If the call has failed,
it is a single structured JSON object (see below).
id: The call id. It is a JSON string or integer and it is the same id
as the request it is responding to.
The error object contains the members code, message, and data.
code: The API does not make use of this member and only retains it for
compliance with the JSON-RPC v2.0 specification. It is a JSON integer
which has a non-zero value.
message: A JSON string representing an API error code.
data: A JSON array of string values representing error parameters
relating to the aforementioned API error code.
For example, a JSON-RPC v2.0 return value from the host.get_resident_VMs
function may look like this:
When a low-level transport error occurs, or a request is malformed at the HTTP
or RPC level, the server may send an HTTP 500 error response, or the client
may simulate the same. The client must be prepared to handle these errors,
though they may be treated as fatal.
For example, the following malformed request when using the XML-RPC protocol:
HTTP/1.1 500 Internal Error
content-length: 297content-type:text/html
connection:close
cache-control:no-cache, no-store
<html><body><h1>HTTP 500 internal server error</h1>An unexpected error occurred;
please wait a while and try again. If the problem persists, please contact your
support representative.<h1> Additional information </h1>Xmlrpc.Parse_error(&quo
t;close_tag", "open_tag", _)</body></html>
HTTP/1.1 500 Internal Error
content-length: 308content-type:text/html
connection:close
cache-control:no-cache, no-store
<html><body><h1>HTTP 500 internal server error</h1>An unexpected error occurred;
please wait a while and try again. If the problem persists, please contact your
support representative.<h1> Additional information </h1>Jsonrpc.Malformed_metho
d_request("{jsonrpc=...,method=...,id=...}")</body></html>
All other failures are reported with a more structured error response, to
allow better automatic response to failures, proper internationalization of
any error message, and easier debugging.
On the wire, these are transmitted like this when using the XML-RPC protocol:
Note that ErrorDescription value is an array of string values. The
first element of the array is an error code; the remainder of the array are
strings representing error parameters relating to that code. In this case,
the client has attempted to add the mapping Customer ->
eSpiel Incorporated to a Map, but it already contains the mapping
Customer -> eSpiel Inc., hence the request has failed.
When using the JSON-RPC protocol v2.0, the above error is transmitted as:
Each possible error code is documented in the last section of the API reference.
Note on References vs UUIDs
References are opaque types - encoded as XML-RPC and JSON-RPC strings on the
wire - understood only by the particular server which generated them. Servers
are free to choose any concrete representation they find convenient; clients
should not make any assumptions or attempt to parse the string contents.
References are not guaranteed to be permanent identifiers for objects; clients
should not assume that references generated during one session are valid for any
future session. References do not allow objects to be compared for equality. Two
references to the same object are not guaranteed to be textually identical.
UUIDs are intended to be permanent identifiers for objects. They are
guaranteed to be in the OSF DCE UUID presentation format (as output by uuidgen).
Clients may store UUIDs on disk and use them to look up objects in subsequent sessions
with the server. Clients may also test equality on objects by comparing UUID strings.
The API provides mechanisms for translating between UUIDs and opaque references.
Each class that contains a UUID field provides:
A get_by_uuid method that takes a UUID and returns an opaque reference
to the server-side object that has that UUID;
A get_uuid function (a regular “field getter” RPC) that takes an opaque reference
and returns the UUID of the server-side object that is referenced by it.
Making RPC Calls
Transport Layer
The following transport layers are currently supported:
HTTP/HTTPS for remote administration
HTTP over Unix domain sockets for local administration
Session Layer
The RPC interface is session-based; before you can make arbitrary RPC calls
you must login and initiate a session. For example:
where uname and password refer to your username and password, as defined by
the Xen administrator, while version and originator are optional. The
session ref returned by session.login_with_password is passed
to subsequent RPC calls as an authentication token. Note that a session
reference obtained by a login request to the XML-RPC backend can be used in
subsequent requests to the JSON-RPC backend, and vice versa.
A session can be terminated with the session.logout function:
void session.logout(session ref session_id)
Synchronous and Asynchronous Invocation
Each method call (apart from methods on the Session and Task objects and
“getters” and “setters” derived from fields) can be made either synchronously or
asynchronously. A synchronous RPC call blocks until the
return value is received; the return value of a synchronous RPC call is
exactly as specified above.
Only synchronous API calls are listed explicitly in this document.
All their asynchronous counterparts are in the special Async namespace.
For example, the synchronous call VM.clone(...) has an asynchronous
counterpart, Async.VM.clone(...), that is non-blocking.
Instead of returning its result directly, an asynchronous RPC call
returns an identifier of type task ref which is subsequently used
to track the status of a running asynchronous RPC.
Note that an asynchronous call may fail immediately, before a task has even been
created. When using the XML-RPC wire protocol, this eventuality is represented
by wrapping the returned task ref in an XML-RPC struct with a Status,
ErrorDescription, and Value fields, exactly as specified above; the
task ref is provided in the Value field if Status is set to Success.
When using the JSON-RPC protocol, the task ref is wrapped in a response JSON
object as specified above and it is provided by the value of the result member
of a successful call.
returns a set of all task identifiers known to the system. The status (including any
returned result and error codes) of these can then be queried by accessing the
fields of the Task object in the usual way. Note that, in order to get a
consistent snapshot of a task’s state, it is advisable to call the get_record
function.
Example interactive session
This section describes how an interactive session might look, using python
XML-RPC and JSON-RPC client libraries.
First, initialise python:
$ python3
>>>
Using the XML-RPC Protocol
Import the library xmlrpc.client and create a
python object referencing the remote server as shown below:
Acquire a session reference by logging in with a username and password; the
session reference is returned under the key Value in the resulting dictionary
(error-handling omitted for brevity):
The VM references here have the form OpaqueRef:X (though they may not be
that simple in reality) and you should treat them as opaque strings.
Templates are VMs with the is_a_template field set to true. We can
find the subset of template VMs using a command like the following:
In this case the start message has been rejected, because the VM is
a template, and so an error response has been returned. These high-level
errors are returned as structured data (rather than as XML-RPC faults),
allowing them to be internationalized.
Rather than querying fields individually, whole records may be returned at once.
To retrieve the record of a single object as a python dictionary:
>>> records = xen.VM.get_all_records(session)['Value']
>>> list(records.keys())
['OpaqueRef:1', 'OpaqueRef:2', 'OpaqueRef:3', 'OpaqueRef:4' ]
>>> records['OpaqueRef:1']['name_label']
'Red Hat Enterprise Linux 7'
Using the JSON-RPC Protocol
For this example we are making use of the package jsonrpcclient and the
requests library due to their simplicity, although other packages can also be
used.
First, import the requests and jsonrpcclient libraries:
>>>import requests
>>>import jsonrpcclient
Now we construct a utility method to make using these libraries easier:
The VM references here have the form OpaqueRef:X (though they may not be
that simple in reality) and you should treat them as opaque strings.
Templates are VMs with the is_a_template field set to true. We can
find the subset of template VMs using a command like the following:
In this case the start message has been rejected because the VM is
a template, hence an error response has been returned. These high-level
errors are returned as structured data, allowing them to be internationalized.
Rather than querying fields individually, whole records may be returned at once.
To retrieve the record of a single object as a python dictionary:
>>> records = jsonrpccall("VM.get_all_records", (session,))
>>> records.keys()
['OpaqueRef:1', 'OpaqueRef:2', 'OpaqueRef:3', 'OpaqueRef:4' ]
>>> records['OpaqueRef:1']['name_label']
'Red Hat Enterprise Linux 7'
Overview of the XenAPI
This chapter introduces the XenAPI and its associated object model. The API has the following key features:
Management of all aspects of the XenServer Host.
The API allows you to manage VMs, storage, networking, host configuration and pools. Performance and status metrics can also be queried from the API.
Persistent Object Model.
The results of all side-effecting operations (e.g. object creation, deletion and parameter modifications) are persisted in a server-side database that is managed by the XenServer installation.
An event mechanism.
Through the API, clients can register to be notified when persistent (server-side) objects are modified. This enables applications to keep track of datamodel modifications performed by concurrently executing clients.
Synchronous and asynchronous invocation.
All API calls can be invoked synchronously (that is, block until completion); any API call that may be long-running can also be invoked asynchronously. Asynchronous calls return immediately with a reference to a task object. This task object can be queried (through the API) for progress and status information. When an asynchronously invoked operation completes, the result (or error code) is available from the task object.
Remotable and Cross-Platform.
The client issuing the API calls does not have to be resident on the host being managed; nor does it have to be connected to the host over ssh in order to execute the API. API calls make use of the XML-RPC protocol to transmit requests and responses over the network.
Secure and Authenticated Access.
The XML-RPC API server executing on the host accepts secure socket connections. This allows a client to execute the APIs over the https protocol. Further, all the API calls execute in the context of a login session generated through username and password validation at the server. This provides secure and authenticated access to the XenServer installation.
Getting Started with the API
We will start our tour of the API by describing the calls required to create a new VM on a XenServer installation, and take it through a start/suspend/resume/stop cycle. This is done without reference to code in any specific language; at this stage we just describe the informal sequence of RPC invocations that accomplish our “install and start” task.
Authentication: acquiring a session reference
The first step is to call Session.login_with_password(, , , ). The API is session based, so before you can make other calls you will need to authenticate with the server. Assuming the username and password are authenticated correctly, the result of this call is a session reference. Subsequent API calls take the session reference as a parameter. In this way we ensure that only API users who are suitably authorized can perform operations on a XenServer installation. You can continue to use the same session for any number of API calls. When you have finished the session, Citrix recommends that you call Session.logout(session) to clean up: see later.
Acquiring a list of templates to base a new VM installation on
The next step is to query the list of “templates” on the host. Templates are specially-marked VM objects that specify suitable default parameters for a variety of supported guest types. (If you want to see a quick enumeration of the templates on a XenServer installation for yourself then you can execute the xe template-list CLI command.) To get a list of templates from the API, we need to find the VM objects on the server that have their is_a_template field set to true. One way to do this by calling VM.get_all_records(session) where the session parameter is the reference we acquired from our Session.login_with_password call earlier. This call queries the server, returning a snapshot (taken at the time of the call) containing all the VM object references and their field values.
(Remember that at this stage we are not concerned about the particular mechanisms by which the returned object references and field values can be manipulated in any particular client language: that detail is dealt with by our language-specific API bindings and described concretely in the following chapter. For now it suffices just to assume the existence of an abstract mechanism for reading and manipulating objects and field values returned by API calls.)
Now that we have a snapshot of all the VM objects’ field values in the memory of our client application we can simply iterate through them and find the ones that have their “is_a_template” set to true. At this stage let’s assume that our example application further iterates through the template objects and remembers the reference corresponding to the one that has its “name_label” set to “Debian Etch 4.0” (one of the default Linux templates supplied with XenServer).
Installing the VM based on a template
Continuing through our example, we must now install a new VM based on the template we selected. The installation process requires 4 API calls:
First we must now invoke the API call VM.clone(session, t_ref, "my first VM"). This tells the server to clone the VM object referenced by t_ref in order to make a new VM object. The return value of this call is the VM reference corresponding to the newly-created VM. Let’s call this new_vm_ref.
Next, we need to specify the UUID of the Storage Repository where the VM’s
disks will be instantiated. We have to put this in the sr attribute in
the disk provisioning XML stored under the “disks” key in the
other_config map of the newly-created VM. This field can be updated by
calling its getter (other_config <- VM.get_other_config(session, new_vm_ref)) and then its setter (VM.set_other_config(session, new_vm_ref, other_config)) with the modified other_config map.
At this stage the object referred to by new_vm_ref is still a template (just like the VM object referred to by t_ref, from which it was cloned). To make new_vm_ref into a VM object we need to call VM.provision(session, new_vm_ref). When this call returns the new_vm_ref object will have had its is_a_template field set to false, indicating that new_vm_ref now refers to a regular VM ready for starting.
Note
The provision operation may take a few minutes, as it is during this call that the template’s disk images are created. In the case of the Debian template, the newly created disks are also at this stage populated with a Debian root filesystem.
Taking the VM through a start/suspend/resume/stop cycle
Now we have an object reference representing our newly-installed VM, it is trivial to take it through a few lifecycle operations:
To start our VM we can just call VM.start(session, new_vm_ref)
After it’s running, we can suspend it by calling VM.suspend(session, new_vm_ref),
and then resume it by calling VM.resume(session, new_vm_ref).
We can call VM.shutdown(session, new_vm_ref) to shutdown the VM cleanly.
Logging out
Once an application is finished interacting with a XenServer Host it is good practice to call Session.logout(session). This invalidates the session reference (so it cannot be used in subsequent API calls) and simultaneously deallocates server-side memory used to store the session object.
Although inactive sessions will eventually timeout, the server has a hardcoded limit of 500 concurrent sessions for each username or originator. Once this limit has been reached fresh logins will evict the session objects that have been used least recently, causing their associated session references to become invalid. For successful interoperability with other applications, concurrently accessing the server, the best policy is:
Choose a string that identifies your application and its version.
Create a single session at start-of-day, using that identifying string for the originator parameter to Session.login_with_password.
Use this session throughout the application (note that sessions can be used across multiple separate client-server network connections) and then explicitly logout when possible.
If a poorly written client leaks sessions or otherwise exceeds the limit, then as long as the client uses an appropriate originator argument, it will be easily identifiable from the XenServer logs and XenServer will destroy the longest-idle sessions of the rogue client only; this may cause problems for that client but not for other clients. If the misbehaving client did not specify an originator, it would be harder to identify and would cause the premature destruction of sessions of any clients that also did not specify an originator
Install and start example: summary
We have seen how the API can be used to install a VM from a XenServer template and perform a number of lifecycle operations on it. You will note that the number of calls we had to make in order to affect these operations was small:
One call to acquire a session: Session.login_with_password()
One call to query the VM (and template) objects present on the XenServer installation: VM.get_all_records(). Recall that we used the information returned from this call to select a suitable template to install from.
Four calls to install a VM from our chosen template: VM.clone(), followed
by the getter and setter of the other_config field to specify where to
create the disk images of the template, and then VM.provision().
One call to start the resultant VM: VM.start() (and similarly other single calls to suspend, resume and shutdown accordingly)
And then one call to logout Session.logout()
The take-home message here is that, although the API as a whole is complex and fully featured, common tasks (such as creating and performing lifecycle operations on VMs) are very straightforward to perform, requiring only a small number of simple API calls. Keep this in mind while you study the next section which may, on first reading, appear a little daunting!
Object Model Overview
This section gives a high-level overview of the object model of the API. A more detailed description of the parameters and methods of each class outlined here can be found in the XenServer API Reference document.
We start by giving a brief outline of some of the core classes that make up the API. (Don’t worry if these definitions seem somewhat abstract in their initial presentation; the textual description in subsequent sections, and the code-sample walk through in the next Chapter will help make these concepts concrete.)
Class
Description
VM
A VM object represents a particular virtual machine instance on a XenServer Host or Resource Pool. Example methods include start, suspend, pool_migrate; example parameters include power_state, memory_static_max, and name_label. (In the previous section we saw how the VM class is used to represent both templates and regular VMs)
Host
A host object represents a physical host in a XenServer pool. Example methods include reboot and shutdown. Example parameters include software_version, hostname, and [IP] address.
VDI
A VDI object represents a Virtual Disk Image. Virtual Disk Images can be attached to VMs, in which case a block device appears inside the VM through which the bits encapsulated by the Virtual Disk Image can be read and written. Example methods of the VDI class include “resize” and “clone”. Example fields include “virtual_size” and “sharable”. (When we called VM.provision on the VM template in our previous example, some VDI objects were automatically created to represent the newly created disks, and attached to the VM object.)
SR
An SR (Storage Repository) aggregates a collection of VDIs and encapsulates the properties of physical storage on which the VDIs’ bits reside. Example parameters include type (which determines the storage-specific driver a XenServer installation uses to read/write the SR’s VDIs) and physical_utilisation; example methods include scan (which invokes the storage-specific driver to acquire a list of the VDIs contained with the SR and the properties of these VDIs) and create (which initializes a block of physical storage so it is ready to store VDIs).
Network
A network object represents a layer-2 network that exists in the environment in which the XenServer Host instance lives. Since XenServer does not manage networks directly this is a lightweight class that serves merely to model physical and virtual network topology. VM and Host objects that are attached to a particular Network object (by virtue of VIF and PIF instances – see below) can send network packets to each other.
At this point, readers who are finding this enumeration of classes rather terse may wish to skip to the code walk-throughs of the next chapter: there are plenty of useful applications that can be written using only a subset of the classes already described! For those who wish to continue this description of classes in the abstract, read on.
On top of the classes listed above, there are 4 more that act as connectors, specifying relationships between VMs and Hosts, and Storage and Networks. The first 2 of these classes that we will consider, VBD and VIF, determine how VMs are attached to virtual disks and network objects respectively:
Class
Description
VBD
A VBD (Virtual Block Device) object represents an attachment between a VM and a VDI. When a VM is booted its VBD objects are queried to determine which disk images (VDIs) should be attached. Example methods of the VBD class include “plug” (which hot plugs a disk device into a running VM, making the specified VDI accessible therein) and “unplug” (which hot unplugs a disk device from a running guest); example fields include “device” (which determines the device name inside the guest under which the specified VDI will be made accessible).
VIF
A VIF (Virtual network InterFace) object represents an attachment between a VM and a Network object. When a VM is booted its VIF objects are queried to determine which network devices should be created. Example methods of the VIF class include “plug” (which hot plugs a network device into a running VM) and “unplug” (which hot unplugs a network device from a running guest).
The second set of “connector classes” that we will consider determine how Hosts are attached to Networks and Storage.
Class
Description
PIF
A PIF (Physical InterFace) object represents an attachment between a Host and a Network object. If a host is connected to a Network (over a PIF) then packets from the specified host can be transmitted/received by the corresponding host. Example fields of the PIF class include “device” (which specifies the device name to which the PIF corresponds – e.g. eth0) and “MAC” (which specifies the MAC address of the underlying NIC that a PIF represents). Note that PIFs abstract both physical interfaces and VLANs (the latter distinguished by the existence of a positive integer in the “VLAN” field).
PBD
A PBD (Physical Block Device) object represents an attachment between a Host and a SR (Storage Repository) object. Fields include “currently-attached” (which specifies whether the chunk of storage represented by the specified SR object) is currently available to the host; and “device_config” (which specifies storage-driver specific parameters that determines how the low-level storage devices are configured on the specified host – e.g. in the case of an SR rendered on an NFS filer, device_config may specify the host-name of the filer and the path on the filer in which the SR files live.).
The figure above presents a graphical overview of the API classes involved in managing VMs, Hosts, Storage and Networking. From this diagram, the symmetry between storage and network configuration, and also the symmetry between virtual machine and host configuration is plain to see.
Working with VIFs and VBDs
In this section we walk through a few more complex scenarios, describing informally how various tasks involving virtual storage and network devices can be accomplished using the API.
Creating disks and attaching them to VMs
Let’s start by considering how to make a new blank disk image and attach it to a running VM. We will assume that we already have ourselves a running VM, and we know its corresponding API object reference (e.g. we may have created this VM using the procedure described in the previous section, and had the server return its reference to us.) We will also assume that we have authenticated with the XenServer installation and have a corresponding session reference. Actually, in the rest of this chapter, for the sake of brevity, we will stop mentioning sessions altogether.
Creating a new blank disk image
The first step is to instantiate the disk image on physical storage. We do this by calling VDI.create(). The VDI.create call takes a number of parameters, including:
name_label and name_description: a human-readable name/description for the disk (e.g. for convenient display in the UI etc.). These fields can be left blank if desired.
SR: the object reference of the Storage Repository representing the physical storage in which the VDI’s bits will be placed.
read_only: setting this field to true indicates that the VDI can only be attached to VMs in a read-only fashion. (Attempting to attach a VDI with its read_only field set to true in a read/write fashion results in error.)
Invoking the VDI.create call causes the XenServer installation to create a blank disk image on physical storage, create an associated VDI object (the datamodel instance that refers to the disk image on physical storage) and return a reference to this newly created VDI object.
The way in which the disk image is represented on physical storage depends on the type of the SR in which the created VDI resides. For example, if the SR is of type “lvm” then the new disk image will be rendered as an LVM volume; if the SR is of type “nfs” then the new disk image will be a sparse VHD file created on an NFS filer. (You can query the SR type through the API using the SR.get_type() call.)
Note
Some SR types might round up the virtual-size value to make it divisible by a configured block size.
Attaching the disk image to a VM
So far we have a running VM (that we assumed the existence of at the start of this example) and a fresh VDI that we just created. Right now, these are both independent objects that exist on the XenServer Host, but there is nothing linking them together. So our next step is to create such a link, associating the VDI with our VM.
The attachment is formed by creating a new “connector” object called a VBD (Virtual Block Device). To create our VBD we invoke the VBD.create() call. The VBD.create() call takes a number of parameters including:
VM - the object reference of the VM to which the VDI is to be attached
VDI - the object reference of the VDI that is to be attached
mode - specifies whether the VDI is to be attached in a read-only or a read-write fashion
userdevice - specifies the block device inside the guest through which applications running inside the VM will be able to read/write the VDI’s bits.
type - specifies whether the VDI should be presented inside the VM as a regular disk or as a CD. (Note that this particular field has more meaning for Windows VMs than it does for Linux VMs, but we will not explore this level of detail in this chapter.)
Invoking VBD.create makes a VBD object on the XenServer installation and returns its object reference. However, this call in itself does not have any side-effects on the running VM (that is, if you go and look inside the running VM you will see that the block device has not been created). The fact that the VBD object exists but that the block device in the guest is not active, is reflected by the fact that the VBD object’s currently_attached field is set to false.
For expository purposes, the figure above presents a graphical example that shows the relationship between VMs, VBDs, VDIs and SRs. In this instance a VM object has 2 attached VDIs: there are 2 VBD objects that form the connections between the VM object and its VDIs; and the VDIs reside within the same SR.
Hotplugging the VBD
If we rebooted the VM at this stage then, after rebooting, the block device corresponding to the VBD would appear: on boot, XenServer queries all VBDs of a VM and actively attaches each of the corresponding VDIs.
Rebooting the VM is all very well, but recall that we wanted to attach a newly created blank disk to a running VM. This can be achieved by invoking the plug method on the newly created VBD object. When the plug call returns successfully, the block device to which the VBD relates will have appeared inside the running VM – i.e. from the perspective of the running VM, the guest operating system is led to believe that a new disk device has just been hot plugged. Mirroring this fact in the managed world of the API, the currently_attached field of the VBD is set to true.
Unsurprisingly, the VBD plug method has a dual called “unplug”. Invoking the unplug method on a VBD object causes the associated block device to be hot unplugged from a running VM, setting the currently_attached field of the VBD object to false accordingly.
Creating and attaching Network Devices to VMs
The API calls involved in configuring virtual network interfaces in VMs are similar in many respects to the calls involved in configuring virtual disk devices. For this reason we will not run through a full example of how one can create network interfaces using the API object-model; instead we will use this section just to outline briefly the symmetry between virtual networking device and virtual storage device configuration.
The networking analogue of the VBD class is the VIF class. Just as a VBD is the API representation of a block device inside a VM, a VIF (Virtual network InterFace) is the API representation of a network device inside a VM. Whereas VBDs associate VM objects with VDI objects, VIFs associate VM objects with Network objects. Just like VBDs, VIFs have a currently_attached field that determines whether or not the network device (inside the guest) associated with the VIF is currently active or not. And as we saw with VBDs, at VM boot-time the VIFs of the VM are queried and a corresponding network device for each created inside the booting VM. Similarly, VIFs also have plug and unplug methods for hot plugging/unplugging network devices in/out of running VMs.
Host configuration for networking and storage
We have seen that the VBD and VIF classes are used to manage configuration of block devices and network devices (respectively) inside VMs. To manage host configuration of storage and networking there are two analogous classes: PBD (Physical Block Device) and PIF (Physical [network] InterFace).
Host storage configuration: PBDs
Let us start by considering the PBD class. A PBD_create() call takes a number of parameters including:
Parameter
Description
host
physical machine on which the PBD is available
SR
the Storage Repository that the PBD connects to
device_config
a string-to-string map that is provided to the host’s SR-backend-driver, containing the low-level parameters required to configure the physical storage device(s) on which the SR is to be realized. The specific contents of the device_config field depend on the type of the SR to which the PBD is connected. (Executing xe sm-list will show a list of possible SR types; the configuration field in this enumeration specifies the device_config parameters that each SR type expects.)
For example, imagine we have an SR object s of type “nfs” (representing a directory on an NFS filer within which VDIs are stored as VHD files); and let’s say that we want a host, h, to be able to access s. In this case we invoke PBD.create() specifying host h, SR s, and a value for the device_config parameter that is the following map:
This tells the XenServer Host that SR s is accessible on host h, and further that to access SR s, the host needs to mount the directory /scratch/mysrs/sr1 on the NFS server named my_nfs_server.example.com.
Like VBD objects, PBD objects also have a field called currently_attached. Storage repositories can be attached and detached from a given host by invoking PBD.plug and PBD.unplug methods respectively.
Host networking configuration: PIFs
Host network configuration is specified by virtue of PIF objects. If a PIF object connects a network object, n, to a host object h, then the network corresponding to n is bridged onto a physical interface (or a physical interface plus a VLAN tag) specified by the fields of the PIF object.
For example, imagine a PIF object exists connecting host h to a network n, and that device field of the PIF object is set to eth0. This means that all packets on network n are bridged to the NIC in the host corresponding to host network device eth0.
XML-RPC notes
Datetimes
The API deviates from the XML-RPC specification in handling of datetimes. The API appends a “Z” to the end of datetime strings, which is meant to indicate that the time is expressed in UTC.
API evolution
All APIs evolve as bugs are fixed, new features added and features are removed
the XenAPI is no exception. This document lists policies describing how the
XenAPI evolves over time.
The goals of XenAPI evolution are:
to allow bugs to be fixed efficiently;
to allow new, innovative features to be added easily;
to keep old, unmodified clients working as much as possible; and
where backwards-incompatible changes are to be made, publish this
information early to enable affected parties to give timely feedback.
Background
In this document, the term XenAPI refers to the XMLRPC-derived wire protocol
used by xapi. The XenAPI has objects which each have fields and
messages. The XenAPI is described in detail elsewhere.
XenAPI Lifecycle
graph LR
Prototype -->|1| Published -->|4| Deprecated -->|5| Removed
Published -->|2,3| Published
Each element of the XenAPI (objects, messages and fields) follows the lifecycle
diagram above. When an element is newly created and being still in development,
it is in the Prototype state. Elements in this state may be stubs: the
interface is there and can be used by clients for prototyping their new
features, but the actual implementation is not yet ready.
When the element subsequently becomes ready for use (the stub is replaced by a
real implementation), it transitions to the Published state. This is the only
state in which the object, message or field should be used. From this point
onwards, the element needs to have clearly defined semantics that are available
for reference in the XenAPI documentation.
If the XenAPI element becomes Deprecated, it will still function as it did
before, but its use is discouraged. The final stage of the lifecycle is the
Removed state, in which the element is not available anymore.
The numbered state changes in the diagram have the following meaning:
Publish: declare that the XenAPI element is ready for people to use.
Extend: a backwards-compatible extension of the XenAPI, for example an
additional parameter in a message with an appropriate default value. If the
API is used as before, it still has the same effect.
Change: a backwards-incompatible change. That is, the message now behaves
differently, or the field has different semantics. Such changes are
discouraged and should only be considered in special cases (always consider
whether deprecation is a better solution). The use of a message can for
example be restricted for security or efficiency reasons, or the behaviour
can be changed simply to fix a bug.
Deprecate: declare that the use of this XenAPI element should be avoided from
now on. Reasons for doing this include: the element is redundant (it
duplicates functionality elsewhere), it is inconsistent with other parts of
the XenAPI, it is insecure or inefficient.
For examples of deprecation policies of other projects, see the policies of the
eclipse
and oval projects.
Remove: the element is taken out of the public API and can no longer be used.
Each lifecycle transition must be accompanied by an explanation describing the
change and the reason for the change. This message should be enough to
understand the semantics of the XenAPI element after the change, and in the case
of backwards-incompatible changes or deprecation, it should give directions
about how to modify a client to deal with the change (for example, how to avoid
using the deprecated field or message).
Releases
Every release must be accompanied by release notes listing all objects, fields
and messages that are newly prototyped, published, extended, changed, deprecated
or removed in the release. Each item should have an explanation as implied
above, documenting the new or changed XenAPI element. The release notes for
every release shall be prominently displayed in the XenAPI HTML documentation.
Documentation
The XenAPI documentation will contain its complete lifecycle history for each
XenAPI element. Only the elements described in the documentation are
“official” and supported.
Each object, message and field in datamodel.ml will have lifecycle
metadata attached to it, which is a list of transitions (transition type *
release * explanation string) as described above. Release notes are automatically generated from this data.
Using the API
This chapter describes how to use the XenServer Management API from real programs to manage XenServer Hosts and VMs. The chapter begins with a walk-through of a typical client application and demonstrates how the API can be used to perform common tasks. Example code fragments are given in python syntax but equivalent code in the other programming languages would look very similar. The language bindings themselves are discussed afterwards and the chapter finishes with walk-throughs of two complete examples.
Anatomy of a typical application
This section describes the structure of a typical application using the XenServer Management API. Most client applications begin by connecting to a XenServer Host and authenticating (e.g. with a username and password). Assuming the authentication succeeds, the server will create a “session” object and return a reference to the client. This reference will be passed as an argument to all future API calls. Once authenticated, the client may search for references to other useful objects (e.g. XenServer Hosts, VMs, etc.) and invoke operations on them. Operations may be invoked either synchronously or asynchronously; special task objects represent the state and progress of asynchronous operations. These application elements are all described in detail in the following sections.
Choosing a low-level transport
API calls can be issued over two transports:
SSL-encrypted TCP on port 443 (https) over an IP network
plaintext over a local Unix domain socket: /var/xapi/xapi
The SSL-encrypted TCP transport is used for all off-host traffic while the Unix domain socket can be used from services running directly on the XenServer Host itself. In the SSL-encrypted TCP transport, all API calls should be directed at the Resource Pool master; failure to do so will result in the error HOST_IS_SLAVE, which includes the IP address of the master as an error parameter.
Because the master host of a pool can change, especially if HA is enabled on a pool, clients must implement the following steps to detect a master host change and connect to the new master as required:
Subscribe to updates in the list of hosts servers, and maintain a current list of hosts in the pool
If the connection to the pool master fails to respond, attempt to connect to all hosts in the list until one responds
The first host to respond will return the HOST_IS_SLAVE error message, which contains the identity of the new pool master (unless of course the host is the new master)
Connect to the new master
Note
As a special-case, all messages sent through the Unix domain socket are transparently forwarded to the correct node.
Authentication and session handling
The vast majority of API calls take a session reference as their first parameter; failure to supply a valid reference will result in a SESSION_INVALID error being returned. Acquire a session reference by supplying a username and password to the login_with_password function.
Note
As a special-case, if this call is executed over the local Unix domain socket then the username and password are ignored and the call always succeeds.
Every session has an associated “last active” timestamp which is updated on every API call. The server software currently has a built-in limit of 500 active sessions and will remove those with the oldest “last active” field if this limit is exceeded for a given username or originator. In addition all sessions whose “last active” field is older than 24 hours are also removed. Therefore it is important to:
Specify an appropriate originator when logging in; and
Remember to log out of active sessions to avoid leaking them; and
Be prepared to log in again to the server if a SESSION_INVALID error is caught.
In the following Python fragment a connection is established over the Unix domain socket and a session is created:
Once an application has authenticated the next step is to acquire references to objects in order to query their state or invoke operations on them. All objects have a set of “implicit” messages which include the following:
get_by_name_label : return a list of all objects of a particular class with a particular label;
get_by_uuid : return a single object named by its UUID;
get_all : return a set of references to all objects of a particular class; and
get_all_records : return a map of reference to records for each object of a particular class.
For example, to list all hosts:
hosts = session.xenapi.host.get_all()
To find all VMs with the name “my first VM”:
vms = session.xenapi.VM.get_by_name_label('my first VM')
Note
Object name_label fields are not guaranteed to be unique and so the get_by_name_label API call returns a set of references rather than a single reference.
In addition to the methods of finding objects described above, most objects also contain references to other objects within fields. For example it is possible to find the set of VMs running on a particular host by calling:
vms = session.xenapi.host.get_resident_VMs(host)
Invoking synchronous operations on objects
Once object references have been acquired, operations may be invoked on them. For example to start a VM:
session.xenapi.VM.start(vm, False, False)
All API calls are by default synchronous and will not return until the operation has completed or failed. For example in the case of VM.start the call does not return until the VM has started booting.
Note
When the VM.start call returns the VM will be booting. To determine when the booting has finished, wait for the in-guest agent to report internal statistics through the VM_guest_metrics object.
Using Tasks to manage asynchronous operations
To simplify managing operations which take quite a long time (e.g. VM.clone and VM.copy) functions are available in two forms: synchronous (the default) and asynchronous. Each asynchronous function returns a reference to a task object which contains information about the in-progress operation including:
whether it is pending
whether it is has succeeded or failed
progress (in the range 0-1)
the result or error code returned by the operation
An application which wanted to track the progress of a VM.clone operation and display a progress bar would have code like the following:
vm = session.xenapi.VM.get_by_name_label('my vm')
task = session.xenapi.Async.VM.clone(vm)
while session.xenapi.task.get_status(task) == "pending":
progress = session.xenapi.task.get_progress(task)
update_progress_bar(progress)
time.sleep(1)
session.xenapi.task.destroy(task)
Note
Note that a well-behaved client should remember to delete tasks created by asynchronous operations when it has finished reading the result or error. If the number of tasks exceeds a built-in threshold then the server will delete the oldest of the completed tasks.
Subscribing to and listening for events
With the exception of the task and metrics classes, whenever an object is modified the server generates an event. Clients can subscribe to this event stream on a per-class basis and receive updates rather than resorting to frequent polling. Events come in three types:
add - generated when an object has been created;
del - generated immediately before an object is destroyed; and
mod - generated when an object’s field has changed.
Events also contain a monotonically increasing ID, the name of the class of object and a snapshot of the object state equivalent to the result of a get_record().
Clients register for events by calling event.register() with a list of class names or the special string “*”. Clients receive events by executing event.next() which blocks until events are available and returns the new events.
Note
Since the queue of generated events on the server is of finite length a very slow client might fail to read the events fast enough; if this happens an EVENTS_LOST error is returned. Clients should be prepared to handle this by re-registering for events and checking that the condition they are waiting for hasn’t become true while they were unregistered.
The following python code fragment demonstrates how to print a summary of every event generated by a system: (similar code exists in Xenserver-SDK/XenServerPython/samples/watch-all-events.py)
fmt = "%8s %20s %5s %s"
session.xenapi.event.register(["*"])
while True:
try:
for event in session.xenapi.event.next():
name = "(unknown)"
if "snapshot" in event.keys():
snapshot = event["snapshot"]
if "name_label" in snapshot.keys():
name = snapshot["name_label"]
print fmt % (event['id'], event['class'], event['operation'], name)
except XenAPI.Failure, e:
if e.details == [ "EVENTS_LOST" ]:
print "Caught EVENTS_LOST; should reregister"
Language bindings
C
The SDK includes the source to the C language binding in the directory XenServer-SDK/libxenserver/src together with a Makefile which compiles the binding into a library. Every API object is associated with a header file which contains declarations for all that object’s API functions; for example the type definitions and functions required to invoke VM operations are all contained in xen_vm.h.
C binding dependencies
Platform supported:
Linux
Library:
The language binding is generated as a libxenserver.so that is linked by C programs.
Dependencies:
XML library (libxml2.so on GNU Linux)
Curl library (libcurl2.so)
The following simple examples are included with the C bindings:
test_vm_async_migrate: demonstrates how to use asynchronous API calls to migrate running VMs from a slave host to the pool master.
test_vm_ops: demonstrates how to query the capabilities of a host, create a VM, attach a fresh blank disk image to the VM and then perform various powercycle operations;
test_failures: demonstrates how to translate error strings into enum_xen_api_failure, and vice versa;
test_event_handling: demonstrates how to listen for events on a connection.
test_enumerate: demonstrates how to enumerate the various API objects.
C#
The C# bindings are contained within the directory XenServer-SDK/XenServer.NET and include project files suitable for building under Microsoft Visual Studio. Every API object is associated with one C# file; for example the functions implementing the VM operations are contained within the file VM.cs.
C# binding dependencies
Platform supported:
Windows with .NET version 4.5
Library:
The language binding is generated as a Dynamic Link Library XenServer.dll that is linked by C# programs.
Dependencies:
CookComputing.XMLRpcV2.dll is needed for the XenServer.dll to be able to communicate with the xml-rpc server. We test with version 2.1.0.6 and recommend that you use this version, though others may work.
Three examples are included with the C# bindings in the directory XenServer-SDK/XenServer.NET/samples as separate projects of the XenSdkSample.sln solution:
GetVariousRecords: logs into a XenServer Host and displays information about hosts, storage and virtual machines;
GetVmRecords: logs into a XenServer Host and lists all the VM records;
VmPowerStates: logs into a XenServer Host, finds a VM and takes it through the various power states. Requires a shut-down VM to be already installed.
Java
The Java bindings are contained within the directory XenServer-SDK/XenServerJava and include project files suitable for building under Microsoft Visual Studio. Every API object is associated with one Java file; for example the functions implementing the VM operations are contained within the file VM.java.
Java binding dependencies
Platform supported:
Linux and Windows
Library:
The language binding is generated as a Java Archive file xenserver-PRODUCT_VERSION.jar that is linked by Java programs.
Dependencies:
xmlrpc-client-3.1.jar is needed for the xenserver.jar to be able to communicate with the xml-rpc server.
ws-commons-util-1.0.2.jar is needed to run the examples.
Running the main file XenServer-SDK/XenServerJava/samples/RunTests.java will run a series of examples included in the same directory:
AddNetwork: Adds a new internal network not attached to any NICs;
SessionReuse: Demonstrates how a Session object can be shared between multiple Connections;
AsyncVMCreate: Makes asynchronously a new VM from a built-in template, starts and stops it;
VdiAndSrOps: Performs various SR and VDI tests, including creating a dummy SR;
CreateVM: Creates a VM on the default SR with a network and DVD drive;
DeprecatedMethod: Tests a warning is displayed wehn a deprecated API method is called;
GetAllRecordsOfAllTypes: Retrieves all the records for all types of objects;
SharedStorage: Creates a shared NFS SR;
StartAllVMs: Connects to a host and tries to start each VM on it.
PowerShell
The PowerShell bindings are contained within the directory XenServer-SDK/XenServerPowerShell. We provide the PowerShell module XenServerPSModule and source code exposing the XenServer API as Windows PowerShell cmdlets.
PowerShell binding dependencies
Platform supported:
Windows with .NET Framework 4.5 and PowerShell v4.0
Library:
XenServerPSModule
Dependencies:
CookComputing.XMLRpcV2.dll is needed to be able to communicate with the xml-rpc server. We test with version 2.1.0.6 and recommend that you use this version, though others may work.
These example scripts are included with the PowerShell bindings in the directory XenServer-SDK/XenServerPowerShell/samples:
AutomatedTestCore.ps1: demonstrates how to log into a XenServer host, create a storage repository and a VM, and then perform various powercycle operations;
HttpTest.ps1: demonstrates how to log into a XenServer host, create a VM, and then perform operations such as VM importing and exporting, patch upload, and retrieval of performance statistics.
Python
The python bindings are contained within a single file: XenServer-SDK/XenServerPython/XenAPI.py.
fixpbds.py - reconfigures the settings used to access shared storage;
install.py - installs a Debian VM, connects it to a network, starts it up and waits for it to report its IP address;
license.py - uploads a fresh license to a XenServer Host;
permute.py - selects a set of VMs and uses XenMotion to move them simultaneously between hosts;
powercycle.py - selects a set of VMs and powercycles them;
shell.py - a simple interactive shell for testing;
vm_start_async.py - demonstrates how to invoke operations asynchronously;
watch-all-events.py - registers for all events and prints details when they occur.
Command Line Interface (CLI)
Besides using raw XML-RPC or one of the supplied language bindings, third-party software developers may integrate with XenServer Hosts by using the XE command line interface xe. The xe CLI is installed by default on XenServer hosts; a stand-alone remote CLI is also available for Linux. On Windows, the xe.exe CLI executable is installed along with XenCenter.
CLI dependencies
|:–|:–|
|Platform supported:|Linux and Windows|
|Library:|None|
|Binary:|xe (xe.exe on Windows)|
|Dependencies:|None|
The CLI allows almost every API call to be directly invoked from a script or other program, silently taking care of the required session management.
The XE CLI syntax and capabilities are described in detail in the XenServer Administrator’s Guide. For additional resources and examples, visit the Citrix Knowledge Center.
Note
When running the CLI from a XenServer Host console, tab-completion of both command names and arguments is available.
Complete application examples
This section describes two complete examples of real programs using the API.
Simultaneously migrating VMs using XenMotion
This python example (contained in XenServer-SDK/XenServerPython/samples/permute.py) demonstrates how to use XenMotion to move VMs simultaneously between hosts in a Resource Pool. The example makes use of asynchronous API calls and shows how to wait for a set of tasks to complete.
The program begins with some standard boilerplate and imports the API bindings module
import sys, time
import XenAPI
Next the commandline arguments containing a server URL, username, password and a number of iterations are parsed. The username and password are used to establish a session which is passed to the function main, which is called multiple times in a loop. Note the use of try: finally: to make sure the program logs out of its session at the end.
if __name__ == "__main__":
if len(sys.argv) <> 5:
print "Usage:"
print sys.argv[0], " <url> <username> <password> <iterations>"
sys.exit(1)
url = sys.argv[1]
username = sys.argv[2]
password = sys.argv[3]
iterations = int(sys.argv[4])
# First acquire a valid session by logging in:
session = XenAPI.Session(url)
session.xenapi.login_with_password(username, password, "2.3",
"Example migration-demo v0.1")
try:
for i in range(iterations):
main(session, i)
finally:
session.xenapi.session.logout()
The main function examines each running VM in the system, taking care to filter out control domains (which are part of the system and not controllable by the user). A list of running VMs and their current hosts is constructed.
def main(session, iteration):
# Find a non-template VM object
all = session.xenapi.VM.get_all()
vms = []
hosts = []
for vm in all:
record = session.xenapi.VM.get_record(vm)
if not(record["is_a_template"]) and \
not(record["is_control_domain"]) and \
record["power_state"] == "Running":
vms.append(vm)
hosts.append(record["resident_on"])
print "%d: Found %d suitable running VMs" % (iteration, len(vms))
Next the list of hosts is rotated:
# use a rotation as a permutation
hosts = [hosts[-1]] + hosts[:(len(hosts)-1)]
Each VM is then moved using XenMotion to the new host under this rotation (i.e. a VM running on host at position 2 in the list will be moved to the host at position 1 in the list etc.) In order to execute each of the movements in parallel, the asynchronous version of the VM.pool_migrate is used and a list of task references constructed. Note the live flag passed to the VM.pool_migrate; this causes the VMs to be moved while they are still running.
tasks = []
for i in range(0, len(vms)):
vm = vms[i]
host = hosts[i]
task = session.xenapi.Async.VM.pool_migrate(vm, host, { "live": "true" })
tasks.append(task)
The list of tasks is then polled for completion:
finished = False
records = {}
while not(finished):
finished = True
for task in tasks:
record = session.xenapi.task.get_record(task)
records[task] = record
if record["status"] == "pending":
finished = False
time.sleep(1)
Once all tasks have left the pending state (i.e. they have successfully completed, failed or been cancelled) the tasks are polled once more to see if they all succeeded:
allok = True
for task in tasks:
record = records[task]
if record["status"] <> "success":
allok = False
If any one of the tasks failed then details are printed, an exception is raised and the task objects left around for further inspection. If all tasks succeeded then the task objects are destroyed and the function returns.
if not(allok):
print "One of the tasks didn't succeed at", \
time.strftime("%F:%HT%M:%SZ", time.gmtime())
idx = 0
for task in tasks:
record = records[task]
vm_name = session.xenapi.VM.get_name_label(vms[idx])
host_name = session.xenapi.host.get_name_label(hosts[idx])
print "%s : %12s %s -> %s [ status: %s; result = %s; error = %s ]" % \
(record["uuid"], record["name_label"], vm_name, host_name, \
record["status"], record["result"], repr(record["error_info"]))
idx = idx + 1
raise "Task failed"
else:
for task in tasks:
session.xenapi.task.destroy(task)
Cloning a VM using the XE CLI
This example is a bash script which uses the XE CLI to clone a VM taking care to shut it down first if it is powered on.
The example begins with some boilerplate which first checks if the environment variable XE has been set: if it has it assumes that it points to the full path of the CLI, else it is assumed that the XE CLI is on the current path. Next the script prompts the user for a server name, username and password:
# Allow the path to the 'xe' binary to be overridden by the XE environment variable
if [ -z "${XE}" ]; then
XE=xe
fi
if [ ! -e "${HOME}/.xe" ]; then
read -p "Server name: " SERVER
read -p "Username: " USERNAME
read -p "Password: " PASSWORD
XE="${XE} -s ${SERVER} -u ${USERNAME} -pw ${PASSWORD}"
fi
Next the script checks its commandline arguments. It requires exactly one: the UUID of the VM which is to be cloned:
# Check if there's a VM by the uuid specified
${XE} vm-list params=uuid | grep -q " ${vmuuid}$"
if [ $? -ne 0 ]; then
echo "error: no vm uuid \"${vmuuid}\" found"
exit 2
fi
The script then checks the power state of the VM and if it is running, it attempts a clean shutdown. The event system is used to wait for the VM to enter state “Halted”.
Note
The XE CLI supports a command-line argument --minimal which causes it to print its output without excess whitespace or formatting, ideal for use from scripts. If multiple values are returned they are comma-separated.
# Check the power state of the vm
name=$(${XE} vm-list uuid=${vmuuid} params=name-label --minimal)
state=$(${XE} vm-list uuid=${vmuuid} params=power-state --minimal)
wasrunning=0
# If the VM state is running, we shutdown the vm first
if [ "${state}" = "running" ]; then
${XE} vm-shutdown uuid=${vmuuid}
${XE} event-wait class=vm power-state=halted uuid=${vmuuid}
wasrunning=1
fi
The VM is then cloned and the new VM has its name_label set to cloned_vm.
# Clone the VM
newuuid=$(${XE} vm-clone uuid=${vmuuid} new-name-label=cloned_vm)
Finally, if the original VM had been running and was shutdown, both it and the new VM are started.
# If the VM state was running before cloning, we start it again
# along with the new VM.
if [ "$wasrunning" -eq 1 ]; then
${XE} vm-start uuid=${vmuuid}
${XE} vm-start uuid=${newuuid}
fi
XenAPI Reference
XenAPI Classes
Click on a class to view the associated fields and messages.
Classes, Fields and Messages
Classes have both fields and messages. Messages are either implicit or explicit where an implicit message is one of:
a constructor (usually called "create");
a destructor (usually called "destroy");
"get_by_name_label";
"get_by_uuid";
"get_record";
"get_all"; and
"get_all_records".
Explicit messages include all the rest, more class-specific messages (e.g. "VM.start", "VM.clone")
Every field has at least one accessor depending both on its type and whether it is read-only or read-write. Accessors for a field named "X" would be a proper subset of:
set_X: change the value of field X (only if it is read-write);
get_X: retrieve the value of field X;
add_X: add a key/value pair (for fields of type set);
remove_X: remove a key (for fields of type set);
add_to_X: add a key/value pair (for fields of type map); and
remove_from_X: remove a key (for fields of type map).
This calls queries the external directory service to obtain the transitively-closed set of groups that the the subject_identifier is member of.
Parameters:
session ref session_id
Reference to a valid session
string subject_identifier
A string containing the subject_identifier, unique in the external directory service
Minimum role:
read-only
Result:
set of subject_identifiers that provides the group membership of subject_identifier passed as argument, it contains, recursively, all groups a subject_identifier is member of.
Published in:
XenServer 5.5 (george)
This calls queries the external directory service to obtain the transitively-closed set of groups that the the subject_identifier is member of.
stringget_subject_identifier(session ref, string)
This call queries the external directory service to obtain the subject_identifier as a string from the human-readable subject_name
Parameters:
session ref session_id
Reference to a valid session
string subject_name
The human-readable subject_name, such as a username or a groupname
Minimum role:
read-only
Result:
the subject_identifier obtained from the external directory service
Published in:
XenServer 5.5 (george)
This call queries the external directory service to obtain the subject_identifier as a string from the human-readable subject_name
This call queries the external directory service to obtain the user information (e.g. username, organization etc) from the specified subject_identifier
Parameters:
session ref session_id
Reference to a valid session
string subject_identifier
A string containing the subject_identifier, unique in the external directory service
Minimum role:
read-only
Result:
key-value pairs containing at least a key called subject_name
Published in:
XenServer 5.5 (george)
This call queries the external directory service to obtain the user information (e.g. username, organization etc) from the specified subject_identifier
blob
Class: blob
A placeholder for a binary blob
Published in:
XenServer 5.0 (orlando)
A placeholder for a binary blob
Fields
datetimelast_updated[RO/constructor]
Time at which the data in the blob was last updated
Published in:
XenServer 4.0 (rio)
Time at which the data in the blob was last updated
stringmime_type[RO/constructor]
The mime type associated with this object. Defaults to 'application/octet-stream' if the empty string is supplied
Published in:
XenServer 4.0 (rio)
The mime type associated with this object. Defaults to 'application/octet-stream' if the empty string is supplied
stringname_description[RW]
a notes field containing human-readable description
Default value:
""
Published in:
XenServer 4.0 (rio)
a notes field containing human-readable description
stringname_label[RW]
a human-readable name
Default value:
""
Published in:
XenServer 4.0 (rio)
a human-readable name
boolpublic[RW]
True if the blob is publicly accessible
Default value:
false
Published in:
XenServer 6.1 (tampa)
True if the blob is publicly accessible
intsize[RO/runtime]
Size of the binary data, in bytes
Published in:
XenServer 4.0 (rio)
Size of the binary data, in bytes
stringuuid[RO/runtime]
Unique identifier/object reference
Published in:
XenServer 4.0 (rio)
Unique identifier/object reference
Messages
blob refcreate(session ref, string, bool)
Create a placeholder for a binary blob
Parameters:
session ref session_id
Reference to a valid session
string mime_type
The mime-type of the blob. Defaults to 'application/octet-stream' if the empty string is supplied
bool public
True if the blob should be publicly available
Minimum role:
pool-operator
Result:
The reference of the created blob
Published in:
XenServer 5.0 (orlando)
Create a placeholder for a binary blob
voiddestroy(session ref, blob ref)
Parameters:
session ref session_id
Reference to a valid session
blob ref self
The reference of the blob to destroy
Minimum role:
pool-operator
Published in:
XenServer 5.0 (orlando)
blob ref setget_all(session ref)
Return a list of all the blobs known to the system.
a notes field containing human-readable description
voidset_name_label(session ref, blob ref, string)
Set the name/label field of the given blob.
Parameters:
session ref session_id
Reference to a valid session
blob ref self
reference to the object
string value
New value to set
Minimum role:
pool-operator
Published in:
XenServer 4.0 (rio)
a human-readable name
voidset_public(session ref, blob ref, bool)
Set the public field of the given blob.
Parameters:
session ref session_id
Reference to a valid session
blob ref self
reference to the object
bool value
New value to set
Minimum role:
pool-operator
Published in:
XenServer 6.1 (tampa)
True if the blob is publicly accessible
Bond
Class: Bond
A Network bond that combines physical network interfaces, also known as link aggregation
Published in:
XenServer 4.1 (miami)
A Network bond that combines physical network interfaces, also known as link aggregation
Enums
bond_mode
Values:
balance-slb
Source-level balancing
active-backup
Active/passive bonding: only one NIC is carrying traffic
lacp
Link aggregation control protocol
Fields
boolauto_update_mac[RO/runtime]
true if the MAC was taken from the primary slave when the bond was created, and false if the client specified the MAC
Default value:
true
Published in:
Citrix Hypervisor 8.1 (quebec)
intlinks_up[RO/runtime]
Number of links up in this bond
Default value:
0
Published in:
XenServer 6.1 (tampa)
Number of links up in this bond
PIF refmaster[RO/constructor]
The bonded interface
Default value:
Null
Published in:
XenServer 4.1 (miami)
The bonded interface
enum bond_modemode[RO/runtime]
The algorithm used to distribute traffic among the bonded NICs
Default value:
balance-slb
Published in:
XenServer 6.0 (boston)
(string → string) mapother_config[RW]
additional configuration
Default value:
{}
Published in:
XenServer 4.1 (miami)
additional configuration
PIF refprimary_slave[RO/runtime]
The PIF of which the IP configuration and MAC were copied to the bond, and which will receive all configuration/VLANs/VIFs on the bond if the bond is destroyed
Default value:
OpaqueRef:NULL
Published in:
XenServer 6.0 (boston)
(string → string) mapproperties[RO/runtime]
Additional configuration properties specific to the bond mode.
Default value:
{}
Published in:
XenServer 6.1 (tampa)
Additional configuration properties specific to the bond mode.
PIF ref setslaves[RO/runtime]
The interfaces which are part of this bond
Published in:
XenServer 4.1 (miami)
The interfaces which are part of this bond
stringuuid[RO/runtime]
Unique identifier/object reference
Published in:
XenServer 4.0 (rio)
Unique identifier/object reference
Messages
voidadd_to_other_config(session ref, Bond ref, string, string)
Add the given key-value pair to the other_config field of the given Bond.
list of the operations allowed in this state. This list is advisory only and the server state may have changed by the time this field is read by a client.
Default value:
{}
Published in:
XenServer 4.0 (rio)
list of the operations allowed in this state. This list is advisory only and the server state may have changed by the time this field is read by a client.
Get the allowed_operations field of the given Cluster.
Parameters:
session ref session_id
Reference to a valid session
Cluster ref self
reference to the object
Minimum role:
read-only
Result:
value of the field
Published in:
XenServer 4.0 (rio)
list of the operations allowed in this state. This list is advisory only and the server state may have changed by the time this field is read by a client.
Cluster refget_by_uuid(session ref, string)
Get a reference to the Cluster instance with the specified UUID.
list of the operations allowed in this state. This list is advisory only and the server state may have changed by the time this field is read by a client.
Default value:
{}
Published in:
XenServer 4.0 (rio)
list of the operations allowed in this state. This list is advisory only and the server state may have changed by the time this field is read by a client.
links each of the running tasks using this object (by reference) to a current_operation enum which describes the nature of the task.
Default value:
{}
Published in:
XenServer 4.0 (rio)
links each of the running tasks using this object (by reference) to a current_operation enum which describes the nature of the task.
boolenabled[RO/runtime]
Whether the cluster host believes that clustering should be enabled on this host. This field can be altered by calling the enable/disable message on a cluster host. Only enabled members run the underlying cluster stack. Disabled members are still considered a member of the cluster (see joined), and can be re-enabled by the user.
Default value:
false
Prototyped in:
XenServer 7.5 (kolkata)
Published in:
XenServer 7.6 (lima)
host refhost[RO/constructor]
Reference to the Host object
Default value:
OpaqueRef:NULL
Prototyped in:
XenServer 7.5 (kolkata)
Published in:
XenServer 7.6 (lima)
booljoined[RO/runtime]
Whether the cluster host has joined the cluster. Contrary to enabled, a host that is not joined is not considered a member of the cluster, and hence enable and disable operations cannot be performed on this host.
Default value:
true
Prototyped in:
XenServer 7.5 (kolkata)
Published in:
XenServer 7.6 (lima)
Prototype
datetimelast_update_live[RO/runtime]
Time when the live field was last updated based on information from the cluster stack
Default value:
19700101T00:00:00Z
Prototyped in:
XAPI 24.3.0 (24.3.0)
Prototype
boollive[RO/runtime]
Whether the underlying cluster stack thinks we are live. This field is set automatically based on updates from the cluster stack and cannot be altered by the user.
Get the allowed_operations field of the given Cluster_host.
Parameters:
session ref session_id
Reference to a valid session
Cluster_host ref self
reference to the object
Minimum role:
read-only
Result:
value of the field
Published in:
XenServer 4.0 (rio)
list of the operations allowed in this state. This list is advisory only and the server state may have changed by the time this field is read by a client.
Cluster_host refget_by_uuid(session ref, string)
Get a reference to the Cluster_host instance with the specified UUID.
Get a record containing the current state of the given DR_task.
Parameters:
session ref session_id
Reference to a valid session
DR_task ref self
reference to the object
Minimum role:
read-only
Result:
all fields from the object
Published in:
XenServer 6.0 (boston)
DR task
stringget_uuid(session ref, DR_task ref)
Get the uuid field of the given DR_task.
Parameters:
session ref session_id
Reference to a valid session
DR_task ref self
reference to the object
Minimum role:
read-only
Result:
value of the field
Published in:
XenServer 4.0 (rio)
Unique identifier/object reference
event
Class: event
Asynchronous event registration and handling
Published in:
XenServer 4.0 (rio)
Enums
event_operation
Values:
add
An object has been created
del
An object has been deleted
mod
An object has been modified
Fields
stringclass[RO/constructor]
The name of the class of the object that changed
Published in:
XenServer 4.0 (rio)
The name of the class of the object that changed
intid[RO/constructor]
An ID, monotonically increasing, and local to the current session
Published in:
XenServer 4.0 (rio)
An ID, monotonically increasing, and local to the current session
Deprecated
stringobj_uuid[RO/constructor]
The uuid of the object that changed
Published in:
XenServer 4.0 (rio)
The uuid of the object that changed
Deprecated in:
XenServer 6.0 (boston)
enum event_operationoperation[RO/constructor]
The operation that was performed
Published in:
XenServer 4.0 (rio)
The operation that was performed
stringref[RO/constructor]
A reference to the object that changed
Published in:
XenServer 4.0 (rio)
A reference to the object that changed
<class> recordsnapshot[RO/runtime]
The record of the database object that was added, changed or deleted
Published in:
XenServer 6.0 (boston)
Deprecated
datetimetimestamp[RO/constructor]
The time at which the event occurred
Published in:
XenServer 4.0 (rio)
The time at which the event occurred
Deprecated in:
XenServer 6.0 (boston)
Messages
an event batchfrom(session ref, string set, string, float)
Blocking call which returns a new token and a (possibly empty) batch of events. The returned token can be used in subsequent calls to this function.
Parameters:
session ref session_id
Reference to a valid session
string set classes
register for events for the indicated classes
string token
A token representing the point from which to generate database events. The empty string represents the beginning.
float timeout
Return after this many seconds if no events match
Minimum role:
read-only
Result:
a structure consisting of a token ('token'), a map of valid references per object type ('valid_ref_counts'), and a set of event records ('events').
Errors:
SESSION_NOT_REGISTERED
This session is not registered to receive events. You must call event.register before event.next. The session handle you are using is echoed.
EVENTS_LOST
Some events have been lost from the queue and cannot be retrieved.
Published in:
XenServer 6.0 (boston)
Blocking call which returns a new token and a (possibly empty) batch of events. The returned token can be used in subsequent calls to this function.
intget_current_id(session ref)
Return the ID of the next event to be generated by the system
Parameters:
session ref session_id
Reference to a valid session
Minimum role:
read-only
Result:
the event ID
Published in:
XenServer 4.0 (rio)
Return the ID of the next event to be generated by the system
stringinject(session ref, string, string)
Injects an artificial event on the given object and returns the corresponding ID in the form of a token, which can be used as a point of reference for database events. For example, to check whether an object has reached the right state before attempting an operation, one can inject an artificial event on the object and wait until the token returned by consecutive event.from calls is lexicographically greater than the one returned by event.inject.
Parameters:
session ref session_id
Reference to a valid session
string class
class of the object
string ref
A reference to the object that will be changed.
Minimum role:
read-only
Result:
the event ID in the form of a token
Published in:
XenServer 6.1 (tampa)
Injects an artificial event on the given object and returns the corresponding ID in the form of a token, which can be used as a point of reference for database events. For example, to check whether an object has reached the right state before attempting an operation, one can inject an artificial event on the object and wait until the token returned by consecutive event.from calls is lexicographically greater than the one returned by event.inject.
Deprecated
event record setnext(session ref)
Blocking call which returns a (possibly empty) batch of events. This method is only recommended for legacy use. New development should use event.from which supercedes this method.
Parameters:
session ref session_id
Reference to a valid session
Minimum role:
read-only
Result:
A set of events
Errors:
SESSION_NOT_REGISTERED
This session is not registered to receive events. You must call event.register before event.next. The session handle you are using is echoed.
EVENTS_LOST
Some events have been lost from the queue and cannot be retrieved.
Published in:
XenServer 4.0 (rio)
Blocking call which returns a (possibly empty) batch of events. This method is only recommended for legacy use. New development should use event.from which supercedes this method.
Deprecated in:
XenServer 6.0 (boston)
Deprecated
voidregister(session ref, string set)
Registers this session with the event system for a set of given classes. This method is only recommended for legacy use in conjunction with event.next.
Parameters:
session ref session_id
Reference to a valid session
string set classes
the classes for which the session will register with the event system; specifying * as the desired class will register for all classes
Minimum role:
read-only
Published in:
XenServer 4.0 (rio)
Registers this session with the event system for a set of given classes. This method is only recommended for legacy use in conjunction with event.next.
Deprecated in:
XenServer 6.0 (boston)
Deprecated
voidunregister(session ref, string set)
Removes this session's registration with the event system for a set of given classes. This method is only recommended for legacy use in conjunction with event.next.
Parameters:
session ref session_id
Reference to a valid session
string set classes
the classes for which the session's registration with the event system will be removed
Minimum role:
read-only
Published in:
XenServer 4.0 (rio)
Removes this session's registration with the event system for a set of given classes. This method is only recommended for legacy use in conjunction with event.next.
Deprecated in:
XenServer 6.0 (boston)
Feature
Class: Feature
A new piece of functionality
Published in:
XenServer 7.2 (falcon)
Fields
boolenabled[RO/runtime]
Indicates whether the feature is enabled
Default value:
false
Published in:
XenServer 7.2 (falcon)
boolexperimental[RO/constructor]
Indicates whether the feature is experimental (as opposed to stable and fully supported)
Default value:
false
Published in:
XenServer 7.2 (falcon)
host refhost[RO/runtime]
The host where this feature is available
Published in:
XenServer 7.2 (falcon)
stringname_description[RO/constructor]
a notes field containing human-readable description
Default value:
""
Published in:
XenServer 4.0 (rio)
a notes field containing human-readable description
stringname_label[RO/constructor]
a human-readable name
Default value:
""
Published in:
XenServer 4.0 (rio)
a human-readable name
stringuuid[RO/runtime]
Unique identifier/object reference
Published in:
XenServer 7.2 (falcon)
stringversion[RO/constructor]
The version of this feature
Default value:
"1.0"
Published in:
XenServer 7.2 (falcon)
Messages
Feature ref setget_all(session ref)
Return a list of all the Features known to the system.
Set the other_config field of the given GPU_group.
Parameters:
session ref session_id
Reference to a valid session
GPU_group ref self
reference to the object
(string → string) map value
New value to set
Minimum role:
pool-operator
Published in:
XenServer 6.0 (boston)
host
Class: host
A physical host
Published in:
XenServer 4.0 (rio)
A physical host
Enums
host_allowed_operations
Values:
provision
Indicates this host is able to provision another VM
evacuate
Indicates this host is evacuating
shutdown
Indicates this host is in the process of shutting itself down
reboot
Indicates this host is in the process of rebooting
power_on
Indicates this host is in the process of being powered on
vm_start
This host is starting a VM
vm_resume
This host is resuming a VM
vm_migrate
This host is the migration target of a VM
apply_updates
Indicates this host is being updated
enable
Indicates this host is in the process of enabling
latest_synced_updates_applied_state
Values:
yes
The host is up to date with the latest updates synced from remote CDN
no
The host is outdated with the latest updates synced from remote CDN
unknown
If the host is up to date with the latest updates synced from remote CDN is unknown
update_guidances
Values:
reboot_host
Indicates the updated host should reboot as soon as possible
reboot_host_on_livepatch_failure
Indicates the updated host should reboot as soon as possible since one or more livepatch(es) failed to be applied.
reboot_host_on_kernel_livepatch_failure
Indicates the updated host should reboot as soon as possible since one or more kernel livepatch(es) failed to be applied.
reboot_host_on_xen_livepatch_failure
Indicates the updated host should reboot as soon as possible since one or more xen livepatch(es) failed to be applied.
restart_toolstack
Indicates the Toolstack running on the updated host should restart as soon as possible
restart_device_model
Indicates the device model of a running VM should restart as soon as possible
restart_vm
Indicates the VM should restart as soon as possible
host_display
Values:
enabled
This host is outputting its console to a physical display device
disable_on_reboot
The host will stop outputting its console to a physical display device on next boot
disabled
This host is not outputting its console to a physical display device
enable_on_reboot
The host will start outputting its console to a physical display device on next boot
host_sched_gran
Values:
core
core scheduling
cpu
CPU scheduling
socket
socket scheduling
host_numa_affinity_policy
Values:
any
VMs are spread across all available NUMA nodes
best_effort
VMs are placed on the smallest number of NUMA nodes that they fit using soft-pinning, but the policy doesn't guarantee a balanced placement, falling back to the 'any' policy.
default_policy
Use the NUMA affinity policy that is the default for the current version
Fields
stringaddress[RW]
The address by which this host can be contacted from any other host in the pool
Published in:
XenServer 4.0 (rio)
The address by which this host can be contacted from any other host in the pool
list of the operations allowed in this state. This list is advisory only and the server state may have changed by the time this field is read by a client.
Default value:
{}
Published in:
XenServer 4.0 (rio)
list of the operations allowed in this state. This list is advisory only and the server state may have changed by the time this field is read by a client.
The CPU configuration on this host. May contain keys such as "nr_nodes", "sockets_per_node", "cores_per_socket", or "threads_per_core"
Published in:
XenServer 4.0 (rio)
The CPU configuration on this host. May contain keys such as "nr_nodes", "sockets_per_node", "cores_per_socket", or "threads_per_core"
The set of pending full guidances after applying updates, which a user should follow to make some updates, e.g. specific hardware drivers or CPU features, fully effective, but the 'average user' doesn't need to
The set of pending recommended guidances after applying updates, which most users should follow to make the updates effective, but if not followed, will not cause a failure
Allow SSLv3 protocol and ciphersuites as used by older server versions. This controls both incoming and outgoing connections. When this is set to a different value, the host immediately restarts its SSL/TLS listening service; typically this takes less than a second but existing connections to it will be broken. API login sessions will remain valid.
Default value:
true
Published in:
XenServer 7.0 (dundee)
Deprecated in:
Citrix Hypervisor 8.2 (stockholm)
Legacy SSL no longer supported
string setsupported_bootloaders[RO/runtime]
a list of the bootloaders installed on the machine
Published in:
XenServer 4.0 (rio)
a list of the bootloaders installed on the machine
SR refsuspend_image_sr[RW]
The SR in which VDIs for suspend images are created
Published in:
XenServer 4.0 (rio)
The SR in which VDIs for suspend images are created
Change to another edition, or reactivate the current edition after a license has expired. This may be subject to the successful checkout of an appropriate license.
Parameters:
session ref session_id
Reference to a valid session
host ref host
The host
string edition
The requested edition
bool force
Update the license params even if the apply call fails
Minimum role:
pool-operator
Published in:
XenServer 5.6 (midnight-ride)
Change to another edition, or reactivate the current edition after a license has expired. This may be subject to the successful checkout of an appropriate license.
Create a placeholder for a named binary blob of data that is associated with this host
Parameters:
session ref session_id
Reference to a valid session
host ref host
The host
string name
The name associated with the blob
string mime_type
The mime type for the data. Empty string translates to application/octet-stream
bool public
True if the blob should be publicly available
Minimum role:
pool-operator
Result:
The reference of the blob, needed for populating its data
Published in:
XenServer 5.0 (orlando)
Create a placeholder for a named binary blob of data that is associated with this host
voiddeclare_dead(session ref, host ref)
Declare that a host is dead. This is a dangerous operation, and should only be called if the administrator is absolutely sure the host is definitely dead
Parameters:
session ref session_id
Reference to a valid session
host ref host
The Host to declare is dead
Minimum role:
pool-operator
Published in:
XenServer 6.2 (clearwater)
Declare that a host is dead. This is a dangerous operation, and should only be called if the administrator is absolutely sure the host is definitely dead
voiddestroy(session ref, host ref)
Destroy specified host record in database
Parameters:
session ref session_id
Reference to a valid session
host ref self
The host record to remove
Minimum role:
pool-operator
Published in:
XenServer 4.0 (rio)
Destroy specified host record in database
voiddisable(session ref, host ref)
Puts the host into a state in which no new VMs can be started. Currently active VMs on the host continue to execute.
Parameters:
session ref session_id
Reference to a valid session
host ref host
The Host to disable
Minimum role:
client-cert
Published in:
XenServer 4.0 (rio)
Puts the host into a state in which no new VMs can be started. Currently active VMs on the host continue to execute.
Get the allowed_operations field of the given host.
Parameters:
session ref session_id
Reference to a valid session
host ref self
reference to the object
Minimum role:
read-only
Result:
value of the field
Published in:
XenServer 4.0 (rio)
list of the operations allowed in this state. This list is advisory only and the server state may have changed by the time this field is read by a client.
intget_API_version_major(session ref, host ref)
Get the API_version/major field of the given host.
Parameters:
session ref session_id
Reference to a valid session
host ref self
reference to the object
Minimum role:
read-only
Result:
value of the field
Published in:
XenServer 4.0 (rio)
major version number
intget_API_version_minor(session ref, host ref)
Get the API_version/minor field of the given host.
Get the cpu_configuration field of the given host.
Parameters:
session ref session_id
Reference to a valid session
host ref self
reference to the object
Minimum role:
read-only
Result:
value of the field
Published in:
XenServer 4.0 (rio)
The CPU configuration on this host. May contain keys such as "nr_nodes", "sockets_per_node", "cores_per_socket", or "threads_per_core"
Reconfigure the management network interface. Should only be used if Host.management_reconfigure is impossible because the network configuration is broken.
Parameters:
session ref session_id
Reference to a valid session
string interface
name of the interface to use as a management interface
Minimum role:
pool-operator
Published in:
XenServer 4.1 (miami)
Reconfigure the management network interface. Should only be used if Host.management_reconfigure is impossible because the network configuration is broken.
voidmanagement_disable(session ref)
Disable the management network interface
Parameters:
session ref session_id
Reference to a valid session
Minimum role:
pool-operator
Published in:
XenServer 4.1 (miami)
Disable the management network interface
voidmanagement_reconfigure(session ref, PIF ref)
Reconfigure the management network interface
Parameters:
session ref session_id
Reference to a valid session
PIF ref pif
reference to a PIF object corresponding to the management interface
Delete the current TLS server certificate and replace by a new, self-signed one. This should only be used with extreme care.
Parameters:
session ref session_id
Reference to a valid session
host ref host
The host
Minimum role:
pool-admin
Published in:
XAPI 1.290.0 (1.290.0)
voidrestart_agent(session ref, host ref)
Restarts the agent after a 10 second pause. WARNING: this is a dangerous operation. Any operations in progress will be aborted, and unrecoverable data loss may occur. The caller is responsible for ensuring that there are no operations in progress when this method is called.
Parameters:
session ref session_id
Reference to a valid session
host ref host
The Host on which you want to restart the agent
Minimum role:
pool-operator
Published in:
XenServer 4.0 (rio)
Restarts the agent after a 10 second pause. WARNING: this is a dangerous operation. Any operations in progress will be aborted, and unrecoverable data loss may occur. The caller is responsible for ensuring that there are no operations in progress when this method is called.
Retrieves recommended host migrations to perform when evacuating the host from the wlb server. If a VM cannot be migrated from the host the reason is listed instead of a recommendation.
Parameters:
session ref session_id
Reference to a valid session
host ref self
The host to query
Minimum role:
read-only
Result:
VMs and the reasons why they would block evacuation, or their target host recommended by the wlb server
Published in:
XenServer 5.5 (george)
Retrieves recommended host migrations to perform when evacuating the host from the wlb server. If a VM cannot be migrated from the host the reason is listed instead of a recommendation.
Sets xen's sched-gran on a host. See: https://xenbits.xen.org/docs/unstable/misc/xen-command-line.html#sched-gran-x86
Parameters:
session ref session_id
Reference to a valid session
host ref self
The host
enum host_sched_gran value
The sched-gran to apply to a host
Minimum role:
Published in:
XAPI 1.271.0 (1.271.0)
voidset_ssl_legacy(session ref, host ref, bool)
Enable/disable SSLv3 for interoperability with older server versions. When this is set to a different value, the host immediately restarts its SSL/TLS listening service; typically this takes less than a second but existing connections to it will be broken. API login sessions will remain valid.
Parameters:
session ref session_id
Reference to a valid session
host ref self
The host
bool value
True to allow SSLv3 and ciphersuites as used in old XenServer versions
Minimum role:
pool-operator
Published in:
XenServer 7.0 (dundee)
Changed in:
Citrix Hypervisor 8.2 (stockholm)
Legacy SSL no longer supported
voidset_suspend_image_sr(session ref, host ref, SR ref)
Set the suspend_image_sr field of the given host.
Parameters:
session ref session_id
Reference to a valid session
host ref self
reference to the object
SR ref value
New value to set
Minimum role:
pool-operator
Published in:
XenServer 4.0 (rio)
The SR in which VDIs for suspend images are created
Shutdown the host. (This function can only be called if there are no currently running VMs on the host and it is disabled.)
Parameters:
session ref session_id
Reference to a valid session
host ref host
The Host to shutdown
Minimum role:
pool-operator
Published in:
XenServer 4.0 (rio)
Shutdown the host. (This function can only be called if there are no currently running VMs on the host and it is disabled.)
voidshutdown_agent(session ref)
Shuts the agent down after a 10 second pause. WARNING: this is a dangerous operation. Any operations in progress will be aborted, and unrecoverable data loss may occur. The caller is responsible for ensuring that there are no operations in progress when this method is called.
Parameters:
session ref session_id
Reference to a valid session
Minimum role:
pool-operator
Published in:
XenServer 5.0 (orlando)
Shuts the agent down after a 10 second pause. WARNING: this is a dangerous operation. Any operations in progress will be aborted, and unrecoverable data loss may occur. The caller is responsible for ensuring that there are no operations in progress when this method is called.
voidsync_data(session ref, host ref)
This causes the synchronisation of the non-database data (messages, RRDs and so on) stored on the master to be synchronised with the host
Parameters:
session ref session_id
Reference to a valid session
host ref host
The host to whom the data should be sent
Minimum role:
pool-admin
Published in:
XenServer 5.0 (orlando)
This causes the synchronisation of the non-database data (messages, RRDs and so on) stored on the master to be synchronised with the host
voidsyslog_reconfigure(session ref, host ref)
Re-configure syslog logging
Parameters:
session ref session_id
Reference to a valid session
host ref host
Tell the host to reread its Host.logging parameters and reconfigure itself accordingly
Minimum role:
pool-operator
Published in:
XenServer 4.1 (miami)
Re-configure syslog logging
host_cpu
Deprecated
Class: host_cpu
A physical CPU
Published in:
XenServer 4.0 (rio)
A physical CPU
Deprecated in:
XenServer 5.6 (midnight-ride)
Deprecated in favour of the Host.cpu_info field
Fields
intfamily[RO/runtime]
the family (number) of the physical CPU
Published in:
XenServer 4.0 (rio)
the family (number) of the physical CPU
stringfeatures[RO/runtime]
the physical CPU feature bitmap
Published in:
XenServer 4.0 (rio)
the physical CPU feature bitmap
stringflags[RO/runtime]
the flags of the physical CPU (a decoded version of the features field)
Published in:
XenServer 4.0 (rio)
the flags of the physical CPU (a decoded version of the features field)
Remove the given key and its corresponding value from the other_config field of the given host_crashdump. If the key is not in that Map, then do nothing.
Remove the given key and its corresponding value from the other_config field of the given host_metrics. If the key is not in that Map, then do nothing.
Set the other_config field of the given host_patch.
Parameters:
session ref session_id
Reference to a valid session
host_patch ref self
reference to the object
(string → string) map value
New value to set
Minimum role:
pool-operator
Published in:
XenServer 4.1 (miami)
additional configuration
LVHD
Class: LVHD
LVHD SR specific operations
Published in:
XenServer 7.0 (dundee)
LVHD SR specific operations
Fields
stringuuid[RO/runtime]
Unique identifier/object reference
Published in:
XenServer 4.0 (rio)
Unique identifier/object reference
Messages
stringenable_thin_provisioning(session ref, host ref, SR ref, int, int)
Upgrades an LVHD SR to enable thin-provisioning. Future VDIs created in this SR will be thinly-provisioned, although existing VDIs will be left alone. Note that the SR must be attached to the SRmaster for upgrade to work.
Parameters:
session ref session_id
Reference to a valid session
host ref host
The LVHD Host to upgrade to being thin-provisioned.
SR ref SR
The LVHD SR to upgrade to being thin-provisioned.
int initial_allocation
The initial amount of space to allocate to a newly-created VDI in bytes
int allocation_quantum
The amount of space to allocate to a VDI when it needs to be enlarged in bytes
Minimum role:
pool-admin
Result:
Message from LVHD.enable_thin_provisioning extension
Published in:
XenServer 7.0 (dundee)
Upgrades an LVHD SR to enable thin-provisioning. Future VDIs created in this SR will be thinly-provisioned, although existing VDIs will be left alone. Note that the SR must be attached to the SRmaster for upgrade to work.
LVHD refget_by_uuid(session ref, string)
Get a reference to the LVHD instance with the specified UUID.
Parameters:
session ref session_id
Reference to a valid session
string uuid
UUID of object to return
Minimum role:
read-only
Result:
reference to the object
Published in:
XenServer 7.0 (dundee)
LVHD SR specific operations
LVHD recordget_record(session ref, LVHD ref)
Get a record containing the current state of the given LVHD.
Parameters:
session ref session_id
Reference to a valid session
LVHD ref self
reference to the object
Minimum role:
read-only
Result:
all fields from the object
Published in:
XenServer 7.0 (dundee)
LVHD SR specific operations
stringget_uuid(session ref, LVHD ref)
Get the uuid field of the given LVHD.
Parameters:
session ref session_id
Reference to a valid session
LVHD ref self
reference to the object
Minimum role:
read-only
Result:
value of the field
Published in:
XenServer 4.0 (rio)
Unique identifier/object reference
message
Class: message
An message for the attention of the administrator
Published in:
XenServer 5.0 (orlando)
An message for the attention of the administrator
Enums
cls
Values:
VM
VM
Host
Host
SR
SR
Pool
Pool
VMPP
VMPP
VMSS
VMSS
PVS_proxy
PVS_proxy
VDI
VDI
Certificate
Certificate
Fields
stringbody[RO/runtime]
The body of the message
Published in:
XenServer 4.0 (rio)
The body of the message
enum clscls[RO/runtime]
The class of the object this message is associated with
Published in:
XenServer 5.0 (orlando)
Extended in:
XAPI 1.313.0 (1.313.0)
Added Certificate class
stringname[RO/runtime]
The name of the message
Published in:
XenServer 4.0 (rio)
The name of the message
stringobj_uuid[RO/runtime]
The uuid of the object this message is associated with
Published in:
XenServer 4.0 (rio)
The uuid of the object this message is associated with
list of the operations allowed in this state. This list is advisory only and the server state may have changed by the time this field is read by a client.
Default value:
{}
Published in:
XenServer 4.0 (rio)
list of the operations allowed in this state. This list is advisory only and the server state may have changed by the time this field is read by a client.
(VIF ref → string) mapassigned_ips[RO/runtime]
The IP addresses assigned to VIFs on networks that have active xapi-managed DHCP
Default value:
{}
Published in:
XenServer 6.5 (creedence)
The IP addresses assigned to VIFs on networks that have active xapi-managed DHCP
(string → blob ref) mapblobs[RO/runtime]
Binary blobs associated with this network
Default value:
{}
Published in:
XenServer 5.0 (orlando)
Binary blobs associated with this network
stringbridge[RO/constructor]
name of the bridge corresponding to this network on the local host
Add the given key-value pair to the other_config field of the given network.
Parameters:
session ref session_id
Reference to a valid session
network ref self
reference to the object
string key
Key to add
string value
Value to add
Minimum role:
pool-operator
Published in:
XenServer 4.0 (rio)
additional configuration
network refcreate(session ref, network record)
Create a new network instance, and return its handle.
The constructor args are: name_label, name_description, MTU, other_config*, bridge, managed, tags (* = non-optional).
Get the allowed_operations field of the given network.
Parameters:
session ref session_id
Reference to a valid session
network ref self
reference to the object
Minimum role:
read-only
Result:
value of the field
Published in:
XenServer 4.0 (rio)
list of the operations allowed in this state. This list is advisory only and the server state may have changed by the time this field is read by a client.
Enable SR-IOV on the specific PIF. It will create a network-sriov based on the specific PIF and automatically create a logical PIF to connect the specific network.
Parameters:
session ref session_id
Reference to a valid session
PIF ref pif
PIF on which to enable SR-IOV
network ref network
Network to connect SR-IOV virtual functions with VM VIFs
Minimum role:
pool-operator
Result:
The reference of the created network_sriov object
Published in:
XenServer 7.5 (kolkata)
voiddestroy(session ref, network_sriov ref)
Disable SR-IOV on the specific PIF. It will destroy the network-sriov and the logical PIF accordingly.
Parameters:
session ref session_id
Reference to a valid session
network_sriov ref self
SRIOV to destroy
Minimum role:
pool-operator
Published in:
XenServer 7.5 (kolkata)
network_sriov ref setget_all(session ref)
Return a list of all the network_sriovs known to the system.
Get the requires_reboot field of the given network_sriov.
Parameters:
session ref session_id
Reference to a valid session
network_sriov ref self
reference to the object
Minimum role:
read-only
Result:
value of the field
Published in:
XenServer 7.5 (kolkata)
stringget_uuid(session ref, network_sriov ref)
Get the uuid field of the given network_sriov.
Parameters:
session ref session_id
Reference to a valid session
network_sriov ref self
reference to the object
Minimum role:
read-only
Result:
value of the field
Published in:
XenServer 4.0 (rio)
Unique identifier/object reference
Observer
Prototype
Class: Observer
Describes a observer which will control observability activity in the Toolstack
Prototyped in:
XAPI 23.14.0 (23.14.0)
Fields
Prototype
(string → string) mapattributes[RO/constructor]
Attributes that observer will add to the data they produce
Default value:
{}
Prototyped in:
XAPI 23.14.0 (23.14.0)
Prototype
string setcomponents[RO/constructor]
The list of xenserver components the observer will broadcast. An empty list means all components
Default value:
{}
Prototyped in:
XAPI 23.14.0 (23.14.0)
Prototype
boolenabled[RO/constructor]
This denotes if the observer is enabled. true if it is enabled and false if it is disabled
Default value:
false
Prototyped in:
XAPI 23.14.0 (23.14.0)
Prototype
string setendpoints[RO/constructor]
The list of endpoints where data is exported to. Each endpoint is a URL or the string 'bugtool' refering to the internal logs
Default value:
{}
Prototyped in:
XAPI 23.14.0 (23.14.0)
Prototype
host ref sethosts[RO/constructor]
The list of hosts the observer is active on. An empty list means all hosts
Default value:
{}
Prototyped in:
XAPI 23.14.0 (23.14.0)
stringname_description[RW]
a notes field containing human-readable description
Default value:
""
Published in:
XenServer 4.0 (rio)
a notes field containing human-readable description
stringname_label[RW]
a human-readable name
Default value:
""
Published in:
XenServer 4.0 (rio)
a human-readable name
Prototype
stringuuid[RO/runtime]
Unique identifier/object reference
Prototyped in:
XAPI 23.14.0 (23.14.0)
Messages
Prototype
Observer refcreate(session ref, Observer record)
Create a new Observer instance, and return its handle.
The constructor args are: name_label, name_description, hosts, attributes, endpoints, components, enabled (* = non-optional).
Parameters:
session ref session_id
Reference to a valid session
Observer record args
All constructor arguments
Minimum role:
pool-admin
Result:
reference to the newly created object
Prototyped in:
XAPI 23.14.0 (23.14.0)
Prototype
voiddestroy(session ref, Observer ref)
Destroy the specified Observer instance.
Parameters:
session ref session_id
Reference to a valid session
Observer ref self
reference to the object
Minimum role:
pool-admin
Prototyped in:
XAPI 23.14.0 (23.14.0)
Prototype
Observer ref setget_all(session ref)
Return a list of all the Observers known to the system.
A physical network interface (note separate VLANs are represented as several PIFs)
Published in:
XenServer 4.0 (rio)
A physical network interface (note separate VLANs are represented as several PIFs)
Enums
pif_igmp_status
Values:
enabled
IGMP Snooping is enabled in the corresponding backend bridge.'
disabled
IGMP Snooping is disabled in the corresponding backend bridge.'
unknown
IGMP snooping status is unknown. If this is a VLAN master, then please consult the underlying VLAN slave PIF.
ip_configuration_mode
Values:
None
Do not acquire an IP address
DHCP
Acquire an IP address by DHCP
Static
Static IP address configuration
ipv6_configuration_mode
Values:
None
Do not acquire an IPv6 address
DHCP
Acquire an IPv6 address by DHCP
Static
Static IPv6 address configuration
Autoconf
Router assigned prefix delegation IPv6 allocation
primary_address_type
Values:
IPv4
Primary address is the IPv4 address
IPv6
Primary address is the IPv6 address
Fields
Bond ref setbond_master_of[RO/runtime]
Indicates this PIF represents the results of a bond
Published in:
XenServer 4.1 (miami)
Indicates this PIF represents the results of a bond
Bond refbond_slave_of[RO/runtime]
Indicates which bond this interface is part of
Default value:
Null
Published in:
XenServer 4.1 (miami)
Indicates which bond this interface is part of
string setcapabilities[RO/runtime]
Additional capabilities on the interface.
Default value:
{}
Published in:
XenServer 7.0 (dundee)
boolcurrently_attached[RO/runtime]
true if this interface is online
Default value:
true
Published in:
XenServer 4.1 (miami)
true if this interface is online
stringdevice[RO/constructor]
machine-readable name of the interface (e.g. eth0)
Published in:
XenServer 4.0 (rio)
machine-readable name of the interface (e.g. eth0)
booldisallow_unplug[RO/runtime]
Prevent this PIF from being unplugged; set this to notify the management tool-stack that the PIF has a special use and should not be unplugged under any circumstances (e.g. because you're running storage traffic over it)
Default value:
false
Published in:
XenServer 5.0 (orlando)
Prevent this PIF from being unplugged; set this to notify the management tool-stack that the PIF has a special use and should not be unplugged under any circumstances (e.g. because you're running storage traffic over it)
stringDNS[RO/runtime]
Comma separated list of the IP addresses of the DNS servers to use
Default value:
""
Published in:
XenServer 4.1 (miami)
Comma separated list of the IP addresses of the DNS servers to use
Sets if and how this interface gets an IPv6 address
Default value:
None
Published in:
XenServer 6.1 (tampa)
stringipv6_gateway[RO/runtime]
IPv6 gateway
Default value:
""
Published in:
XenServer 6.1 (tampa)
stringMAC[RO/constructor]
ethernet MAC address of physical interface
Published in:
XenServer 4.0 (rio)
ethernet MAC address of physical interface
boolmanaged[RO/constructor]
Indicates whether the interface is managed by xapi. If it is not, then xapi will not configure the interface, the commands PIF.plug/unplug/reconfigure_ip(v6) cannot be used, nor can the interface be bonded or have VLANs based on top through xapi.
Default value:
true
Published in:
XenServer 6.2 SP1 (vgpu-productisation)
boolmanagement[RO/runtime]
Indicates whether the control software is listening for connections on this interface
Default value:
false
Published in:
XenServer 4.1 (miami)
Indicates whether the control software is listening for connections on this interface
PIF_metrics refmetrics[RO/runtime]
metrics associated with this PIF
Published in:
XenServer 4.0 (rio)
metrics associated with this PIF
intMTU[RO/constructor]
MTU in octets
Published in:
XenServer 4.0 (rio)
MTU in octets
stringnetmask[RO/runtime]
IP netmask
Default value:
""
Published in:
XenServer 4.1 (miami)
IP netmask
network refnetwork[RO/constructor]
virtual network to which this pif is connected
Published in:
XenServer 4.0 (rio)
virtual network to which this pif is connected
(string → string) mapother_config[RW]
Additional configuration
Default value:
{}
Published in:
XenServer 4.1 (miami)
Additional configuration
PCI refPCI[RO/runtime]
Link to underlying PCI device
Default value:
OpaqueRef:NULL
Published in:
XenServer 7.5 (kolkata)
boolphysical[RO/runtime]
true if this represents a physical network interface
Default value:
false
Published in:
XenServer 4.1 (miami)
true if this represents a physical network interface
Destroy the PIF object (provided it is a VLAN interface). This call is deprecated: use VLAN.destroy or Bond.destroy instead
Parameters:
session ref session_id
Reference to a valid session
PIF ref self
the PIF object to destroy
Minimum role:
pool-operator
Errors:
PIF_IS_PHYSICAL
You tried to destroy a PIF, but it represents an aspect of the physical host configuration, and so cannot be destroyed. The parameter echoes the PIF handle you gave.
Published in:
XenServer 4.0 (rio)
Destroy the PIF object (provided it is a VLAN interface)
Deprecated in:
XenServer 4.1 (miami)
Replaced by VLAN.destroy and Bond.destroy
voidforget(session ref, PIF ref)
Destroy the PIF object matching a particular network interface
Parameters:
session ref session_id
Reference to a valid session
PIF ref self
The PIF object to destroy
Minimum role:
pool-operator
Errors:
PIF_TUNNEL_STILL_EXISTS
Operation cannot proceed while a tunnel exists on this interface.
CLUSTERING_ENABLED
An operation was attempted while clustering was enabled on the cluster_host.
Published in:
XenServer 4.1 (miami)
Destroy the PIF object matching a particular network interface
PIF ref setget_all(session ref)
Return a list of all the PIFs known to the system.
Parameters:
session ref session_id
Reference to a valid session
Minimum role:
read-only
Result:
references to all objects
Published in:
XenServer 4.0 (rio)
A physical network interface (note separate VLANs are represented as several PIFs)
Return a map of PIF references to PIF records for all PIFs known to the system.
Parameters:
session ref session_id
Reference to a valid session
Minimum role:
read-only
Result:
records of all objects
Published in:
XenServer 4.0 (rio)
A physical network interface (note separate VLANs are represented as several PIFs)
Bond ref setget_bond_master_of(session ref, PIF ref)
Get the bond_master_of field of the given PIF.
Parameters:
session ref session_id
Reference to a valid session
PIF ref self
reference to the object
Minimum role:
read-only
Result:
value of the field
Published in:
XenServer 4.1 (miami)
Indicates this PIF represents the results of a bond
Bond refget_bond_slave_of(session ref, PIF ref)
Get the bond_slave_of field of the given PIF.
Parameters:
session ref session_id
Reference to a valid session
PIF ref self
reference to the object
Minimum role:
read-only
Result:
value of the field
Published in:
XenServer 4.1 (miami)
Indicates which bond this interface is part of
PIF refget_by_uuid(session ref, string)
Get a reference to the PIF instance with the specified UUID.
Parameters:
session ref session_id
Reference to a valid session
string uuid
UUID of object to return
Minimum role:
read-only
Result:
reference to the object
Published in:
XenServer 4.0 (rio)
A physical network interface (note separate VLANs are represented as several PIFs)
string setget_capabilities(session ref, PIF ref)
Get the capabilities field of the given PIF.
Parameters:
session ref session_id
Reference to a valid session
PIF ref self
reference to the object
Minimum role:
read-only
Result:
value of the field
Published in:
XenServer 7.0 (dundee)
boolget_currently_attached(session ref, PIF ref)
Get the currently_attached field of the given PIF.
Parameters:
session ref session_id
Reference to a valid session
PIF ref self
reference to the object
Minimum role:
read-only
Result:
value of the field
Published in:
XenServer 4.1 (miami)
true if this interface is online
stringget_device(session ref, PIF ref)
Get the device field of the given PIF.
Parameters:
session ref session_id
Reference to a valid session
PIF ref self
reference to the object
Minimum role:
read-only
Result:
value of the field
Published in:
XenServer 4.0 (rio)
machine-readable name of the interface (e.g. eth0)
boolget_disallow_unplug(session ref, PIF ref)
Get the disallow_unplug field of the given PIF.
Parameters:
session ref session_id
Reference to a valid session
PIF ref self
reference to the object
Minimum role:
read-only
Result:
value of the field
Published in:
XenServer 5.0 (orlando)
Prevent this PIF from being unplugged; set this to notify the management tool-stack that the PIF has a special use and should not be unplugged under any circumstances (e.g. because you're running storage traffic over it)
stringget_DNS(session ref, PIF ref)
Get the DNS field of the given PIF.
Parameters:
session ref session_id
Reference to a valid session
PIF ref self
reference to the object
Minimum role:
read-only
Result:
value of the field
Published in:
XenServer 4.1 (miami)
Comma separated list of the IP addresses of the DNS servers to use
This operation cannot be performed because it would invalidate VM failover planning such that the system would be unable to guarantee to restart protected VMs after a Host failure.
VIF_IN_USE
Network has active VIFs
PIF_DOES_NOT_ALLOW_UNPLUG
The operation you requested cannot be performed because the specified PIF does not allow unplug.
PIF_HAS_FCOE_SR_IN_USE
The operation you requested cannot be performed because the specified PIF has FCoE SR in use.
Published in:
XenServer 4.1 (miami)
Attempt to bring down a physical interface
PIF_metrics
Class: PIF_metrics
The metrics associated with a physical network interface
Published in:
XenServer 4.0 (rio)
The metrics associated with a physical network interface
list of the operations allowed in this state. This list is advisory only and the server state may have changed by the time this field is read by a client.
Default value:
{}
Published in:
XenServer 4.0 (rio)
list of the operations allowed in this state. This list is advisory only and the server state may have changed by the time this field is read by a client.
(string → blob ref) mapblobs[RO/runtime]
Binary blobs associated with this pool
Default value:
{}
Published in:
XenServer 5.0 (orlando)
Binary blobs associated with this pool
boolclient_certificate_auth_enabled[RO/runtime]
True if authentication by TLS client certificates is enabled
Default value:
false
Published in:
XAPI 1.318.0 (1.318.0)
stringclient_certificate_auth_name[RO/runtime]
The name (CN/SAN) that an incoming client certificate must have to allow authentication
Default value:
""
Published in:
XAPI 1.318.0 (1.318.0)
boolcoordinator_bias[RW]
true if bias against pool master when scheduling vms is enabled, false otherwise
Default value:
true
Prototyped in:
XAPI 22.37.0 (22.37.0)
Published in:
XenServer 4.0 (rio)
true if bias against pool master when scheduling vms is enabled, false otherwise
If set to false then operations which would cause the Pool to become overcommitted will be blocked.
Default value:
false
Published in:
XenServer 5.0 (orlando)
If set to false then operations which would cause the Pool to become overcommitted will be blocked.
stringha_cluster_stack[RO/runtime]
The HA cluster stack that is currently in use. Only valid when HA is enabled.
Default value:
""
Published in:
XenServer 7.0 (dundee)
The HA cluster stack that is currently in use. Only valid when HA is enabled.
(string → string) mapha_configuration[RO/runtime]
The current HA configuration
Default value:
{}
Published in:
XenServer 5.0 (orlando)
The current HA configuration
boolha_enabled[RO/runtime]
true if HA is enabled on the pool, false otherwise
Default value:
false
Published in:
XenServer 5.0 (orlando)
true if HA is enabled on the pool, false otherwise
intha_host_failures_to_tolerate[RO/runtime]
Number of host failures to tolerate before the Pool is declared to be overcommitted
Default value:
0
Published in:
XenServer 5.0 (orlando)
Number of host failures to tolerate before the Pool is declared to be overcommitted
boolha_overcommitted[RO/runtime]
True if the Pool is considered to be overcommitted i.e. if there exist insufficient physical resources to tolerate the configured number of host failures
Default value:
false
Published in:
XenServer 5.0 (orlando)
True if the Pool is considered to be overcommitted i.e. if there exist insufficient physical resources to tolerate the configured number of host failures
intha_plan_exists_for[RO/runtime]
Number of future host failures we have managed to find a plan for. Once this reaches zero any future host failures will cause the failure of protected VMs.
Default value:
0
Published in:
XenServer 5.0 (orlando)
Number of future host failures we have managed to find a plan for. Once this reaches zero any future host failures will cause the failure of protected VMs.
string setha_statefiles[RO/runtime]
HA statefile VDIs in use
Default value:
{}
Published in:
XenServer 5.0 (orlando)
HA statefile VDIs in use
(string → string) maphealth_check_config[RW]
Configuration for the automatic health check feature
Default value:
{}
Published in:
XenServer 7.0 (dundee)
Configuration for the automatic health check feature
booligmp_snooping_enabled[RO/runtime]
true if IGMP snooping is enabled in the pool, false otherwise.
Default value:
false
Published in:
XenServer 7.3 (inverness)
true if IGMP snooping is enabled in the pool, false otherwise.
boolis_psr_pending[RW]
True if either a PSR is running or we are waiting for a PSR to be re-run
Default value:
false
Published in:
Citrix Hypervisor 8.2 Hotfix 2 (stockholm_psr)
True if either a PSR is running or we are waiting for a PSR to be re-run
Prototype
datetimelast_update_sync[RO/runtime]
time of the last update sychronization
Default value:
19700101T00:00:00Z
Prototyped in:
XAPI 23.18.0 (23.18.0)
boollive_patching_disabled[RW]
The pool-wide flag to show if the live patching feauture is disabled or not.
Default value:
false
Published in:
XenServer 7.1 (ely)
The pool-wide flag to show if the live patching feauture is disabled or not.
Prototype
intlocal_auth_max_threads[RO/constructor]
Maximum number of threads to use for PAM authentication
Default value:
8
Prototyped in:
XAPI 23.27.0 (23.27.0)
host refmaster[RO/runtime]
The host that is pool master
Published in:
XenServer 4.0 (rio)
The host that is pool master
VDI ref setmetadata_VDIs[RO/runtime]
The set of currently known metadata VDIs for this pool
Published in:
XenServer 6.0 (boston)
The set of currently known metadata VDIs for this pool
Prototype
boolmigration_compression[RW]
Default behaviour during migration, True if stream compression should be used
Default value:
false
Prototyped in:
XAPI 22.33.0 (22.33.0)
stringname_description[RW]
Description
Published in:
XenServer 4.0 (rio)
Description
stringname_label[RW]
Short name
Published in:
XenServer 4.0 (rio)
Short name
(string → string) mapother_config[RW]
additional configuration
Published in:
XenServer 4.0 (rio)
additional configuration
boolpolicy_no_vendor_device[RW]
The pool-wide policy for clients on whether to use the vendor device or not on newly created VMs. This field will also be consulted if the 'has_vendor_device' field is not specified in the VM.create call.
Default value:
false
Published in:
XenServer 7.0 (dundee)
The pool-wide policy for clients on whether to use the vendor device or not on newly created VMs. This field will also be consulted if the 'has_vendor_device' field is not specified in the VM.create call.
boolredo_log_enabled[RO/runtime]
true a redo-log is to be used other than when HA is enabled, false otherwise
Default value:
false
Published in:
XenServer 5.6 (midnight-ride)
true a redo-log is to be used other than when HA is enabled, false otherwise
VDI refredo_log_vdi[RO/runtime]
indicates the VDI to use for the redo-log other than when HA is enabled
Default value:
OpaqueRef:NULL
Published in:
XenServer 5.6 (midnight-ride)
indicates the VDI to use for the redo-log other than when HA is enabled
Repository ref setrepositories[RO/runtime]
The set of currently enabled repositories
Default value:
{}
Published in:
XAPI 1.301.0 (1.301.0)
The set of currently enabled repositories
secret refrepository_proxy_password[RO/runtime]
Password for the authentication of the proxy used in syncing with the enabled repositories
Default value:
OpaqueRef:NULL
Published in:
XAPI 21.3.0 (21.3.0)
Changed in:
XAPI 23.9.0 (23.9.0)
Changed internal_only to false
stringrepository_proxy_url[RO/runtime]
Url of the proxy used in syncing with the enabled repositories
Default value:
""
Published in:
XAPI 21.3.0 (21.3.0)
Url of the proxy used in syncing with the enabled repositories
stringrepository_proxy_username[RO/runtime]
Username for the authentication of the proxy used in syncing with the enabled repositories
Default value:
""
Published in:
XAPI 21.3.0 (21.3.0)
Username for the authentication of the proxy used in syncing with the enabled repositories
(string → string) maprestrictions[RO/runtime]
Pool-wide restrictions currently in effect
Default value:
{}
Published in:
XenServer 5.6 (midnight-ride)
Pool-wide restrictions currently in effect
SR refsuspend_image_SR[RW]
The SR in which VDIs for suspend images are created
Published in:
XenServer 4.0 (rio)
The SR in which VDIs for suspend images are created
List the names of all installed TLS CA certificates.
Parameters:
session ref session_id
Reference to a valid session
Minimum role:
pool-operator
Result:
All installed certificates
Published in:
XenServer 5.5 (george)
List installed TLS CA certificate
Deprecated in:
XAPI 1.290.0 (1.290.0)
Use openssl to inspect certificate
voidcertificate_sync(session ref)
Copy the TLS CA certificates and CRLs of the master to all slaves.
Parameters:
session ref session_id
Reference to a valid session
Minimum role:
pool-operator
Published in:
XenServer 5.5 (george)
Copy the TLS CA certificates and CRLs of the master to all slaves.
Deprecated
voidcertificate_uninstall(session ref, string)
Remove a pool-wide TLS CA certificate.
Parameters:
session ref session_id
Reference to a valid session
string name
The certificate name
Minimum role:
pool-operator
Published in:
XenServer 5.5 (george)
Install TLS CA certificate
Deprecated in:
XAPI 1.290.0 (1.290.0)
Use Pool.uninstall_ca_certificate instead
string set setcheck_update_readiness(session ref, pool ref, bool)
Check if the pool is ready to be updated. If not, report the reasons.
Parameters:
session ref session_id
Reference to a valid session
pool ref self
The pool
bool requires_reboot
Assume that the update will require host reboots
Minimum role:
client-cert
Result:
A set of error codes with arguments, if the pool is
not ready to update. An empty list means the pool can be updated.
Published in:
XAPI 1.304.0 (1.304.0)
voidconfigure_repository_proxy(session ref, pool ref, string, string, string)
Configure proxy for RPM package repositories.
Parameters:
session ref session_id
Reference to a valid session
pool ref self
The pool
string url
The URL of the proxy server
string username
The username used to authenticate with the proxy server
string password
The password used to authenticate with the proxy server
Minimum role:
client-cert
Published in:
XAPI 21.3.0 (21.3.0)
Configure proxy for RPM package repositories.
Prototype
voidconfigure_update_sync(session ref, pool ref, enum update_sync_frequency, int)
Configure periodic update synchronization to sync updates from a remote CDN
Parameters:
session ref session_id
Reference to a valid session
pool ref self
The pool
enum update_sync_frequency update_sync_frequency
The frequency at which updates are synchronized from a remote CDN: daily or weekly.
int update_sync_day
The day of the week the update synchronization will happen, based on pool's local timezone. Valid values are 0 to 6, 0 being Sunday. For 'daily' schedule, the value is ignored.
Minimum role:
pool-operator
Prototyped in:
XAPI 23.18.0 (23.18.0)
blob refcreate_new_blob(session ref, pool ref, string, string, bool)
Create a placeholder for a named binary blob of data that is associated with this pool
Parameters:
session ref session_id
Reference to a valid session
pool ref pool
The pool
string name
The name associated with the blob
string mime_type
The mime type for the data. Empty string translates to application/octet-stream
bool public
True if the blob should be publicly available
Minimum role:
pool-operator
Result:
The reference of the blob, needed for populating its data
Published in:
XenServer 5.0 (orlando)
Create a placeholder for a named binary blob of data that is associated with this pool
physical interface on any particular host, that identifies the PIF on which to create the (pool-wide) VLAN interface
network ref network
network to which this interface should be connected
int VLAN
VLAN tag for the new interface
Minimum role:
pool-operator
Result:
The references of the created PIF objects
Errors:
VLAN_TAG_INVALID
You tried to create a VLAN, but the tag you gave was invalid -- it must be between 0 and 4094. The parameter echoes the VLAN tag you gave.
Published in:
XenServer 4.0 (rio)
Create a pool-wide VLAN by taking the PIF.
voidcrl_install(session ref, string, string)
Install a TLS CA-issued Certificate Revocation List, pool-wide.
Parameters:
session ref session_id
Reference to a valid session
string name
A name to give the CRL
string cert
The CRL
Minimum role:
pool-operator
Published in:
XenServer 5.5 (george)
Install a TLS CA-issued Certificate Revocation List, pool-wide.
string setcrl_list(session ref)
List the names of all installed TLS CA-issued Certificate Revocation Lists.
Parameters:
session ref session_id
Reference to a valid session
Minimum role:
pool-operator
Result:
The names of all installed CRLs
Published in:
XenServer 5.5 (george)
List the names of all installed TLS CA-issued Certificate Revocation Lists.
voidcrl_uninstall(session ref, string)
Remove a pool-wide TLS CA-issued Certificate Revocation List.
Parameters:
session ref session_id
Reference to a valid session
string name
The CRL name
Minimum role:
pool-operator
Published in:
XenServer 5.5 (george)
Remove a pool-wide TLS CA-issued Certificate Revocation List.
voiddeconfigure_wlb(session ref)
Permanently deconfigures workload balancing monitoring on this pool
Parameters:
session ref session_id
Reference to a valid session
Minimum role:
pool-operator
Published in:
XenServer 5.5 (george)
Permanently deconfigures workload balancing monitoring on this pool
voiddesignate_new_master(session ref, host ref)
Perform an orderly handover of the role of master to the referenced host.
Parameters:
session ref session_id
Reference to a valid session
host ref host
The host who should become the new master
Minimum role:
pool-operator
Published in:
XenServer 4.1 (miami)
Perform an orderly handover of the role of master to the referenced host.
voiddetect_nonhomogeneous_external_auth(session ref, pool ref)
This call asynchronously detects if the external authentication configuration in any slave is different from that in the master and raises appropriate alerts
Parameters:
session ref session_id
Reference to a valid session
pool ref pool
The pool where to detect non-homogeneous external authentication configuration
Minimum role:
pool-operator
Published in:
XenServer 5.5 (george)
This call asynchronously detects if the external authentication configuration in any slave is different from that in the master and raises appropriate alerts
voiddisable_client_certificate_auth(session ref, pool ref)
Disable client certificate authentication on the pool
Parameters:
session ref session_id
Reference to a valid session
pool ref self
The pool
Minimum role:
client-cert
Published in:
XAPI 1.318.0 (1.318.0)
voiddisable_external_auth(session ref, pool ref, (string → string) map)
This call disables external authentication on all the hosts of the pool
Parameters:
session ref session_id
Reference to a valid session
pool ref pool
The pool whose external authentication should be disabled
(string → string) map config
Optional parameters as a list of key-values containing the configuration data
Minimum role:
pool-admin
Published in:
XenServer 5.5 (george)
This call disables external authentication on all the hosts of the pool
voiddisable_ha(session ref)
Turn off High Availability mode
Parameters:
session ref session_id
Reference to a valid session
Minimum role:
client-cert
Published in:
XenServer 4.1 (miami)
Turn off High Availability mode
voiddisable_local_storage_caching(session ref, pool ref)
This call disables pool-wide local storage caching
Parameters:
session ref session_id
Reference to a valid session
pool ref self
Reference to the pool
Minimum role:
pool-operator
Published in:
XenServer 5.6 FP1 (cowley)
This call disables pool-wide local storage caching
voiddisable_redo_log(session ref)
Disable the redo log if in use, unless HA is enabled.
Parameters:
session ref session_id
Reference to a valid session
Minimum role:
pool-operator
Published in:
XenServer 5.6 (midnight-ride)
Disable the redo log if in use, unless HA is enabled.
voiddisable_repository_proxy(session ref, pool ref)
Disable the proxy for RPM package repositories.
Parameters:
session ref session_id
Reference to a valid session
pool ref self
The pool
Minimum role:
client-cert
Published in:
XAPI 21.4.0 (21.4.0)
Disable the proxy for RPM package repositories.
Deprecated
voiddisable_ssl_legacy(session ref, pool ref)
Sets ssl_legacy false on each host, pool-master last. See Host.ssl_legacy and Host.set_ssl_legacy.
Parameters:
session ref session_id
Reference to a valid session
pool ref self
(ignored)
Minimum role:
pool-operator
Published in:
XenServer 7.0 (dundee)
Deprecated in:
Citrix Hypervisor 8.2 (stockholm)
Legacy SSL no longer supported
voideject(session ref, host ref)
Instruct a pool master to eject a host from the pool
Parameters:
session ref session_id
Reference to a valid session
host ref host
The host to eject
Minimum role:
pool-operator
Published in:
XenServer 4.0 (rio)
Instruct a pool master to eject a host from the pool
voidemergency_reset_master(session ref, string)
Instruct a slave already in a pool that the master has changed
Parameters:
session ref session_id
Reference to a valid session
string master_address
The hostname of the master
Minimum role:
pool-operator
Published in:
XenServer 4.0 (rio)
Instruct a slave already in a pool that the master has changed
voidemergency_transition_to_master(session ref)
Instruct host that's currently a slave to transition to being master
Parameters:
session ref session_id
Reference to a valid session
Minimum role:
pool-operator
Published in:
XenServer 4.0 (rio)
Instruct host that's currently a slave to transition to being master
voidenable_client_certificate_auth(session ref, pool ref, string)
Enable client certificate authentication on the pool
Parameters:
session ref session_id
Reference to a valid session
pool ref self
The pool
string name
The name (CN/SAN) that an incoming client certificate must have to allow authentication
Minimum role:
client-cert
Published in:
XAPI 1.318.0 (1.318.0)
voidenable_external_auth(session ref, pool ref, (string → string) map, string, string)
This call enables external authentication on all the hosts of the pool
Parameters:
session ref session_id
Reference to a valid session
pool ref pool
The pool whose external authentication should be enabled
(string → string) map config
A list of key-values containing the configuration data
string service_name
The name of the service
string auth_type
The type of authentication (e.g. AD for Active Directory)
Minimum role:
pool-admin
Published in:
XenServer 5.5 (george)
This call enables external authentication on all the hosts of the pool
voidenable_ha(session ref, SR ref set, (string → string) map)
Turn on High Availability mode
Parameters:
session ref session_id
Reference to a valid session
SR ref set heartbeat_srs
Set of SRs to use for storage heartbeating
(string → string) map configuration
Detailed HA configuration to apply
Minimum role:
client-cert
Published in:
XenServer 4.1 (miami)
Turn on High Availability mode
voidenable_local_storage_caching(session ref, pool ref)
This call attempts to enable pool-wide local storage caching
Parameters:
session ref session_id
Reference to a valid session
pool ref self
Reference to the pool
Minimum role:
pool-operator
Published in:
XenServer 5.6 FP1 (cowley)
This call attempts to enable pool-wide local storage caching
voidenable_redo_log(session ref, SR ref)
Enable the redo log on the given SR and start using it, unless HA is enabled.
Parameters:
session ref session_id
Reference to a valid session
SR ref sr
SR to hold the redo log.
Minimum role:
pool-operator
Published in:
XenServer 5.6 (midnight-ride)
Enable the redo log on the given SR and start using it, unless HA is enabled.
Removed
voidenable_ssl_legacy(session ref, pool ref)
Sets ssl_legacy true on each host, pool-master last. See Host.ssl_legacy and Host.set_ssl_legacy.
Parameters:
session ref session_id
Reference to a valid session
pool ref self
(ignored)
Minimum role:
pool-operator
Published in:
XenServer 7.0 (dundee)
Deprecated in:
XenServer 7.0 (dundee)
Legacy SSL will soon cease to be supported
Removed in:
Citrix Hypervisor 8.2 (stockholm)
Legacy SSL no longer supported
voidenable_tls_verification(session ref)
Enable TLS server certificate verification
Parameters:
session ref session_id
Reference to a valid session
Minimum role:
pool-admin
Published in:
XAPI 1.290.0 (1.290.0)
pool ref setget_all(session ref)
Return a list of all the pools known to the system.
Parameters:
session ref session_id
Reference to a valid session
Minimum role:
read-only
Result:
references to all objects
Published in:
XenServer 4.0 (rio)
Pool-wide information
(pool ref → pool record) mapget_all_records(session ref)
Return a map of pool references to pool records for all pools known to the system.
Parameters:
session ref session_id
Reference to a valid session
Minimum role:
read-only
Result:
records of all objects
Published in:
XenServer 4.0 (rio)
Pool-wide information
enum pool_allowed_operations setget_allowed_operations(session ref, pool ref)
Get the allowed_operations field of the given pool.
Parameters:
session ref session_id
Reference to a valid session
pool ref self
reference to the object
Minimum role:
read-only
Result:
value of the field
Published in:
XenServer 4.0 (rio)
list of the operations allowed in this state. This list is advisory only and the server state may have changed by the time this field is read by a client.
(string → blob ref) mapget_blobs(session ref, pool ref)
Get the blobs field of the given pool.
Parameters:
session ref session_id
Reference to a valid session
pool ref self
reference to the object
Minimum role:
read-only
Result:
value of the field
Published in:
XenServer 5.0 (orlando)
Binary blobs associated with this pool
pool refget_by_uuid(session ref, string)
Get a reference to the pool instance with the specified UUID.
Parameters:
session ref session_id
Reference to a valid session
string uuid
UUID of object to return
Minimum role:
read-only
Result:
reference to the object
Published in:
XenServer 4.0 (rio)
Pool-wide information
boolget_client_certificate_auth_enabled(session ref, pool ref)
Get the client_certificate_auth_enabled field of the given pool.
Parameters:
session ref session_id
Reference to a valid session
pool ref self
reference to the object
Minimum role:
read-only
Result:
value of the field
Published in:
XAPI 1.318.0 (1.318.0)
stringget_client_certificate_auth_name(session ref, pool ref)
Get the client_certificate_auth_name field of the given pool.
Parameters:
session ref session_id
Reference to a valid session
pool ref self
reference to the object
Minimum role:
read-only
Result:
value of the field
Published in:
XAPI 1.318.0 (1.318.0)
boolget_coordinator_bias(session ref, pool ref)
Get the coordinator_bias field of the given pool.
Parameters:
session ref session_id
Reference to a valid session
pool ref self
reference to the object
Minimum role:
read-only
Result:
value of the field
Prototyped in:
XAPI 22.37.0 (22.37.0)
Published in:
XenServer 4.0 (rio)
true if bias against pool master when scheduling vms is enabled, false otherwise
(string → string) mapget_cpu_info(session ref, pool ref)
Get the cpu_info field of the given pool.
Parameters:
session ref session_id
Reference to a valid session
pool ref self
reference to the object
Minimum role:
read-only
Result:
value of the field
Published in:
XenServer 7.0 (dundee)
Details about the physical CPUs on the pool
SR refget_crash_dump_SR(session ref, pool ref)
Get the crash_dump_SR field of the given pool.
Parameters:
session ref session_id
Reference to a valid session
pool ref self
reference to the object
Minimum role:
read-only
Result:
value of the field
Published in:
XenServer 4.0 (rio)
The SR in which VDIs for crash dumps are created
(string → enum pool_allowed_operations) mapget_current_operations(session ref, pool ref)
Get the current_operations field of the given pool.
Parameters:
session ref session_id
Reference to a valid session
pool ref self
reference to the object
Minimum role:
read-only
Result:
value of the field
Published in:
XenServer 4.0 (rio)
links each of the running tasks using this object (by reference) to a current_operation enum which describes the nature of the task.
Prototype
stringget_custom_uefi_certificates(session ref, pool ref)
Get the custom_uefi_certificates field of the given pool.
Parameters:
session ref session_id
Reference to a valid session
pool ref self
reference to the object
Minimum role:
read-only
Result:
value of the field
Prototyped in:
XAPI 24.0.0 (24.0.0)
SR refget_default_SR(session ref, pool ref)
Get the default_SR field of the given pool.
Parameters:
session ref session_id
Reference to a valid session
pool ref self
reference to the object
Minimum role:
read-only
Result:
value of the field
Published in:
XenServer 4.0 (rio)
Default SR for VDIs
Prototype
intget_ext_auth_max_threads(session ref, pool ref)
Get the ext_auth_max_threads field of the given pool.
Parameters:
session ref session_id
Reference to a valid session
pool ref self
reference to the object
Minimum role:
read-only
Result:
value of the field
Prototyped in:
XAPI 23.27.0 (23.27.0)
(string → string) mapget_guest_agent_config(session ref, pool ref)
Get the guest_agent_config field of the given pool.
Parameters:
session ref session_id
Reference to a valid session
pool ref self
reference to the object
Minimum role:
read-only
Result:
value of the field
Published in:
XenServer 7.0 (dundee)
Pool-wide guest agent configuration information
(string → string) mapget_gui_config(session ref, pool ref)
Get the gui_config field of the given pool.
Parameters:
session ref session_id
Reference to a valid session
pool ref self
reference to the object
Minimum role:
read-only
Result:
value of the field
Published in:
XenServer 5.0 (orlando)
gui-specific configuration for pool
boolget_ha_allow_overcommit(session ref, pool ref)
Get the ha_allow_overcommit field of the given pool.
Parameters:
session ref session_id
Reference to a valid session
pool ref self
reference to the object
Minimum role:
read-only
Result:
value of the field
Published in:
XenServer 5.0 (orlando)
If set to false then operations which would cause the Pool to become overcommitted will be blocked.
stringget_ha_cluster_stack(session ref, pool ref)
Get the ha_cluster_stack field of the given pool.
Parameters:
session ref session_id
Reference to a valid session
pool ref self
reference to the object
Minimum role:
read-only
Result:
value of the field
Published in:
XenServer 7.0 (dundee)
The HA cluster stack that is currently in use. Only valid when HA is enabled.
(string → string) mapget_ha_configuration(session ref, pool ref)
Get the ha_configuration field of the given pool.
Parameters:
session ref session_id
Reference to a valid session
pool ref self
reference to the object
Minimum role:
read-only
Result:
value of the field
Published in:
XenServer 5.0 (orlando)
The current HA configuration
boolget_ha_enabled(session ref, pool ref)
Get the ha_enabled field of the given pool.
Parameters:
session ref session_id
Reference to a valid session
pool ref self
reference to the object
Minimum role:
read-only
Result:
value of the field
Published in:
XenServer 5.0 (orlando)
true if HA is enabled on the pool, false otherwise
intget_ha_host_failures_to_tolerate(session ref, pool ref)
Get the ha_host_failures_to_tolerate field of the given pool.
Parameters:
session ref session_id
Reference to a valid session
pool ref self
reference to the object
Minimum role:
read-only
Result:
value of the field
Published in:
XenServer 5.0 (orlando)
Number of host failures to tolerate before the Pool is declared to be overcommitted
boolget_ha_overcommitted(session ref, pool ref)
Get the ha_overcommitted field of the given pool.
Parameters:
session ref session_id
Reference to a valid session
pool ref self
reference to the object
Minimum role:
read-only
Result:
value of the field
Published in:
XenServer 5.0 (orlando)
True if the Pool is considered to be overcommitted i.e. if there exist insufficient physical resources to tolerate the configured number of host failures
intget_ha_plan_exists_for(session ref, pool ref)
Get the ha_plan_exists_for field of the given pool.
Parameters:
session ref session_id
Reference to a valid session
pool ref self
reference to the object
Minimum role:
read-only
Result:
value of the field
Published in:
XenServer 5.0 (orlando)
Number of future host failures we have managed to find a plan for. Once this reaches zero any future host failures will cause the failure of protected VMs.
string setget_ha_statefiles(session ref, pool ref)
Get the ha_statefiles field of the given pool.
Parameters:
session ref session_id
Reference to a valid session
pool ref self
reference to the object
Minimum role:
read-only
Result:
value of the field
Published in:
XenServer 5.0 (orlando)
HA statefile VDIs in use
(string → string) mapget_health_check_config(session ref, pool ref)
Get the health_check_config field of the given pool.
Parameters:
session ref session_id
Reference to a valid session
pool ref self
reference to the object
Minimum role:
read-only
Result:
value of the field
Published in:
XenServer 7.0 (dundee)
Configuration for the automatic health check feature
boolget_igmp_snooping_enabled(session ref, pool ref)
Get the igmp_snooping_enabled field of the given pool.
Parameters:
session ref session_id
Reference to a valid session
pool ref self
reference to the object
Minimum role:
read-only
Result:
value of the field
Published in:
XenServer 7.3 (inverness)
true if IGMP snooping is enabled in the pool, false otherwise.
boolget_is_psr_pending(session ref, pool ref)
Get the is_psr_pending field of the given pool.
Parameters:
session ref session_id
Reference to a valid session
pool ref self
reference to the object
Minimum role:
read-only
Result:
value of the field
Published in:
Citrix Hypervisor 8.2 Hotfix 2 (stockholm_psr)
True if either a PSR is running or we are waiting for a PSR to be re-run
Prototype
datetimeget_last_update_sync(session ref, pool ref)
Get the last_update_sync field of the given pool.
Parameters:
session ref session_id
Reference to a valid session
pool ref self
reference to the object
Minimum role:
read-only
Result:
value of the field
Prototyped in:
XAPI 23.18.0 (23.18.0)
(string → string) mapget_license_state(session ref, pool ref)
This call returns the license state for the pool
Parameters:
session ref session_id
Reference to a valid session
pool ref self
Reference to the pool
Minimum role:
read-only
Result:
The pool's license state
Published in:
XenServer 6.2 (clearwater)
This call returns the license state for the pool
boolget_live_patching_disabled(session ref, pool ref)
Get the live_patching_disabled field of the given pool.
Parameters:
session ref session_id
Reference to a valid session
pool ref self
reference to the object
Minimum role:
read-only
Result:
value of the field
Published in:
XenServer 7.1 (ely)
The pool-wide flag to show if the live patching feauture is disabled or not.
Prototype
intget_local_auth_max_threads(session ref, pool ref)
Get the local_auth_max_threads field of the given pool.
Parameters:
session ref session_id
Reference to a valid session
pool ref self
reference to the object
Minimum role:
read-only
Result:
value of the field
Prototyped in:
XAPI 23.27.0 (23.27.0)
host refget_master(session ref, pool ref)
Get the master field of the given pool.
Parameters:
session ref session_id
Reference to a valid session
pool ref self
reference to the object
Minimum role:
read-only
Result:
value of the field
Published in:
XenServer 4.0 (rio)
The host that is pool master
VDI ref setget_metadata_VDIs(session ref, pool ref)
Get the metadata_VDIs field of the given pool.
Parameters:
session ref session_id
Reference to a valid session
pool ref self
reference to the object
Minimum role:
read-only
Result:
value of the field
Published in:
XenServer 6.0 (boston)
The set of currently known metadata VDIs for this pool
Prototype
boolget_migration_compression(session ref, pool ref)
Get the migration_compression field of the given pool.
Parameters:
session ref session_id
Reference to a valid session
pool ref self
reference to the object
Minimum role:
read-only
Result:
value of the field
Prototyped in:
XAPI 22.33.0 (22.33.0)
stringget_name_description(session ref, pool ref)
Get the name_description field of the given pool.
Parameters:
session ref session_id
Reference to a valid session
pool ref self
reference to the object
Minimum role:
read-only
Result:
value of the field
Published in:
XenServer 4.0 (rio)
Description
stringget_name_label(session ref, pool ref)
Get the name_label field of the given pool.
Parameters:
session ref session_id
Reference to a valid session
pool ref self
reference to the object
Minimum role:
read-only
Result:
value of the field
Published in:
XenServer 4.0 (rio)
Short name
(string → string) mapget_other_config(session ref, pool ref)
Get the other_config field of the given pool.
Parameters:
session ref session_id
Reference to a valid session
pool ref self
reference to the object
Minimum role:
read-only
Result:
value of the field
Published in:
XenServer 4.0 (rio)
additional configuration
boolget_policy_no_vendor_device(session ref, pool ref)
Get the policy_no_vendor_device field of the given pool.
Parameters:
session ref session_id
Reference to a valid session
pool ref self
reference to the object
Minimum role:
read-only
Result:
value of the field
Published in:
XenServer 7.0 (dundee)
The pool-wide policy for clients on whether to use the vendor device or not on newly created VMs. This field will also be consulted if the 'has_vendor_device' field is not specified in the VM.create call.
pool recordget_record(session ref, pool ref)
Get a record containing the current state of the given pool.
Parameters:
session ref session_id
Reference to a valid session
pool ref self
reference to the object
Minimum role:
read-only
Result:
all fields from the object
Published in:
XenServer 4.0 (rio)
Pool-wide information
boolget_redo_log_enabled(session ref, pool ref)
Get the redo_log_enabled field of the given pool.
Parameters:
session ref session_id
Reference to a valid session
pool ref self
reference to the object
Minimum role:
read-only
Result:
value of the field
Published in:
XenServer 5.6 (midnight-ride)
true a redo-log is to be used other than when HA is enabled, false otherwise
VDI refget_redo_log_vdi(session ref, pool ref)
Get the redo_log_vdi field of the given pool.
Parameters:
session ref session_id
Reference to a valid session
pool ref self
reference to the object
Minimum role:
read-only
Result:
value of the field
Published in:
XenServer 5.6 (midnight-ride)
indicates the VDI to use for the redo-log other than when HA is enabled
Repository ref setget_repositories(session ref, pool ref)
Get the repositories field of the given pool.
Parameters:
session ref session_id
Reference to a valid session
pool ref self
reference to the object
Minimum role:
read-only
Result:
value of the field
Published in:
XAPI 1.301.0 (1.301.0)
The set of currently enabled repositories
secret refget_repository_proxy_password(session ref, pool ref)
Get the repository_proxy_password field of the given pool.
Parameters:
session ref session_id
Reference to a valid session
pool ref self
reference to the object
Minimum role:
read-only
Result:
value of the field
Published in:
XAPI 21.3.0 (21.3.0)
Changed in:
XAPI 23.9.0 (23.9.0)
Changed internal_only to false
stringget_repository_proxy_url(session ref, pool ref)
Get the repository_proxy_url field of the given pool.
Parameters:
session ref session_id
Reference to a valid session
pool ref self
reference to the object
Minimum role:
read-only
Result:
value of the field
Published in:
XAPI 21.3.0 (21.3.0)
Url of the proxy used in syncing with the enabled repositories
stringget_repository_proxy_username(session ref, pool ref)
Get the repository_proxy_username field of the given pool.
Parameters:
session ref session_id
Reference to a valid session
pool ref self
reference to the object
Minimum role:
read-only
Result:
value of the field
Published in:
XAPI 21.3.0 (21.3.0)
Username for the authentication of the proxy used in syncing with the enabled repositories
(string → string) mapget_restrictions(session ref, pool ref)
Get the restrictions field of the given pool.
Parameters:
session ref session_id
Reference to a valid session
pool ref self
reference to the object
Minimum role:
read-only
Result:
value of the field
Published in:
XenServer 5.6 (midnight-ride)
Pool-wide restrictions currently in effect
SR refget_suspend_image_SR(session ref, pool ref)
Get the suspend_image_SR field of the given pool.
Parameters:
session ref session_id
Reference to a valid session
pool ref self
reference to the object
Minimum role:
read-only
Result:
value of the field
Published in:
XenServer 4.0 (rio)
The SR in which VDIs for suspend images are created
string setget_tags(session ref, pool ref)
Get the tags field of the given pool.
Parameters:
session ref session_id
Reference to a valid session
pool ref self
reference to the object
Minimum role:
read-only
Result:
value of the field
Published in:
XenServer 5.0 (orlando)
user-specified tags for categorization purposes
Prototype
enum telemetry_frequencyget_telemetry_frequency(session ref, pool ref)
Get the telemetry_frequency field of the given pool.
Parameters:
session ref session_id
Reference to a valid session
pool ref self
reference to the object
Minimum role:
read-only
Result:
value of the field
Prototyped in:
XAPI 23.9.0 (23.9.0)
Prototype
datetimeget_telemetry_next_collection(session ref, pool ref)
Get the telemetry_next_collection field of the given pool.
Parameters:
session ref session_id
Reference to a valid session
pool ref self
reference to the object
Minimum role:
read-only
Result:
value of the field
Prototyped in:
XAPI 23.9.0 (23.9.0)
Prototype
secret refget_telemetry_uuid(session ref, pool ref)
Get the telemetry_uuid field of the given pool.
Parameters:
session ref session_id
Reference to a valid session
pool ref self
reference to the object
Minimum role:
read-only
Result:
value of the field
Prototyped in:
XAPI 23.9.0 (23.9.0)
boolget_tls_verification_enabled(session ref, pool ref)
Get the tls_verification_enabled field of the given pool.
Parameters:
session ref session_id
Reference to a valid session
pool ref self
reference to the object
Minimum role:
read-only
Result:
value of the field
Published in:
XAPI 1.290.0 (1.290.0)
stringget_uefi_certificates(session ref, pool ref)
Get the uefi_certificates field of the given pool.
Parameters:
session ref session_id
Reference to a valid session
pool ref self
reference to the object
Minimum role:
read-only
Result:
value of the field
Published in:
Citrix Hypervisor 8.1 (quebec)
The UEFI certificates allowing Secure Boot
Changed in:
XAPI 22.16.0 (22.16.0)
Became StaticRO to be editable through new method
Prototype
intget_update_sync_day(session ref, pool ref)
Get the update_sync_day field of the given pool.
Parameters:
session ref session_id
Reference to a valid session
pool ref self
reference to the object
Minimum role:
read-only
Result:
value of the field
Prototyped in:
XAPI 23.18.0 (23.18.0)
Prototype
boolget_update_sync_enabled(session ref, pool ref)
Get the update_sync_enabled field of the given pool.
Parameters:
session ref session_id
Reference to a valid session
pool ref self
reference to the object
Minimum role:
read-only
Result:
value of the field
Prototyped in:
XAPI 23.18.0 (23.18.0)
Prototype
enum update_sync_frequencyget_update_sync_frequency(session ref, pool ref)
Get the update_sync_frequency field of the given pool.
Parameters:
session ref session_id
Reference to a valid session
pool ref self
reference to the object
Minimum role:
read-only
Result:
value of the field
Prototyped in:
XAPI 23.18.0 (23.18.0)
stringget_uuid(session ref, pool ref)
Get the uuid field of the given pool.
Parameters:
session ref session_id
Reference to a valid session
pool ref self
reference to the object
Minimum role:
read-only
Result:
value of the field
Published in:
XenServer 4.0 (rio)
Unique identifier/object reference
Deprecated
stringget_vswitch_controller(session ref, pool ref)
Get the vswitch_controller field of the given pool.
Parameters:
session ref session_id
Reference to a valid session
pool ref self
reference to the object
Minimum role:
read-only
Result:
value of the field
Published in:
XenServer 5.6 (midnight-ride)
the IP address of the vswitch controller.
Deprecated in:
XenServer 7.2 (falcon)
Deprecated: set the IP address of the vswitch controller in SDN_controller instead.
boolget_wlb_enabled(session ref, pool ref)
Get the wlb_enabled field of the given pool.
Parameters:
session ref session_id
Reference to a valid session
pool ref self
reference to the object
Minimum role:
read-only
Result:
value of the field
Published in:
XenServer 5.5 (george)
true if workload balancing is enabled on the pool, false otherwise
stringget_wlb_url(session ref, pool ref)
Get the wlb_url field of the given pool.
Parameters:
session ref session_id
Reference to a valid session
pool ref self
reference to the object
Minimum role:
read-only
Result:
value of the field
Published in:
XenServer 5.5 (george)
Url for the configured workload balancing host
stringget_wlb_username(session ref, pool ref)
Get the wlb_username field of the given pool.
Parameters:
session ref session_id
Reference to a valid session
pool ref self
reference to the object
Minimum role:
read-only
Result:
value of the field
Published in:
XenServer 5.5 (george)
Username for accessing the workload balancing host
Deprecated
boolget_wlb_verify_cert(session ref, pool ref)
Get the wlb_verify_cert field of the given pool.
Parameters:
session ref session_id
Reference to a valid session
pool ref self
reference to the object
Minimum role:
read-only
Result:
value of the field
Published in:
XenServer 5.5 (george)
Deprecated in:
XAPI 1.290.0 (1.290.0)
Deprecated: to enable TLS verification use Pool.enable_tls_verification instead
Return a VM failover plan assuming a given subset of hosts fail
Parameters:
session ref session_id
Reference to a valid session
host ref set failed_hosts
The set of hosts to assume have failed
VM ref set failed_vms
The set of VMs to restart
Minimum role:
pool-operator
Result:
VM failover plan: a map of VM to host to restart the host on
Published in:
XenServer 5.0 (orlando)
Return a VM failover plan assuming a given subset of hosts fail
boolha_failover_plan_exists(session ref, int)
Returns true if a VM failover plan exists for up to 'n' host failures
Parameters:
session ref session_id
Reference to a valid session
int n
The number of host failures to plan for
Minimum role:
pool-operator
Result:
true if a failover plan exists for the supplied number of host failures
Published in:
XenServer 5.0 (orlando)
Returns true if a VM failover plan exists for up to 'n' host failures
voidha_prevent_restarts_for(session ref, int)
When this call returns the VM restart logic will not run for the requested number of seconds. If the argument is zero then the restart thread is immediately unblocked
Parameters:
session ref session_id
Reference to a valid session
int seconds
The number of seconds to block the restart thread for
Minimum role:
pool-operator
Published in:
XenServer 5.0 Update 1 (orlando-update-1)
When this call returns the VM restart logic will not run for the requested number of seconds. If the argument is zero then the restart thread is immediately unblocked
boolhas_extension(session ref, pool ref, string)
Return true if the extension is available on the pool
Parameters:
session ref session_id
Reference to a valid session
pool ref self
The pool
string name
The name of the API call
Minimum role:
pool-admin
Result:
True if the extension exists, false otherwise
Published in:
XenServer 7.0 (dundee)
Return true if the extension is available on the pool
Sets the pool optimization criteria for the workload balancing server
Parameters:
session ref session_id
Reference to a valid session
(string → string) map config
The configuration to use in optimizing this pool
Minimum role:
pool-operator
Published in:
XenServer 5.5 (george)
Sets the pool optimization criteria for the workload balancing server
voidset_coordinator_bias(session ref, pool ref, bool)
Set the coordinator_bias field of the given pool.
Parameters:
session ref session_id
Reference to a valid session
pool ref self
reference to the object
bool value
New value to set
Minimum role:
pool-operator
Prototyped in:
XAPI 22.37.0 (22.37.0)
Published in:
XenServer 4.0 (rio)
true if bias against pool master when scheduling vms is enabled, false otherwise
voidset_crash_dump_SR(session ref, pool ref, SR ref)
Set the crash_dump_SR field of the given pool.
Parameters:
session ref session_id
Reference to a valid session
pool ref self
reference to the object
SR ref value
New value to set
Minimum role:
pool-operator
Published in:
XenServer 4.0 (rio)
The SR in which VDIs for crash dumps are created
Prototype
voidset_custom_uefi_certificates(session ref, pool ref, string)
Set custom UEFI certificates for a pool and all its hosts. Need `allow-custom-uefi-certs` set to true in conf. If empty: default back to Pool.uefi_certificates
Parameters:
session ref session_id
Reference to a valid session
pool ref self
The pool
string value
The certificates to apply to the pool and its hosts
Minimum role:
pool-admin
Prototyped in:
XAPI 24.0.0 (24.0.0)
voidset_default_SR(session ref, pool ref, SR ref)
Set the default_SR field of the given pool.
Parameters:
session ref session_id
Reference to a valid session
pool ref self
reference to the object
SR ref value
New value to set
Minimum role:
pool-operator
Published in:
XenServer 4.0 (rio)
Default SR for VDIs
Prototype
voidset_ext_auth_max_threads(session ref, pool ref, int)
Parameters:
session ref session_id
Reference to a valid session
pool ref self
The pool
int value
The new maximum
Minimum role:
pool-operator
Prototyped in:
XAPI 23.27.0 (23.27.0)
voidset_gui_config(session ref, pool ref, (string → string) map)
Set the gui_config field of the given pool.
Parameters:
session ref session_id
Reference to a valid session
pool ref self
reference to the object
(string → string) map value
New value to set
Minimum role:
vm-operator
Published in:
XenServer 5.0 (orlando)
gui-specific configuration for pool
voidset_ha_allow_overcommit(session ref, pool ref, bool)
Set the ha_allow_overcommit field of the given pool.
Parameters:
session ref session_id
Reference to a valid session
pool ref self
reference to the object
bool value
New value to set
Minimum role:
pool-operator
Published in:
XenServer 5.0 (orlando)
If set to false then operations which would cause the Pool to become overcommitted will be blocked.
voidset_ha_host_failures_to_tolerate(session ref, pool ref, int)
Set the maximum number of host failures to consider in the HA VM restart planner
Parameters:
session ref session_id
Reference to a valid session
pool ref self
The pool
int value
New number of host failures to consider
Minimum role:
pool-operator
Published in:
XenServer 5.0 (orlando)
Set the maximum number of host failures to consider in the HA VM restart planner
voidset_health_check_config(session ref, pool ref, (string → string) map)
Set the health_check_config field of the given pool.
Parameters:
session ref session_id
Reference to a valid session
pool ref self
reference to the object
(string → string) map value
New value to set
Minimum role:
pool-operator
Published in:
XenServer 7.0 (dundee)
Configuration for the automatic health check feature
Prototype
voidset_https_only(session ref, pool ref, bool)
updates all the host firewalls in the pool to open or close port 80 depending on the value
Parameters:
session ref session_id
Reference to a valid session
pool ref self
The pool
bool value
true - http port 80 will be blocked, false - http port 80 will be open for the hosts in the pool
Minimum role:
pool-operator
Prototyped in:
XAPI 22.27.0 (22.27.0)
voidset_igmp_snooping_enabled(session ref, pool ref, bool)
Enable or disable IGMP Snooping on the pool.
Parameters:
session ref session_id
Reference to a valid session
pool ref self
The pool
bool value
Enable or disable IGMP Snooping on the pool
Minimum role:
pool-operator
Published in:
XenServer 7.3 (inverness)
Enable or disable IGMP Snooping on the pool.
voidset_is_psr_pending(session ref, pool ref, bool)
Set the is_psr_pending field of the given pool.
Parameters:
session ref session_id
Reference to a valid session
pool ref self
reference to the object
bool value
New value to set
Minimum role:
pool-operator
Published in:
Citrix Hypervisor 8.2 Hotfix 2 (stockholm_psr)
True if either a PSR is running or we are waiting for a PSR to be re-run
voidset_live_patching_disabled(session ref, pool ref, bool)
Set the live_patching_disabled field of the given pool.
Parameters:
session ref session_id
Reference to a valid session
pool ref self
reference to the object
bool value
New value to set
Minimum role:
pool-operator
Published in:
XenServer 7.1 (ely)
The pool-wide flag to show if the live patching feauture is disabled or not.
Prototype
voidset_local_auth_max_threads(session ref, pool ref, int)
Parameters:
session ref session_id
Reference to a valid session
pool ref self
The pool
int value
The new maximum
Minimum role:
pool-operator
Prototyped in:
XAPI 23.27.0 (23.27.0)
Prototype
voidset_migration_compression(session ref, pool ref, bool)
Set the migration_compression field of the given pool.
Parameters:
session ref session_id
Reference to a valid session
pool ref self
reference to the object
bool value
New value to set
Minimum role:
pool-operator
Prototyped in:
XAPI 22.33.0 (22.33.0)
voidset_name_description(session ref, pool ref, string)
Set the name_description field of the given pool.
Parameters:
session ref session_id
Reference to a valid session
pool ref self
reference to the object
string value
New value to set
Minimum role:
pool-operator
Published in:
XenServer 4.0 (rio)
Description
voidset_name_label(session ref, pool ref, string)
Set the name_label field of the given pool.
Parameters:
session ref session_id
Reference to a valid session
pool ref self
reference to the object
string value
New value to set
Minimum role:
pool-operator
Published in:
XenServer 4.0 (rio)
Short name
voidset_other_config(session ref, pool ref, (string → string) map)
Set the other_config field of the given pool.
Parameters:
session ref session_id
Reference to a valid session
pool ref self
reference to the object
(string → string) map value
New value to set
Minimum role:
pool-operator
Published in:
XenServer 4.0 (rio)
additional configuration
voidset_policy_no_vendor_device(session ref, pool ref, bool)
Set the policy_no_vendor_device field of the given pool.
Parameters:
session ref session_id
Reference to a valid session
pool ref self
reference to the object
bool value
New value to set
Minimum role:
pool-operator
Published in:
XenServer 7.0 (dundee)
The pool-wide policy for clients on whether to use the vendor device or not on newly created VMs. This field will also be consulted if the 'has_vendor_device' field is not specified in the VM.create call.
voidset_repositories(session ref, pool ref, Repository ref set)
Set enabled set of repositories
Parameters:
session ref session_id
Reference to a valid session
pool ref self
The pool
Repository ref set value
The set of repositories to be enabled
Minimum role:
client-cert
Published in:
XAPI 1.301.0 (1.301.0)
Set enabled set of repositories
voidset_suspend_image_SR(session ref, pool ref, SR ref)
Set the suspend_image_SR field of the given pool.
Parameters:
session ref session_id
Reference to a valid session
pool ref self
reference to the object
SR ref value
New value to set
Minimum role:
pool-operator
Published in:
XenServer 4.0 (rio)
The SR in which VDIs for suspend images are created
voidset_tags(session ref, pool ref, string set)
Set the tags field of the given pool.
Parameters:
session ref session_id
Reference to a valid session
pool ref self
reference to the object
string set value
New value to set
Minimum role:
vm-operator
Published in:
XenServer 5.0 (orlando)
user-specified tags for categorization purposes
Prototype
voidset_telemetry_next_collection(session ref, pool ref, datetime)
Set the timestamp for the next telemetry data collection.
Parameters:
session ref session_id
Reference to a valid session
pool ref self
The pool
datetime value
The earliest timestamp (in UTC) when the next round of telemetry collection can be carried out.
Minimum role:
pool-admin
Prototyped in:
XAPI 23.9.0 (23.9.0)
Deprecated
voidset_uefi_certificates(session ref, pool ref, string)
Set the UEFI certificates for a pool and all its hosts. Deprecated: use set_custom_uefi_certificates instead
Parameters:
session ref session_id
Reference to a valid session
pool ref self
The pool
string value
The certificates to apply to the pool and its hosts
Minimum role:
pool-admin
Published in:
XAPI 22.16.0 (22.16.0)
Deprecated in:
XAPI 24.0.0 (24.0.0)
use set_custom_uefi_certificates instead
Prototype
voidset_update_sync_enabled(session ref, pool ref, bool)
enable or disable periodic update synchronization depending on the value
Parameters:
session ref session_id
Reference to a valid session
pool ref self
The pool
bool value
true - enable periodic update synchronization, false - disable it
Minimum role:
pool-operator
Prototyped in:
XAPI 23.18.0 (23.18.0)
Deprecated
voidset_vswitch_controller(session ref, string)
Set the IP address of the vswitch controller.
Parameters:
session ref session_id
Reference to a valid session
string address
IP address of the vswitch controller.
Minimum role:
pool-operator
Published in:
XenServer 5.6 (midnight-ride)
Set the IP address of the vswitch controller.
Extended in:
XenServer 5.6 FP1 (cowley)
Allow to be set to the empty string (no controller is used).
Deprecated in:
XenServer 7.2 (falcon)
Deprecated: use 'SDN_controller.introduce' and 'SDN_controller.forget' instead.
voidset_wlb_enabled(session ref, pool ref, bool)
Set the wlb_enabled field of the given pool.
Parameters:
session ref session_id
Reference to a valid session
pool ref self
reference to the object
bool value
New value to set
Minimum role:
client-cert
Published in:
XenServer 5.5 (george)
true if workload balancing is enabled on the pool, false otherwise
Deprecated
voidset_wlb_verify_cert(session ref, pool ref, bool)
Set the wlb_verify_cert field of the given pool.
Parameters:
session ref session_id
Reference to a valid session
pool ref self
reference to the object
bool value
New value to set
Minimum role:
pool-operator
Published in:
XenServer 5.5 (george)
Deprecated in:
XAPI 1.290.0 (1.290.0)
Deprecated: to enable TLS verification use Pool.enable_tls_verification instead
voidsync_database(session ref)
Forcibly synchronise the database now
Parameters:
session ref session_id
Reference to a valid session
Minimum role:
pool-operator
Published in:
XenServer 4.0 (rio)
Forcibly synchronise the database now
stringsync_updates(session ref, pool ref, bool, string, string)
Sync with the enabled repository
Parameters:
session ref session_id
Reference to a valid session
pool ref self
The pool
bool force
If true local mirroring repo will be removed before syncing
string token
The token for repository client authentication
string token_id
The ID of the token
Minimum role:
client-cert
Result:
The SHA256 hash of updateinfo.xml.gz
Published in:
XAPI 1.329.0 (1.329.0)
Sync with the enabled repository
stringtest_archive_target(session ref, pool ref, (string → string) map)
This call tests if a location is valid
Parameters:
session ref session_id
Reference to a valid session
pool ref self
Reference to the pool
(string → string) map config
Location config settings to test
Minimum role:
pool-operator
Result:
An XMLRPC result
Published in:
XenServer 5.6 FP1 (cowley)
This call tests if a location is valid
voiduninstall_ca_certificate(session ref, string)
Remove a pool-wide TLS CA certificate.
Parameters:
session ref session_id
Reference to a valid session
string name
The certificate name
Minimum role:
client-cert
Published in:
XAPI 1.290.0 (1.290.0)
Uninstall TLS CA certificate
pool_patch
Deprecated
Class: pool_patch
Pool-wide patches
Published in:
XenServer 4.1 (miami)
Pool-wide patches
Deprecated in:
XenServer 7.1 (ely)
Enums
after_apply_guidance
Values:
restartHVM
This patch requires HVM guests to be restarted once applied.
restartPV
This patch requires PV guests to be restarted once applied.
restartHost
This patch requires the host to be restarted once applied.
restartXAPI
This patch requires XAPI to be restarted once applied.
Set the other_config field of the given pool_update.
Parameters:
session ref session_id
Reference to a valid session
pool_update ref self
reference to the object
(string → string) map value
New value to set
Minimum role:
pool-operator
Published in:
XenServer 7.3 (inverness)
additional configuration
probe_result
Class: probe_result
A set of properties that describe one result element of SR.probe. Result elements and properties can change dynamically based on changes to the the SR.probe input-parameters or the target.
Prototyped in:
XenServer 7.5 (kolkata)
Published in:
XenServer 7.6 (lima)
Fields
boolcomplete[RO/runtime]
True if this configuration is complete and can be used to call SR.create. False if it requires further iterative calls to SR.probe, to potentially narrow down on a configuration that can be used.
Prototyped in:
XenServer 7.5 (kolkata)
Published in:
XenServer 7.6 (lima)
(string → string) mapconfiguration[RO/runtime]
Plugin-specific configuration which describes where and how to locate the storage repository. This may include the physical block device name, a remote NFS server and path or an RBD storage pool.
Prototyped in:
XenServer 7.5 (kolkata)
Published in:
XenServer 7.6 (lima)
(string → string) mapextra_info[RO/runtime]
Additional plugin-specific information about this configuration, that might be of use for an API user. This can for example include the LUN or the WWPN.
the subject name of the user that was externally authenticated. If a session instance has is_local_superuser set, then the value of this field is undefined.
Default value:
""
Published in:
XenServer 5.6 (midnight-ride)
the subject name of the user that was externally authenticated. If a session instance has is_local_superuser set, then the value of this field is undefined.
stringauth_user_sid[RO/runtime]
the subject identifier of the user that was externally authenticated. If a session instance has is_local_superuser set, then the value of this field is undefined.
Default value:
""
Published in:
XenServer 5.5 (george)
the subject identifier of the user that was externally authenticated. If a session instance has is_local_superuser set, then the value of this field is undefined.
boolclient_certificate[RO/runtime]
indicates whether this session was authenticated using a client certificate
Default value:
false
Published in:
XAPI 21.2.0 (21.2.0)
indicates whether this session was authenticated using a client certificate
boolis_local_superuser[RO/runtime]
true iff this session was created using local superuser credentials
Default value:
false
Published in:
XenServer 5.5 (george)
true iff this session was created using local superuser credentials
datetimelast_active[RO/runtime]
Timestamp for last time session was active
Published in:
XenServer 4.0 (rio)
Timestamp for last time session was active
stringoriginator[RO/runtime]
a key string provided by a API user to distinguish itself from other users sharing the same login name
Default value:
""
Published in:
XenServer 6.2 (clearwater)
a key string provided by a API user to distinguish itself from other users sharing the same login name
(string → string) mapother_config[RW]
additional configuration
Default value:
{}
Published in:
XenServer 4.1 (miami)
additional configuration
session refparent[RO/constructor]
references the parent session that created this session
Default value:
OpaqueRef:NULL
Published in:
XenServer 5.6 (midnight-ride)
references the parent session that created this session
boolpool[RO/runtime]
True if this session relates to a intra-pool login, false otherwise
Published in:
XenServer 4.0 (rio)
True if this session relates to a intra-pool login, false otherwise
string setrbac_permissions[RO/constructor]
list with all RBAC permissions for this session
Default value:
{}
Published in:
XenServer 5.6 (midnight-ride)
list with all RBAC permissions for this session
subject refsubject[RO/runtime]
references the subject instance that created the session. If a session instance has is_local_superuser set, then the value of this field is undefined.
Default value:
OpaqueRef:NULL
Published in:
XenServer 5.5 (george)
references the subject instance that created the session. If a session instance has is_local_superuser set, then the value of this field is undefined.
Get the auth_user_name field of the given session.
Parameters:
session ref session_id
Reference to a valid session
session ref self
reference to the object
Minimum role:
read-only
Result:
value of the field
Published in:
XenServer 5.6 (midnight-ride)
the subject name of the user that was externally authenticated. If a session instance has is_local_superuser set, then the value of this field is undefined.
stringget_auth_user_sid(session ref, session ref)
Get the auth_user_sid field of the given session.
Parameters:
session ref session_id
Reference to a valid session
session ref self
reference to the object
Minimum role:
read-only
Result:
value of the field
Published in:
XenServer 5.5 (george)
the subject identifier of the user that was externally authenticated. If a session instance has is_local_superuser set, then the value of this field is undefined.
session refget_by_uuid(session ref, string)
Get a reference to the session instance with the specified UUID.
list of the operations allowed in this state. This list is advisory only and the server state may have changed by the time this field is read by a client.
Default value:
{}
Published in:
XenServer 4.0 (rio)
list of the operations allowed in this state. This list is advisory only and the server state may have changed by the time this field is read by a client.
(string → blob ref) mapblobs[RO/runtime]
Binary blobs associated with this SR
Default value:
{}
Published in:
XenServer 5.0 (orlando)
Binary blobs associated with this SR
boolclustered[RO/runtime]
True if the SR is using aggregated local storage
Default value:
false
Published in:
XenServer 7.0 (dundee)
stringcontent_type[RO/constructor]
the type of the SR's content, if required (e.g. ISOs)
Published in:
XenServer 4.0 (rio)
the type of the SR's content, if required (e.g. ISOs)
links each of the running tasks using this object (by reference) to a current_operation enum which describes the nature of the task.
Default value:
{}
Published in:
XenServer 4.0 (rio)
links each of the running tasks using this object (by reference) to a current_operation enum which describes the nature of the task.
DR_task refintroduced_by[RO/runtime]
The disaster recovery task which introduced this SR
Default value:
OpaqueRef:NULL
Published in:
XenServer 6.0 (boston)
The disaster recovery task which introduced this SR
boolis_tools_sr[RO/runtime]
True if this is the SR that contains the Tools ISO VDIs
Default value:
false
Published in:
XenServer 7.0 (dundee)
boollocal_cache_enabled[RO/runtime]
True if this SR is assigned to be the local cache for its host
Default value:
false
Published in:
XenServer 5.6 FP1 (cowley)
True if this SR is assigned to be the local cache for its host
stringname_description[RO/constructor]
a notes field containing human-readable description
Default value:
""
Published in:
XenServer 4.0 (rio)
a notes field containing human-readable description
stringname_label[RO/constructor]
a human-readable name
Default value:
""
Published in:
XenServer 4.0 (rio)
a human-readable name
(string → string) mapother_config[RW]
additional configuration
Published in:
XenServer 4.0 (rio)
additional configuration
PBD ref setPBDs[RO/runtime]
describes how particular hosts can see this storage repository
Published in:
XenServer 4.0 (rio)
describes how particular hosts can see this storage repository
intphysical_size[RO/constructor]
total physical size of the repository (in bytes)
Published in:
XenServer 4.0 (rio)
total physical size of the repository (in bytes)
intphysical_utilisation[RO/runtime]
physical space currently utilised on this storage repository (in bytes). Note that for sparse disk formats, physical_utilisation may be less than virtual_allocation
Published in:
XenServer 4.0 (rio)
physical space currently utilised on this storage repository (in bytes). Note that for sparse disk formats, physical_utilisation may be less than virtual_allocation
boolshared[RO/runtime]
true if this SR is (capable of being) shared between multiple hosts
Published in:
XenServer 4.0 (rio)
true if this SR is (capable of being) shared between multiple hosts
(string → string) mapsm_config[RW]
SM dependent data
Default value:
{}
Published in:
XenServer 4.1 (miami)
SM dependent data
string settags[RW]
user-specified tags for categorization purposes
Default value:
{}
Published in:
XenServer 5.0 (orlando)
user-specified tags for categorization purposes
stringtype[RO/constructor]
type of the storage repository
Published in:
XenServer 4.0 (rio)
type of the storage repository
stringuuid[RO/runtime]
Unique identifier/object reference
Published in:
XenServer 4.0 (rio)
Unique identifier/object reference
VDI ref setVDIs[RO/runtime]
all virtual disks known to this storage repository
Published in:
XenServer 4.0 (rio)
all virtual disks known to this storage repository
intvirtual_allocation[RO/runtime]
sum of virtual_sizes of all VDIs in this storage repository (in bytes)
Published in:
XenServer 4.0 (rio)
sum of virtual_sizes of all VDIs in this storage repository (in bytes)
Messages
voidadd_tags(session ref, SR ref, string)
Add the given value to the tags field of the given SR. If the value is already in that Set, then do nothing.
Parameters:
session ref session_id
Reference to a valid session
SR ref self
reference to the object
string value
New value to add
Minimum role:
vm-operator
Published in:
XenServer 5.0 (orlando)
user-specified tags for categorization purposes
voidadd_to_other_config(session ref, SR ref, string, string)
Add the given key-value pair to the other_config field of the given SR.
Parameters:
session ref session_id
Reference to a valid session
SR ref self
reference to the object
string key
Key to add
string value
Value to add
Minimum role:
pool-operator
Published in:
XenServer 4.0 (rio)
additional configuration
voidadd_to_sm_config(session ref, SR ref, string, string)
Add the given key-value pair to the sm_config field of the given SR.
Parameters:
session ref session_id
Reference to a valid session
SR ref self
reference to the object
string key
Key to add
string value
Value to add
Minimum role:
pool-operator
Published in:
XenServer 4.1 (miami)
SM dependent data
voidassert_can_host_ha_statefile(session ref, SR ref)
Returns successfully if the given SR can host an HA statefile. Otherwise returns an error to explain why not
Parameters:
session ref session_id
Reference to a valid session
SR ref sr
The SR to query
Minimum role:
pool-operator
Published in:
XenServer 5.0 (orlando)
Returns successfully if the given SR can host an HA statefile. Otherwise returns an error to explain why not
voidassert_supports_database_replication(session ref, SR ref)
Returns successfully if the given SR supports database replication. Otherwise returns an error to explain why not.
Parameters:
session ref session_id
Reference to a valid session
SR ref sr
The SR to query
Minimum role:
pool-operator
Published in:
XenServer 6.0 (boston)
Returns successfully if the given SR supports database replication. Otherwise returns an error to explain why not.
Create a new Storage Repository and introduce it into the managed system, creating both SR record and PBD record to attach it to current host (with specified device_config parameters)
Parameters:
session ref session_id
Reference to a valid session
host ref host
The host to create/make the SR on
(string → string) map device_config
The device config string that will be passed to backend SR driver
int physical_size
The physical size of the new storage repository
string name_label
The name of the new storage repository
string name_description
The description of the new storage repository
string type
The type of the SR; used to specify the SR backend driver to use
string content_type
The type of the new SRs content, if required (e.g. ISOs)
bool shared
True if the SR (is capable of) being shared by multiple hosts
(string → string) map sm_config
Storage backend specific configuration options
Minimum role:
pool-operator
Result:
The reference of the newly created Storage Repository.
Errors:
SR_UNKNOWN_DRIVER
The SR could not be connected because the driver was not recognised.
Published in:
XenServer 4.0 (rio)
Create a new Storage Repository and introduce it into the managed system, creating both SR record and PBD record to attach it to current host (with specified device_config parameters)
blob refcreate_new_blob(session ref, SR ref, string, string, bool)
Create a placeholder for a named binary blob of data that is associated with this SR
Parameters:
session ref session_id
Reference to a valid session
SR ref sr
The SR
string name
The name associated with the blob
string mime_type
The mime type for the data. Empty string translates to application/octet-stream
bool public
True if the blob should be publicly available
Minimum role:
pool-operator
Result:
The reference of the blob, needed for populating its data
Published in:
XenServer 5.0 (orlando)
Create a placeholder for a named binary blob of data that is associated with this SR
voiddestroy(session ref, SR ref)
Destroy specified SR, removing SR-record from database and remove SR from disk. (In order to affect this operation the appropriate device_config is read from the specified SR's PBD on current host)
Parameters:
session ref session_id
Reference to a valid session
SR ref sr
The SR to destroy
Minimum role:
pool-operator
Errors:
SR_HAS_PBD
The SR is still connected to a host via a PBD. It cannot be destroyed or forgotten.
Published in:
XenServer 4.0 (rio)
Destroy specified SR, removing SR-record from database and remove SR from disk. (In order to affect this operation the appropriate device_config is read from the specified SR's PBD on current host)
voiddisable_database_replication(session ref, SR ref)
Parameters:
session ref session_id
Reference to a valid session
SR ref sr
The SR to which metadata should be no longer replicated
Minimum role:
pool-operator
Published in:
XenServer 6.0 (boston)
voidenable_database_replication(session ref, SR ref)
Parameters:
session ref session_id
Reference to a valid session
SR ref sr
The SR to which metadata should be replicated
Minimum role:
pool-operator
Published in:
XenServer 6.0 (boston)
voidforget(session ref, SR ref)
Removing specified SR-record from database, without attempting to remove SR from disk
Parameters:
session ref session_id
Reference to a valid session
SR ref sr
The SR to destroy
Minimum role:
pool-operator
Errors:
SR_HAS_PBD
The SR is still connected to a host via a PBD. It cannot be destroyed or forgotten.
Published in:
XenServer 4.0 (rio)
Removing specified SR-record from database, without attempting to remove SR from disk
voidforget_data_source_archives(session ref, SR ref, string)
Forget the recorded statistics related to the specified data source
Parameters:
session ref session_id
Reference to a valid session
SR ref sr
The SR
string data_source
The data source whose archives are to be forgotten
Minimum role:
pool-operator
Published in:
XenServer 7.0 (dundee)
Forget the recorded statistics related to the specified data source
SR ref setget_all(session ref)
Return a list of all the SRs known to the system.
Parameters:
session ref session_id
Reference to a valid session
Minimum role:
read-only
Result:
references to all objects
Published in:
XenServer 4.0 (rio)
A storage repository
(SR ref → SR record) mapget_all_records(session ref)
Return a map of SR references to SR records for all SRs known to the system.
Parameters:
session ref session_id
Reference to a valid session
Minimum role:
read-only
Result:
records of all objects
Published in:
XenServer 4.0 (rio)
A storage repository
enum storage_operations setget_allowed_operations(session ref, SR ref)
Get the allowed_operations field of the given SR.
Parameters:
session ref session_id
Reference to a valid session
SR ref self
reference to the object
Minimum role:
read-only
Result:
value of the field
Published in:
XenServer 4.0 (rio)
list of the operations allowed in this state. This list is advisory only and the server state may have changed by the time this field is read by a client.
(string → blob ref) mapget_blobs(session ref, SR ref)
Get the blobs field of the given SR.
Parameters:
session ref session_id
Reference to a valid session
SR ref self
reference to the object
Minimum role:
read-only
Result:
value of the field
Published in:
XenServer 5.0 (orlando)
Binary blobs associated with this SR
SR ref setget_by_name_label(session ref, string)
Get all the SR instances with the given label.
Parameters:
session ref session_id
Reference to a valid session
string label
label of object to return
Minimum role:
read-only
Result:
references to objects with matching names
Published in:
XenServer 4.0 (rio)
A storage repository
SR refget_by_uuid(session ref, string)
Get a reference to the SR instance with the specified UUID.
Parameters:
session ref session_id
Reference to a valid session
string uuid
UUID of object to return
Minimum role:
read-only
Result:
reference to the object
Published in:
XenServer 4.0 (rio)
A storage repository
boolget_clustered(session ref, SR ref)
Get the clustered field of the given SR.
Parameters:
session ref session_id
Reference to a valid session
SR ref self
reference to the object
Minimum role:
read-only
Result:
value of the field
Published in:
XenServer 7.0 (dundee)
stringget_content_type(session ref, SR ref)
Get the content_type field of the given SR.
Parameters:
session ref session_id
Reference to a valid session
SR ref self
reference to the object
Minimum role:
read-only
Result:
value of the field
Published in:
XenServer 4.0 (rio)
the type of the SR's content, if required (e.g. ISOs)
(string → enum storage_operations) mapget_current_operations(session ref, SR ref)
Get the current_operations field of the given SR.
Parameters:
session ref session_id
Reference to a valid session
SR ref self
reference to the object
Minimum role:
read-only
Result:
value of the field
Published in:
XenServer 4.0 (rio)
links each of the running tasks using this object (by reference) to a current_operation enum which describes the nature of the task.
data_source record setget_data_sources(session ref, SR ref)
Parameters:
session ref session_id
Reference to a valid session
SR ref sr
The SR to interrogate
Minimum role:
read-only
Result:
A set of data sources
Published in:
XenServer 7.0 (dundee)
DR_task refget_introduced_by(session ref, SR ref)
Get the introduced_by field of the given SR.
Parameters:
session ref session_id
Reference to a valid session
SR ref self
reference to the object
Minimum role:
read-only
Result:
value of the field
Published in:
XenServer 6.0 (boston)
The disaster recovery task which introduced this SR
boolget_is_tools_sr(session ref, SR ref)
Get the is_tools_sr field of the given SR.
Parameters:
session ref session_id
Reference to a valid session
SR ref self
reference to the object
Minimum role:
read-only
Result:
value of the field
Published in:
XenServer 7.0 (dundee)
boolget_local_cache_enabled(session ref, SR ref)
Get the local_cache_enabled field of the given SR.
Parameters:
session ref session_id
Reference to a valid session
SR ref self
reference to the object
Minimum role:
read-only
Result:
value of the field
Published in:
XenServer 5.6 FP1 (cowley)
True if this SR is assigned to be the local cache for its host
stringget_name_description(session ref, SR ref)
Get the name/description field of the given SR.
Parameters:
session ref session_id
Reference to a valid session
SR ref self
reference to the object
Minimum role:
read-only
Result:
value of the field
Published in:
XenServer 4.0 (rio)
a notes field containing human-readable description
stringget_name_label(session ref, SR ref)
Get the name/label field of the given SR.
Parameters:
session ref session_id
Reference to a valid session
SR ref self
reference to the object
Minimum role:
read-only
Result:
value of the field
Published in:
XenServer 4.0 (rio)
a human-readable name
(string → string) mapget_other_config(session ref, SR ref)
Get the other_config field of the given SR.
Parameters:
session ref session_id
Reference to a valid session
SR ref self
reference to the object
Minimum role:
read-only
Result:
value of the field
Published in:
XenServer 4.0 (rio)
additional configuration
PBD ref setget_PBDs(session ref, SR ref)
Get the PBDs field of the given SR.
Parameters:
session ref session_id
Reference to a valid session
SR ref self
reference to the object
Minimum role:
read-only
Result:
value of the field
Published in:
XenServer 4.0 (rio)
describes how particular hosts can see this storage repository
intget_physical_size(session ref, SR ref)
Get the physical_size field of the given SR.
Parameters:
session ref session_id
Reference to a valid session
SR ref self
reference to the object
Minimum role:
read-only
Result:
value of the field
Published in:
XenServer 4.0 (rio)
total physical size of the repository (in bytes)
intget_physical_utilisation(session ref, SR ref)
Get the physical_utilisation field of the given SR.
Parameters:
session ref session_id
Reference to a valid session
SR ref self
reference to the object
Minimum role:
read-only
Result:
value of the field
Published in:
XenServer 4.0 (rio)
physical space currently utilised on this storage repository (in bytes). Note that for sparse disk formats, physical_utilisation may be less than virtual_allocation
SR recordget_record(session ref, SR ref)
Get a record containing the current state of the given SR.
Parameters:
session ref session_id
Reference to a valid session
SR ref self
reference to the object
Minimum role:
read-only
Result:
all fields from the object
Published in:
XenServer 4.0 (rio)
A storage repository
boolget_shared(session ref, SR ref)
Get the shared field of the given SR.
Parameters:
session ref session_id
Reference to a valid session
SR ref self
reference to the object
Minimum role:
read-only
Result:
value of the field
Published in:
XenServer 4.0 (rio)
true if this SR is (capable of being) shared between multiple hosts
(string → string) mapget_sm_config(session ref, SR ref)
Get the sm_config field of the given SR.
Parameters:
session ref session_id
Reference to a valid session
SR ref self
reference to the object
Minimum role:
read-only
Result:
value of the field
Published in:
XenServer 4.1 (miami)
SM dependent data
string setget_supported_types(session ref)
Return a set of all the SR types supported by the system
Parameters:
session ref session_id
Reference to a valid session
Minimum role:
read-only
Result:
the supported SR types
Published in:
XenServer 4.0 (rio)
Return a set of all the SR types supported by the system
string setget_tags(session ref, SR ref)
Get the tags field of the given SR.
Parameters:
session ref session_id
Reference to a valid session
SR ref self
reference to the object
Minimum role:
read-only
Result:
value of the field
Published in:
XenServer 5.0 (orlando)
user-specified tags for categorization purposes
stringget_type(session ref, SR ref)
Get the type field of the given SR.
Parameters:
session ref session_id
Reference to a valid session
SR ref self
reference to the object
Minimum role:
read-only
Result:
value of the field
Published in:
XenServer 4.0 (rio)
type of the storage repository
stringget_uuid(session ref, SR ref)
Get the uuid field of the given SR.
Parameters:
session ref session_id
Reference to a valid session
SR ref self
reference to the object
Minimum role:
read-only
Result:
value of the field
Published in:
XenServer 4.0 (rio)
Unique identifier/object reference
VDI ref setget_VDIs(session ref, SR ref)
Get the VDIs field of the given SR.
Parameters:
session ref session_id
Reference to a valid session
SR ref self
reference to the object
Minimum role:
read-only
Result:
value of the field
Published in:
XenServer 4.0 (rio)
all virtual disks known to this storage repository
intget_virtual_allocation(session ref, SR ref)
Get the virtual_allocation field of the given SR.
Parameters:
session ref session_id
Reference to a valid session
SR ref self
reference to the object
Minimum role:
read-only
Result:
value of the field
Published in:
XenServer 4.0 (rio)
sum of virtual_sizes of all VDIs in this storage repository (in bytes)
Perform a backend-specific scan, using the given device_config. If the device_config is complete, then this will return a list of the SRs present of this type on the device, if any. If the device_config is partial, then a backend-specific scan will be performed, returning results that will guide the user in improving the device_config.
Parameters:
session ref session_id
Reference to a valid session
host ref host
The host to create/make the SR on
(string → string) map device_config
The device config string that will be passed to backend SR driver
string type
The type of the SR; used to specify the SR backend driver to use
(string → string) map sm_config
Storage backend specific configuration options
Minimum role:
pool-operator
Result:
An XML fragment containing the scan results. These are specific to the scan being performed, and the backend.
Published in:
XenServer 4.1 (miami)
Perform a backend-specific scan, using the given device_config. If the device_config is complete, then this will return a list of the SRs present of this type on the device, if any. If the device_config is partial, then a backend-specific scan will be performed, returning results that will guide the user in improving the device_config.
Perform a backend-specific scan, using the given device_config. If the device_config is complete, then this will return a list of the SRs present of this type on the device, if any. If the device_config is partial, then a backend-specific scan will be performed, returning results that will guide the user in improving the device_config.
Parameters:
session ref session_id
Reference to a valid session
host ref host
The host to create/make the SR on
(string → string) map device_config
The device config string that will be passed to backend SR driver
string type
The type of the SR; used to specify the SR backend driver to use
(string → string) map sm_config
Storage backend specific configuration options
Minimum role:
pool-operator
Result:
A set of records containing the scan results.
Prototyped in:
XenServer 7.5 (kolkata)
Published in:
XenServer 7.6 (lima)
floatquery_data_source(session ref, SR ref, string)
Query the latest value of the specified data source
Parameters:
session ref session_id
Reference to a valid session
SR ref sr
The SR
string data_source
The data source to query
Minimum role:
read-only
Result:
The latest value, averaged over the last 5 seconds
Published in:
XenServer 7.0 (dundee)
Query the latest value of the specified data source
voidrecord_data_source(session ref, SR ref, string)
Start recording the specified data source
Parameters:
session ref session_id
Reference to a valid session
SR ref sr
The SR
string data_source
The data source to record
Minimum role:
pool-operator
Published in:
XenServer 7.0 (dundee)
Start recording the specified data source
voidremove_from_other_config(session ref, SR ref, string)
Remove the given key and its corresponding value from the other_config field of the given SR. If the key is not in that Map, then do nothing.
Parameters:
session ref session_id
Reference to a valid session
SR ref self
reference to the object
string key
Key to remove
Minimum role:
pool-operator
Published in:
XenServer 4.0 (rio)
additional configuration
voidremove_from_sm_config(session ref, SR ref, string)
Remove the given key and its corresponding value from the sm_config field of the given SR. If the key is not in that Map, then do nothing.
Parameters:
session ref session_id
Reference to a valid session
SR ref self
reference to the object
string key
Key to remove
Minimum role:
pool-operator
Published in:
XenServer 4.1 (miami)
SM dependent data
voidremove_tags(session ref, SR ref, string)
Remove the given value from the tags field of the given SR. If the value is not in that Set, then do nothing.
Parameters:
session ref session_id
Reference to a valid session
SR ref self
reference to the object
string value
Value to remove
Minimum role:
vm-operator
Published in:
XenServer 5.0 (orlando)
user-specified tags for categorization purposes
voidscan(session ref, SR ref)
Refreshes the list of VDIs associated with an SR
Parameters:
session ref session_id
Reference to a valid session
SR ref sr
The SR to scan
Minimum role:
vm-power-admin
Published in:
XenServer 4.0 (rio)
Refreshes the list of VDIs associated with an SR
voidset_name_description(session ref, SR ref, string)
Set the name description of the SR
Parameters:
session ref session_id
Reference to a valid session
SR ref sr
The SR
string value
The name description for the SR
Minimum role:
pool-operator
Published in:
XenServer 4.0 (rio)
Set the name description of the SR
voidset_name_label(session ref, SR ref, string)
Set the name label of the SR
Parameters:
session ref session_id
Reference to a valid session
SR ref sr
The SR
string value
The name label for the SR
Minimum role:
pool-operator
Published in:
XenServer 4.0 (rio)
Set the name label of the SR
voidset_other_config(session ref, SR ref, (string → string) map)
Set the other_config field of the given SR.
Parameters:
session ref session_id
Reference to a valid session
SR ref self
reference to the object
(string → string) map value
New value to set
Minimum role:
pool-operator
Published in:
XenServer 4.0 (rio)
additional configuration
voidset_physical_size(session ref, SR ref, int)
Sets the SR's physical_size field
Parameters:
session ref session_id
Reference to a valid session
SR ref self
The SR to modify
int value
The new value of the SR's physical_size
Minimum role:
pool-operator
Published in:
XenServer 4.1 (miami)
Sets the SR's physical_size field
voidset_shared(session ref, SR ref, bool)
Sets the shared flag on the SR
Parameters:
session ref session_id
Reference to a valid session
SR ref sr
The SR
bool value
True if the SR is shared
Minimum role:
pool-operator
Published in:
XenServer 4.0 (rio)
Sets the shared flag on the SR
voidset_sm_config(session ref, SR ref, (string → string) map)
Set the sm_config field of the given SR.
Parameters:
session ref session_id
Reference to a valid session
SR ref self
reference to the object
(string → string) map value
New value to set
Minimum role:
pool-operator
Published in:
XenServer 4.1 (miami)
SM dependent data
voidset_tags(session ref, SR ref, string set)
Set the tags field of the given SR.
Parameters:
session ref session_id
Reference to a valid session
SR ref self
reference to the object
string set value
New value to set
Minimum role:
vm-operator
Published in:
XenServer 5.0 (orlando)
user-specified tags for categorization purposes
voidupdate(session ref, SR ref)
Refresh the fields on the SR object
Parameters:
session ref session_id
Reference to a valid session
SR ref sr
The SR whose fields should be refreshed
Minimum role:
pool-operator
Published in:
XenServer 4.1.1 (symc)
Refresh the fields on the SR object
sr_stat
Class: sr_stat
A set of high-level properties associated with an SR.
Prototyped in:
XenServer 7.5 (kolkata)
Published in:
XenServer 7.6 (lima)
Enums
sr_health
Values:
healthy
Storage is fully available
recovering
Storage is busy recovering, e.g. rebuilding mirrors.
Fields
boolclustered[RO/runtime]
Indicates whether the SR uses clustered local storage.
Prototyped in:
XenServer 7.5 (kolkata)
Published in:
XenServer 7.6 (lima)
intfree_space[RO/runtime]
Number of bytes free on the backing storage (in bytes)
Prototyped in:
XenServer 7.5 (kolkata)
Published in:
XenServer 7.6 (lima)
enum sr_healthhealth[RO/runtime]
The health status of the SR.
Prototyped in:
XenServer 7.5 (kolkata)
Published in:
XenServer 7.6 (lima)
stringname_description[RO/runtime]
Longer, human-readable description of the SR. Descriptions are generally only displayed by clients when the user is examining SRs in detail.
Prototyped in:
XenServer 7.5 (kolkata)
Published in:
XenServer 7.6 (lima)
stringname_label[RO/runtime]
Short, human-readable label for the SR.
Prototyped in:
XenServer 7.5 (kolkata)
Published in:
XenServer 7.6 (lima)
inttotal_space[RO/runtime]
Total physical size of the backing storage (in bytes)
Prototyped in:
XenServer 7.5 (kolkata)
Published in:
XenServer 7.6 (lima)
string optionuuid[RO/runtime]
Uuid that uniquely identifies this SR, if one is available.
Prototyped in:
XenServer 7.5 (kolkata)
Published in:
XenServer 7.6 (lima)
Messages
subject
Class: subject
A user or group that can log in xapi
Published in:
XenServer 5.5 (george)
A user or group that can log in xapi
Fields
(string → string) mapother_config[RO/constructor]
additional configuration
Default value:
{}
Published in:
XenServer 5.5 (george)
additional configuration
role ref setroles[RO/runtime]
the roles associated with this subject
Default value:
{OpaqueRef:0165f154-ba3e-034e-6b27-5d271af109ba}
Published in:
XenServer 5.6 (midnight-ride)
the roles associated with this subject
stringsubject_identifier[RO/constructor]
the subject identifier, unique in the external directory service
Default value:
""
Published in:
XenServer 5.5 (george)
the subject identifier, unique in the external directory service
stringuuid[RO/runtime]
Unique identifier/object reference
Published in:
XenServer 4.0 (rio)
Unique identifier/object reference
Messages
voidadd_to_roles(session ref, subject ref, role ref)
This call adds a new role to a subject
Parameters:
session ref session_id
Reference to a valid session
subject ref self
The subject who we want to add the role to
role ref role
The unique role reference
Minimum role:
pool-admin
Published in:
XenServer 5.6 (midnight-ride)
This call adds a new role to a subject
subject refcreate(session ref, subject record)
Create a new subject instance, and return its handle.
The constructor args are: subject_identifier, other_config (* = non-optional).
Parameters:
session ref session_id
Reference to a valid session
subject record args
All constructor arguments
Minimum role:
pool-admin
Result:
reference to the newly created object
Published in:
XenServer 5.5 (george)
A user or group that can log in xapi
voiddestroy(session ref, subject ref)
Destroy the specified subject instance.
Parameters:
session ref session_id
Reference to a valid session
subject ref self
reference to the object
Minimum role:
pool-admin
Published in:
XenServer 5.5 (george)
A user or group that can log in xapi
subject ref setget_all(session ref)
Return a list of all the subjects known to the system.
list of the operations allowed in this state. This list is advisory only and the server state may have changed by the time this field is read by a client.
Default value:
{}
Published in:
XenServer 4.0 (rio)
list of the operations allowed in this state. This list is advisory only and the server state may have changed by the time this field is read by a client.
links each of the running tasks using this object (by reference) to a current_operation enum which describes the nature of the task.
Default value:
{}
Published in:
XenServer 4.0 (rio)
links each of the running tasks using this object (by reference) to a current_operation enum which describes the nature of the task.
string seterror_info[RO/runtime]
if the task has failed, this field contains the set of associated error strings. Undefined otherwise.
Published in:
XenServer 4.0 (rio)
if the task has failed, this field contains the set of associated error strings. Undefined otherwise.
datetimefinished[RO/runtime]
Time task finished (i.e. succeeded or failed). If task-status is pending, then the value of this field has no meaning
Published in:
XenServer 4.0 (rio)
Time task finished (i.e. succeeded or failed). If task-status is pending, then the value of this field has no meaning
stringname_description[RO/runtime]
a notes field containing human-readable description
Default value:
""
Published in:
XenServer 4.0 (rio)
a notes field containing human-readable description
stringname_label[RO/runtime]
a human-readable name
Default value:
""
Published in:
XenServer 4.0 (rio)
a human-readable name
(string → string) mapother_config[RW]
additional configuration
Default value:
{}
Published in:
XenServer 4.1 (miami)
additional configuration
floatprogress[RO/runtime]
This field contains the estimated fraction of the task which is complete. This field should not be used to determine whether the task is complete - for this the status field of the task should be used.
Published in:
XenServer 4.0 (rio)
This field contains the estimated fraction of the task which is complete. This field should not be used to determine whether the task is complete - for this the status field of the task should be used.
host refresident_on[RO/runtime]
the host on which the task is running
Published in:
XenServer 4.0 (rio)
the host on which the task is running
stringresult[RO/runtime]
if the task has completed successfully, this field contains the result value (either Void or an object reference). Undefined otherwise.
Published in:
XenServer 4.0 (rio)
if the task has completed successfully, this field contains the result value (either Void or an object reference). Undefined otherwise.
enum task_status_typestatus[RO/runtime]
current status of the task
Published in:
XenServer 4.0 (rio)
current status of the task
task refsubtask_of[RO/runtime]
Ref pointing to the task this is a substask of.
Default value:
Null
Published in:
XenServer 5.0 (orlando)
Ref pointing to the task this is a substask of.
task ref setsubtasks[RO/runtime]
List pointing to all the substasks.
Published in:
XenServer 5.0 (orlando)
List pointing to all the substasks.
stringtype[RO/runtime]
if the task has completed successfully, this field contains the type of the encoded result (i.e. name of the class whose reference is in the result field). Undefined otherwise.
Published in:
XenServer 4.0 (rio)
if the task has completed successfully, this field contains the type of the encoded result (i.e. name of the class whose reference is in the result field). Undefined otherwise.
Add the given key-value pair to the other_config field of the given task.
Parameters:
session ref session_id
Reference to a valid session
task ref self
reference to the object
string key
Key to add
string value
Value to add
Minimum role:
pool-operator
Published in:
XenServer 4.1 (miami)
additional configuration
voidcancel(session ref, task ref)
Request that a task be cancelled. Note that a task may fail to be cancelled and may complete or fail normally and note that, even when a task does cancel, it might take an arbitrary amount of time.
Parameters:
session ref session_id
Reference to a valid session
task ref task
The task
Minimum role:
read-only
Errors:
OPERATION_NOT_ALLOWED
You attempted an operation that was not allowed.
Published in:
XenServer 4.0 (rio)
Request that a task be cancelled. Note that a task may fail to be cancelled and may complete or fail normally and note that, even when a task does cancel, it might take an arbitrary amount of time.
task refcreate(session ref, string, string)
Create a new task object which must be manually destroyed.
Parameters:
session ref session_id
Reference to a valid session
string label
short label for the new task
string description
longer description for the new task
Minimum role:
read-only
Result:
The reference of the created task object
Published in:
XenServer 4.0 (rio)
Create a new task object which must be manually destroyed.
voiddestroy(session ref, task ref)
Destroy the task object
Parameters:
session ref session_id
Reference to a valid session
task ref self
Reference to the task object
Minimum role:
read-only
Published in:
XenServer 4.0 (rio)
Destroy the task object
task ref setget_all(session ref)
Return a list of all the tasks known to the system.
Get the allowed_operations field of the given task.
Parameters:
session ref session_id
Reference to a valid session
task ref self
reference to the object
Minimum role:
read-only
Result:
value of the field
Published in:
XenServer 4.0 (rio)
list of the operations allowed in this state. This list is advisory only and the server state may have changed by the time this field is read by a client.
This field contains the estimated fraction of the task which is complete. This field should not be used to determine whether the task is complete - for this the status field of the task should be used.
task recordget_record(session ref, task ref)
Get a record containing the current state of the given task.
Parameters:
session ref session_id
Reference to a valid session
task ref self
reference to the object
Minimum role:
read-only
Result:
all fields from the object
Published in:
XenServer 4.0 (rio)
A long-running asynchronous task
host refget_resident_on(session ref, task ref)
Get the resident_on field of the given task.
Parameters:
session ref session_id
Reference to a valid session
task ref self
reference to the object
Minimum role:
read-only
Result:
value of the field
Published in:
XenServer 4.0 (rio)
the host on which the task is running
stringget_result(session ref, task ref)
Get the result field of the given task.
Parameters:
session ref session_id
Reference to a valid session
task ref self
reference to the object
Minimum role:
read-only
Result:
value of the field
Published in:
XenServer 4.0 (rio)
if the task has completed successfully, this field contains the result value (either Void or an object reference). Undefined otherwise.
if the task has completed successfully, this field contains the type of the encoded result (i.e. name of the class whose reference is in the result field). Undefined otherwise.
list of the operations allowed in this state. This list is advisory only and the server state may have changed by the time this field is read by a client.
Default value:
{}
Published in:
XenServer 4.0 (rio)
list of the operations allowed in this state. This list is advisory only and the server state may have changed by the time this field is read by a client.
Get the allowed_operations field of the given VBD.
Parameters:
session ref session_id
Reference to a valid session
VBD ref self
reference to the object
Minimum role:
read-only
Result:
value of the field
Published in:
XenServer 4.0 (rio)
list of the operations allowed in this state. This list is advisory only and the server state may have changed by the time this field is read by a client.
boolget_bootable(session ref, VBD ref)
Get the bootable field of the given VBD.
Parameters:
session ref session_id
Reference to a valid session
VBD ref self
reference to the object
Minimum role:
read-only
Result:
value of the field
Published in:
XenServer 4.0 (rio)
true if this VBD is bootable
VBD refget_by_uuid(session ref, string)
Get a reference to the VBD instance with the specified UUID.
Set the other_config field of the given VBD_metrics.
Parameters:
session ref session_id
Reference to a valid session
VBD_metrics ref self
reference to the object
(string → string) map value
New value to set
Minimum role:
vm-admin
Published in:
XenServer 5.0 (orlando)
Deprecated in:
XenServer 6.1 (tampa)
Dummy transition
Removed in:
XenServer 6.1 (tampa)
Disabled in favour of RRD
VDI
Class: VDI
A virtual disk image
Published in:
XenServer 4.0 (rio)
A virtual disk image
Enums
vdi_operations
Values:
clone
Cloning the VDI
copy
Copying the VDI
resize
Resizing the VDI
resize_online
Resizing the VDI which may or may not be online
snapshot
Snapshotting the VDI
mirror
Mirroring the VDI
destroy
Destroying the VDI
forget
Forget about the VDI
update
Refreshing the fields of the VDI
force_unlock
Forcibly unlocking the VDI
generate_config
Generating static configuration
enable_cbt
Enabling changed block tracking for a VDI
disable_cbt
Disabling changed block tracking for a VDI
data_destroy
Deleting the data of the VDI
list_changed_blocks
Exporting a bitmap that shows the changed blocks between two VDIs
set_on_boot
Setting the on_boot field of the VDI
blocked
Operations on this VDI are temporarily blocked
vdi_type
Values:
system
a disk that may be replaced on upgrade
user
a disk that is always preserved on upgrade
ephemeral
a disk that may be reformatted on upgrade
suspend
a disk that stores a suspend image
crashdump
a disk that stores VM crashdump information
ha_statefile
a disk used for HA storage heartbeating
metadata
a disk used for HA Pool metadata
redo_log
a disk used for a general metadata redo-log
rrd
a disk that stores SR-level RRDs
pvs_cache
a disk that stores PVS cache data
cbt_metadata
Metadata about a snapshot VDI that has been deleted: the set of blocks that changed between some previous version of the disk and the version tracked by the snapshot.
on_boot
Values:
reset
When a VM containing this VDI is started, the contents of the VDI are reset to the state they were in when this flag was last set.
persist
Standard behaviour.
Fields
boolallow_caching[RO/runtime]
true if this VDI is to be cached in the local cache SR
Default value:
false
Published in:
XenServer 5.6 FP1 (cowley)
true if this VDI is to be cached in the local cache SR
list of the operations allowed in this state. This list is advisory only and the server state may have changed by the time this field is read by a client.
Default value:
{}
Published in:
XenServer 4.0 (rio)
list of the operations allowed in this state. This list is advisory only and the server state may have changed by the time this field is read by a client.
links each of the running tasks using this object (by reference) to a current_operation enum which describes the nature of the task.
Default value:
{}
Published in:
XenServer 4.0 (rio)
links each of the running tasks using this object (by reference) to a current_operation enum which describes the nature of the task.
boolis_a_snapshot[RO/runtime]
true if this is a snapshot.
Default value:
false
Published in:
XenServer 5.0 (orlando)
true if this is a snapshot.
boolis_tools_iso[RO/runtime]
Whether this VDI is a Tools ISO
Default value:
false
Published in:
XenServer 7.0 (dundee)
stringlocation[RO/runtime]
location information
Default value:
""
Published in:
XenServer 4.1 (miami)
location information
boolmanaged[RO/runtime]
Published in:
XenServer 4.0 (rio)
boolmetadata_latest[RO/runtime]
Whether this VDI contains the latest known accessible metadata for the pool
Default value:
false
Published in:
XenServer 6.0 (boston)
Whether this VDI contains the latest known accessible metadata for the pool
pool refmetadata_of_pool[RO/runtime]
The pool whose metadata is contained in this VDI
Default value:
OpaqueRef:NULL
Published in:
XenServer 6.0 (boston)
The pool whose metadata is contained in this VDI
boolmissing[RO/runtime]
true if SR scan operation reported this VDI as not present on disk
Published in:
XenServer 4.0 (rio)
true if SR scan operation reported this VDI as not present on disk
stringname_description[RO/constructor]
a notes field containing human-readable description
Default value:
""
Published in:
XenServer 4.0 (rio)
a notes field containing human-readable description
stringname_label[RO/constructor]
a human-readable name
Default value:
""
Published in:
XenServer 4.0 (rio)
a human-readable name
enum on_booton_boot[RO/runtime]
The behaviour of this VDI on a VM boot
Default value:
persist
Published in:
XenServer 5.6 FP1 (cowley)
The behaviour of this VDI on a VM boot
(string → string) mapother_config[RW]
additional configuration
Published in:
XenServer 4.0 (rio)
additional configuration
Deprecated
VDI refparent[RO/runtime]
This field is always null. Deprecated
Published in:
XenServer 4.0 (rio)
Deprecated in:
XenServer 7.1 (ely)
The field was never used.
intphysical_utilisation[RO/runtime]
amount of physical space that the disk image is currently taking up on the storage repository (in bytes)
Published in:
XenServer 4.0 (rio)
amount of physical space that the disk image is currently taking up on the storage repository (in bytes)
boolread_only[RO/constructor]
true if this disk may ONLY be mounted read-only
Published in:
XenServer 4.0 (rio)
true if this disk may ONLY be mounted read-only
boolsharable[RO/constructor]
true if this disk may be shared
Published in:
XenServer 4.0 (rio)
true if this disk may be shared
(string → string) mapsm_config[RW]
SM dependent data
Default value:
{}
Published in:
XenServer 4.1 (miami)
SM dependent data
VDI refsnapshot_of[RO/runtime]
Ref pointing to the VDI this snapshot is of.
Default value:
Null
Published in:
XenServer 5.0 (orlando)
Ref pointing to the VDI this snapshot is of.
datetimesnapshot_time[RO/runtime]
Date/time when this snapshot was created.
Default value:
19700101T00:00:00Z
Published in:
XenServer 5.0 (orlando)
Date/time when this snapshot was created.
VDI ref setsnapshots[RO/runtime]
List pointing to all the VDIs snapshots.
Published in:
XenServer 5.0 (orlando)
List pointing to all the VDIs snapshots.
SR refSR[RO/constructor]
storage repository in which the VDI resides
Published in:
XenServer 4.0 (rio)
storage repository in which the VDI resides
boolstorage_lock[RO/runtime]
true if this disk is locked at the storage level
Published in:
XenServer 4.0 (rio)
true if this disk is locked at the storage level
string settags[RW]
user-specified tags for categorization purposes
Default value:
{}
Published in:
XenServer 5.0 (orlando)
user-specified tags for categorization purposes
enum vdi_typetype[RO/constructor]
type of the VDI
Published in:
XenServer 4.0 (rio)
type of the VDI
stringuuid[RO/runtime]
Unique identifier/object reference
Published in:
XenServer 4.0 (rio)
Unique identifier/object reference
VBD ref setVBDs[RO/runtime]
list of vbds that refer to this disk
Published in:
XenServer 4.0 (rio)
list of vbds that refer to this disk
intvirtual_size[RO/constructor]
size of disk as presented to the guest (in bytes). Note that, depending on storage backend type, requested size may not be respected exactly
Published in:
XenServer 4.0 (rio)
size of disk as presented to the guest (in bytes). Note that, depending on storage backend type, requested size may not be respected exactly
(string → string) mapxenstore_data[RW]
data to be inserted into the xenstore tree (/local/domain/0/backend/vbd/<domid>/<device-id>/sm-data) after the VDI is attached. This is generally set by the SM backends on vdi_attach.
Default value:
{}
Published in:
XenServer 4.1 (miami)
data to be inserted into the xenstore tree (/local/domain/0/backend/vbd/<domid>/<device-id>/sm-data) after the VDI is attached. This is generally set by the SM backends on vdi_attach.
Messages
voidadd_tags(session ref, VDI ref, string)
Add the given value to the tags field of the given VDI. If the value is already in that Set, then do nothing.
Add the given key-value pair to the xenstore_data field of the given VDI.
Parameters:
session ref session_id
Reference to a valid session
VDI ref self
reference to the object
string key
Key to add
string value
Value to add
Minimum role:
vm-admin
Published in:
XenServer 4.1 (miami)
data to be inserted into the xenstore tree (/local/domain/0/backend/vbd/<domid>/<device-id>/sm-data) after the VDI is attached. This is generally set by the SM backends on vdi_attach.
Take an exact copy of the VDI and return a reference to the new disk. If any driver_params are specified then these are passed through to the storage-specific substrate driver that implements the clone operation. NB the clone lives in the same Storage Repository as its parent.
Parameters:
session ref session_id
Reference to a valid session
VDI ref vdi
The VDI to clone
(string → string) map driver_params
Optional parameters that are passed through to the backend driver in order to specify storage-type-specific clone options
Minimum role:
vm-admin
Result:
The ID of the newly created VDI.
Published in:
XenServer 4.0 (rio)
Take an exact copy of the VDI and return a reference to the new disk. If any driver_params are specified then these are passed through to the storage-specific substrate driver that implements the clone operation. NB the clone lives in the same Storage Repository as its parent.
Copy either a full VDI or the block differences between two VDIs into either a fresh VDI or an existing VDI.
Parameters:
session ref session_id
Reference to a valid session
VDI ref vdi
The VDI to copy
SR ref sr
The destination SR (only required if the destination VDI is not specified
VDI ref base_vdi
The base VDI (only required if copying only changed blocks, by default all blocks will be copied)
VDI ref into_vdi
The destination VDI to copy blocks into (if omitted then a destination SR must be provided and a fresh VDI will be created)
Minimum role:
vm-admin
Result:
The reference of the VDI where the blocks were written.
Errors:
VDI_READONLY
The operation required write access but this VDI is read-only
VDI_TOO_SMALL
The VDI is too small. Please resize it to at least the minimum size.
VDI_NOT_SPARSE
The VDI is not stored using a sparse format. It is not possible to query and manipulate only the changed blocks (or 'block differences' or 'disk deltas') between two VDIs. Please select a VDI which uses a sparse-aware technology such as VHD.
Published in:
XenServer 4.0 (rio)
Copies a VDI to an SR. There must be a host that can see both the source and destination SRs simultaneously
Extended in:
XenServer 5.6 FP1 (cowley)
The copy can now be performed between any two SRs.
Extended in:
XenServer 6.2 SP1 Hotfix 4 (clearwater-felton)
The copy can now be performed into a pre-created VDI. It is now possible to request copying only changed blocks from a base VDI
VDI refcreate(session ref, VDI record)
Create a new VDI instance, and return its handle.
The constructor args are: name_label, name_description, SR*, virtual_size*, type*, sharable*, read_only*, other_config*, xenstore_data, sm_config, tags (* = non-optional).
Parameters:
session ref session_id
Reference to a valid session
VDI record args
All constructor arguments
Minimum role:
vm-admin
Result:
reference to the newly created object
Published in:
XenServer 4.0 (rio)
A virtual disk image
voiddata_destroy(session ref, VDI ref)
Delete the data of the snapshot VDI, but keep its changed block tracking metadata. When successful, this call changes the type of the VDI to cbt_metadata. This operation is idempotent: calling it on a VDI of type cbt_metadata results in a no-op, and no error will be thrown.
Parameters:
session ref session_id
Reference to a valid session
VDI ref self
The VDI whose data should be deleted.
Minimum role:
vm-admin
Errors:
SR_OPERATION_NOT_SUPPORTED
The SR backend does not support the operation (check the SR's allowed operations)
VDI_MISSING
This operation cannot be performed because the specified VDI could not be found on the storage substrate
SR_NOT_ATTACHED
The SR is not attached.
SR_HAS_NO_PBDS
The SR has no attached PBDs
OPERATION_NOT_ALLOWED
You attempted an operation that was not allowed.
VDI_INCOMPATIBLE_TYPE
This operation cannot be performed because the specified VDI is of an incompatible type (eg: an HA statefile cannot be attached to a guest)
VDI_NO_CBT_METADATA
The requested operation is not allowed because the specified VDI does not have changed block tracking metadata.
VDI_IN_USE
This operation cannot be performed because this VDI is in use by some other operation
VDI_IS_A_PHYSICAL_DEVICE
The operation cannot be performed on physical device
Published in:
XenServer 7.3 (inverness)
Delete the data of the snapshot VDI, but keep its changed block tracking metadata. When successful, this call changes the type of the VDI to cbt_metadata. This operation is idempotent: calling it on a VDI of type cbt_metadata results in a no-op, and no error will be thrown.
voiddestroy(session ref, VDI ref)
Destroy the specified VDI instance.
Parameters:
session ref session_id
Reference to a valid session
VDI ref self
reference to the object
Minimum role:
vm-admin
Published in:
XenServer 4.0 (rio)
A virtual disk image
voiddisable_cbt(session ref, VDI ref)
Disable changed block tracking for the VDI. This call is only allowed on VDIs that support enabling CBT. It is an idempotent operation - disabling CBT for a VDI for which CBT is not enabled results in a no-op, and no error will be thrown.
Parameters:
session ref session_id
Reference to a valid session
VDI ref self
The VDI for which CBT should be disabled
Minimum role:
vm-admin
Errors:
SR_OPERATION_NOT_SUPPORTED
The SR backend does not support the operation (check the SR's allowed operations)
VDI_MISSING
This operation cannot be performed because the specified VDI could not be found on the storage substrate
SR_NOT_ATTACHED
The SR is not attached.
SR_HAS_NO_PBDS
The SR has no attached PBDs
OPERATION_NOT_ALLOWED
You attempted an operation that was not allowed.
VDI_INCOMPATIBLE_TYPE
This operation cannot be performed because the specified VDI is of an incompatible type (eg: an HA statefile cannot be attached to a guest)
VDI_ON_BOOT_MODE_INCOMPATIBLE_WITH_OPERATION
This operation is not permitted on VDIs in the 'on-boot=reset' mode, or on VMs having such VDIs.
Published in:
XenServer 7.3 (inverness)
Disable changed block tracking for the VDI. This call is only allowed on VDIs that support enabling CBT. It is an idempotent operation - disabling CBT for a VDI for which CBT is not enabled results in a no-op, and no error will be thrown.
voidenable_cbt(session ref, VDI ref)
Enable changed block tracking for the VDI. This call is idempotent - enabling CBT for a VDI for which CBT is already enabled results in a no-op, and no error will be thrown.
Parameters:
session ref session_id
Reference to a valid session
VDI ref self
The VDI for which CBT should be enabled
Minimum role:
vm-admin
Errors:
SR_OPERATION_NOT_SUPPORTED
The SR backend does not support the operation (check the SR's allowed operations)
VDI_MISSING
This operation cannot be performed because the specified VDI could not be found on the storage substrate
SR_NOT_ATTACHED
The SR is not attached.
SR_HAS_NO_PBDS
The SR has no attached PBDs
OPERATION_NOT_ALLOWED
You attempted an operation that was not allowed.
VDI_INCOMPATIBLE_TYPE
This operation cannot be performed because the specified VDI is of an incompatible type (eg: an HA statefile cannot be attached to a guest)
VDI_ON_BOOT_MODE_INCOMPATIBLE_WITH_OPERATION
This operation is not permitted on VDIs in the 'on-boot=reset' mode, or on VMs having such VDIs.
Published in:
XenServer 7.3 (inverness)
Enable changed block tracking for the VDI. This call is idempotent - enabling CBT for a VDI for which CBT is already enabled results in a no-op, and no error will be thrown.
voidforget(session ref, VDI ref)
Removes a VDI record from the database
Parameters:
session ref session_id
Reference to a valid session
VDI ref vdi
The VDI to forget about
Minimum role:
vm-admin
Published in:
XenServer 4.0 (rio)
Removes a VDI record from the database
VDI ref setget_all(session ref)
Return a list of all the VDIs known to the system.
Get the allowed_operations field of the given VDI.
Parameters:
session ref session_id
Reference to a valid session
VDI ref self
reference to the object
Minimum role:
read-only
Result:
value of the field
Published in:
XenServer 4.0 (rio)
list of the operations allowed in this state. This list is advisory only and the server state may have changed by the time this field is read by a client.
VDI ref setget_by_name_label(session ref, string)
Get all the VDI instances with the given label.
Parameters:
session ref session_id
Reference to a valid session
string label
label of object to return
Minimum role:
read-only
Result:
references to objects with matching names
Published in:
XenServer 4.0 (rio)
A virtual disk image
VDI refget_by_uuid(session ref, string)
Get a reference to the VDI instance with the specified UUID.
Get the current_operations field of the given VDI.
Parameters:
session ref session_id
Reference to a valid session
VDI ref self
reference to the object
Minimum role:
read-only
Result:
value of the field
Published in:
XenServer 4.0 (rio)
links each of the running tasks using this object (by reference) to a current_operation enum which describes the nature of the task.
boolget_is_a_snapshot(session ref, VDI ref)
Get the is_a_snapshot field of the given VDI.
Parameters:
session ref session_id
Reference to a valid session
VDI ref self
reference to the object
Minimum role:
read-only
Result:
value of the field
Published in:
XenServer 5.0 (orlando)
true if this is a snapshot.
boolget_is_tools_iso(session ref, VDI ref)
Get the is_tools_iso field of the given VDI.
Parameters:
session ref session_id
Reference to a valid session
VDI ref self
reference to the object
Minimum role:
read-only
Result:
value of the field
Published in:
XenServer 7.0 (dundee)
stringget_location(session ref, VDI ref)
Get the location field of the given VDI.
Parameters:
session ref session_id
Reference to a valid session
VDI ref self
reference to the object
Minimum role:
read-only
Result:
value of the field
Published in:
XenServer 4.1 (miami)
location information
boolget_managed(session ref, VDI ref)
Get the managed field of the given VDI.
Parameters:
session ref session_id
Reference to a valid session
VDI ref self
reference to the object
Minimum role:
read-only
Result:
value of the field
Published in:
XenServer 4.0 (rio)
boolget_metadata_latest(session ref, VDI ref)
Get the metadata_latest field of the given VDI.
Parameters:
session ref session_id
Reference to a valid session
VDI ref self
reference to the object
Minimum role:
read-only
Result:
value of the field
Published in:
XenServer 6.0 (boston)
Whether this VDI contains the latest known accessible metadata for the pool
pool refget_metadata_of_pool(session ref, VDI ref)
Get the metadata_of_pool field of the given VDI.
Parameters:
session ref session_id
Reference to a valid session
VDI ref self
reference to the object
Minimum role:
read-only
Result:
value of the field
Published in:
XenServer 6.0 (boston)
The pool whose metadata is contained in this VDI
boolget_missing(session ref, VDI ref)
Get the missing field of the given VDI.
Parameters:
session ref session_id
Reference to a valid session
VDI ref self
reference to the object
Minimum role:
read-only
Result:
value of the field
Published in:
XenServer 4.0 (rio)
true if SR scan operation reported this VDI as not present on disk
stringget_name_description(session ref, VDI ref)
Get the name/description field of the given VDI.
Parameters:
session ref session_id
Reference to a valid session
VDI ref self
reference to the object
Minimum role:
read-only
Result:
value of the field
Published in:
XenServer 4.0 (rio)
a notes field containing human-readable description
stringget_name_label(session ref, VDI ref)
Get the name/label field of the given VDI.
Parameters:
session ref session_id
Reference to a valid session
VDI ref self
reference to the object
Minimum role:
read-only
Result:
value of the field
Published in:
XenServer 4.0 (rio)
a human-readable name
vdi_nbd_server_info record setget_nbd_info(session ref, VDI ref)
Get details specifying how to access this VDI via a Network Block Device server. For each of a set of NBD server addresses on which the VDI is available, the return value set contains a vdi_nbd_server_info object that contains an exportname to request once the NBD connection is established, and connection details for the address. An empty list is returned if there is no network that has a PIF on a host with access to the relevant SR, or if no such network has been assigned an NBD-related purpose in its purpose field. To access the given VDI, any of the vdi_nbd_server_info objects can be used to make a connection to a server, and then the VDI will be available by requesting the exportname.
Parameters:
session ref session_id
Reference to a valid session
VDI ref self
The VDI to access via Network Block Device protocol
Minimum role:
vm-admin
Result:
The details necessary for connecting to the VDI over NBD. This includes an authentication token, so must be treated as sensitive material and must not be sent over insecure networks.
Errors:
VDI_INCOMPATIBLE_TYPE
This operation cannot be performed because the specified VDI is of an incompatible type (eg: an HA statefile cannot be attached to a guest)
Published in:
XenServer 7.3 (inverness)
Get details specifying how to access this VDI via a Network Block Device server. For each of a set of NBD server addresses on which the VDI is available, the return value set contains a vdi_nbd_server_info object that contains an exportname to request once the NBD connection is established, and connection details for the address. An empty list is returned if there is no network that has a PIF on a host with access to the relevant SR, or if no such network has been assigned an NBD-related purpose in its purpose field. To access the given VDI, any of the vdi_nbd_server_info objects can be used to make a connection to a server, and then the VDI will be available by requesting the exportname.
data to be inserted into the xenstore tree (/local/domain/0/backend/vbd/<domid>/<device-id>/sm-data) after the VDI is attached. This is generally set by the SM backends on vdi_attach.
Remove the given key and its corresponding value from the xenstore_data field of the given VDI. If the key is not in that Map, then do nothing.
Parameters:
session ref session_id
Reference to a valid session
VDI ref self
reference to the object
string key
Key to remove
Minimum role:
vm-admin
Published in:
XenServer 4.1 (miami)
data to be inserted into the xenstore tree (/local/domain/0/backend/vbd/<domid>/<device-id>/sm-data) after the VDI is attached. This is generally set by the SM backends on vdi_attach.
voidremove_tags(session ref, VDI ref, string)
Remove the given value from the tags field of the given VDI. If the value is not in that Set, then do nothing.
Parameters:
session ref session_id
Reference to a valid session
VDI ref self
reference to the object
string value
Value to remove
Minimum role:
vm-operator
Published in:
XenServer 5.0 (orlando)
user-specified tags for categorization purposes
voidresize(session ref, VDI ref, int)
Resize the VDI.
Parameters:
session ref session_id
Reference to a valid session
VDI ref vdi
The VDI to resize
int size
The new size of the VDI
Minimum role:
vm-admin
Published in:
XenServer 4.0 (rio)
Resize the VDI.
Removed
voidresize_online(session ref, VDI ref, int)
Resize the VDI which may or may not be attached to running guests.
Parameters:
session ref session_id
Reference to a valid session
VDI ref vdi
The VDI to resize
int size
The new size of the VDI
Minimum role:
vm-admin
Published in:
XenServer 4.0 (rio)
Deprecated in:
XenServer 7.3 (inverness)
Dummy transition
Removed in:
XenServer 7.3 (inverness)
Online VDI resize is not supported by any of the storage backends.
voidset_allow_caching(session ref, VDI ref, bool)
Set the value of the allow_caching parameter. This value can only be changed when the VDI is not attached to a running VM. The caching behaviour is only affected by this flag for VHD-based VDIs that have one parent and no child VHDs. Moreover, caching only takes place when the host running the VM containing this VDI has a nominated SR for local caching.
Parameters:
session ref session_id
Reference to a valid session
VDI ref self
The VDI to modify
bool value
The value to set
Minimum role:
vm-admin
Published in:
XenServer 5.6 FP1 (cowley)
Set the value of the allow_caching parameter. This value can only be changed when the VDI is not attached to a running VM. The caching behaviour is only affected by this flag for VHD-based VDIs that have one parent and no child VHDs. Moreover, caching only takes place when the host running the VM containing this VDI has a nominated SR for local caching.
data to be inserted into the xenstore tree (/local/domain/0/backend/vbd/<domid>/<device-id>/sm-data) after the VDI is attached. This is generally set by the SM backends on vdi_attach.
Take a read-only snapshot of the VDI, returning a reference to the snapshot. If any driver_params are specified then these are passed through to the storage-specific substrate driver that takes the snapshot. NB the snapshot lives in the same Storage Repository as its parent.
Parameters:
session ref session_id
Reference to a valid session
VDI ref vdi
The VDI to snapshot
(string → string) map driver_params
Optional parameters that can be passed through to backend driver in order to specify storage-type-specific snapshot options
Minimum role:
vm-admin
Result:
The ID of the newly created VDI.
Published in:
XenServer 4.0 (rio)
Take a read-only snapshot of the VDI, returning a reference to the snapshot. If any driver_params are specified then these are passed through to the storage-specific substrate driver that takes the snapshot. NB the snapshot lives in the same Storage Repository as its parent.
voidupdate(session ref, VDI ref)
Ask the storage backend to refresh the fields in the VDI object
Parameters:
session ref session_id
Reference to a valid session
VDI ref vdi
The VDI whose stats (eg size) should be updated
Minimum role:
vm-admin
Errors:
SR_OPERATION_NOT_SUPPORTED
The SR backend does not support the operation (check the SR's allowed operations)
Published in:
XenServer 4.1.1 (symc)
Ask the storage backend to refresh the fields in the VDI object
vdi_nbd_server_info
Class: vdi_nbd_server_info
Details for connecting to a VDI using the Network Block Device protocol
Published in:
XenServer 7.3 (inverness)
Fields
stringaddress[RO/runtime]
An address on which the server can be reached; this can be IPv4, IPv6, or a DNS name.
Published in:
XenServer 7.3 (inverness)
stringcert[RO/runtime]
The TLS certificate of the server
Published in:
XenServer 7.3 (inverness)
stringexportname[RO/runtime]
The exportname to request over NBD. This holds details including an authentication token, so it must be protected appropriately. Clients should regard the exportname as an opaque string or token.
Published in:
XenServer 7.3 (inverness)
intport[RO/runtime]
The TCP port
Published in:
XenServer 7.3 (inverness)
stringsubject[RO/runtime]
For convenience, this redundant field holds a DNS (hostname) subject of the certificate. This can be a wildcard, but only for a certificate that has a wildcard subject and no concrete hostname subjects.
list of the operations allowed in this state. This list is advisory only and the server state may have changed by the time this field is read by a client.
Default value:
{}
Published in:
XenServer 4.0 (rio)
list of the operations allowed in this state. This list is advisory only and the server state may have changed by the time this field is read by a client.
Get the allowed_operations field of the given VIF.
Parameters:
session ref session_id
Reference to a valid session
VIF ref self
reference to the object
Minimum role:
read-only
Result:
value of the field
Published in:
XenServer 4.0 (rio)
list of the operations allowed in this state. This list is advisory only and the server state may have changed by the time this field is read by a client.
VIF refget_by_uuid(session ref, string)
Get a reference to the VIF instance with the specified UUID.
A host which the VM has some affinity for (or NULL). This is used as a hint to the start call when it decides where to run the VM. Resource constraints may cause the VM to be started elsewhere.
Published in:
XenServer 4.0 (rio)
A host which the VM has some affinity for (or NULL). This is used as a hint to the start call when it decides where to run the VM. Resource constraints may cause the VM to be started elsewhere.
list of the operations allowed in this state. This list is advisory only and the server state may have changed by the time this field is read by a client.
Default value:
{}
Published in:
XenServer 4.0 (rio)
list of the operations allowed in this state. This list is advisory only and the server state may have changed by the time this field is read by a client.
if true then the system will attempt to keep the VM running as much as possible.
Default value:
false
Published in:
XenServer 5.0 (orlando)
if true then the system will attempt to keep the VM running as much as possible.
Deprecated in:
XenServer 6.0 (boston)
stringha_restart_priority[RO/constructor]
has possible values: "best-effort" meaning "try to restart this VM if possible but don't consider the Pool to be overcommitted if this is not possible"; "restart" meaning "this VM should be restarted"; "" meaning "do not try to restart this VM"
Default value:
""
Published in:
XenServer 5.0 (orlando)
has possible values: "best-effort" meaning "try to restart this VM if possible but don't consider the Pool to be overcommitted if this is not possible"; "restart" meaning "this VM should be restarted"; "" meaning "do not try to restart this VM"
inthardware_platform_version[RW]
The host virtual hardware platform version the VM can run on
Default value:
0
Published in:
XenServer 6.5 SP1 (cream)
The host virtual hardware platform version the VM can run on
boolhas_vendor_device[RO/constructor]
When an HVM guest starts, this controls the presence of the emulated C000 PCI device which triggers Windows Update to fetch or update PV drivers.
Default value:
false
Published in:
XenServer 7.0 (dundee)
(string → string) mapHVM_boot_params[RW]
HVM boot params
Published in:
XenServer 4.0 (rio)
HVM boot params
Deprecated
stringHVM_boot_policy[RO/constructor]
HVM boot policy
Published in:
XenServer 4.0 (rio)
Deprecated in:
XenServer 7.5 (kolkata)
Replaced by VM.domain_type
floatHVM_shadow_multiplier[RO/constructor]
multiplier applied to the amount of shadow that will be made available to the guest
Default value:
1.
Published in:
XenServer 4.1 (miami)
multiplier applied to the amount of shadow that will be made available to the guest
boolis_a_snapshot[RO/runtime]
true if this is a snapshot. Snapshotted VMs can never be started, they are used only for cloning other VMs
Default value:
false
Published in:
XenServer 5.0 (orlando)
true if this is a snapshot. Snapshotted VMs can never be started, they are used only for cloning other VMs
boolis_a_template[RW]
true if this is a template. Template VMs can never be started, they are used only for cloning other VMs
Published in:
XenServer 4.0 (rio)
true if this is a template. Template VMs can never be started, they are used only for cloning other VMs
boolis_control_domain[RO/runtime]
true if this is a control domain (domain 0 or a driver domain)
Published in:
XenServer 4.0 (rio)
true if this is a control domain (domain 0 or a driver domain)
boolis_default_template[RO/runtime]
true if this is a default template. Default template VMs can never be started or migrated, they are used only for cloning other VMs
Default value:
false
Published in:
XenServer 7.2 (falcon)
Identifies default templates
Removed
boolis_snapshot_from_vmpp[RO/constructor]
true if this snapshot was created by the protection policy
Default value:
false
Published in:
XenServer 5.6 FP1 (cowley)
Deprecated in:
XenServer 6.2 (clearwater)
Dummy transition
Removed in:
XenServer 6.2 (clearwater)
The VMPR feature was removed
boolis_vmss_snapshot[RO/constructor]
true if this snapshot was created by the snapshot schedule
Default value:
false
Published in:
XenServer 7.2 (falcon)
true if this snapshot was created by the snapshot schedule
describes the CPU flags on which the VM was last booted
Default value:
{}
Published in:
XenServer 4.0 (rio)
describes the CPU flags on which the VM was last booted
stringlast_booted_record[RO/constructor]
marshalled value containing VM record at time of last boot
Default value:
""
Published in:
XenServer 4.1 (miami)
Marshalled value containing VM record at time of last boot, updated dynamically to reflect the runtime state of the domain
Changed in:
XAPI 1.257.0 (1.257.0)
Become static to allow Suspended VM creation
intmemory_dynamic_max[RO/constructor]
Dynamic maximum (bytes)
Published in:
XenServer 4.0 (rio)
Dynamic maximum (bytes)
intmemory_dynamic_min[RO/constructor]
Dynamic minimum (bytes)
Published in:
XenServer 4.0 (rio)
Dynamic minimum (bytes)
intmemory_overhead[RO/runtime]
Virtualization memory overhead (bytes).
Default value:
0
Published in:
XenServer 4.0 (rio)
Virtualization memory overhead (bytes).
intmemory_static_max[RO/constructor]
Statically-set (i.e. absolute) maximum (bytes). The value of this field at VM start time acts as a hard limit of the amount of memory a guest can use. New values only take effect on reboot.
Published in:
XenServer 4.0 (rio)
Statically-set (i.e. absolute) maximum (bytes). The value of this field at VM start time acts as a hard limit of the amount of memory a guest can use. New values only take effect on reboot.
intmemory_static_min[RO/constructor]
Statically-set (i.e. absolute) mininum (bytes). The value of this field indicates the least amount of memory this VM can boot with without crashing.
Published in:
XenServer 4.0 (rio)
Statically-set (i.e. absolute) mininum (bytes). The value of this field indicates the least amount of memory this VM can boot with without crashing.
Deprecated
intmemory_target[RO/constructor]
Dynamically-set memory target (bytes). The value of this field indicates the current target for memory available to this VM.
Default value:
0
Published in:
XenServer 4.0 (rio)
Dynamically-set memory target (bytes). The value of this field indicates the current target for memory available to this VM.
Deprecated in:
XenServer 5.6 (midnight-ride)
VM_metrics refmetrics[RO/runtime]
metrics associated with this VM
Published in:
XenServer 4.0 (rio)
metrics associated with this VM
stringname_description[RW]
a notes field containing human-readable description
Default value:
""
Published in:
XenServer 4.0 (rio)
a notes field containing human-readable description
stringname_label[RW]
a human-readable name
Default value:
""
Published in:
XenServer 4.0 (rio)
a human-readable name
(string → string) mapNVRAM[RO/constructor]
initial value for guest NVRAM (containing UEFI variables, etc). Cannot be changed while the VM is running
Default value:
{}
Published in:
Citrix Hypervisor 8.0 (naples)
intorder[RO/constructor]
The point in the startup or shutdown sequence at which this VM will be started
Default value:
0
Published in:
XenServer 6.0 (boston)
The point in the startup or shutdown sequence at which this VM will be started
The set of pending full guidances after applying updates, which a user should follow to make some updates, e.g. specific hardware drivers or CPU features, fully effective, but the 'average user' doesn't need to
The set of pending recommended guidances after applying updates, which most users should follow to make the updates effective, but if not followed, will not cause a failure
Default value:
{}
Prototyped in:
XAPI 24.10.0 (24.10.0)
(string → string) mapplatform[RW]
platform-specific configuration
Published in:
XenServer 4.0 (rio)
platform-specific configuration
enum vm_power_statepower_state[RO/constructor]
Current power state of the machine
Default value:
Halted
Published in:
XenServer 4.0 (rio)
Changed in:
XAPI 1.257.0 (1.257.0)
Made StaticRO to allow Suspended VM creation
Deprecated
VMPP refprotection_policy[RO/constructor]
Ref pointing to a protection policy for this VM
Default value:
OpaqueRef:NULL
Published in:
XenServer 5.6 FP1 (cowley)
Deprecated in:
XenServer 6.2 (clearwater)
The VMPR feature was removed
stringPV_args[RW]
kernel command-line arguments
Published in:
XenServer 4.0 (rio)
kernel command-line arguments
stringPV_bootloader[RW]
name of or path to bootloader
Published in:
XenServer 4.0 (rio)
name of or path to bootloader
stringPV_bootloader_args[RW]
miscellaneous arguments for the bootloader
Published in:
XenServer 4.0 (rio)
miscellaneous arguments for the bootloader
stringPV_kernel[RW]
path to the kernel
Published in:
XenServer 4.0 (rio)
path to the kernel
stringPV_legacy_args[RW]
to make Zurich guests boot
Published in:
XenServer 4.0 (rio)
to make Zurich guests boot
stringPV_ramdisk[RW]
path to the initrd
Published in:
XenServer 4.0 (rio)
path to the initrd
stringrecommendations[RW]
An XML specification of recommended values and ranges for properties of this VM
Published in:
XenServer 4.0 (rio)
An XML specification of recommended values and ranges for properties of this VM
stringreference_label[RO/constructor]
Textual reference to the template used to create a VM. This can be used by clients in need of an immutable reference to the template since the latter's uuid and name_label may change, for example, after a package installation or upgrade.
Default value:
""
Published in:
XenServer 7.1 (ely)
Textual reference to the template used to create a VM. This can be used by clients in need of an immutable reference to the template since the latter's uuid and name_label may change, for example, after a package installation or upgrade.
boolrequires_reboot[RO/runtime]
Indicates whether a VM requires a reboot in order to update its configuration, e.g. its memory allocation.
Default value:
false
Published in:
XenServer 7.1 (ely)
host refresident_on[RO/runtime]
the host the VM is currently resident on
Published in:
XenServer 4.0 (rio)
the host the VM is currently resident on
host refscheduled_to_be_resident_on[RO/runtime]
the host on which the VM is due to be started/resumed/migrated. This acts as a memory reservation indicator
Default value:
OpaqueRef:NULL
Published in:
XenServer 4.0 (rio)
the host on which the VM is due to be started/resumed/migrated. This acts as a memory reservation indicator
intshutdown_delay[RO/constructor]
The delay to wait before proceeding to the next order in the shutdown sequence (seconds)
Default value:
0
Published in:
XenServer 6.0 (boston)
The delay to wait before proceeding to the next order in the shutdown sequence (seconds)
(string → string) mapsnapshot_info[RO/runtime]
Human-readable information concerning this snapshot
Default value:
{}
Published in:
XenServer 5.6 (midnight-ride)
Human-readable information concerning this snapshot
stringsnapshot_metadata[RO/runtime]
Encoded information about the VM's metadata this is a snapshot of
Default value:
""
Published in:
XenServer 5.6 (midnight-ride)
Encoded information about the VM's metadata this is a snapshot of
VM refsnapshot_of[RO/runtime]
Ref pointing to the VM this snapshot is of.
Default value:
Null
Published in:
XenServer 5.0 (orlando)
Ref pointing to the VM this snapshot is of.
VMSS refsnapshot_schedule[RO/constructor]
Ref pointing to a snapshot schedule for this VM
Default value:
OpaqueRef:NULL
Published in:
XenServer 7.2 (falcon)
Ref pointing to a snapshot schedule for this VM
datetimesnapshot_time[RO/runtime]
Date/time when this snapshot was created.
Default value:
19700101T00:00:00Z
Published in:
XenServer 5.0 (orlando)
Date/time when this snapshot was created.
VM ref setsnapshots[RO/runtime]
List pointing to all the VM snapshots.
Published in:
XenServer 5.0 (orlando)
List pointing to all the VM snapshots.
intstart_delay[RO/constructor]
The delay to wait before proceeding to the next order in the startup sequence (seconds)
Default value:
0
Published in:
XenServer 6.0 (boston)
The delay to wait before proceeding to the next order in the startup sequence (seconds)
SR refsuspend_SR[RW]
The SR on which a suspend image is stored
Default value:
OpaqueRef:NULL
Published in:
XenServer 6.0 (boston)
The SR on which a suspend image is stored
VDI refsuspend_VDI[RO/constructor]
The VDI that a suspend image is stored on. (Only has meaning if VM is currently suspended)
Default value:
OpaqueRef:NULL
Published in:
XenServer 4.0 (rio)
Changed in:
XAPI 1.257.0 (1.257.0)
Become static to allow Suspended VM creation
string settags[RW]
user-specified tags for categorization purposes
Default value:
{}
Published in:
XenServer 5.0 (orlando)
user-specified tags for categorization purposes
stringtransportable_snapshot_id[RO/runtime]
Transportable ID of the snapshot VM
Default value:
""
Published in:
XenServer 5.0 (orlando)
Transportable ID of the snapshot VM
intuser_version[RW]
Creators of VMs and templates may store version information here.
Published in:
XenServer 4.0 (rio)
Creators of VMs and templates may store version information here.
stringuuid[RO/runtime]
Unique identifier/object reference
Published in:
XenServer 4.0 (rio)
Unique identifier/object reference
VBD ref setVBDs[RO/runtime]
virtual block devices
Published in:
XenServer 4.0 (rio)
virtual block devices
intVCPUs_at_startup[RO/constructor]
Boot number of VCPUs
Published in:
XenServer 4.0 (rio)
Boot number of VCPUs
intVCPUs_max[RO/constructor]
Max number of VCPUs
Published in:
XenServer 4.0 (rio)
Max number of VCPUs
(string → string) mapVCPUs_params[RW]
configuration parameters for the selected VCPU policy
Published in:
XenServer 4.0 (rio)
configuration parameters for the selected VCPU policy
intversion[RO/constructor]
The number of times this VM has been recovered
Default value:
0
Published in:
XenServer 6.0 (boston)
The number of times this VM has been recovered
VGPU ref setVGPUs[RO/runtime]
Virtual GPUs
Published in:
XenServer 6.0 (boston)
VIF ref setVIFs[RO/runtime]
virtual network interfaces
Published in:
XenServer 4.0 (rio)
virtual network interfaces
VTPM ref setVTPMs[RO/runtime]
virtual TPMs
Published in:
XenServer 4.0 (rio)
virtual TPMs
VUSB ref setVUSBs[RO/runtime]
vitual usb devices
Published in:
XenServer 4.0 (rio)
vitual usb devices
(string → string) mapxenstore_data[RW]
data to be inserted into the xenstore tree (/local/domain/<domid>/vm-data) after the VM is created.
Default value:
{}
Published in:
XenServer 4.1 (miami)
data to be inserted into the xenstore tree (/local/domain/<domid>/vm-data) after the VM is created.
Messages
voidadd_tags(session ref, VM ref, string)
Add the given value to the tags field of the given VM. If the value is already in that Set, then do nothing.
Parameters:
session ref session_id
Reference to a valid session
VM ref self
reference to the object
string value
New value to add
Minimum role:
vm-operator
Published in:
XenServer 5.0 (orlando)
user-specified tags for categorization purposes
voidadd_to_blocked_operations(session ref, VM ref, enum vm_operations, string)
Add the given key-value pair to the blocked_operations field of the given VM.
Parameters:
session ref session_id
Reference to a valid session
VM ref self
reference to the object
enum vm_operations key
Key to add
string value
Value to add
Minimum role:
vm-admin
Published in:
XenServer 5.0 (orlando)
List of operations which have been explicitly blocked and an error code
voidadd_to_HVM_boot_params(session ref, VM ref, string, string)
Add the given key-value pair to the HVM/boot_params field of the given VM.
Parameters:
session ref session_id
Reference to a valid session
VM ref self
reference to the object
string key
Key to add
string value
Value to add
Minimum role:
vm-admin
Published in:
XenServer 4.0 (rio)
HVM boot params
voidadd_to_NVRAM(session ref, VM ref, string, string)
Parameters:
session ref session_id
Reference to a valid session
VM ref self
The VM
string key
The key
string value
The value
Minimum role:
vm-admin
Published in:
Citrix Hypervisor 8.0 (naples)
voidadd_to_other_config(session ref, VM ref, string, string)
Add the given key-value pair to the other_config field of the given VM.
Parameters:
session ref session_id
Reference to a valid session
VM ref self
reference to the object
string key
Key to add
string value
Value to add
Minimum role:
vm-admin
Published in:
XenServer 4.0 (rio)
additional configuration
voidadd_to_platform(session ref, VM ref, string, string)
Add the given key-value pair to the platform field of the given VM.
Parameters:
session ref session_id
Reference to a valid session
VM ref self
reference to the object
string key
Key to add
string value
Value to add
Minimum role:
vm-admin
Published in:
XenServer 4.0 (rio)
platform-specific configuration
voidadd_to_VCPUs_params(session ref, VM ref, string, string)
Add the given key-value pair to the VCPUs/params field of the given VM.
Parameters:
session ref session_id
Reference to a valid session
VM ref self
reference to the object
string key
Key to add
string value
Value to add
Minimum role:
vm-admin
Published in:
XenServer 4.0 (rio)
configuration parameters for the selected VCPU policy
voidadd_to_VCPUs_params_live(session ref, VM ref, string, string)
Add the given key-value pair to VM.VCPUs_params, and apply that value on the running VM
Parameters:
session ref session_id
Reference to a valid session
VM ref self
The VM
string key
The key
string value
The value
Minimum role:
vm-admin
Published in:
XenServer 4.0 (rio)
Add the given key-value pair to VM.VCPUs_params, and apply that value on the running VM
voidadd_to_xenstore_data(session ref, VM ref, string, string)
Add the given key-value pair to the xenstore_data field of the given VM.
Parameters:
session ref session_id
Reference to a valid session
VM ref self
reference to the object
string key
Key to add
string value
Value to add
Minimum role:
vm-admin
Published in:
XenServer 4.1 (miami)
data to be inserted into the xenstore tree (/local/domain/<domid>/vm-data) after the VM is created.
voidassert_agile(session ref, VM ref)
Returns an error if the VM is not considered agile e.g. because it is tied to a resource local to a host
Parameters:
session ref session_id
Reference to a valid session
VM ref self
The VM
Minimum role:
read-only
Published in:
XenServer 5.0 (orlando)
Returns an error if the VM is not considered agile e.g. because it is tied to a resource local to a host
voidassert_can_be_recovered(session ref, VM ref, session ref)
Assert whether all SRs required to recover this VM are available.
Parameters:
session ref session_id
Reference to a valid session
VM ref self
The VM to recover
session ref session_to
The session to which the VM is to be recovered.
Minimum role:
read-only
Errors:
VM_IS_PART_OF_AN_APPLIANCE
This operation is not allowed as the VM is part of an appliance.
VM_REQUIRES_SR
You attempted to run a VM on a host which doesn't have access to an SR needed by the VM. The VM has at least one VBD attached to a VDI in the SR.
Published in:
XenServer 6.0 (boston)
Assert whether all SRs required to recover this VM are available.
voidassert_can_boot_here(session ref, VM ref, host ref)
Returns an error if the VM could not boot on this host for some reason
Parameters:
session ref session_id
Reference to a valid session
VM ref self
The VM
host ref host
The host
Minimum role:
read-only
Errors:
HOST_NOT_ENOUGH_FREE_MEMORY
Not enough server memory is available to perform this operation.
HOST_NOT_ENOUGH_PCPUS
The host does not have enough pCPUs to run the VM. It needs at least as many as the VM has vCPUs.
NETWORK_SRIOV_INSUFFICIENT_CAPACITY
There is insufficient capacity for VF reservation
HOST_NOT_LIVE
This operation cannot be completed as the server is not live.
HOST_DISABLED
The specified server is disabled.
HOST_CANNOT_ATTACH_NETWORK
Server cannot attach network (in the case of NIC bonding, this may be because attaching the network on this server would require other networks - that are currently active - to be taken down).
VM_HVM_REQUIRED
HVM is required for this operation
VM_REQUIRES_GPU
You attempted to run a VM on a host which doesn't have a pGPU available in the GPU group needed by the VM. The VM has a vGPU attached to this GPU group.
VM_REQUIRES_IOMMU
You attempted to run a VM on a host which doesn't have I/O virtualization (IOMMU/VT-d) enabled, which is needed by the VM.
VM_REQUIRES_NETWORK
You attempted to run a VM on a host which doesn't have a PIF on a Network needed by the VM. The VM has at least one VIF attached to the Network.
VM_REQUIRES_SR
You attempted to run a VM on a host which doesn't have access to an SR needed by the VM. The VM has at least one VBD attached to a VDI in the SR.
VM_REQUIRES_VGPU
You attempted to run a VM on a host on which the vGPU required by the VM cannot be allocated on any pGPUs in the GPU_group needed by the VM.
VM_HOST_INCOMPATIBLE_VERSION
This VM operation cannot be performed on an older-versioned host during an upgrade.
You attempted to run a VM on a host that cannot provide the VM's required Virtual Hardware Platform version.
INVALID_VALUE
The value given is invalid
MEMORY_CONSTRAINT_VIOLATION
The dynamic memory range does not satisfy the following constraint.
OPERATION_NOT_ALLOWED
You attempted an operation that was not allowed.
VALUE_NOT_SUPPORTED
You attempted to set a value that is not supported by this implementation. The fully-qualified field name and the value that you tried to set are returned. Also returned is a developer-only diagnostic reason.
VM_INCOMPATIBLE_WITH_THIS_HOST
The VM is incompatible with the CPU features of this host.
Published in:
XenServer 4.0 (rio)
Changed in:
Citrix Hypervisor 8.1 (quebec)
Does additional compatibility checks when VM powerstate is not halted (e.g. CPUID). Use this before calling VM.resume or VM.pool_migrate.
Assert whether a VM can be migrated to the specified destination.
Parameters:
session ref session_id
Reference to a valid session
VM ref vm
The VM
(string → string) map dest
The result of a VM.migrate_receive call.
bool live
Live migration
(VDI ref → SR ref) map vdi_map
Map of source VDI to destination SR
(VIF ref → network ref) map vif_map
Map of source VIF to destination network
(string → string) map options
Other parameters
(VGPU ref → GPU_group ref) map vgpu_map
Map of source vGPU to destination GPU group
Minimum role:
vm-power-admin
Errors:
LICENCE_RESTRICTION
This operation is not allowed because your license lacks a needed feature. Please contact your support representative.
Published in:
XenServer 6.1 (tampa)
Assert whether a VM can be migrated to the specified destination.
voidassert_operation_valid(session ref, VM ref, enum vm_operations)
Check to see whether this operation is acceptable in the current state of the system, raising an error if the operation is invalid for some reason
Parameters:
session ref session_id
Reference to a valid session
VM ref self
reference to the object
enum vm_operations op
proposed operation
Minimum role:
read-only
Published in:
XenServer 4.0 (rio)
Check to see whether this operation is acceptable in the current state of the system, raising an error if the operation is invalid for some reason
stringcall_plugin(session ref, VM ref, string, string, (string → string) map)
Call an API plugin on this vm
Parameters:
session ref session_id
Reference to a valid session
VM ref vm
The vm
string plugin
The name of the plugin
string fn
The name of the function within the plugin
(string → string) map args
Arguments for the function
Minimum role:
vm-operator
Result:
Result from the plugin
Published in:
XenServer 6.5 SP1 (cream)
Call an API plugin on this vm
VM refcheckpoint(session ref, VM ref, string)
Checkpoints the specified VM, making a new VM. Checkpoint automatically exploits the capabilities of the underlying storage repository in which the VM's disk images are stored (e.g. Copy on Write) and saves the memory image as well.
Parameters:
session ref session_id
Reference to a valid session
VM ref vm
The VM to be checkpointed
string new_name
The name of the checkpointed VM
Minimum role:
vm-power-admin
Result:
The reference of the newly created VM.
Errors:
VM_BAD_POWER_STATE
You attempted an operation on a VM that was not in an appropriate power state at the time; for example, you attempted to start a VM that was already running. The parameters returned are the VM's handle, and the expected and actual VM state at the time of the call.
SR_FULL
The SR is full. Requested new size exceeds the maximum size
OPERATION_NOT_ALLOWED
You attempted an operation that was not allowed.
VM_CHECKPOINT_SUSPEND_FAILED
An error occured while saving the memory image of the specified virtual machine
VM_CHECKPOINT_RESUME_FAILED
An error occured while restoring the memory image of the specified virtual machine
Published in:
XenServer 5.6 (midnight-ride)
Checkpoints the specified VM, making a new VM. Checkpoint automatically exploits the capabilities of the underlying storage repository in which the VM's disk images are stored (e.g. Copy on Write) and saves the memory image as well.
voidclean_reboot(session ref, VM ref)
Attempt to cleanly shutdown the specified VM (Note: this may not be supported---e.g. if a guest agent is not installed). This can only be called when the specified VM is in the Running state.
Parameters:
session ref session_id
Reference to a valid session
VM ref vm
The VM to shutdown
Minimum role:
vm-operator
Errors:
VM_BAD_POWER_STATE
You attempted an operation on a VM that was not in an appropriate power state at the time; for example, you attempted to start a VM that was already running. The parameters returned are the VM's handle, and the expected and actual VM state at the time of the call.
OTHER_OPERATION_IN_PROGRESS
Another operation involving the object is currently in progress
OPERATION_NOT_ALLOWED
You attempted an operation that was not allowed.
VM_IS_TEMPLATE
The operation attempted is not valid for a template VM
Published in:
XenServer 4.0 (rio)
Attempt to cleanly shutdown the specified VM (Note: this may not be supported---e.g. if a guest agent is not installed). This can only be called when the specified VM is in the Running state.
voidclean_shutdown(session ref, VM ref)
Attempt to cleanly shutdown the specified VM. (Note: this may not be supported---e.g. if a guest agent is not installed). This can only be called when the specified VM is in the Running state.
Parameters:
session ref session_id
Reference to a valid session
VM ref vm
The VM to shutdown
Minimum role:
vm-operator
Errors:
VM_BAD_POWER_STATE
You attempted an operation on a VM that was not in an appropriate power state at the time; for example, you attempted to start a VM that was already running. The parameters returned are the VM's handle, and the expected and actual VM state at the time of the call.
OTHER_OPERATION_IN_PROGRESS
Another operation involving the object is currently in progress
OPERATION_NOT_ALLOWED
You attempted an operation that was not allowed.
VM_IS_TEMPLATE
The operation attempted is not valid for a template VM
Published in:
XenServer 4.0 (rio)
Attempt to cleanly shutdown the specified VM. (Note: this may not be supported---e.g. if a guest agent is not installed). This can only be called when the specified VM is in the Running state.
VM refclone(session ref, VM ref, string)
Clones the specified VM, making a new VM. Clone automatically exploits the capabilities of the underlying storage repository in which the VM's disk images are stored (e.g. Copy on Write). This function can only be called when the VM is in the Halted State.
Parameters:
session ref session_id
Reference to a valid session
VM ref vm
The VM to be cloned
string new_name
The name of the cloned VM
Minimum role:
vm-admin
Result:
The reference of the newly created VM.
Errors:
VM_BAD_POWER_STATE
You attempted an operation on a VM that was not in an appropriate power state at the time; for example, you attempted to start a VM that was already running. The parameters returned are the VM's handle, and the expected and actual VM state at the time of the call.
SR_FULL
The SR is full. Requested new size exceeds the maximum size
OPERATION_NOT_ALLOWED
You attempted an operation that was not allowed.
LICENCE_RESTRICTION
This operation is not allowed because your license lacks a needed feature. Please contact your support representative.
Published in:
XenServer 4.0 (rio)
Clones the specified VM, making a new VM. Clone automatically exploits the capabilities of the underlying storage repository in which the VM's disk images are stored (e.g. Copy on Write). This function can only be called when the VM is in the Halted State.
intcompute_memory_overhead(session ref, VM ref)
Computes the virtualization memory overhead of a VM.
Parameters:
session ref session_id
Reference to a valid session
VM ref vm
The VM for which to compute the memory overhead
Minimum role:
read-only
Result:
the virtualization memory overhead of the VM.
Published in:
XenServer 5.6 (midnight-ride)
Computes the virtualization memory overhead of a VM.
VM refcopy(session ref, VM ref, string, SR ref)
Copied the specified VM, making a new VM. Unlike clone, copy does not exploits the capabilities of the underlying storage repository in which the VM's disk images are stored. Instead, copy guarantees that the disk images of the newly created VM will be 'full disks' - i.e. not part of a CoW chain. This function can only be called when the VM is in the Halted State.
Parameters:
session ref session_id
Reference to a valid session
VM ref vm
The VM to be copied
string new_name
The name of the copied VM
SR ref sr
An SR to copy all the VM's disks into (if an invalid reference then it uses the existing SRs)
Minimum role:
vm-admin
Result:
The reference of the newly created VM.
Errors:
VM_BAD_POWER_STATE
You attempted an operation on a VM that was not in an appropriate power state at the time; for example, you attempted to start a VM that was already running. The parameters returned are the VM's handle, and the expected and actual VM state at the time of the call.
SR_FULL
The SR is full. Requested new size exceeds the maximum size
OPERATION_NOT_ALLOWED
You attempted an operation that was not allowed.
LICENCE_RESTRICTION
This operation is not allowed because your license lacks a needed feature. Please contact your support representative.
Published in:
XenServer 4.0 (rio)
Copies a VM to an SR. There must be a host that can see both the source and destination SRs simultaneously
Extended in:
XenServer 5.6 FP1 (cowley)
The copy can now be performed between any two SRs.
voidcopy_bios_strings(session ref, VM ref, host ref)
Copy the BIOS strings from the given host to this VM
Parameters:
session ref session_id
Reference to a valid session
VM ref vm
The VM to modify
host ref host
The host to copy the BIOS strings from
Minimum role:
vm-admin
Published in:
XenServer 5.6 (midnight-ride)
Copy the BIOS strings from the given host to this VM
VM refcreate(session ref, VM record)
NOT RECOMMENDED! VM.clone or VM.copy (or VM.import) is a better choice in almost all situations. The standard way to obtain a new VM is to call VM.clone on a template VM, then call VM.provision on the new clone. Caution: if VM.create is used and then the new VM is attached to a virtual disc that has an operating system already installed, then there is no guarantee that the operating system will boot and run. Any software that calls VM.create on a future version of this API may fail or give unexpected results. For example this could happen if an additional parameter were added to VM.create. VM.create is intended only for use in the automatic creation of the system VM templates. It creates a new VM instance, and returns its handle.
The constructor args are: name_label, name_description, power_state, user_version*, is_a_template*, suspend_VDI, affinity*, memory_target, memory_static_max*, memory_dynamic_max*, memory_dynamic_min*, memory_static_min*, VCPUs_params*, VCPUs_max*, VCPUs_at_startup*, actions_after_softreboot, actions_after_shutdown*, actions_after_reboot*, actions_after_crash*, PV_bootloader*, PV_kernel*, PV_ramdisk*, PV_args*, PV_bootloader_args*, PV_legacy_args*, HVM_boot_policy*, HVM_boot_params*, HVM_shadow_multiplier, platform*, PCI_bus*, other_config*, last_boot_CPU_flags, last_booted_record, recommendations*, xenstore_data, ha_always_run, ha_restart_priority, tags, blocked_operations, protection_policy, is_snapshot_from_vmpp, snapshot_schedule, is_vmss_snapshot, appliance, start_delay, shutdown_delay, order, suspend_SR, version, generation_id, hardware_platform_version, has_vendor_device, reference_label, domain_type, NVRAM (* = non-optional).
Parameters:
session ref session_id
Reference to a valid session
VM record args
All constructor arguments
Minimum role:
vm-admin
Result:
reference to the newly created object
Published in:
XenServer 4.0 (rio)
Changed in:
XAPI 1.257.0 (1.257.0)
possibility to create a VM in suspended mode with a suspend_VDI set
blob refcreate_new_blob(session ref, VM ref, string, string, bool)
Create a placeholder for a named binary blob of data that is associated with this VM
Parameters:
session ref session_id
Reference to a valid session
VM ref vm
The VM
string name
The name associated with the blob
string mime_type
The mime type for the data. Empty string translates to application/octet-stream
bool public
True if the blob should be publicly available
Minimum role:
vm-power-admin
Result:
The reference of the blob, needed for populating its data
Published in:
XenServer 5.0 (orlando)
Create a placeholder for a named binary blob of data that is associated with this VM
voiddestroy(session ref, VM ref)
Destroy the specified VM. The VM is completely removed from the system. This function can only be called when the VM is in the Halted State.
Parameters:
session ref session_id
Reference to a valid session
VM ref self
reference to the object
Minimum role:
vm-admin
Published in:
XenServer 4.0 (rio)
Changed in:
XAPI 1.257.0 (1.257.0)
possibility to create a VM in suspended mode with a suspend_VDI set
voidforget_data_source_archives(session ref, VM ref, string)
Forget the recorded statistics related to the specified data source
Parameters:
session ref session_id
Reference to a valid session
VM ref self
The VM
string data_source
The data source whose archives are to be forgotten
Minimum role:
vm-admin
Published in:
XenServer 5.0 (orlando)
Forget the recorded statistics related to the specified data source
enum on_crash_behaviourget_actions_after_crash(session ref, VM ref)
Get the actions/after_crash field of the given VM.
Parameters:
session ref session_id
Reference to a valid session
VM ref self
reference to the object
Minimum role:
read-only
Result:
value of the field
Published in:
XenServer 4.0 (rio)
action to take if the guest crashes
enum on_normal_exitget_actions_after_reboot(session ref, VM ref)
Get the actions/after_reboot field of the given VM.
Parameters:
session ref session_id
Reference to a valid session
VM ref self
reference to the object
Minimum role:
read-only
Result:
value of the field
Published in:
XenServer 4.0 (rio)
action to take after the guest has rebooted itself
enum on_normal_exitget_actions_after_shutdown(session ref, VM ref)
Get the actions/after_shutdown field of the given VM.
Parameters:
session ref session_id
Reference to a valid session
VM ref self
reference to the object
Minimum role:
read-only
Result:
value of the field
Published in:
XenServer 4.0 (rio)
action to take after the guest has shutdown itself
Prototype
enum on_softreboot_behaviorget_actions_after_softreboot(session ref, VM ref)
Get the actions/after_softreboot field of the given VM.
Parameters:
session ref session_id
Reference to a valid session
VM ref self
reference to the object
Minimum role:
read-only
Result:
value of the field
Prototyped in:
XAPI 23.1.0 (23.1.0)
host refget_affinity(session ref, VM ref)
Get the affinity field of the given VM.
Parameters:
session ref session_id
Reference to a valid session
VM ref self
reference to the object
Minimum role:
read-only
Result:
value of the field
Published in:
XenServer 4.0 (rio)
A host which the VM has some affinity for (or NULL). This is used as a hint to the start call when it decides where to run the VM. Resource constraints may cause the VM to be started elsewhere.
VM ref setget_all(session ref)
Return a list of all the VMs known to the system.
Parameters:
session ref session_id
Reference to a valid session
Minimum role:
read-only
Result:
references to all objects
Published in:
XenServer 4.0 (rio)
Changed in:
XAPI 1.257.0 (1.257.0)
possibility to create a VM in suspended mode with a suspend_VDI set
(VM ref → VM record) mapget_all_records(session ref)
Return a map of VM references to VM records for all VMs known to the system.
Parameters:
session ref session_id
Reference to a valid session
Minimum role:
read-only
Result:
records of all objects
Published in:
XenServer 4.0 (rio)
Changed in:
XAPI 1.257.0 (1.257.0)
possibility to create a VM in suspended mode with a suspend_VDI set
enum vm_operations setget_allowed_operations(session ref, VM ref)
Get the allowed_operations field of the given VM.
Parameters:
session ref session_id
Reference to a valid session
VM ref self
reference to the object
Minimum role:
read-only
Result:
value of the field
Published in:
XenServer 4.0 (rio)
list of the operations allowed in this state. This list is advisory only and the server state may have changed by the time this field is read by a client.
string setget_allowed_VBD_devices(session ref, VM ref)
Returns a list of the allowed values that a VBD device field can take
Parameters:
session ref session_id
Reference to a valid session
VM ref vm
The VM to query
Minimum role:
read-only
Result:
The allowed values
Published in:
XenServer 4.0 (rio)
Returns a list of the allowed values that a VBD device field can take
string setget_allowed_VIF_devices(session ref, VM ref)
Returns a list of the allowed values that a VIF device field can take
Parameters:
session ref session_id
Reference to a valid session
VM ref vm
The VM to query
Minimum role:
read-only
Result:
The allowed values
Published in:
XenServer 4.0 (rio)
Returns a list of the allowed values that a VIF device field can take
VM_appliance refget_appliance(session ref, VM ref)
Get the appliance field of the given VM.
Parameters:
session ref session_id
Reference to a valid session
VM ref self
reference to the object
Minimum role:
read-only
Result:
value of the field
Published in:
XenServer 4.0 (rio)
the appliance to which this VM belongs
PCI ref setget_attached_PCIs(session ref, VM ref)
Get the attached_PCIs field of the given VM.
Parameters:
session ref session_id
Reference to a valid session
VM ref self
reference to the object
Minimum role:
read-only
Result:
value of the field
Published in:
XenServer 6.0 (boston)
(string → string) mapget_bios_strings(session ref, VM ref)
Get the bios_strings field of the given VM.
Parameters:
session ref session_id
Reference to a valid session
VM ref self
reference to the object
Minimum role:
read-only
Result:
value of the field
Published in:
XenServer 5.6 (midnight-ride)
BIOS strings
(string → blob ref) mapget_blobs(session ref, VM ref)
Get the blobs field of the given VM.
Parameters:
session ref session_id
Reference to a valid session
VM ref self
reference to the object
Minimum role:
read-only
Result:
value of the field
Published in:
XenServer 5.0 (orlando)
Binary blobs associated with this VM
(enum vm_operations → string) mapget_blocked_operations(session ref, VM ref)
Get the blocked_operations field of the given VM.
Parameters:
session ref session_id
Reference to a valid session
VM ref self
reference to the object
Minimum role:
read-only
Result:
value of the field
Published in:
XenServer 5.0 (orlando)
List of operations which have been explicitly blocked and an error code
Deprecated
VM recordget_boot_record(session ref, VM ref)
Returns a record describing the VM's dynamic state, initialised when the VM boots and updated to reflect runtime configuration changes e.g. CPU hotplug
Parameters:
session ref session_id
Reference to a valid session
VM ref self
The VM whose boot-time state to return
Minimum role:
read-only
Result:
A record describing the VM
Published in:
XenServer 4.0 (rio)
Deprecated in:
XenServer 7.3 (inverness)
Use the current VM record/fields instead
VM ref setget_by_name_label(session ref, string)
Get all the VM instances with the given label.
Parameters:
session ref session_id
Reference to a valid session
string label
label of object to return
Minimum role:
read-only
Result:
references to objects with matching names
Published in:
XenServer 4.0 (rio)
Changed in:
XAPI 1.257.0 (1.257.0)
possibility to create a VM in suspended mode with a suspend_VDI set
VM refget_by_uuid(session ref, string)
Get a reference to the VM instance with the specified UUID.
Parameters:
session ref session_id
Reference to a valid session
string uuid
UUID of object to return
Minimum role:
read-only
Result:
reference to the object
Published in:
XenServer 4.0 (rio)
Changed in:
XAPI 1.257.0 (1.257.0)
possibility to create a VM in suspended mode with a suspend_VDI set
VM ref setget_children(session ref, VM ref)
Get the children field of the given VM.
Parameters:
session ref session_id
Reference to a valid session
VM ref self
reference to the object
Minimum role:
read-only
Result:
value of the field
Published in:
XenServer 5.6 (midnight-ride)
List pointing to all the children of this VM
console ref setget_consoles(session ref, VM ref)
Get the consoles field of the given VM.
Parameters:
session ref session_id
Reference to a valid session
VM ref self
reference to the object
Minimum role:
read-only
Result:
value of the field
Published in:
XenServer 4.0 (rio)
virtual console devices
Deprecated
boolget_cooperative(session ref, VM ref)
Return true if the VM is currently 'co-operative' i.e. is expected to reach a balloon target and actually has done
Parameters:
session ref session_id
Reference to a valid session
VM ref self
The VM
Minimum role:
read-only
Result:
true if the VM is currently 'co-operative'; false otherwise
Published in:
XenServer 5.6 (midnight-ride)
Return true if the VM is currently 'co-operative' i.e. is expected to reach a balloon target and actually has done
Deprecated in:
XenServer 6.1 (tampa)
crashdump ref setget_crash_dumps(session ref, VM ref)
Get the crash_dumps field of the given VM.
Parameters:
session ref session_id
Reference to a valid session
VM ref self
reference to the object
Minimum role:
read-only
Result:
value of the field
Published in:
XenServer 4.0 (rio)
crash dumps associated with this VM
(string → enum vm_operations) mapget_current_operations(session ref, VM ref)
Get the current_operations field of the given VM.
Parameters:
session ref session_id
Reference to a valid session
VM ref self
reference to the object
Minimum role:
read-only
Result:
value of the field
Published in:
XenServer 4.0 (rio)
links each of the running tasks using this object (by reference) to a current_operation enum which describes the nature of the task.
data_source record setget_data_sources(session ref, VM ref)
Parameters:
session ref session_id
Reference to a valid session
VM ref self
The VM to interrogate
Minimum role:
read-only
Result:
A set of data sources
Published in:
XenServer 5.0 (orlando)
enum domain_typeget_domain_type(session ref, VM ref)
VM_guest_metrics refget_guest_metrics(session ref, VM ref)
Get the guest_metrics field of the given VM.
Parameters:
session ref session_id
Reference to a valid session
VM ref self
reference to the object
Minimum role:
read-only
Result:
value of the field
Published in:
XenServer 4.0 (rio)
metrics associated with the running guest
Deprecated
boolget_ha_always_run(session ref, VM ref)
Get the ha_always_run field of the given VM.
Parameters:
session ref session_id
Reference to a valid session
VM ref self
reference to the object
Minimum role:
read-only
Result:
value of the field
Published in:
XenServer 5.0 (orlando)
if true then the system will attempt to keep the VM running as much as possible.
Deprecated in:
XenServer 6.0 (boston)
stringget_ha_restart_priority(session ref, VM ref)
Get the ha_restart_priority field of the given VM.
Parameters:
session ref session_id
Reference to a valid session
VM ref self
reference to the object
Minimum role:
read-only
Result:
value of the field
Published in:
XenServer 5.0 (orlando)
has possible values: "best-effort" meaning "try to restart this VM if possible but don't consider the Pool to be overcommitted if this is not possible"; "restart" meaning "this VM should be restarted"; "" meaning "do not try to restart this VM"
intget_hardware_platform_version(session ref, VM ref)
Get the hardware_platform_version field of the given VM.
Parameters:
session ref session_id
Reference to a valid session
VM ref self
reference to the object
Minimum role:
read-only
Result:
value of the field
Published in:
XenServer 6.5 SP1 (cream)
The host virtual hardware platform version the VM can run on
boolget_has_vendor_device(session ref, VM ref)
Get the has_vendor_device field of the given VM.
Parameters:
session ref session_id
Reference to a valid session
VM ref self
reference to the object
Minimum role:
read-only
Result:
value of the field
Published in:
XenServer 7.0 (dundee)
(string → string) mapget_HVM_boot_params(session ref, VM ref)
Get the HVM/boot_params field of the given VM.
Parameters:
session ref session_id
Reference to a valid session
VM ref self
reference to the object
Minimum role:
read-only
Result:
value of the field
Published in:
XenServer 4.0 (rio)
HVM boot params
Deprecated
stringget_HVM_boot_policy(session ref, VM ref)
Get the HVM/boot_policy field of the given VM.
Parameters:
session ref session_id
Reference to a valid session
VM ref self
reference to the object
Minimum role:
read-only
Result:
value of the field
Published in:
XenServer 4.0 (rio)
Deprecated in:
XenServer 7.5 (kolkata)
Replaced by VM.domain_type
floatget_HVM_shadow_multiplier(session ref, VM ref)
Get the HVM/shadow_multiplier field of the given VM.
Parameters:
session ref session_id
Reference to a valid session
VM ref self
reference to the object
Minimum role:
read-only
Result:
value of the field
Published in:
XenServer 4.1 (miami)
multiplier applied to the amount of shadow that will be made available to the guest
boolget_is_a_snapshot(session ref, VM ref)
Get the is_a_snapshot field of the given VM.
Parameters:
session ref session_id
Reference to a valid session
VM ref self
reference to the object
Minimum role:
read-only
Result:
value of the field
Published in:
XenServer 5.0 (orlando)
true if this is a snapshot. Snapshotted VMs can never be started, they are used only for cloning other VMs
boolget_is_a_template(session ref, VM ref)
Get the is_a_template field of the given VM.
Parameters:
session ref session_id
Reference to a valid session
VM ref self
reference to the object
Minimum role:
read-only
Result:
value of the field
Published in:
XenServer 4.0 (rio)
true if this is a template. Template VMs can never be started, they are used only for cloning other VMs
boolget_is_control_domain(session ref, VM ref)
Get the is_control_domain field of the given VM.
Parameters:
session ref session_id
Reference to a valid session
VM ref self
reference to the object
Minimum role:
read-only
Result:
value of the field
Published in:
XenServer 4.0 (rio)
true if this is a control domain (domain 0 or a driver domain)
boolget_is_default_template(session ref, VM ref)
Get the is_default_template field of the given VM.
Parameters:
session ref session_id
Reference to a valid session
VM ref self
reference to the object
Minimum role:
read-only
Result:
value of the field
Published in:
XenServer 7.2 (falcon)
Identifies default templates
Removed
boolget_is_snapshot_from_vmpp(session ref, VM ref)
Get the is_snapshot_from_vmpp field of the given VM.
Parameters:
session ref session_id
Reference to a valid session
VM ref self
reference to the object
Minimum role:
read-only
Result:
value of the field
Published in:
XenServer 5.6 FP1 (cowley)
Deprecated in:
XenServer 6.2 (clearwater)
Dummy transition
Removed in:
XenServer 6.2 (clearwater)
The VMPR feature was removed
boolget_is_vmss_snapshot(session ref, VM ref)
Get the is_vmss_snapshot field of the given VM.
Parameters:
session ref session_id
Reference to a valid session
VM ref self
reference to the object
Minimum role:
read-only
Result:
value of the field
Published in:
XenServer 7.2 (falcon)
true if this snapshot was created by the snapshot schedule
(string → string) mapget_last_boot_CPU_flags(session ref, VM ref)
Get the last_boot_CPU_flags field of the given VM.
Parameters:
session ref session_id
Reference to a valid session
VM ref self
reference to the object
Minimum role:
read-only
Result:
value of the field
Published in:
XenServer 4.0 (rio)
describes the CPU flags on which the VM was last booted
stringget_last_booted_record(session ref, VM ref)
Get the last_booted_record field of the given VM.
Parameters:
session ref session_id
Reference to a valid session
VM ref self
reference to the object
Minimum role:
read-only
Result:
value of the field
Published in:
XenServer 4.1 (miami)
Marshalled value containing VM record at time of last boot, updated dynamically to reflect the runtime state of the domain
Changed in:
XAPI 1.257.0 (1.257.0)
Become static to allow Suspended VM creation
intget_memory_dynamic_max(session ref, VM ref)
Get the memory/dynamic_max field of the given VM.
Parameters:
session ref session_id
Reference to a valid session
VM ref self
reference to the object
Minimum role:
read-only
Result:
value of the field
Published in:
XenServer 4.0 (rio)
Dynamic maximum (bytes)
intget_memory_dynamic_min(session ref, VM ref)
Get the memory/dynamic_min field of the given VM.
Parameters:
session ref session_id
Reference to a valid session
VM ref self
reference to the object
Minimum role:
read-only
Result:
value of the field
Published in:
XenServer 4.0 (rio)
Dynamic minimum (bytes)
intget_memory_overhead(session ref, VM ref)
Get the memory/overhead field of the given VM.
Parameters:
session ref session_id
Reference to a valid session
VM ref self
reference to the object
Minimum role:
read-only
Result:
value of the field
Published in:
XenServer 4.0 (rio)
Virtualization memory overhead (bytes).
intget_memory_static_max(session ref, VM ref)
Get the memory/static_max field of the given VM.
Parameters:
session ref session_id
Reference to a valid session
VM ref self
reference to the object
Minimum role:
read-only
Result:
value of the field
Published in:
XenServer 4.0 (rio)
Statically-set (i.e. absolute) maximum (bytes). The value of this field at VM start time acts as a hard limit of the amount of memory a guest can use. New values only take effect on reboot.
intget_memory_static_min(session ref, VM ref)
Get the memory/static_min field of the given VM.
Parameters:
session ref session_id
Reference to a valid session
VM ref self
reference to the object
Minimum role:
read-only
Result:
value of the field
Published in:
XenServer 4.0 (rio)
Statically-set (i.e. absolute) mininum (bytes). The value of this field indicates the least amount of memory this VM can boot with without crashing.
Deprecated
intget_memory_target(session ref, VM ref)
Get the memory/target field of the given VM.
Parameters:
session ref session_id
Reference to a valid session
VM ref self
reference to the object
Minimum role:
read-only
Result:
value of the field
Published in:
XenServer 4.0 (rio)
Dynamically-set memory target (bytes). The value of this field indicates the current target for memory available to this VM.
Deprecated in:
XenServer 5.6 (midnight-ride)
VM_metrics refget_metrics(session ref, VM ref)
Get the metrics field of the given VM.
Parameters:
session ref session_id
Reference to a valid session
VM ref self
reference to the object
Minimum role:
read-only
Result:
value of the field
Published in:
XenServer 4.0 (rio)
metrics associated with this VM
stringget_name_description(session ref, VM ref)
Get the name/description field of the given VM.
Parameters:
session ref session_id
Reference to a valid session
VM ref self
reference to the object
Minimum role:
read-only
Result:
value of the field
Published in:
XenServer 4.0 (rio)
a notes field containing human-readable description
stringget_name_label(session ref, VM ref)
Get the name/label field of the given VM.
Parameters:
session ref session_id
Reference to a valid session
VM ref self
reference to the object
Minimum role:
read-only
Result:
value of the field
Published in:
XenServer 4.0 (rio)
a human-readable name
(string → string) mapget_NVRAM(session ref, VM ref)
Get the NVRAM field of the given VM.
Parameters:
session ref session_id
Reference to a valid session
VM ref self
reference to the object
Minimum role:
read-only
Result:
value of the field
Published in:
Citrix Hypervisor 8.0 (naples)
intget_order(session ref, VM ref)
Get the order field of the given VM.
Parameters:
session ref session_id
Reference to a valid session
VM ref self
reference to the object
Minimum role:
read-only
Result:
value of the field
Published in:
XenServer 6.0 (boston)
The point in the startup or shutdown sequence at which this VM will be started
(string → string) mapget_other_config(session ref, VM ref)
Get the other_config field of the given VM.
Parameters:
session ref session_id
Reference to a valid session
VM ref self
reference to the object
Minimum role:
read-only
Result:
value of the field
Published in:
XenServer 4.0 (rio)
additional configuration
VM refget_parent(session ref, VM ref)
Get the parent field of the given VM.
Parameters:
session ref session_id
Reference to a valid session
VM ref self
reference to the object
Minimum role:
read-only
Result:
value of the field
Published in:
XenServer 5.6 (midnight-ride)
Ref pointing to the parent of this VM
Deprecated
stringget_PCI_bus(session ref, VM ref)
Get the PCI_bus field of the given VM.
Parameters:
session ref session_id
Reference to a valid session
VM ref self
reference to the object
Minimum role:
read-only
Result:
value of the field
Published in:
XenServer 4.0 (rio)
PCI bus path for pass-through devices
Deprecated in:
XenServer 6.0 (boston)
Field was never used
enum update_guidances setget_pending_guidances(session ref, VM ref)
Get the pending_guidances field of the given VM.
Parameters:
session ref session_id
Reference to a valid session
VM ref self
reference to the object
Minimum role:
read-only
Result:
value of the field
Published in:
XAPI 1.303.0 (1.303.0)
The set of pending mandatory guidances after applying updates, which must be applied, as otherwise there may be e.g. VM failures
Prototype
enum update_guidances setget_pending_guidances_full(session ref, VM ref)
Get the pending_guidances_full field of the given VM.
Parameters:
session ref session_id
Reference to a valid session
VM ref self
reference to the object
Minimum role:
read-only
Result:
value of the field
Prototyped in:
XAPI 24.10.0 (24.10.0)
Prototype
enum update_guidances setget_pending_guidances_recommended(session ref, VM ref)
Get the pending_guidances_recommended field of the given VM.
Parameters:
session ref session_id
Reference to a valid session
VM ref self
reference to the object
Minimum role:
read-only
Result:
value of the field
Prototyped in:
XAPI 24.10.0 (24.10.0)
(string → string) mapget_platform(session ref, VM ref)
Get the platform field of the given VM.
Parameters:
session ref session_id
Reference to a valid session
VM ref self
reference to the object
Minimum role:
read-only
Result:
value of the field
Published in:
XenServer 4.0 (rio)
platform-specific configuration
host ref setget_possible_hosts(session ref, VM ref)
Return the list of hosts on which this VM may run.
Parameters:
session ref session_id
Reference to a valid session
VM ref vm
The VM
Minimum role:
read-only
Result:
The possible hosts
Published in:
XenServer 4.0 (rio)
Return the list of hosts on which this VM may run.
enum vm_power_stateget_power_state(session ref, VM ref)
Get the power_state field of the given VM.
Parameters:
session ref session_id
Reference to a valid session
VM ref self
reference to the object
Minimum role:
read-only
Result:
value of the field
Published in:
XenServer 4.0 (rio)
Changed in:
XAPI 1.257.0 (1.257.0)
Made StaticRO to allow Suspended VM creation
Deprecated
VMPP refget_protection_policy(session ref, VM ref)
Get the protection_policy field of the given VM.
Parameters:
session ref session_id
Reference to a valid session
VM ref self
reference to the object
Minimum role:
read-only
Result:
value of the field
Published in:
XenServer 5.6 FP1 (cowley)
Deprecated in:
XenServer 6.2 (clearwater)
The VMPR feature was removed
stringget_PV_args(session ref, VM ref)
Get the PV/args field of the given VM.
Parameters:
session ref session_id
Reference to a valid session
VM ref self
reference to the object
Minimum role:
read-only
Result:
value of the field
Published in:
XenServer 4.0 (rio)
kernel command-line arguments
stringget_PV_bootloader(session ref, VM ref)
Get the PV/bootloader field of the given VM.
Parameters:
session ref session_id
Reference to a valid session
VM ref self
reference to the object
Minimum role:
read-only
Result:
value of the field
Published in:
XenServer 4.0 (rio)
name of or path to bootloader
stringget_PV_bootloader_args(session ref, VM ref)
Get the PV/bootloader_args field of the given VM.
Parameters:
session ref session_id
Reference to a valid session
VM ref self
reference to the object
Minimum role:
read-only
Result:
value of the field
Published in:
XenServer 4.0 (rio)
miscellaneous arguments for the bootloader
stringget_PV_kernel(session ref, VM ref)
Get the PV/kernel field of the given VM.
Parameters:
session ref session_id
Reference to a valid session
VM ref self
reference to the object
Minimum role:
read-only
Result:
value of the field
Published in:
XenServer 4.0 (rio)
path to the kernel
stringget_PV_legacy_args(session ref, VM ref)
Get the PV/legacy_args field of the given VM.
Parameters:
session ref session_id
Reference to a valid session
VM ref self
reference to the object
Minimum role:
read-only
Result:
value of the field
Published in:
XenServer 4.0 (rio)
to make Zurich guests boot
stringget_PV_ramdisk(session ref, VM ref)
Get the PV/ramdisk field of the given VM.
Parameters:
session ref session_id
Reference to a valid session
VM ref self
reference to the object
Minimum role:
read-only
Result:
value of the field
Published in:
XenServer 4.0 (rio)
path to the initrd
stringget_recommendations(session ref, VM ref)
Get the recommendations field of the given VM.
Parameters:
session ref session_id
Reference to a valid session
VM ref self
reference to the object
Minimum role:
read-only
Result:
value of the field
Published in:
XenServer 4.0 (rio)
An XML specification of recommended values and ranges for properties of this VM
VM recordget_record(session ref, VM ref)
Get a record containing the current state of the given VM.
Parameters:
session ref session_id
Reference to a valid session
VM ref self
reference to the object
Minimum role:
read-only
Result:
all fields from the object
Published in:
XenServer 4.0 (rio)
Changed in:
XAPI 1.257.0 (1.257.0)
possibility to create a VM in suspended mode with a suspend_VDI set
stringget_reference_label(session ref, VM ref)
Get the reference_label field of the given VM.
Parameters:
session ref session_id
Reference to a valid session
VM ref self
reference to the object
Minimum role:
read-only
Result:
value of the field
Published in:
XenServer 7.1 (ely)
Textual reference to the template used to create a VM. This can be used by clients in need of an immutable reference to the template since the latter's uuid and name_label may change, for example, after a package installation or upgrade.
boolget_requires_reboot(session ref, VM ref)
Get the requires_reboot field of the given VM.
Parameters:
session ref session_id
Reference to a valid session
VM ref self
reference to the object
Minimum role:
read-only
Result:
value of the field
Published in:
XenServer 7.1 (ely)
host refget_resident_on(session ref, VM ref)
Get the resident_on field of the given VM.
Parameters:
session ref session_id
Reference to a valid session
VM ref self
reference to the object
Minimum role:
read-only
Result:
value of the field
Published in:
XenServer 4.0 (rio)
the host the VM is currently resident on
host refget_scheduled_to_be_resident_on(session ref, VM ref)
Get the scheduled_to_be_resident_on field of the given VM.
Parameters:
session ref session_id
Reference to a valid session
VM ref self
reference to the object
Minimum role:
read-only
Result:
value of the field
Published in:
XenServer 4.0 (rio)
the host on which the VM is due to be started/resumed/migrated. This acts as a memory reservation indicator
intget_shutdown_delay(session ref, VM ref)
Get the shutdown_delay field of the given VM.
Parameters:
session ref session_id
Reference to a valid session
VM ref self
reference to the object
Minimum role:
read-only
Result:
value of the field
Published in:
XenServer 6.0 (boston)
The delay to wait before proceeding to the next order in the shutdown sequence (seconds)
(string → string) mapget_snapshot_info(session ref, VM ref)
Get the snapshot_info field of the given VM.
Parameters:
session ref session_id
Reference to a valid session
VM ref self
reference to the object
Minimum role:
read-only
Result:
value of the field
Published in:
XenServer 5.6 (midnight-ride)
Human-readable information concerning this snapshot
stringget_snapshot_metadata(session ref, VM ref)
Get the snapshot_metadata field of the given VM.
Parameters:
session ref session_id
Reference to a valid session
VM ref self
reference to the object
Minimum role:
read-only
Result:
value of the field
Published in:
XenServer 5.6 (midnight-ride)
Encoded information about the VM's metadata this is a snapshot of
VM refget_snapshot_of(session ref, VM ref)
Get the snapshot_of field of the given VM.
Parameters:
session ref session_id
Reference to a valid session
VM ref self
reference to the object
Minimum role:
read-only
Result:
value of the field
Published in:
XenServer 5.0 (orlando)
Ref pointing to the VM this snapshot is of.
VMSS refget_snapshot_schedule(session ref, VM ref)
Get the snapshot_schedule field of the given VM.
Parameters:
session ref session_id
Reference to a valid session
VM ref self
reference to the object
Minimum role:
read-only
Result:
value of the field
Published in:
XenServer 7.2 (falcon)
Ref pointing to a snapshot schedule for this VM
datetimeget_snapshot_time(session ref, VM ref)
Get the snapshot_time field of the given VM.
Parameters:
session ref session_id
Reference to a valid session
VM ref self
reference to the object
Minimum role:
read-only
Result:
value of the field
Published in:
XenServer 5.0 (orlando)
Date/time when this snapshot was created.
VM ref setget_snapshots(session ref, VM ref)
Get the snapshots field of the given VM.
Parameters:
session ref session_id
Reference to a valid session
VM ref self
reference to the object
Minimum role:
read-only
Result:
value of the field
Published in:
XenServer 5.0 (orlando)
List pointing to all the VM snapshots.
SR ref setget_SRs_required_for_recovery(session ref, VM ref, session ref)
List all the SR's that are required for the VM to be recovered
Parameters:
session ref session_id
Reference to a valid session
VM ref self
The VM for which the SRs have to be recovered
session ref session_to
The session to which the SRs of the VM have to be recovered.
Minimum role:
read-only
Result:
refs for SRs required to recover the VM
Published in:
XenServer 6.5 (creedence)
List all the SR's that are required for the VM to be recovered
intget_start_delay(session ref, VM ref)
Get the start_delay field of the given VM.
Parameters:
session ref session_id
Reference to a valid session
VM ref self
reference to the object
Minimum role:
read-only
Result:
value of the field
Published in:
XenServer 6.0 (boston)
The delay to wait before proceeding to the next order in the startup sequence (seconds)
SR refget_suspend_SR(session ref, VM ref)
Get the suspend_SR field of the given VM.
Parameters:
session ref session_id
Reference to a valid session
VM ref self
reference to the object
Minimum role:
read-only
Result:
value of the field
Published in:
XenServer 6.0 (boston)
The SR on which a suspend image is stored
VDI refget_suspend_VDI(session ref, VM ref)
Get the suspend_VDI field of the given VM.
Parameters:
session ref session_id
Reference to a valid session
VM ref self
reference to the object
Minimum role:
read-only
Result:
value of the field
Published in:
XenServer 4.0 (rio)
Changed in:
XAPI 1.257.0 (1.257.0)
Become static to allow Suspended VM creation
string setget_tags(session ref, VM ref)
Get the tags field of the given VM.
Parameters:
session ref session_id
Reference to a valid session
VM ref self
reference to the object
Minimum role:
read-only
Result:
value of the field
Published in:
XenServer 5.0 (orlando)
user-specified tags for categorization purposes
stringget_transportable_snapshot_id(session ref, VM ref)
Get the transportable_snapshot_id field of the given VM.
Parameters:
session ref session_id
Reference to a valid session
VM ref self
reference to the object
Minimum role:
read-only
Result:
value of the field
Published in:
XenServer 5.0 (orlando)
Transportable ID of the snapshot VM
intget_user_version(session ref, VM ref)
Get the user_version field of the given VM.
Parameters:
session ref session_id
Reference to a valid session
VM ref self
reference to the object
Minimum role:
read-only
Result:
value of the field
Published in:
XenServer 4.0 (rio)
Creators of VMs and templates may store version information here.
stringget_uuid(session ref, VM ref)
Get the uuid field of the given VM.
Parameters:
session ref session_id
Reference to a valid session
VM ref self
reference to the object
Minimum role:
read-only
Result:
value of the field
Published in:
XenServer 4.0 (rio)
Unique identifier/object reference
VBD ref setget_VBDs(session ref, VM ref)
Get the VBDs field of the given VM.
Parameters:
session ref session_id
Reference to a valid session
VM ref self
reference to the object
Minimum role:
read-only
Result:
value of the field
Published in:
XenServer 4.0 (rio)
virtual block devices
intget_VCPUs_at_startup(session ref, VM ref)
Get the VCPUs/at_startup field of the given VM.
Parameters:
session ref session_id
Reference to a valid session
VM ref self
reference to the object
Minimum role:
read-only
Result:
value of the field
Published in:
XenServer 4.0 (rio)
Boot number of VCPUs
intget_VCPUs_max(session ref, VM ref)
Get the VCPUs/max field of the given VM.
Parameters:
session ref session_id
Reference to a valid session
VM ref self
reference to the object
Minimum role:
read-only
Result:
value of the field
Published in:
XenServer 4.0 (rio)
Max number of VCPUs
(string → string) mapget_VCPUs_params(session ref, VM ref)
Get the VCPUs/params field of the given VM.
Parameters:
session ref session_id
Reference to a valid session
VM ref self
reference to the object
Minimum role:
read-only
Result:
value of the field
Published in:
XenServer 4.0 (rio)
configuration parameters for the selected VCPU policy
intget_version(session ref, VM ref)
Get the version field of the given VM.
Parameters:
session ref session_id
Reference to a valid session
VM ref self
reference to the object
Minimum role:
read-only
Result:
value of the field
Published in:
XenServer 6.0 (boston)
The number of times this VM has been recovered
VGPU ref setget_VGPUs(session ref, VM ref)
Get the VGPUs field of the given VM.
Parameters:
session ref session_id
Reference to a valid session
VM ref self
reference to the object
Minimum role:
read-only
Result:
value of the field
Published in:
XenServer 6.0 (boston)
VIF ref setget_VIFs(session ref, VM ref)
Get the VIFs field of the given VM.
Parameters:
session ref session_id
Reference to a valid session
VM ref self
reference to the object
Minimum role:
read-only
Result:
value of the field
Published in:
XenServer 4.0 (rio)
virtual network interfaces
VTPM ref setget_VTPMs(session ref, VM ref)
Get the VTPMs field of the given VM.
Parameters:
session ref session_id
Reference to a valid session
VM ref self
reference to the object
Minimum role:
read-only
Result:
value of the field
Published in:
XenServer 4.0 (rio)
virtual TPMs
VUSB ref setget_VUSBs(session ref, VM ref)
Get the VUSBs field of the given VM.
Parameters:
session ref session_id
Reference to a valid session
VM ref self
reference to the object
Minimum role:
read-only
Result:
value of the field
Published in:
XenServer 4.0 (rio)
vitual usb devices
(string → string) mapget_xenstore_data(session ref, VM ref)
Get the xenstore_data field of the given VM.
Parameters:
session ref session_id
Reference to a valid session
VM ref self
reference to the object
Minimum role:
read-only
Result:
value of the field
Published in:
XenServer 4.1 (miami)
data to be inserted into the xenstore tree (/local/domain/<domid>/vm-data) after the VM is created.
voidhard_reboot(session ref, VM ref)
Stop executing the specified VM without attempting a clean shutdown and immediately restart the VM.
Parameters:
session ref session_id
Reference to a valid session
VM ref vm
The VM to reboot
Minimum role:
vm-operator
Errors:
VM_BAD_POWER_STATE
You attempted an operation on a VM that was not in an appropriate power state at the time; for example, you attempted to start a VM that was already running. The parameters returned are the VM's handle, and the expected and actual VM state at the time of the call.
OTHER_OPERATION_IN_PROGRESS
Another operation involving the object is currently in progress
OPERATION_NOT_ALLOWED
You attempted an operation that was not allowed.
VM_IS_TEMPLATE
The operation attempted is not valid for a template VM
Published in:
XenServer 4.0 (rio)
Stop executing the specified VM without attempting a clean shutdown and immediately restart the VM.
voidhard_shutdown(session ref, VM ref)
Stop executing the specified VM without attempting a clean shutdown.
Parameters:
session ref session_id
Reference to a valid session
VM ref vm
The VM to destroy
Minimum role:
vm-operator
Errors:
VM_BAD_POWER_STATE
You attempted an operation on a VM that was not in an appropriate power state at the time; for example, you attempted to start a VM that was already running. The parameters returned are the VM's handle, and the expected and actual VM state at the time of the call.
OTHER_OPERATION_IN_PROGRESS
Another operation involving the object is currently in progress
OPERATION_NOT_ALLOWED
You attempted an operation that was not allowed.
VM_IS_TEMPLATE
The operation attempted is not valid for a template VM
Published in:
XenServer 4.0 (rio)
Stop executing the specified VM without attempting a clean shutdown.
VM ref setimport(session ref, string, SR ref, bool, bool)
intmaximise_memory(session ref, VM ref, int, bool)
Returns the maximum amount of guest memory which will fit, together with overheads, in the supplied amount of physical memory. If 'exact' is true then an exact calculation is performed using the VM's current settings. If 'exact' is false then a more conservative approximation is used
Parameters:
session ref session_id
Reference to a valid session
VM ref self
The VM
int total
Total amount of physical RAM to fit within
bool approximate
If false the limit is calculated with the guest's current exact configuration. Otherwise a more approximate calculation is performed
Minimum role:
read-only
Result:
The maximum possible static-max
Published in:
XenServer 4.1 (miami)
Returns the maximum amount of guest memory which will fit, together with overheads, in the supplied amount of physical memory. If 'exact' is true then an exact calculation is performed using the VM's current settings. If 'exact' is false then a more conservative approximation is used
Migrate the VM to another host. This can only be called when the specified VM is in the Running state.
Parameters:
session ref session_id
Reference to a valid session
VM ref vm
The VM
(string → string) map dest
The result of a Host.migrate_receive call.
bool live
Live migration
(VDI ref → SR ref) map vdi_map
Map of source VDI to destination SR
(VIF ref → network ref) map vif_map
Map of source VIF to destination network
(string → string) map options
Other parameters
(VGPU ref → GPU_group ref) map vgpu_map
Map of source vGPU to destination GPU group
Minimum role:
vm-power-admin
Result:
The reference of the newly created VM in the destination pool
Errors:
VM_BAD_POWER_STATE
You attempted an operation on a VM that was not in an appropriate power state at the time; for example, you attempted to start a VM that was already running. The parameters returned are the VM's handle, and the expected and actual VM state at the time of the call.
LICENCE_RESTRICTION
This operation is not allowed because your license lacks a needed feature. Please contact your support representative.
Published in:
XenServer 6.1 (tampa)
Migrate the VM to another host. This can only be called when the specified VM is in the Running state.
voidpause(session ref, VM ref)
Pause the specified VM. This can only be called when the specified VM is in the Running state.
Parameters:
session ref session_id
Reference to a valid session
VM ref vm
The VM to pause
Minimum role:
vm-operator
Errors:
VM_BAD_POWER_STATE
You attempted an operation on a VM that was not in an appropriate power state at the time; for example, you attempted to start a VM that was already running. The parameters returned are the VM's handle, and the expected and actual VM state at the time of the call.
OTHER_OPERATION_IN_PROGRESS
Another operation involving the object is currently in progress
OPERATION_NOT_ALLOWED
You attempted an operation that was not allowed.
VM_IS_TEMPLATE
The operation attempted is not valid for a template VM
Published in:
XenServer 4.0 (rio)
Pause the specified VM. This can only be called when the specified VM is in the Running state.
voidpool_migrate(session ref, VM ref, host ref, (string → string) map)
Migrate a VM to another Host.
Parameters:
session ref session_id
Reference to a valid session
VM ref vm
The VM to migrate
host ref host
The target host
(string → string) map options
Extra configuration operations: force, live, copy, compress. Each is a boolean option, taking 'true' or 'false' as a value. Option 'compress' controls the use of stream compression during migration.
Minimum role:
client-cert
Errors:
VM_BAD_POWER_STATE
You attempted an operation on a VM that was not in an appropriate power state at the time; for example, you attempted to start a VM that was already running. The parameters returned are the VM's handle, and the expected and actual VM state at the time of the call.
OTHER_OPERATION_IN_PROGRESS
Another operation involving the object is currently in progress
VM_IS_TEMPLATE
The operation attempted is not valid for a template VM
OPERATION_NOT_ALLOWED
You attempted an operation that was not allowed.
VM_BAD_POWER_STATE
You attempted an operation on a VM that was not in an appropriate power state at the time; for example, you attempted to start a VM that was already running. The parameters returned are the VM's handle, and the expected and actual VM state at the time of the call.
Published in:
XenServer 4.0 (rio)
Migrate a VM to another Host.
voidpower_state_reset(session ref, VM ref)
Reset the power-state of the VM to halted in the database only. (Used to recover from slave failures in pooling scenarios by resetting the power-states of VMs running on dead slaves to halted.) This is a potentially dangerous operation; use with care.
Parameters:
session ref session_id
Reference to a valid session
VM ref vm
The VM to reset
Minimum role:
pool-operator
Published in:
XenServer 4.0 (rio)
Reset the power-state of the VM to halted in the database only. (Used to recover from slave failures in pooling scenarios by resetting the power-states of VMs running on dead slaves to halted.) This is a potentially dangerous operation; use with care.
voidprovision(session ref, VM ref)
Inspects the disk configuration contained within the VM's other_config, creates VDIs and VBDs and then executes any applicable post-install script.
Parameters:
session ref session_id
Reference to a valid session
VM ref vm
The VM to be provisioned
Minimum role:
vm-admin
Errors:
VM_BAD_POWER_STATE
You attempted an operation on a VM that was not in an appropriate power state at the time; for example, you attempted to start a VM that was already running. The parameters returned are the VM's handle, and the expected and actual VM state at the time of the call.
SR_FULL
The SR is full. Requested new size exceeds the maximum size
OPERATION_NOT_ALLOWED
You attempted an operation that was not allowed.
LICENCE_RESTRICTION
This operation is not allowed because your license lacks a needed feature. Please contact your support representative.
Published in:
XenServer 4.0 (rio)
Inspects the disk configuration contained within the VM's other_config, creates VDIs and VBDs and then executes any applicable post-install script.
floatquery_data_source(session ref, VM ref, string)
Query the latest value of the specified data source
Parameters:
session ref session_id
Reference to a valid session
VM ref self
The VM
string data_source
The data source to query
Minimum role:
read-only
Result:
The latest value, averaged over the last 5 seconds
Published in:
XenServer 5.0 (orlando)
Query the latest value of the specified data source
(string → string) mapquery_services(session ref, VM ref)
Query the system services advertised by this VM and register them. This can only be applied to a system domain.
Parameters:
session ref session_id
Reference to a valid session
VM ref self
The VM
Minimum role:
pool-admin
Result:
map of service type to name
Published in:
XenServer 6.1 (tampa)
Query the system services advertised by this VM and register them. This can only be applied to a system domain.
voidrecord_data_source(session ref, VM ref, string)
Start recording the specified data source
Parameters:
session ref session_id
Reference to a valid session
VM ref self
The VM
string data_source
The data source to record
Minimum role:
vm-admin
Published in:
XenServer 5.0 (orlando)
Start recording the specified data source
voidrecover(session ref, VM ref, session ref, bool)
Recover the VM
Parameters:
session ref session_id
Reference to a valid session
VM ref self
The VM to recover
session ref session_to
The session to which the VM is to be recovered.
bool force
Whether the VM should replace newer versions of itself.
Minimum role:
read-only
Published in:
XenServer 6.0 (boston)
Recover the VM
voidremove_from_blocked_operations(session ref, VM ref, enum vm_operations)
Remove the given key and its corresponding value from the blocked_operations field of the given VM. If the key is not in that Map, then do nothing.
Parameters:
session ref session_id
Reference to a valid session
VM ref self
reference to the object
enum vm_operations key
Key to remove
Minimum role:
vm-admin
Published in:
XenServer 5.0 (orlando)
List of operations which have been explicitly blocked and an error code
voidremove_from_HVM_boot_params(session ref, VM ref, string)
Remove the given key and its corresponding value from the HVM/boot_params field of the given VM. If the key is not in that Map, then do nothing.
Parameters:
session ref session_id
Reference to a valid session
VM ref self
reference to the object
string key
Key to remove
Minimum role:
vm-admin
Published in:
XenServer 4.0 (rio)
HVM boot params
voidremove_from_NVRAM(session ref, VM ref, string)
Parameters:
session ref session_id
Reference to a valid session
VM ref self
The VM
string key
The key
Minimum role:
vm-admin
Published in:
Citrix Hypervisor 8.0 (naples)
voidremove_from_other_config(session ref, VM ref, string)
Remove the given key and its corresponding value from the other_config field of the given VM. If the key is not in that Map, then do nothing.
Parameters:
session ref session_id
Reference to a valid session
VM ref self
reference to the object
string key
Key to remove
Minimum role:
vm-admin
Published in:
XenServer 4.0 (rio)
additional configuration
voidremove_from_platform(session ref, VM ref, string)
Remove the given key and its corresponding value from the platform field of the given VM. If the key is not in that Map, then do nothing.
Parameters:
session ref session_id
Reference to a valid session
VM ref self
reference to the object
string key
Key to remove
Minimum role:
vm-admin
Published in:
XenServer 4.0 (rio)
platform-specific configuration
voidremove_from_VCPUs_params(session ref, VM ref, string)
Remove the given key and its corresponding value from the VCPUs/params field of the given VM. If the key is not in that Map, then do nothing.
Parameters:
session ref session_id
Reference to a valid session
VM ref self
reference to the object
string key
Key to remove
Minimum role:
vm-admin
Published in:
XenServer 4.0 (rio)
configuration parameters for the selected VCPU policy
voidremove_from_xenstore_data(session ref, VM ref, string)
Remove the given key and its corresponding value from the xenstore_data field of the given VM. If the key is not in that Map, then do nothing.
Parameters:
session ref session_id
Reference to a valid session
VM ref self
reference to the object
string key
Key to remove
Minimum role:
vm-admin
Published in:
XenServer 4.1 (miami)
data to be inserted into the xenstore tree (/local/domain/<domid>/vm-data) after the VM is created.
voidremove_tags(session ref, VM ref, string)
Remove the given value from the tags field of the given VM. If the value is not in that Set, then do nothing.
Parameters:
session ref session_id
Reference to a valid session
VM ref self
reference to the object
string value
Value to remove
Minimum role:
vm-operator
Published in:
XenServer 5.0 (orlando)
user-specified tags for categorization purposes
Prototype
voidrestart_device_models(session ref, VM ref)
Restart device models of the VM
Parameters:
session ref session_id
Reference to a valid session
VM ref self
The VM
Minimum role:
client-cert
Errors:
VM_BAD_POWER_STATE
You attempted an operation on a VM that was not in an appropriate power state at the time; for example, you attempted to start a VM that was already running. The parameters returned are the VM's handle, and the expected and actual VM state at the time of the call.
OTHER_OPERATION_IN_PROGRESS
Another operation involving the object is currently in progress
VM_IS_TEMPLATE
The operation attempted is not valid for a template VM
OPERATION_NOT_ALLOWED
You attempted an operation that was not allowed.
VM_BAD_POWER_STATE
You attempted an operation on a VM that was not in an appropriate power state at the time; for example, you attempted to start a VM that was already running. The parameters returned are the VM's handle, and the expected and actual VM state at the time of the call.
Prototyped in:
XAPI 23.30.0 (23.30.0)
voidresume(session ref, VM ref, bool, bool)
Awaken the specified VM and resume it. This can only be called when the specified VM is in the Suspended state.
Parameters:
session ref session_id
Reference to a valid session
VM ref vm
The VM to resume
bool start_paused
Resume VM in paused state if set to true.
bool force
Attempt to force the VM to resume. If this flag is false then the VM may fail pre-resume safety checks (e.g. if the CPU the VM was running on looks substantially different to the current one)
Minimum role:
vm-operator
Errors:
VM_BAD_POWER_STATE
You attempted an operation on a VM that was not in an appropriate power state at the time; for example, you attempted to start a VM that was already running. The parameters returned are the VM's handle, and the expected and actual VM state at the time of the call.
OPERATION_NOT_ALLOWED
You attempted an operation that was not allowed.
VM_IS_TEMPLATE
The operation attempted is not valid for a template VM
Published in:
XenServer 4.0 (rio)
Awaken the specified VM and resume it. This can only be called when the specified VM is in the Suspended state.
voidresume_on(session ref, VM ref, host ref, bool, bool)
Awaken the specified VM and resume it on a particular Host. This can only be called when the specified VM is in the Suspended state.
Parameters:
session ref session_id
Reference to a valid session
VM ref vm
The VM to resume
host ref host
The Host on which to resume the VM
bool start_paused
Resume VM in paused state if set to true.
bool force
Attempt to force the VM to resume. If this flag is false then the VM may fail pre-resume safety checks (e.g. if the CPU the VM was running on looks substantially different to the current one)
Minimum role:
client-cert
Errors:
VM_BAD_POWER_STATE
You attempted an operation on a VM that was not in an appropriate power state at the time; for example, you attempted to start a VM that was already running. The parameters returned are the VM's handle, and the expected and actual VM state at the time of the call.
OPERATION_NOT_ALLOWED
You attempted an operation that was not allowed.
VM_IS_TEMPLATE
The operation attempted is not valid for a template VM
Published in:
XenServer 4.0 (rio)
Awaken the specified VM and resume it on a particular Host. This can only be called when the specified VM is in the Suspended state.
(host ref → string set) mapretrieve_wlb_recommendations(session ref, VM ref)
Returns mapping of hosts to ratings, indicating the suitability of starting the VM at that location according to wlb. Rating is replaced with an error if the VM cannot boot there.
Parameters:
session ref session_id
Reference to a valid session
VM ref vm
The VM
Minimum role:
read-only
Result:
The potential hosts and their corresponding recommendations or errors
Published in:
XenServer 5.5 (george)
Returns mapping of hosts to ratings, indicating the suitability of starting the VM at that location according to wlb. Rating is replaced with an error if the VM cannot boot there.
voidrevert(session ref, VM ref)
Reverts the specified VM to a previous state.
Parameters:
session ref session_id
Reference to a valid session
VM ref snapshot
The snapshotted state that we revert to
Minimum role:
vm-power-admin
Errors:
VM_BAD_POWER_STATE
You attempted an operation on a VM that was not in an appropriate power state at the time; for example, you attempted to start a VM that was already running. The parameters returned are the VM's handle, and the expected and actual VM state at the time of the call.
OPERATION_NOT_ALLOWED
You attempted an operation that was not allowed.
SR_FULL
The SR is full. Requested new size exceeds the maximum size
VM_REVERT_FAILED
An error occured while reverting the specified virtual machine to the specified snapshot
Published in:
XenServer 5.6 (midnight-ride)
Reverts the specified VM to a previous state.
voidsend_sysrq(session ref, VM ref, string)
Send the given key as a sysrq to this VM. The key is specified as a single character (a String of length 1). This can only be called when the specified VM is in the Running state.
Parameters:
session ref session_id
Reference to a valid session
VM ref vm
The VM
string key
The key to send
Minimum role:
pool-admin
Errors:
VM_BAD_POWER_STATE
You attempted an operation on a VM that was not in an appropriate power state at the time; for example, you attempted to start a VM that was already running. The parameters returned are the VM's handle, and the expected and actual VM state at the time of the call.
Published in:
XenServer 4.0 (rio)
Send the given key as a sysrq to this VM. The key is specified as a single character (a String of length 1). This can only be called when the specified VM is in the Running state.
voidsend_trigger(session ref, VM ref, string)
Send the named trigger to this VM. This can only be called when the specified VM is in the Running state.
Parameters:
session ref session_id
Reference to a valid session
VM ref vm
The VM
string trigger
The trigger to send
Minimum role:
pool-admin
Errors:
VM_BAD_POWER_STATE
You attempted an operation on a VM that was not in an appropriate power state at the time; for example, you attempted to start a VM that was already running. The parameters returned are the VM's handle, and the expected and actual VM state at the time of the call.
Published in:
XenServer 4.0 (rio)
Send the named trigger to this VM. This can only be called when the specified VM is in the Running state.
voidset_actions_after_crash(session ref, VM ref, enum on_crash_behaviour)
Sets the actions_after_crash parameter
Parameters:
session ref session_id
Reference to a valid session
VM ref self
The VM to set
enum on_crash_behaviour value
The new value to set
Minimum role:
vm-admin
Published in:
XenServer 4.0 (rio)
Sets the actions_after_crash parameter
voidset_actions_after_reboot(session ref, VM ref, enum on_normal_exit)
Set the actions/after_reboot field of the given VM.
Parameters:
session ref session_id
Reference to a valid session
VM ref self
reference to the object
enum on_normal_exit value
New value to set
Minimum role:
vm-admin
Published in:
XenServer 4.0 (rio)
action to take after the guest has rebooted itself
voidset_actions_after_shutdown(session ref, VM ref, enum on_normal_exit)
Set the actions/after_shutdown field of the given VM.
Parameters:
session ref session_id
Reference to a valid session
VM ref self
reference to the object
enum on_normal_exit value
New value to set
Minimum role:
vm-admin
Published in:
XenServer 4.0 (rio)
action to take after the guest has shutdown itself
Prototype
voidset_actions_after_softreboot(session ref, VM ref, enum on_softreboot_behavior)
Set the actions/after_softreboot field of the given VM.
Parameters:
session ref session_id
Reference to a valid session
VM ref self
reference to the object
enum on_softreboot_behavior value
New value to set
Minimum role:
vm-admin
Prototyped in:
XAPI 23.1.0 (23.1.0)
voidset_affinity(session ref, VM ref, host ref)
Set the affinity field of the given VM.
Parameters:
session ref session_id
Reference to a valid session
VM ref self
reference to the object
host ref value
New value to set
Minimum role:
vm-power-admin
Published in:
XenServer 4.0 (rio)
A host which the VM has some affinity for (or NULL). This is used as a hint to the start call when it decides where to run the VM. Resource constraints may cause the VM to be started elsewhere.
voidset_appliance(session ref, VM ref, VM_appliance ref)
Assign this VM to an appliance.
Parameters:
session ref session_id
Reference to a valid session
VM ref self
The VM to assign to an appliance.
VM_appliance ref value
The appliance to which this VM should be assigned.
Minimum role:
pool-operator
Published in:
XenServer 6.0 (boston)
Assign this VM to an appliance.
voidset_bios_strings(session ref, VM ref, (string → string) map)
Set custom BIOS strings to this VM. VM will be given a default set of BIOS strings, only some of which can be overridden by the supplied values. Allowed keys are: 'bios-vendor', 'bios-version', 'system-manufacturer', 'system-product-name', 'system-version', 'system-serial-number', 'enclosure-asset-tag', 'baseboard-manufacturer', 'baseboard-product-name', 'baseboard-version', 'baseboard-serial-number', 'baseboard-asset-tag', 'baseboard-location-in-chassis', 'enclosure-asset-tag'
Parameters:
session ref session_id
Reference to a valid session
VM ref self
The VM to modify
(string → string) map value
The custom BIOS strings as a list of key-value pairs
Minimum role:
vm-admin
Errors:
VM_BIOS_STRINGS_ALREADY_SET
The BIOS strings for this VM have already been set and cannot be changed.
INVALID_VALUE
The value given is invalid
Published in:
XenServer 7.3 (inverness)
Set custom BIOS strings to this VM. VM will be given a default set of BIOS strings, only some of which can be overridden by the supplied values. Allowed keys are: 'bios-vendor', 'bios-version', 'system-manufacturer', 'system-product-name', 'system-version', 'system-serial-number', 'enclosure-asset-tag', 'baseboard-manufacturer', 'baseboard-product-name', 'baseboard-version', 'baseboard-serial-number', 'baseboard-asset-tag', 'baseboard-location-in-chassis', 'enclosure-asset-tag'
voidset_blocked_operations(session ref, VM ref, (enum vm_operations → string) map)
Set the blocked_operations field of the given VM.
Parameters:
session ref session_id
Reference to a valid session
VM ref self
reference to the object
(enum vm_operations → string) map value
New value to set
Minimum role:
vm-admin
Published in:
XenServer 5.0 (orlando)
List of operations which have been explicitly blocked and an error code
voidset_domain_type(session ref, VM ref, enum domain_type)
Set the VM.domain_type field of the given VM, which will take effect when it is next started
Parameters:
session ref session_id
Reference to a valid session
VM ref self
The VM
enum domain_type value
The new domain type
Minimum role:
vm-admin
Published in:
XenServer 7.5 (kolkata)
Deprecated
voidset_ha_always_run(session ref, VM ref, bool)
Set the value of the ha_always_run
Parameters:
session ref session_id
Reference to a valid session
VM ref self
The VM
bool value
The value
Minimum role:
pool-operator
Published in:
XenServer 5.0 (orlando)
Set the value of the ha_always_run
Deprecated in:
XenServer 6.0 (boston)
voidset_ha_restart_priority(session ref, VM ref, string)
Set the value of the ha_restart_priority field
Parameters:
session ref session_id
Reference to a valid session
VM ref self
The VM
string value
The value
Minimum role:
pool-operator
Published in:
XenServer 5.0 (orlando)
Set the value of the ha_restart_priority field
voidset_hardware_platform_version(session ref, VM ref, int)
Set the hardware_platform_version field of the given VM.
Parameters:
session ref session_id
Reference to a valid session
VM ref self
reference to the object
int value
New value to set
Minimum role:
vm-admin
Published in:
XenServer 6.5 SP1 (cream)
The host virtual hardware platform version the VM can run on
voidset_has_vendor_device(session ref, VM ref, bool)
Controls whether, when the VM starts in HVM mode, its virtual hardware will include the emulated PCI device for which drivers may be available through Windows Update. Usually this should never be changed on a VM on which Windows has been installed: changing it on such a VM is likely to lead to a crash on next start.
Parameters:
session ref session_id
Reference to a valid session
VM ref self
The VM on which to set this flag
bool value
True to provide the vendor PCI device.
Minimum role:
vm-admin
Published in:
XenServer 7.0 (dundee)
Controls whether, when the VM starts in HVM mode, its virtual hardware will include the emulated PCI device for which drivers may be available through Windows Update. Usually this should never be changed on a VM on which Windows has been installed: changing it on such a VM is likely to lead to a crash on next start.
voidset_HVM_boot_params(session ref, VM ref, (string → string) map)
Set the HVM/boot_params field of the given VM.
Parameters:
session ref session_id
Reference to a valid session
VM ref self
reference to the object
(string → string) map value
New value to set
Minimum role:
vm-admin
Published in:
XenServer 4.0 (rio)
HVM boot params
Deprecated
voidset_HVM_boot_policy(session ref, VM ref, string)
Set the VM.HVM_boot_policy field of the given VM, which will take effect when it is next started
Parameters:
session ref session_id
Reference to a valid session
VM ref self
The VM
string value
The new HVM boot policy
Minimum role:
vm-admin
Published in:
XenServer 4.0 (rio)
Deprecated in:
XenServer 7.5 (kolkata)
Replaced by VM.set_domain_type
voidset_HVM_shadow_multiplier(session ref, VM ref, float)
Set the shadow memory multiplier on a halted VM
Parameters:
session ref session_id
Reference to a valid session
VM ref self
The VM
float value
The new shadow memory multiplier to set
Minimum role:
vm-power-admin
Published in:
XenServer 5.6 (midnight-ride)
Set the shadow memory multiplier on a halted VM
voidset_is_a_template(session ref, VM ref, bool)
Set the is_a_template field of the given VM.
Parameters:
session ref session_id
Reference to a valid session
VM ref self
reference to the object
bool value
New value to set
Minimum role:
vm-admin
Published in:
XenServer 4.0 (rio)
true if this is a template. Template VMs can never be started, they are used only for cloning other VMs
voidset_memory(session ref, VM ref, int)
Set the memory allocation of this VM. Sets all of memory_static_max, memory_dynamic_min, and memory_dynamic_max to the given value, and leaves memory_static_min untouched.
Parameters:
session ref session_id
Reference to a valid session
VM ref self
The VM
int value
The new memory allocation (bytes).
Minimum role:
vm-power-admin
Published in:
XenServer 7.1 (ely)
Set the memory allocation of this VM. Sets all of memory_static_max, memory_dynamic_min, and memory_dynamic_max to the given value, and leaves memory_static_min untouched.
voidset_memory_dynamic_max(session ref, VM ref, int)
Set the value of the memory_dynamic_max field
Parameters:
session ref session_id
Reference to a valid session
VM ref self
The VM to modify
int value
The new value of memory_dynamic_max
Minimum role:
vm-power-admin
Published in:
XenServer 5.6 (midnight-ride)
Set the value of the memory_dynamic_max field
voidset_memory_dynamic_min(session ref, VM ref, int)
Set the value of the memory_dynamic_min field
Parameters:
session ref session_id
Reference to a valid session
VM ref self
The VM to modify
int value
The new value of memory_dynamic_min
Minimum role:
vm-power-admin
Published in:
XenServer 5.6 (midnight-ride)
Set the value of the memory_dynamic_min field
voidset_memory_dynamic_range(session ref, VM ref, int, int)
Set the minimum and maximum amounts of physical memory the VM is allowed to use.
Parameters:
session ref session_id
Reference to a valid session
VM ref self
The VM
int min
The new minimum value
int max
The new maximum value
Minimum role:
vm-power-admin
Published in:
XenServer 5.6 (midnight-ride)
Set the minimum and maximum amounts of physical memory the VM is allowed to use.
voidset_memory_limits(session ref, VM ref, int, int, int, int)
Set the memory limits of this VM.
Parameters:
session ref session_id
Reference to a valid session
VM ref self
The VM
int static_min
The new value of memory_static_min.
int static_max
The new value of memory_static_max.
int dynamic_min
The new value of memory_dynamic_min.
int dynamic_max
The new value of memory_dynamic_max.
Minimum role:
vm-power-admin
Published in:
XenServer 5.6 (midnight-ride)
Set the memory limits of this VM.
voidset_memory_static_max(session ref, VM ref, int)
Set the value of the memory_static_max field
Parameters:
session ref session_id
Reference to a valid session
VM ref self
The VM to modify
int value
The new value of memory_static_max
Minimum role:
vm-power-admin
Errors:
HA_OPERATION_WOULD_BREAK_FAILOVER_PLAN
This operation cannot be performed because it would invalidate VM failover planning such that the system would be unable to guarantee to restart protected VMs after a Host failure.
Published in:
XenServer 5.0 (orlando)
Set the value of the memory_static_max field
voidset_memory_static_min(session ref, VM ref, int)
Set the value of the memory_static_min field
Parameters:
session ref session_id
Reference to a valid session
VM ref self
The VM to modify
int value
The new value of memory_static_min
Minimum role:
vm-power-admin
Published in:
XenServer 5.6 (midnight-ride)
Set the value of the memory_static_min field
voidset_memory_static_range(session ref, VM ref, int, int)
Set the static (ie boot-time) range of virtual memory that the VM is allowed to use.
Parameters:
session ref session_id
Reference to a valid session
VM ref self
The VM
int min
The new minimum value
int max
The new maximum value
Minimum role:
vm-power-admin
Published in:
XenServer 5.6 (midnight-ride)
Set the static (ie boot-time) range of virtual memory that the VM is allowed to use.
Deprecated
voidset_memory_target_live(session ref, VM ref, int)
Set the memory target for a running VM
Parameters:
session ref session_id
Reference to a valid session
VM ref self
The VM
int target
The target in bytes
Minimum role:
vm-power-admin
Published in:
XenServer 4.0 (rio)
Set the memory target for a running VM
Deprecated in:
XenServer 5.6 (midnight-ride)
voidset_name_description(session ref, VM ref, string)
Set the name/description field of the given VM.
Parameters:
session ref session_id
Reference to a valid session
VM ref self
reference to the object
string value
New value to set
Minimum role:
vm-admin
Published in:
XenServer 4.0 (rio)
a notes field containing human-readable description
voidset_name_label(session ref, VM ref, string)
Set the name/label field of the given VM.
Parameters:
session ref session_id
Reference to a valid session
VM ref self
reference to the object
string value
New value to set
Minimum role:
vm-admin
Published in:
XenServer 4.0 (rio)
a human-readable name
voidset_NVRAM(session ref, VM ref, (string → string) map)
Parameters:
session ref session_id
Reference to a valid session
VM ref self
The VM
(string → string) map value
The value
Minimum role:
vm-admin
Published in:
Citrix Hypervisor 8.0 (naples)
voidset_order(session ref, VM ref, int)
Set this VM's boot order
Parameters:
session ref session_id
Reference to a valid session
VM ref self
The VM
int value
This VM's boot order
Minimum role:
pool-operator
Published in:
XenServer 6.0 (boston)
Set this VM's boot order
voidset_other_config(session ref, VM ref, (string → string) map)
Set the other_config field of the given VM.
Parameters:
session ref session_id
Reference to a valid session
VM ref self
reference to the object
(string → string) map value
New value to set
Minimum role:
vm-admin
Published in:
XenServer 4.0 (rio)
additional configuration
Deprecated
voidset_PCI_bus(session ref, VM ref, string)
Set the PCI_bus field of the given VM.
Parameters:
session ref session_id
Reference to a valid session
VM ref self
reference to the object
string value
New value to set
Minimum role:
vm-admin
Published in:
XenServer 4.0 (rio)
PCI bus path for pass-through devices
Deprecated in:
XenServer 6.0 (boston)
Field was never used
voidset_platform(session ref, VM ref, (string → string) map)
Set the platform field of the given VM.
Parameters:
session ref session_id
Reference to a valid session
VM ref self
reference to the object
(string → string) map value
New value to set
Minimum role:
vm-admin
Published in:
XenServer 4.0 (rio)
platform-specific configuration
Removed
voidset_protection_policy(session ref, VM ref, VMPP ref)
Set the value of the protection_policy field
Parameters:
session ref session_id
Reference to a valid session
VM ref self
The VM
VMPP ref value
The value
Minimum role:
pool-operator
Published in:
XenServer 5.6 FP1 (cowley)
Deprecated in:
XenServer 6.2 (clearwater)
Dummy transition
Removed in:
XenServer 6.2 (clearwater)
The VMPR feature was removed
voidset_PV_args(session ref, VM ref, string)
Set the PV/args field of the given VM.
Parameters:
session ref session_id
Reference to a valid session
VM ref self
reference to the object
string value
New value to set
Minimum role:
vm-admin
Published in:
XenServer 4.0 (rio)
kernel command-line arguments
voidset_PV_bootloader(session ref, VM ref, string)
Set the PV/bootloader field of the given VM.
Parameters:
session ref session_id
Reference to a valid session
VM ref self
reference to the object
string value
New value to set
Minimum role:
vm-admin
Published in:
XenServer 4.0 (rio)
name of or path to bootloader
voidset_PV_bootloader_args(session ref, VM ref, string)
Set the PV/bootloader_args field of the given VM.
Parameters:
session ref session_id
Reference to a valid session
VM ref self
reference to the object
string value
New value to set
Minimum role:
vm-admin
Published in:
XenServer 4.0 (rio)
miscellaneous arguments for the bootloader
voidset_PV_kernel(session ref, VM ref, string)
Set the PV/kernel field of the given VM.
Parameters:
session ref session_id
Reference to a valid session
VM ref self
reference to the object
string value
New value to set
Minimum role:
vm-admin
Published in:
XenServer 4.0 (rio)
path to the kernel
voidset_PV_legacy_args(session ref, VM ref, string)
Set the PV/legacy_args field of the given VM.
Parameters:
session ref session_id
Reference to a valid session
VM ref self
reference to the object
string value
New value to set
Minimum role:
vm-admin
Published in:
XenServer 4.0 (rio)
to make Zurich guests boot
voidset_PV_ramdisk(session ref, VM ref, string)
Set the PV/ramdisk field of the given VM.
Parameters:
session ref session_id
Reference to a valid session
VM ref self
reference to the object
string value
New value to set
Minimum role:
vm-admin
Published in:
XenServer 4.0 (rio)
path to the initrd
voidset_recommendations(session ref, VM ref, string)
Set the recommendations field of the given VM.
Parameters:
session ref session_id
Reference to a valid session
VM ref self
reference to the object
string value
New value to set
Minimum role:
vm-admin
Published in:
XenServer 4.0 (rio)
An XML specification of recommended values and ranges for properties of this VM
voidset_shadow_multiplier_live(session ref, VM ref, float)
Set the shadow memory multiplier on a running VM
Parameters:
session ref session_id
Reference to a valid session
VM ref self
The VM
float multiplier
The new shadow memory multiplier to set
Minimum role:
vm-power-admin
Published in:
XenServer 4.0 (rio)
Set the shadow memory multiplier on a running VM
voidset_shutdown_delay(session ref, VM ref, int)
Set this VM's shutdown delay in seconds
Parameters:
session ref session_id
Reference to a valid session
VM ref self
The VM
int value
This VM's shutdown delay in seconds
Minimum role:
pool-operator
Published in:
XenServer 6.0 (boston)
Set this VM's shutdown delay in seconds
voidset_snapshot_schedule(session ref, VM ref, VMSS ref)
Set the value of the snapshot schedule field
Parameters:
session ref session_id
Reference to a valid session
VM ref self
The VM
VMSS ref value
The value
Minimum role:
pool-operator
Published in:
XenServer 7.2 (falcon)
Set the value of the snapshot schedule field
voidset_start_delay(session ref, VM ref, int)
Set this VM's start delay in seconds
Parameters:
session ref session_id
Reference to a valid session
VM ref self
The VM
int value
This VM's start delay in seconds
Minimum role:
pool-operator
Published in:
XenServer 6.0 (boston)
Set this VM's start delay in seconds
voidset_suspend_SR(session ref, VM ref, SR ref)
Set the suspend_SR field of the given VM.
Parameters:
session ref session_id
Reference to a valid session
VM ref self
reference to the object
SR ref value
New value to set
Minimum role:
vm-admin
Published in:
XenServer 6.0 (boston)
The SR on which a suspend image is stored
voidset_suspend_VDI(session ref, VM ref, VDI ref)
Set this VM's suspend VDI, which must be indentical to its current one
Parameters:
session ref session_id
Reference to a valid session
VM ref self
The VM
VDI ref value
The suspend VDI uuid
Minimum role:
pool-operator
Published in:
XenServer 6.0 (boston)
Set this VM's suspend VDI, which must be indentical to its current one
voidset_tags(session ref, VM ref, string set)
Set the tags field of the given VM.
Parameters:
session ref session_id
Reference to a valid session
VM ref self
reference to the object
string set value
New value to set
Minimum role:
vm-operator
Published in:
XenServer 5.0 (orlando)
user-specified tags for categorization purposes
voidset_user_version(session ref, VM ref, int)
Set the user_version field of the given VM.
Parameters:
session ref session_id
Reference to a valid session
VM ref self
reference to the object
int value
New value to set
Minimum role:
vm-admin
Published in:
XenServer 4.0 (rio)
Creators of VMs and templates may store version information here.
voidset_VCPUs_at_startup(session ref, VM ref, int)
Set the number of startup VCPUs for a halted VM
Parameters:
session ref session_id
Reference to a valid session
VM ref self
The VM
int value
The new maximum number of VCPUs
Minimum role:
vm-admin
Published in:
XenServer 5.6 (midnight-ride)
Set the number of startup VCPUs for a halted VM
voidset_VCPUs_max(session ref, VM ref, int)
Set the maximum number of VCPUs for a halted VM
Parameters:
session ref session_id
Reference to a valid session
VM ref self
The VM
int value
The new maximum number of VCPUs
Minimum role:
vm-admin
Published in:
XenServer 5.6 (midnight-ride)
Set the maximum number of VCPUs for a halted VM
voidset_VCPUs_number_live(session ref, VM ref, int)
Set the number of VCPUs for a running VM
Parameters:
session ref session_id
Reference to a valid session
VM ref self
The VM
int nvcpu
The number of VCPUs
Minimum role:
vm-admin
Errors:
OPERATION_NOT_ALLOWED
You attempted an operation that was not allowed.
LICENCE_RESTRICTION
This operation is not allowed because your license lacks a needed feature. Please contact your support representative.
Published in:
XenServer 4.0 (rio)
Set the number of VCPUs for a running VM
Changed in:
XenServer 7.1 (ely)
Unless the feature is explicitly enabled for every host in the pool, this fails with Api_errors.license_restriction.
voidset_VCPUs_params(session ref, VM ref, (string → string) map)
Set the VCPUs/params field of the given VM.
Parameters:
session ref session_id
Reference to a valid session
VM ref self
reference to the object
(string → string) map value
New value to set
Minimum role:
vm-admin
Published in:
XenServer 4.0 (rio)
configuration parameters for the selected VCPU policy
voidset_xenstore_data(session ref, VM ref, (string → string) map)
Set the xenstore_data field of the given VM.
Parameters:
session ref session_id
Reference to a valid session
VM ref self
reference to the object
(string → string) map value
New value to set
Minimum role:
vm-admin
Published in:
XenServer 4.1 (miami)
data to be inserted into the xenstore tree (/local/domain/<domid>/vm-data) after the VM is created.
voidshutdown(session ref, VM ref)
Attempts to first clean shutdown a VM and if it should fail then perform a hard shutdown on it.
Parameters:
session ref session_id
Reference to a valid session
VM ref vm
The VM to shutdown
Minimum role:
client-cert
Errors:
VM_BAD_POWER_STATE
You attempted an operation on a VM that was not in an appropriate power state at the time; for example, you attempted to start a VM that was already running. The parameters returned are the VM's handle, and the expected and actual VM state at the time of the call.
OTHER_OPERATION_IN_PROGRESS
Another operation involving the object is currently in progress
OPERATION_NOT_ALLOWED
You attempted an operation that was not allowed.
VM_IS_TEMPLATE
The operation attempted is not valid for a template VM
Published in:
XenServer 6.2 (clearwater)
Attempts to first clean shutdown a VM and if it should fail then perform a hard shutdown on it.
VM refsnapshot(session ref, VM ref, string, VDI ref set)
Snapshots the specified VM, making a new VM. Snapshot automatically exploits the capabilities of the underlying storage repository in which the VM's disk images are stored (e.g. Copy on Write).
Parameters:
session ref session_id
Reference to a valid session
VM ref vm
The VM to be snapshotted
string new_name
The name of the snapshotted VM
VDI ref set ignore_vdis
A list of VDIs to ignore for the snapshot
Minimum role:
vm-power-admin
Result:
The reference of the newly created VM.
Errors:
VM_BAD_POWER_STATE
You attempted an operation on a VM that was not in an appropriate power state at the time; for example, you attempted to start a VM that was already running. The parameters returned are the VM's handle, and the expected and actual VM state at the time of the call.
SR_FULL
The SR is full. Requested new size exceeds the maximum size
OPERATION_NOT_ALLOWED
You attempted an operation that was not allowed.
Published in:
XenServer 5.0 (orlando)
Snapshots the specified VM, making a new VM. Snapshot automatically exploits the capabilities of the underlying storage repository in which the VM's disk images are stored (e.g. Copy on Write).
Removed
VM refsnapshot_with_quiesce(session ref, VM ref, string)
Snapshots the specified VM with quiesce, making a new VM. Snapshot automatically exploits the capabilities of the underlying storage repository in which the VM's disk images are stored (e.g. Copy on Write).
Parameters:
session ref session_id
Reference to a valid session
VM ref vm
The VM to be snapshotted
string new_name
The name of the snapshotted VM
Minimum role:
vm-power-admin
Result:
The reference of the newly created VM.
Errors:
VM_BAD_POWER_STATE
You attempted an operation on a VM that was not in an appropriate power state at the time; for example, you attempted to start a VM that was already running. The parameters returned are the VM's handle, and the expected and actual VM state at the time of the call.
SR_FULL
The SR is full. Requested new size exceeds the maximum size
OPERATION_NOT_ALLOWED
You attempted an operation that was not allowed.
VM_SNAPSHOT_WITH_QUIESCE_FAILED
The quiesced-snapshot operation failed for an unexpected reason
VM_SNAPSHOT_WITH_QUIESCE_TIMEOUT
The VSS plug-in has timed out
VM_SNAPSHOT_WITH_QUIESCE_PLUGIN_DEOS_NOT_RESPOND
The VSS plug-in cannot be contacted
VM_SNAPSHOT_WITH_QUIESCE_NOT_SUPPORTED
The VSS plug-in is not installed on this virtual machine
Published in:
XenServer 5.0 (orlando)
Deprecated in:
Citrix Hypervisor 8.1 (quebec)
Dummy transition
Removed in:
Citrix Hypervisor 8.1 (quebec)
VSS support has been removed
voidstart(session ref, VM ref, bool, bool)
Start the specified VM. This function can only be called with the VM is in the Halted State.
Parameters:
session ref session_id
Reference to a valid session
VM ref vm
The VM to start
bool start_paused
Instantiate VM in paused state if set to true.
bool force
Attempt to force the VM to start. If this flag is false then the VM may fail pre-boot safety checks (e.g. if the CPU the VM last booted on looks substantially different to the current one)
Minimum role:
vm-operator
Errors:
VM_BAD_POWER_STATE
You attempted an operation on a VM that was not in an appropriate power state at the time; for example, you attempted to start a VM that was already running. The parameters returned are the VM's handle, and the expected and actual VM state at the time of the call.
VM_HVM_REQUIRED
HVM is required for this operation
VM_IS_TEMPLATE
The operation attempted is not valid for a template VM
OTHER_OPERATION_IN_PROGRESS
Another operation involving the object is currently in progress
OPERATION_NOT_ALLOWED
You attempted an operation that was not allowed.
BOOTLOADER_FAILED
The bootloader returned an error
UNKNOWN_BOOTLOADER
The requested bootloader is unknown
NO_HOSTS_AVAILABLE
There were no servers available to complete the specified operation.
LICENCE_RESTRICTION
This operation is not allowed because your license lacks a needed feature. Please contact your support representative.
Published in:
XenServer 4.0 (rio)
Start the specified VM. This function can only be called with the VM is in the Halted State.
voidstart_on(session ref, VM ref, host ref, bool, bool)
Start the specified VM on a particular host. This function can only be called with the VM is in the Halted State.
Parameters:
session ref session_id
Reference to a valid session
VM ref vm
The VM to start
host ref host
The Host on which to start the VM
bool start_paused
Instantiate VM in paused state if set to true.
bool force
Attempt to force the VM to start. If this flag is false then the VM may fail pre-boot safety checks (e.g. if the CPU the VM last booted on looks substantially different to the current one)
Minimum role:
client-cert
Errors:
VM_BAD_POWER_STATE
You attempted an operation on a VM that was not in an appropriate power state at the time; for example, you attempted to start a VM that was already running. The parameters returned are the VM's handle, and the expected and actual VM state at the time of the call.
VM_IS_TEMPLATE
The operation attempted is not valid for a template VM
OTHER_OPERATION_IN_PROGRESS
Another operation involving the object is currently in progress
OPERATION_NOT_ALLOWED
You attempted an operation that was not allowed.
BOOTLOADER_FAILED
The bootloader returned an error
UNKNOWN_BOOTLOADER
The requested bootloader is unknown
Published in:
XenServer 4.0 (rio)
Start the specified VM on a particular host. This function can only be called with the VM is in the Halted State.
voidsuspend(session ref, VM ref)
Suspend the specified VM to disk. This can only be called when the specified VM is in the Running state.
Parameters:
session ref session_id
Reference to a valid session
VM ref vm
The VM to suspend
Minimum role:
client-cert
Errors:
VM_BAD_POWER_STATE
You attempted an operation on a VM that was not in an appropriate power state at the time; for example, you attempted to start a VM that was already running. The parameters returned are the VM's handle, and the expected and actual VM state at the time of the call.
OTHER_OPERATION_IN_PROGRESS
Another operation involving the object is currently in progress
OPERATION_NOT_ALLOWED
You attempted an operation that was not allowed.
VM_IS_TEMPLATE
The operation attempted is not valid for a template VM
Published in:
XenServer 4.0 (rio)
Suspend the specified VM to disk. This can only be called when the specified VM is in the Running state.
voidunpause(session ref, VM ref)
Resume the specified VM. This can only be called when the specified VM is in the Paused state.
Parameters:
session ref session_id
Reference to a valid session
VM ref vm
The VM to unpause
Minimum role:
vm-operator
Errors:
VM_BAD_POWER_STATE
You attempted an operation on a VM that was not in an appropriate power state at the time; for example, you attempted to start a VM that was already running. The parameters returned are the VM's handle, and the expected and actual VM state at the time of the call.
OPERATION_NOT_ALLOWED
You attempted an operation that was not allowed.
VM_IS_TEMPLATE
The operation attempted is not valid for a template VM
Published in:
XenServer 4.0 (rio)
Resume the specified VM. This can only be called when the specified VM is in the Paused state.
voidupdate_allowed_operations(session ref, VM ref)
Recomputes the list of acceptable operations
Parameters:
session ref session_id
Reference to a valid session
VM ref self
reference to the object
Minimum role:
pool-admin
Published in:
XenServer 4.0 (rio)
Recomputes the list of acceptable operations
Deprecated
voidwait_memory_target_live(session ref, VM ref)
Wait for a running VM to reach its current memory target
Parameters:
session ref session_id
Reference to a valid session
VM ref self
The VM
Minimum role:
read-only
Published in:
XenServer 5.0 (orlando)
Wait for a running VM to reach its current memory target
list of the operations allowed in this state. This list is advisory only and the server state may have changed by the time this field is read by a client.
Default value:
{}
Published in:
XenServer 4.0 (rio)
list of the operations allowed in this state. This list is advisory only and the server state may have changed by the time this field is read by a client.
Get the allowed_operations field of the given VM_appliance.
Parameters:
session ref session_id
Reference to a valid session
VM_appliance ref self
reference to the object
Minimum role:
read-only
Result:
value of the field
Published in:
XenServer 4.0 (rio)
list of the operations allowed in this state. This list is advisory only and the server state may have changed by the time this field is read by a client.
Set the name/label field of the given VM_appliance.
Parameters:
session ref session_id
Reference to a valid session
VM_appliance ref self
reference to the object
string value
New value to set
Minimum role:
pool-operator
Published in:
XenServer 4.0 (rio)
a human-readable name
voidshutdown(session ref, VM_appliance ref)
For each VM in the appliance, try to shut it down cleanly. If this fails, perform a hard shutdown of the VM.
Parameters:
session ref session_id
Reference to a valid session
VM_appliance ref self
The VM appliance
Minimum role:
pool-operator
Errors:
OPERATION_PARTIALLY_FAILED
Some VMs belonging to the appliance threw an exception while carrying out the specified operation
Published in:
XenServer 6.0 (boston)
For each VM in the appliance, try to shut it down cleanly. If this fails, perform a hard shutdown of the VM.
voidstart(session ref, VM_appliance ref, bool)
Start all VMs in the appliance
Parameters:
session ref session_id
Reference to a valid session
VM_appliance ref self
The VM appliance
bool paused
Instantiate all VMs belonging to this appliance in paused state if set to true.
Minimum role:
pool-operator
Errors:
OPERATION_PARTIALLY_FAILED
Some VMs belonging to the appliance threw an exception while carrying out the specified operation
Published in:
XenServer 6.0 (boston)
Start all VMs in the appliance
VM_guest_metrics
Class: VM_guest_metrics
The metrics reported by the guest (as opposed to inferred from outside)
Published in:
XenServer 4.0 (rio)
The metrics reported by the guest (as opposed to inferred from outside)
Enums
tristate_type
Values:
yes
Known to be true
no
Known to be false
unspecified
Unknown or unspecified
Fields
enum tristate_typecan_use_hotplug_vbd[RO/runtime]
The guest's statement of whether it supports VBD hotplug, i.e. whether it is capable of responding immediately to instantiation of a new VBD by bringing online a new PV block device. If the guest states that it is not capable, then the VBD plug and unplug operations will not be allowed while the guest is running.
Default value:
unspecified
Published in:
XenServer 7.0 (dundee)
To be used where relevant and available instead of checking PV driver version.
enum tristate_typecan_use_hotplug_vif[RO/runtime]
The guest's statement of whether it supports VIF hotplug, i.e. whether it is capable of responding immediately to instantiation of a new VIF by bringing online a new PV network device. If the guest states that it is not capable, then the VIF plug and unplug operations will not be allowed while the guest is running.
Default value:
unspecified
Published in:
XenServer 7.0 (dundee)
To be used where relevant and available instead of checking PV driver version.
Removed
(string → string) mapdisks[RO/runtime]
This field exists but has no data.
Default value:
{}
Published in:
XenServer 4.0 (rio)
Disk configuration/free space
Deprecated in:
XenServer 5.0 (orlando)
Dummy transition
Removed in:
XenServer 5.0 (orlando)
No data
datetimelast_updated[RO/runtime]
Time at which this information was last updated
Published in:
XenServer 4.0 (rio)
Time at which this information was last updated
boollive[RO/runtime]
True if the guest is sending heartbeat messages via the guest agent
Default value:
false
Published in:
XenServer 5.0 (orlando)
True if the guest is sending heartbeat messages via the guest agent
Removed
(string → string) mapmemory[RO/runtime]
This field exists but has no data. Use the memory and memory_internal_free RRD data-sources instead.
Default value:
{}
Published in:
XenServer 4.0 (rio)
free/used/total
Deprecated in:
XenServer 5.5 (george)
Dummy transition
Removed in:
XenServer 5.5 (george)
Disabled in favour of the RRDs, to improve scalability
(string → string) mapnetworks[RO/runtime]
network configuration
Published in:
XenServer 4.0 (rio)
network configuration
(string → string) mapos_version[RO/runtime]
version of the OS
Published in:
XenServer 4.0 (rio)
version of the OS
(string → string) mapother[RO/runtime]
anything else
Published in:
XenServer 4.0 (rio)
anything else
(string → string) mapother_config[RW]
additional configuration
Default value:
{}
Published in:
XenServer 5.0 (orlando)
additional configuration
boolPV_drivers_detected[RO/runtime]
At least one of the guest's devices has successfully connected to the backend.
Default value:
false
Published in:
XenServer 7.0 (dundee)
Deprecated
boolPV_drivers_up_to_date[RO/runtime]
Logically equivalent to PV_drivers_detected
Published in:
XenServer 4.0 (rio)
true if the PV drivers appear to be up to date
Deprecated in:
XenServer 7.0 (dundee)
Deprecated in favour of PV_drivers_detected, and redefined in terms of it
Remove the given key and its corresponding value from the other_config field of the given VM_guest_metrics. If the key is not in that Map, then do nothing.
Create a new VMSS instance, and return its handle.
The constructor args are: name_label, name_description, enabled, type*, retained_snapshots, frequency*, schedule (* = non-optional).
Parameters:
session ref session_id
Reference to a valid session
VMSS record args
All constructor arguments
Minimum role:
pool-operator
Result:
reference to the newly created object
Published in:
XenServer 7.2 (falcon)
VM Snapshot Schedule
voiddestroy(session ref, VMSS ref)
Destroy the specified VMSS instance.
Parameters:
session ref session_id
Reference to a valid session
VMSS ref self
reference to the object
Minimum role:
pool-operator
Published in:
XenServer 7.2 (falcon)
VM Snapshot Schedule
VMSS ref setget_all(session ref)
Return a list of all the VMSSs known to the system.
list of the operations allowed in this state. This list is advisory only and the server state may have changed by the time this field is read by a client.
Default value:
{}
Published in:
XenServer 4.0 (rio)
list of the operations allowed in this state. This list is advisory only and the server state may have changed by the time this field is read by a client.
Get the allowed_operations field of the given VTPM.
Parameters:
session ref session_id
Reference to a valid session
VTPM ref self
reference to the object
Minimum role:
read-only
Result:
value of the field
Published in:
XenServer 4.0 (rio)
list of the operations allowed in this state. This list is advisory only and the server state may have changed by the time this field is read by a client.
VM refget_backend(session ref, VTPM ref)
Get the backend field of the given VTPM.
Parameters:
session ref session_id
Reference to a valid session
VTPM ref self
reference to the object
Minimum role:
read-only
Result:
value of the field
Published in:
XenServer 4.0 (rio)
The domain where the backend is located (unused)
Prototype
VTPM refget_by_uuid(session ref, string)
Get a reference to the VTPM instance with the specified UUID.
list of the operations allowed in this state. This list is advisory only and the server state may have changed by the time this field is read by a client.
Default value:
{}
Published in:
XenServer 4.0 (rio)
list of the operations allowed in this state. This list is advisory only and the server state may have changed by the time this field is read by a client.
Get the allowed_operations field of the given VUSB.
Parameters:
session ref session_id
Reference to a valid session
VUSB ref self
reference to the object
Minimum role:
read-only
Result:
value of the field
Published in:
XenServer 4.0 (rio)
list of the operations allowed in this state. This list is advisory only and the server state may have changed by the time this field is read by a client.
VUSB refget_by_uuid(session ref, string)
Get a reference to the VUSB instance with the specified UUID.
A set of properties that describe one result element of SR.probe. Result elements and properties can change dynamically based on changes to the the SR.probe input-parameters or the target.
Version of cluster stack, not writable via the API. Defaulting to 2 for backwards compatibility when upgrading from a cluster without this field, which means it is necessarily running version 2 of corosync, the only cluster stack supported so far.
Whether the cluster host believes that clustering should be enabled on this host. This field can be altered by calling the enable/disable message on a cluster host. Only enabled members run the underlying cluster stack. Disabled members are still considered a member of the cluster (see joined), and can be re-enabled by the user.
Whether the cluster host has joined the cluster. Contrary to enabled, a host that is not joined is not considered a member of the cluster, and hence enable and disable operations cannot be performed on this host.
True if this configuration is complete and can be used to call SR.create. False if it requires further iterative calls to SR.probe, to potentially narrow down on a configuration that can be used.
Plugin-specific configuration which describes where and how to locate the storage repository. This may include the physical block device name, a remote NFS server and path or an RBD storage pool.
Additional plugin-specific information about this configuration, that might be of use for an API user. This can for example include the LUN or the WWPN.
Perform a backend-specific scan, using the given device_config. If the device_config is complete, then this will return a list of the SRs present of this type on the device, if any. If the device_config is partial, then a backend-specific scan will be performed, returning results that will guide the user in improving the device_config.
Enable SR-IOV on the specific PIF. It will create a network-sriov based on the specific PIF and automatically create a logical PIF to connect the specific network.
The exportname to request over NBD. This holds details including an authentication token, so it must be protected appropriately. Clients should regard the exportname as an opaque string or token.
For convenience, this redundant field holds a DNS (hostname) subject of the certificate. This can be a wildcard, but only for a certificate that has a wildcard subject and no concrete hostname subjects.
Delete the data of the snapshot VDI, but keep its changed block tracking metadata. When successful, this call changes the type of the VDI to cbt_metadata. This operation is idempotent: calling it on a VDI of type cbt_metadata results in a no-op, and no error will be thrown.
Disable changed block tracking for the VDI. This call is only allowed on VDIs that support enabling CBT. It is an idempotent operation - disabling CBT for a VDI for which CBT is not enabled results in a no-op, and no error will be thrown.
Enable changed block tracking for the VDI. This call is idempotent - enabling CBT for a VDI for which CBT is already enabled results in a no-op, and no error will be thrown.
Get details specifying how to access this VDI via a Network Block Device server. For each of a set of NBD server addresses on which the VDI is available, the return value set contains a vdi_nbd_server_info object that contains an exportname to request once the NBD connection is established, and connection details for the address. An empty list is returned if there is no network that has a PIF on a host with access to the relevant SR, or if no such network has been assigned an NBD-related purpose in its purpose field. To access the given VDI, any of the vdi_nbd_server_info objects can be used to make a connection to a server, and then the VDI will be available by requesting the exportname.
Set custom BIOS strings to this VM. VM will be given a default set of BIOS strings, only some of which can be overridden by the supplied values. Allowed keys are: 'bios-vendor', 'bios-version', 'system-manufacturer', 'system-product-name', 'system-version', 'system-serial-number', 'enclosure-asset-tag', 'baseboard-manufacturer', 'baseboard-product-name', 'baseboard-version', 'baseboard-serial-number', 'baseboard-asset-tag', 'baseboard-location-in-chassis', 'enclosure-asset-tag'
Textual reference to the template used to create a VM. This can be used by clients in need of an immutable reference to the template since the latter's uuid and name_label may change, for example, after a package installation or upgrade.
Set the memory allocation of this VM. Sets all of memory_static_max, memory_dynamic_min, and memory_dynamic_max to the given value, and leaves memory_static_min untouched.
Allow SSLv3 protocol and ciphersuites as used by older server versions. This controls both incoming and outgoing connections. When this is set to a different value, the host immediately restarts its SSL/TLS listening service; typically this takes less than a second but existing connections to it will be broken. API login sessions will remain valid.
This field was consulted when VM.create did not specify a value for 'has_vendor_device'; VM.create now uses a simple default and no longer consults this value.
Upgrades an LVHD SR to enable thin-provisioning. Future VDIs created in this SR will be thinly-provisioned, although existing VDIs will be left alone. Note that the SR must be attached to the SRmaster for upgrade to work.
Controls whether, when the VM starts in HVM mode, its virtual hardware will include the emulated PCI device for which drivers may be available through Windows Update. Usually this should never be changed on a VM on which Windows has been installed: changing it on such a VM is likely to lead to a crash on next start.
Enable/disable SSLv3 for interoperability with older server versions. When this is set to a different value, the host immediately restarts its SSL/TLS listening service; typically this takes less than a second but existing connections to it will be broken. API login sessions will remain valid.
Indicates whether the interface is managed by xapi. If it is not, then xapi will not configure the interface, the commands PIF.plug/unplug/reconfigure_ip(v6) cannot be used, nor can the interface be bonded or have VLANs based on top through xapi.
Declare that a host is dead. This is a dangerous operation, and should only be called if the administrator is absolutely sure the host is definitely dead
Injects an artificial event on the given object and returns the corresponding ID in the form of a token, which can be used as a point of reference for database events. For example, to check whether an object has reached the right state before attempting an operation, one can inject an artificial event on the object and wait until the token returned by consecutive event.from calls is lexicographically greater than the one returned by event.inject.
The PIF of which the IP configuration and MAC were copied to the bond, and which will receive all configuration/VLANs/VIFs on the bond if the bond is destroyed
Set the value of the allow_caching parameter. This value can only be changed when the VDI is not attached to a running VM. The caching behaviour is only affected by this flag for VHD-based VDIs that have one parent and no child VHDs. Moreover, caching only takes place when the host running the VM containing this VDI has a nominated SR for local caching.
the subject name of the user that was externally authenticated. If a session instance has is_local_superuser set, then the value of this field is undefined.
Checkpoints the specified VM, making a new VM. Checkpoint automatically exploits the capabilities of the underlying storage repository in which the VM's disk images are stored (e.g. Copy on Write) and saves the memory image as well.
Change to another edition, or reactivate the current edition after a license has expired. This may be subject to the successful checkout of an appropriate license.
the subject identifier of the user that was externally authenticated. If a session instance has is_local_superuser set, then the value of this field is undefined.
Returns mapping of hosts to ratings, indicating the suitability of starting the VM at that location according to wlb. Rating is replaced with an error if the VM cannot boot there.
This call queries the external directory service to obtain the user information (e.g. username, organization etc) from the specified subject_identifier
Retrieves recommended host migrations to perform when evacuating the host from the wlb server. If a VM cannot be migrated from the host the reason is listed instead of a recommendation.
This call asynchronously detects if the external authentication configuration in any slave is different from that in the master and raises appropriate alerts
When this call returns the VM restart logic will not run for the requested number of seconds. If the argument is zero then the restart thread is immediately unblocked
Prevent this PIF from being unplugged; set this to notify the management tool-stack that the PIF has a special use and should not be unplugged under any circumstances (e.g. because you're running storage traffic over it)
has possible values: "best-effort" meaning "try to restart this VM if possible but don't consider the Pool to be overcommitted if this is not possible"; "restart" meaning "this VM should be restarted"; "" meaning "do not try to restart this VM"
True if the Pool is considered to be overcommitted i.e. if there exist insufficient physical resources to tolerate the configured number of host failures
Number of future host failures we have managed to find a plan for. Once this reaches zero any future host failures will cause the failure of protected VMs.
Snapshots the specified VM, making a new VM. Snapshot automatically exploits the capabilities of the underlying storage repository in which the VM's disk images are stored (e.g. Copy on Write).
Snapshots the specified VM with quiesce, making a new VM. Snapshot automatically exploits the capabilities of the underlying storage repository in which the VM's disk images are stored (e.g. Copy on Write).
Shuts the agent down after a 10 second pause. WARNING: this is a dangerous operation. Any operations in progress will be aborted, and unrecoverable data loss may occur. The caller is responsible for ensuring that there are no operations in progress when this method is called.
data to be inserted into the xenstore tree (/local/domain/0/backend/vbd/<domid>/<device-id>/sm-data) after the VDI is attached. This is generally set by the SM backends on vdi_attach.
Perform a backend-specific scan, using the given device_config. If the device_config is complete, then this will return a list of the SRs present of this type on the device, if any. If the device_config is partial, then a backend-specific scan will be performed, returning results that will guide the user in improving the device_config.
Returns the maximum amount of guest memory which will fit, together with overheads, in the supplied amount of physical memory. If 'exact' is true then an exact calculation is performed using the VM's current settings. If 'exact' is false then a more conservative approximation is used
Reconfigure the management network interface. Should only be used if Host.management_reconfigure is impossible because the network configuration is broken.
list of the operations allowed in this state. This list is advisory only and the server state may have changed by the time this field is read by a client.
list of the operations allowed in this state. This list is advisory only and the server state may have changed by the time this field is read by a client.
list of the operations allowed in this state. This list is advisory only and the server state may have changed by the time this field is read by a client.
physical space currently utilised on this storage repository (in bytes). Note that for sparse disk formats, physical_utilisation may be less than virtual_allocation
list of the operations allowed in this state. This list is advisory only and the server state may have changed by the time this field is read by a client.
list of the operations allowed in this state. This list is advisory only and the server state may have changed by the time this field is read by a client.
list of the operations allowed in this state. This list is advisory only and the server state may have changed by the time this field is read by a client.
A host which the VM has some affinity for (or NULL). This is used as a hint to the start call when it decides where to run the VM. Resource constraints may cause the VM to be started elsewhere.
list of the operations allowed in this state. This list is advisory only and the server state may have changed by the time this field is read by a client.
Statically-set (i.e. absolute) maximum (bytes). The value of this field at VM start time acts as a hard limit of the amount of memory a guest can use. New values only take effect on reboot.
list of the operations allowed in this state. This list is advisory only and the server state may have changed by the time this field is read by a client.
list of the operations allowed in this state. This list is advisory only and the server state may have changed by the time this field is read by a client.
list of the operations allowed in this state. This list is advisory only and the server state may have changed by the time this field is read by a client.
list of the operations allowed in this state. This list is advisory only and the server state may have changed by the time this field is read by a client.
list of the operations allowed in this state. This list is advisory only and the server state may have changed by the time this field is read by a client.
list of the operations allowed in this state. This list is advisory only and the server state may have changed by the time this field is read by a client.
list of the operations allowed in this state. This list is advisory only and the server state may have changed by the time this field is read by a client.
This field contains the estimated fraction of the task which is complete. This field should not be used to determine whether the task is complete - for this the status field of the task should be used.
if the task has completed successfully, this field contains the type of the encoded result (i.e. name of the class whose reference is in the result field). Undefined otherwise.
Create a new Storage Repository and introduce it into the managed system, creating both SR record and PBD record to attach it to current host (with specified device_config parameters)
Destroy specified SR, removing SR-record from database and remove SR from disk. (In order to affect this operation the appropriate device_config is read from the specified SR's PBD on current host)
Take an exact copy of the VDI and return a reference to the new disk. If any driver_params are specified then these are passed through to the storage-specific substrate driver that implements the clone operation. NB the clone lives in the same Storage Repository as its parent.
Take a read-only snapshot of the VDI, returning a reference to the snapshot. If any driver_params are specified then these are passed through to the storage-specific substrate driver that takes the snapshot. NB the snapshot lives in the same Storage Repository as its parent.
Attempt to cleanly shutdown the specified VM (Note: this may not be supported---e.g. if a guest agent is not installed). This can only be called when the specified VM is in the Running state.
Attempt to cleanly shutdown the specified VM. (Note: this may not be supported---e.g. if a guest agent is not installed). This can only be called when the specified VM is in the Running state.
Clones the specified VM, making a new VM. Clone automatically exploits the capabilities of the underlying storage repository in which the VM's disk images are stored (e.g. Copy on Write). This function can only be called when the VM is in the Halted State.
Returns a record describing the VM's dynamic state, initialised when the VM boots and updated to reflect runtime configuration changes e.g. CPU hotplug
Reset the power-state of the VM to halted in the database only. (Used to recover from slave failures in pooling scenarios by resetting the power-states of VMs running on dead slaves to halted.) This is a potentially dangerous operation; use with care.
Send the given key as a sysrq to this VM. The key is specified as a single character (a String of length 1). This can only be called when the specified VM is in the Running state.
Blocking call which returns a (possibly empty) batch of events. This method is only recommended for legacy use. New development should use event.from which supersedes this method.
Registers this session with the event system for a set of given classes. This method is only recommended for legacy use in conjunction with event.next.
Removes this session's registration with the event system for a set of given classes. This method is only recommended for legacy use in conjunction with event.next.
Restarts the agent after a 10 second pause. WARNING: this is a dangerous operation. Any operations in progress will be aborted, and unrecoverable data loss may occur. The caller is responsible for ensuring that there are no operations in progress when this method is called.
Request that a task be cancelled. Note that a task may fail to be cancelled and may complete or fail normally and note that, even when a task does cancel, it might take an arbitrary amount of time.
This API allows you to configure the DHCP service running on the Host
Internal Management Network (HIMN). The API configures a udhcp daemon
residing in Dom0 and alters the service configuration for any VM using
the network.
It should be noted that for this reason, that callers who modify the
default configuration should be aware that their changes may have an
adverse effect on other consumers of the HIMN.
Version history
Date State
---- ----
2013-3-15 Stable
Stable: this API is considered stable and unlikely to change between
software version and between hotfixes.
API description
The API for configuring the network is based on a series of other_config
keys that can be set by the caller on the HIMN XAPI network object. Once
any of the keys below have been set, the caller must ensure that any VIFs
attached to the HIMN are removed, destroyed, created and plugged.
ip_begin
The first IP address in the desired subnet that the caller wishes the
DHCP service to use.
ip_end
The last IP address in the desired subnet that the caller wishes the
DHCP service to use.
netmask
The subnet mask for each of the issues IP addresses.
ip_disable_gw
A boolean key for disabling the DHCP server from returning a default
gateway for VMs on the network. To disable returning the gateway address
set the key to True.
Note: By default, the DHCP server will issue a default gateway for
those requesting an address. Setting this key may disrupt applications
that require the default gateway for communicating with Dom0 and so
should be used with care.
Example code
An example python extract of setting the config for the network:
def get_himn_ref():
networks = session.xenapi.network.get_all_records()
for ref, rec in networks.iteritems():
if 'is_host_internal_management_network' \
in rec['other_config']:
return ref
raise Exception("Error: unable to find HIMN.")
himn_ref = get_himn_ref()
other_config = session.xenapi.network.get_other_config(himn_ref)
other_config['ip_begin'] = "169.254.0.1"
other_config['ip_end'] = "169.254.255.254"
other_config['netmask'] = "255.255.0.0"
session.xenapi.network.set_other_config(himn_ref, other_config)
An example for how to disable the server returning a default gateway:
“Guest agents” are special programs which run inside VMs which can be controlled
via the XenAPI.
One communication method between XenAPI clients is via Xenstore.
Adding Xenstore entries to VMs
Developers may wish to install guest agents into VMs which take special action based on the type of the VM. In order to communicate this information into the guest, a special Xenstore name-space known as vm-data is available which is populated at VM creation time. It is populated from the xenstore-data map in the VM record.
If it is a Linux-based VM, install the COMPANY_TOOLS and use the xenstore-read to verify that the node exists in Xenstore.
Note
Only prefixes beginning with vm-data are permitted, and anything not in this name-space will be silently ignored when starting the VM.
Memory
Memory is used for many things:
the hypervisor code: this is the Xen executable itself
the hypervisor heap: this is needed for per-domain structures and per-vCPU
structures
the crash kernel: this is needed to collect information after a host crash
domain RAM: this is the memory the VM believes it has
shadow memory: for HVM guests running on hosts without hardware assisted
paging (HAP) Xen uses shadow to optimise page table updates. For all guests
shadow is used during live migration for tracking the memory transfer.
video RAM for the virtual graphics card
Some of these are constants (e.g. hypervisor code) while some depend on the VM
configuration (e.g. domain RAM). Xapi calls the constants “host overhead” and
the variables due to VM configuration as “VM overhead”.
These overheads are subtracted from free memory on the host when starting,
resuming and migrating VMs.
Metrics
xcp-rrdd
records statistics about the host and the VMs running on top.
The metrics are stored persistently for long-term access and analysis of
historical trends.
Statistics are stored in RRDs (Round Robin
Databases).
RRDs are fixed-size structures that store time series with decreasing time
resolution: the older the data point is, the longer the timespan it represents.
‘Data sources’ are sampled every few seconds and points are added to
the highest resolution RRD. Periodically each high-frequency RRD is
‘consolidated’ (e.g. averaged) to produce a data point for a lower-frequency
RRD.
RRDs are resident on the host on which the VM is running, or the pool
coordinator when the VM is not running.
The RRDs are backed up every day.
Granularity
Statistics are persisted for a maximum of one year, and are stored at
different granularities.
The average and most recent values are stored at intervals of:
five seconds for the past ten minutes
one minute for the past two hours
one hour for the past week
one day for the past year
RRDs are saved to disk as uncompressed XML. The size of each RRD when
written to disk ranges from 200KiB to approximately 1.2MiB when the RRD
stores the full year of statistics.
By default each RRD contains only averaged data to save storage space.
To record minimum and maximum values in future RRDs, set the Pool-wide flag
Statistics can be downloaded over HTTP in XML or JSON format, for example
using wget.
See rrddump and
rrdxport for information
about the XML format.
The JSON format has the same structure as the XML.
Parameters are appended to the URL following a question mark (?) and separated
by ampersands (&).
HTTP authentication can take the form of a username and password or a session
token in a URL parameter.
Statistics may be downloaded all at once, including all history, or as
deltas suitable for interactive graphing.
A URL parameter is used to decide which format to return: XML is returned by
default, adding the parameter json makes the server return JSON.
Starting from xapi version 23.17.0, the server uses the HTTP header Accept
to decide which format to return.
When both formats are accepted, for example, using */*; JSON is returned.
Of interest are the clients wget and curl which use this accept header value,
meaning that when using them the default behaviour will change and the accept
header needs to be overridden to make the server return XML.
The content type is provided in the reponse’s headers in these newer versions.
The XML RRD data is in the format used by rrdtool and looks like this:
<?xml version="1.0"?><rrd><version>0003</version><step>5</step><lastupdate>1213616574</lastupdate><ds><name>memory_total_kib</name><type>GAUGE</type><minimal_heartbeat>300.0000</minimal_heartbeat><min>0.0</min><max>Infinity</max><last_ds>2070172</last_ds><value>9631315.6300</value><unknown_sec>0</unknown_sec></ds><ds><!-- other dss - the order of the data sources is important
and defines the ordering of the columns in the archives below --></ds><rra><cf>AVERAGE</cf><pdp_per_row>1</pdp_per_row><params><xff>0.5000</xff></params><cdp_prep><!-- This is for internal use --><ds><primary_value>0.0</primary_value><secondary_value>0.0</secondary_value><value>0.0</value><unknown_datapoints>0</unknown_datapoints></ds> ...other dss - internal use only...
</cdp_prep><database><row><v>2070172.0000</v><!-- columns correspond to the DSs defined above --><v>1756408.0000</v><v>0.0</v><v>0.0</v><v>732.2130</v><v>0.0</v><v>782.9186</v><v>0.0</v><v>647.0431</v><v>0.0</v><v>0.0001</v><v>0.0268</v><v>0.0100</v><v>0.0</v><v>615.1072</v></row> ...
</rra> ... other archives ...
</rrd>
To obtain a full dump of RRD data of a VM with uuid x:
Note that it is quite expensive to download full RRDs as they contain
lots of historical information. For interactive displays clients should
download deltas instead.
Downloading deltas
To obtain an update of all VM statistics on a host, the URL would be of
the form:
This request returns data in an rrdtool xport style XML format, for every VM
resident on the particular host that is being queried.
To differentiate which column in the export is associated with which VM, the
legend field is prefixed with the UUID of the VM.
An example rrd_updates output:
<xport><meta><start>1213578000</start><step>3600</step><end>1213617600</end><rows>12</rows><columns>12</columns><legend><entry>AVERAGE:vm:ecd8d7a0-1be3-4d91-bd0e-4888c0e30ab3:cpu1</entry><!-- nb - each data source might have multiple entries for different consolidation functions --><entry>AVERAGE:vm:ecd8d7a0-1be3-4d91-bd0e-4888c0e30ab3:cpu0</entry><entry>AVERAGE:vm:ecd8d7a0-1be3-4d91-bd0e-4888c0e30ab3:memory</entry><entry>MIN:vm:ecd8d7a0-1be3-4d91-bd0e-4888c0e30ab3:cpu1</entry><entry>MIN:vm:ecd8d7a0-1be3-4d91-bd0e-4888c0e30ab3:cpu0</entry><entry>MIN:vm:ecd8d7a0-1be3-4d91-bd0e-4888c0e30ab3:memory</entry><entry>MAX:vm:ecd8d7a0-1be3-4d91-bd0e-4888c0e30ab3:cpu1</entry><entry>MAX:vm:ecd8d7a0-1be3-4d91-bd0e-4888c0e30ab3:cpu0</entry><entry>MAX:vm:ecd8d7a0-1be3-4d91-bd0e-4888c0e30ab3:memory</entry><entry>LAST:vm:ecd8d7a0-1be3-4d91-bd0e-4888c0e30ab3:cpu1</entry><entry>LAST:vm:ecd8d7a0-1be3-4d91-bd0e-4888c0e30ab3:cpu0</entry><entry>LAST:vm:ecd8d7a0-1be3-4d91-bd0e-4888c0e30ab3:memory</entry></legend></meta><data><row><t>1213617600</t><v>0.0</v><!-- once again, the order or the columns is defined by the legend above --><v>0.0282</v><v>209715200.0000</v><v>0.0</v><v>0.0201</v><v>209715200.0000</v><v>0.0</v><v>0.0445</v><v>209715200.0000</v><v>0.0</v><v>0.0243</v><v>209715200.0000</v></row> ...
</data></xport>
To obtain host updates too, use the query parameter host=true:
The step will decrease as the period decreases, which means that if you
request statistics for a shorter time period you will get more detailed
statistics.
To download updates containing only the averages, or minimums or maximums,
add the parameter cf=AVERAGE|MIN|MAX (note case is important) e.g.
where vdi is the reference to the disk to be snapshotted, and driver_params
is a list of string pairs providing optional backend implementation-specific hints.
The snapshot operation should be quick (i.e. it should never be implemented as
a slow disk copy) and the resulting VDI will have
Field name
Description
is_a_snapshot
a flag, set to true, indicating the disk is a snapshot
snapshot_of
a reference to the disk the snapshot was created from
snapshot_time
the time the snapshot was taken
The resulting snapshot should be considered read-only. Depending on the backend
implementation it may be technically possible to write to the snapshot, but clients
must not do this. To create a writable disk from a snapshot, see “restoring from
a snapshot” below.
Note that the storage backend is free to implement this in different ways. We
do not assume the presence of a .vhd-formatted storage repository. Clients
must never assume anything about the backend implementation without checking
first with the maintainers of the backend implementation.
where snapshot_vdi is a reference to the snapshot VDI, and driver_params
is a list of string pairs providing optional backend implementation-specific hints.
The clone operation should be quick (i.e. it should never be implemented as
a slow disk copy) and the resulting VDI will have
Field name
Description
is_a_snapshot
a flag, set to false, indicating the disk is not a snapshot
snapshot_of
an invalid reference
snapshot_time
an invalid time
The resulting disk is writable and can be used by the client as normal.
Note that the “restored” VDI will have a different VDI.uuid and reference to
the original VDI.
Taking a VM snapshot
A VM snapshot is a copy of the VM metadata and a snapshot of all the associated
VDIs at around the same point in time. To take a VM snapshot:
where vm is a reference to the existing VM and new_name will be the name_label
of the resulting VM (snapshot) object. The resulting VM will have
Field name
Description
is_a_snapshot
a flag, set to true, indicating the VM is a snapshot
snapshot_of
a reference to the VM the snapshot was created from
snapshot_time
the time the snapshot was taken
Note that each disk is snapshotted one-by-one and not at the same time.
Restoring to a VM snapshot
A VM snapshot can be reverted to a snapshot using
VM.revert(session_id, snapshot_ref)
where snapshot_ref is a reference to the snapshot VM. Each VDI associated with
the VM before the snapshot will be destroyed and each VDI associated with the
snapshot will be cloned (see “Reverting to a disk snapshot” above) and associated
with the VM. The resulting VM will have
Field name
Description
is_a_snapshot
a flag, set to false, indicating the VM is not a snapshot
snapshot_of
an invalid reference
snapshot_time
an invalid time
Note that the VM.uuid and reference are preserved, but the VDI.uuid and
VDI references are not.
Downloading a disk or snapshot
Disks can be downloaded in either raw or vhd format using an HTTP 1.0 GET
request as follows:
GET /export_raw_vdi?session_id=%s&task_id=%s&vdi=%s&format=%s[&base=%s] HTTP/1.0\r\n
Connection: close\r\n
\r\n
\r\n
where
session_id is a currently logged-in session
task_id is a Task reference which will be used to monitor the
progress of this task and receive errors from it
vdi is the reference of the VDI into which the data will be
imported
format is either vhd or raw
(optional) base is the reference of a VDI which has already been
exported and this export should only contain the blocks which have changed
since then.
Note that the vhd format allows the disk to be sparse i.e. only contain allocated
blocks. This helps reduce the size of the download.
Disks can be uploaded in either raw or vhd format using an HTTP 1.0 PUT
request as follows:
PUT /import_raw_vdi?session_id=%s&task_id=%s&vdi=%s&format=%s HTTP/1.0\r\n
Connection: close\r\n
\r\n
\r\n
where
session_id is a currently logged-in session
task_id is a Task reference which will be used to monitor the
progress of this task and receive errors from it
vdi is the reference of the VDI into which the data will be
imported
format is either vhd or raw
Note that you must create the disk (with the correct size) before importing
data to it. The disk doesn’t have to be empty, in fact if restoring from a
series of incremental downloads it makes sense to upload them all to the
same disk in order.
Example: incremental backup with xe
This section will show how easy it is to build an incremental backup
tool using these APIs. For simplicity we will use the xe commands
rather than raw XMLRPC and HTTP.
For a VDI with uuid $VDI, take a snapshot:
FULL=$(xe vdi-snapshot uuid=$VDI)
Next perform a full backup into a file “full.vhd”, in vhd format:
If the SR was using the vhd format internally (this is the default)
then the full backup will be sparse and will only contain blocks if they
have been written to.
After some time has passed and the VDI has been written to, take another
snapshot:
DELTA=$(xe vdi-snapshot uuid=$VDI)
Now we can backup only the disk blocks which have changed between the original
snapshot $FULL and the next snapshot $DELTA into a file called “delta.vhd”:
Note there is no need to supply a “base” parameter when importing; Xapi will
treat the “vhd differencing disk” as a set of blocks and import them. It
is up to you to check you are importing them to the right place.
Now the VDI $RESTORE should have the same contents as $DELTA.
VM consoles
Most XenAPI graphical interfaces will want to gain access to the VM consoles, in order to render them to the user as if they were physical machines. There are several types of consoles available, depending on the type of guest or if the physical host console is being accessed:
Types of consoles
Operating System
Text
Graphical
Optimized graphical
Windows
No
VNC, using an API call
RDP, directly from guest
Linux
Yes, through VNC and an API call
No
VNC, directly from guest
Physical Host
Yes, through VNC and an API call
No
No
Hardware-assisted VMs, such as Windows, directly provide a graphical console over VNC. There is no text-based console, and guest networking is not necessary to use the graphical console. Once guest networking has been established, it is more efficient to setup Remote Desktop Access and use an RDP client to connect directly (this must be done outside of the XenAPI).
Paravirtual VMs, such as Linux guests, provide a native text console directly. XenServer provides a utility (called vncterm) to convert this text-based console into a graphical VNC representation. Guest networking is not necessary for this console to function. As with Windows above, Linux distributions often configure VNC within the guest, and directly connect to it over a guest network interface.
The physical host console is only available as a vt100 console, which is exposed through the XenAPI as a VNC console by using vncterm in the control domain.
RFB (Remote Framebuffer) is the protocol which underlies VNC, specified in The RFB Protocol. Third-party developers are expected to provide their own VNC viewers, and many freely available implementations can be adapted for this purpose. RFB 3.3 is the minimum version which viewers must support.
Retrieving VNC consoles using the API
VNC consoles are retrieved using a special URL passed through to the host agent. The sequence of API calls is as follows:
Client to Master/443: XML-RPC: Session.login_with_password().
Master/443 to Client: Returns a session reference to be used with subsequent calls.
Client to Master/443: XML-RPC: VM.get_by_name_label().
Master/443 to Client: Returns a reference to a particular VM (or the “control domain” if you want to retrieve the physical host console).
Client to Master/443: XML-RPC: VM.get_consoles().
Master/443 to Client: Returns a list of console objects associated with the VM.
Client to Master/443: XML-RPC: VM.get_location().
Returns a URI describing where the requested console is located. The URIs are of the form: https://192.168.0.1/console?ref=OpaqueRef:c038533a-af99-a0ff-9095-c1159f2dc6a0.
Client to 192.168.0.1: HTTP CONNECT “/console?ref=(…)”
The final HTTP CONNECT is slightly non-standard since the HTTP/1.1 RFC specifies that it should only be a host and a port, rather than a URL. Once the HTTP connect is complete, the connection can subsequently directly be used as a VNC server without any further HTTP protocol action.
This scheme requires direct access from the client to the control domain’s IP, and will not work correctly if there are Network Address Translation (NAT) devices blocking such connectivity. You can use the CLI to retrieve the console URI from the client and perform a connectivity check.
Use command-line utilities like ping to test connectivity to the IP address provided in the location field.
Disabling VNC forwarding for Linux VM
When creating and destroying Linux VMs, the host agent automatically manages the vncterm processes which convert the text console into VNC. Advanced users who wish to directly access the text console can disable VNC forwarding for that VM. The text console can then only be accessed directly from the control domain directly, and graphical interfaces such as XenCenter will not be able to render a console for that VM.
Before starting the guest, set the following parameter on the VM record:
On the host console, connect to the text console directly by:
$ /usr/lib/xen/bin/xenconsole $DOMID
This configuration is an advanced procedure, and we do not recommend that the text console is directly used for heavy I/O operations. Instead, connect to the guest over SSH or some other network-based connection mechanism.
VM import/export
VMs can be exported to a file and later imported to any Xapi host. The export
protocol is a simple HTTP(S) GET, which should be sent to the Pool master.
Authorization is either via a pre-created session_id or by HTTP basic
authentication (particularly useful on the command-line).
The VM to export is specified either by UUID or by reference. To keep track of
the export, a task can be created and passed in using its reference. Note that
Xapi may send an HTTP redirect if a different host has better access to the
disk data.
The following arguments are passed as URI query parameters or HTTP cookies:
Argument
Description
session_id
the reference of the session being used to authenticate; required only when not using HTTP basic authentication
task_id
the reference of the task object with which to keep track of the operation; optional, required only if you have created a task object to keep track of the export
ref
the reference of the VM; required only if not using the UUID
uuid
the UUID of the VM; required only if not using the reference
use_compression
an optional boolean “true” or “false” (defaulting to “false”). If “true” then the output will be gzip-compressed before transmission.
For example, using the Linux command line tool cURL:
will export the specified VM to the file exportfile.
To export just the metadata, use the URI http://server/export_metadata.
The import protocol is similar, using HTTP(S) PUT. The session_id and task_id arguments are as for the export. The ref and uuid are not used; a new reference and uuid will be generated for the VM. There are some additional parameters:
Argument
Description
restore
if true, the import is treated as replacing the original VM - the implication of this currently is that the MAC addresses on the VIFs are exactly as the export was, which will lead to conflicts if the original VM is still being run.
force
if true, any checksum failures will be ignored (the default is to destroy the VM if a checksum error is detected)
sr_id
the reference of an SR into which the VM should be imported. The default behavior is to import into the Pool.default_SR
Note there is no need to specify whether the export is compressed, as Xapi
will automatically detect and decompress gzip-encoded streams.
will import the VM to the specified SR on the server.
To import just the metadata, use the URI http://server/import_metadata
Legacy VM Import Format
This section describes the legacy VM import/export format and is for historical
interest only. It should be updated to describe the current format, see
issue 64
Xapi supports a human-readable legacy VM input format called XVA. This section describes the syntax and structure of XVA.
An XVA consists of a directory containing XML metadata and a set of disk images. A VM represented by an XVA is not intended to be directly executable. Data within an XVA package is compressed and intended for either archiving on permanent storage or for being transmitted to a VM server - such as a XenServer host - where it can be decompressed and executed.
XVA is a hypervisor-neutral packaging format; it should be possible to create simple tools to instantiate an XVA VM on any other platform. XVA does not specify any particular runtime format; for example disks may be instantiated as file images, LVM volumes, QCoW images, VMDK or VHD images. An XVA VM may be instantiated any number of times, each instantiation may have a different runtime format.
XVA does not:
specify any particular serialization or transport format
provide any mechanism for customizing VMs (or templates) on install
address how a VM may be upgraded post-install
define how multiple VMs, acting as an appliance, may communicate
These issues are all addressed by the related Open Virtual Appliance specification.
An XVA is a directory containing, at a minimum, a file called ova.xml. This file describes the VM contained within the XVA and is described in Section 3.2. Disks are stored within sub-directories and are referenced from the ova.xml. The format of disk data is described later in Section 3.3.
The following terms will be used in the rest of the chapter:
HVM: a mode in which unmodified OS kernels run with the help of virtualization support in the hardware.
PV: a mode in which specially modified “paravirtualized” kernels run explicitly on top of a hypervisor without requiring hardware support for virtualization.
The “ova.xml” file contains the following elements:
<applianceversion="0.1">
The number in the attribute “version” indicates the version of this specification to which the XVA is constructed; in this case version 0.1. Inside the <appliance> there is exactly one <vm>: (in the OVA specification, multiple <vm>s are permitted)
<vmname="name">
Each <vm> element describes one VM. The “name” attribute is for future internal use only and must be unique within the ova.xml file. The “name” attribute is permitted to be any valid UTF-8 string. Inside each <vm> tag are the following compulsory elements:
<label>... text ... </label>
A short name for the VM to be displayed in a UI.
<shortdesc> ... description ... </shortdesc>
A description for the VM to be displayed in the UI. Note that for both <label> and <shortdesc> contents, leading and trailing whitespace will be ignored.
<configmem_set="268435456"vcpus="1"/>
The <config> element has attributes which describe the amount of memory in bytes (mem_set) and number of CPUs (VCPUs) the VM should have.
Each <vm> has zero or more <vbd> elements representing block devices which look like the following:
device: name of the physical device to expose to the VM. For linux guests
we use “sd[a-z]” and for windows guests we use “hd[a-d]”.
function: if marked as “root”, this disk will be used to boot the guest.
(NB this does not imply the existence of the Linux root i.e. / filesystem)
Only one device should be marked as “root”. See Section 3.4 describing VM
booting. Any other string is ignored.
mode: either “w” or “ro” if the device is to be read/write or read-only
vdi: the name of the disk image (represented by a <vdi> element) to which
this block device is connected
Each <vm> may have an optional <hacks> section like the following:
The <hacks> element will be removed in future. The attribute is_hvm is
either true or false, depending on whether the VM should be booted in HVM or not.
The kernel_boot_cmdline contains additional kernel commandline arguments when
booting a guest using pygrub.
In addition to a <vm> element, the <appliance> will contain zero or more
<vdi> elements like the following:
Each <vdi> corresponds to a disk image. The attributes have the following meanings:
name: name of the VDI, referenced by the vdi attribute of <vbd>elements.
Any valid UTF-8 string is permitted.
size: size of the required image in bytes
source: a URI describing where to find the data for the image, only
file:// URIs are currently permitted and must describe paths relative to the
directory containing the ova.xml
type: describes the format of the disk data
A single disk image encoding is specified in which has type “dir-gzipped-chunks”: Each image is represented by a directory containing a sequence of files as follows:
Each file (named “chunk-XXXXXXXXX.gz”) is a gzipped file containing exactly 1e9 bytes (1GB, not 1GiB) of raw block data. The small size was chosen to be safely under the maximum file size limits of several filesystems. If the files are gunzipped and then concatenated together, the original image is recovered.
Because the import and export of VMs can take some time to complete, an
asynchronous HTTP interface to the import and export operations is
provided. To perform an export using the XenServer API, construct
an HTTP GET call providing a valid session ID, task ID and VM UUID, as
shown in the following pseudo code:
task = Task.create()
result = HTTP.get(
server, 80, "/export?session_id=&task_id=&ref=");
For the import operation, use an HTTP PUT call as demonstrated in the
following pseudo code:
task = Task.create()
result = HTTP.put(
server, 80, "/import?session_id=&task_id=&ref=");
VM Lifecycle
The following figure shows the states that a VM can be in and the
API calls that can be used to move the VM between these states.
The VM class contains a number of fields that control the way in which the VM
is booted. With reference to the fields defined in the VM class (see later in
this document), this section outlines the boot options available and the
mechanisms provided for controlling them.
VM booting is controlled by setting one of the two mutually exclusive groups:
“PV” and “HVM”. If HVM.boot_policy is an empty string, then paravirtual
domain building and booting will be used; otherwise the VM will be loaded as a
HVM domain, and booted using an emulated BIOS.
When paravirtual booting is in use, the PV_bootloader field indicates the
bootloader to use. It may be “pygrub”, in which case the platform’s default
installation of pygrub will be used, or a full path within the control domain to
some other bootloader. The other fields, PV_kernel, PV_ramdisk, PV_args,
and PV_bootloader_args will be passed to the bootloader unmodified, and
interpretation of those fields is then specific to the bootloader itself,
including the possibility that the bootloader will ignore some or all of
those given values. Finally the paths of all bootable disks are added to the
bootloader commandline (a disk is bootable if its VBD has the bootable flag set).
There may be zero, one, or many bootable disks; the bootloader decides which
disk (if any) to boot from.
If the bootloader is pygrub, then the menu.lst is parsed, if present in the
guest’s filesystem, otherwise the specified kernel and ramdisk are used, or an
autodetected kernel is used if nothing is specified and autodetection is
possible. PV_args is appended to the kernel command line, no matter which
mechanism is used for finding the kernel.
If PV_bootloader is empty but PV_kernel is specified, then the kernel and
ramdisk values will be treated as paths within the control domain. If both
PV_bootloader and PV_kernel are empty, then the behaviour is as if
PV_bootloader were specified as “pygrub”.
When using HVM booting, HVM_boot_policy and HVM_boot_params specify the boot
handling. Only one policy is currently defined, “BIOS order”. In this case,
HVM_boot_params should contain one key-value pair “order” = “N” where N is the
string that will be passed to QEMU.
Optionally HVM_boot_params can contain another key-value pair “firmware”
with values “bios” or “uefi” (default is “bios” if absent).
By default Secure Boot is not enabled, it can be enabled when “uefi” is enabled
by setting VM.platform["secureboot"] to true.
XenCenter
XenCenter uses some conventions on top of the XenAPI:
Internationalization for SR names
The SRs created at install time now have an other_config key indicating how their names may be internationalized.
other_config["i18n-key"] may be one of
local-hotplug-cd
local-hotplug-disk
local-storage
xenserver-tools
Additionally, other_config["i18n-original-value-<field name>"] gives the value of that field when the SR was created. If XenCenter sees a record where SR.name_label equals other_config["i18n-original-value-name_label"] (that is, the record has not changed since it was created during XenServer installation), then internationalization will be applied. In other words, XenCenter will disregard the current contents of that field, and instead use a value appropriate to the user’s own language.
If you change SR.name_label for your own purpose, then it no longer is the same as other_config["i18n-original-value-name_label"]. Therefore, XenCenter does not apply internationalization, and instead preserves your given name.
Hiding objects from XenCenter
Networks, PIFs, and VMs can be hidden from XenCenter by adding the key HideFromXenCenter=true to the other_config parameter for the object. This capability is intended for ISVs who know what they are doing, not general use by everyday users. For example, you might want to hide certain VMs because they are cloned VMs that shouldn’t be used directly by general users in your environment.
In XenCenter, hidden Networks, PIFs, and VMs can be made visible, using the View menu.

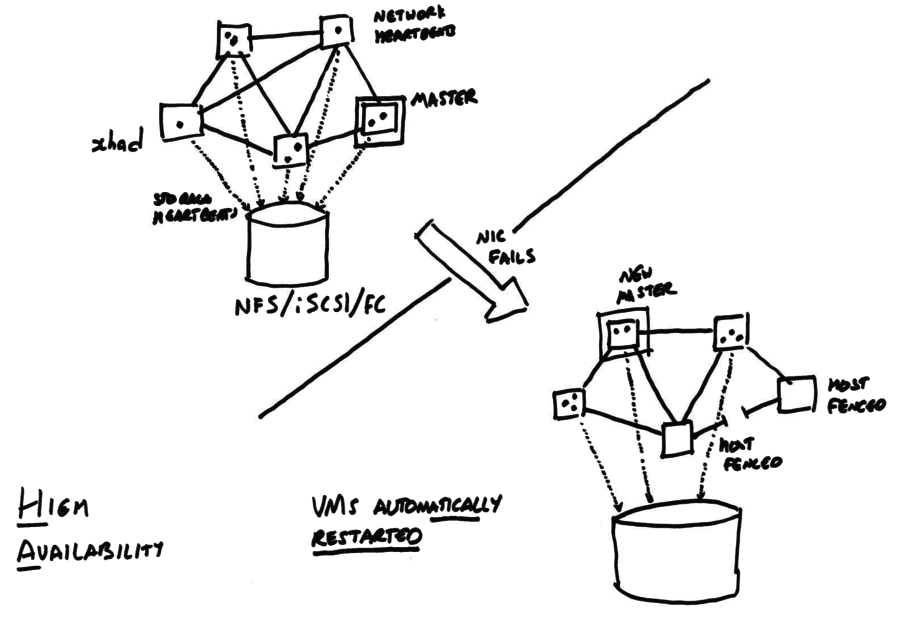


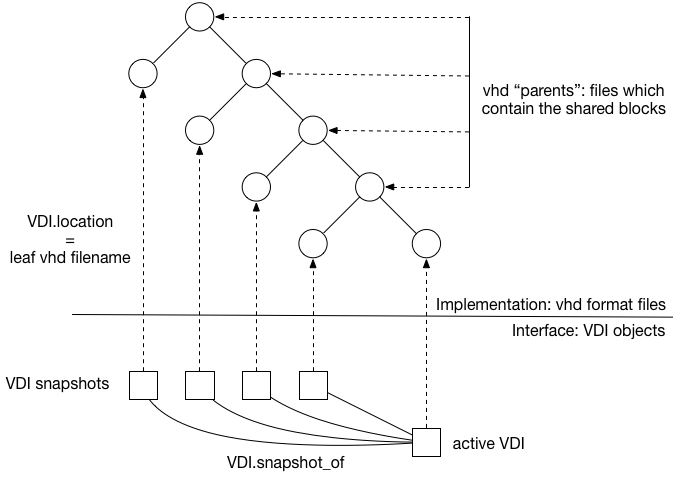
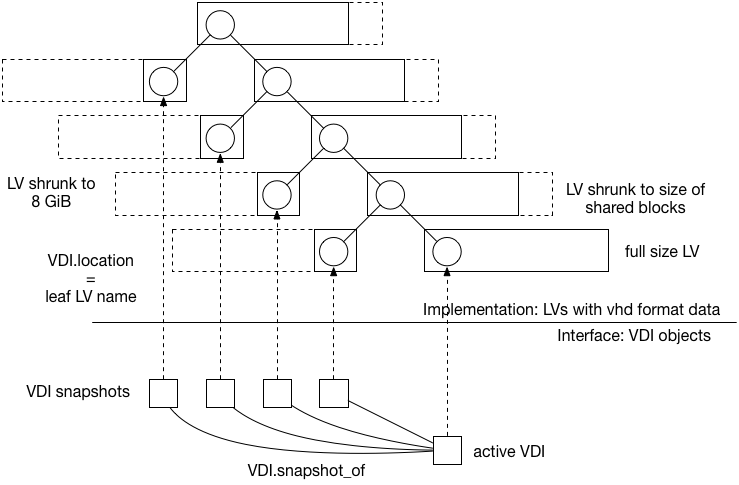
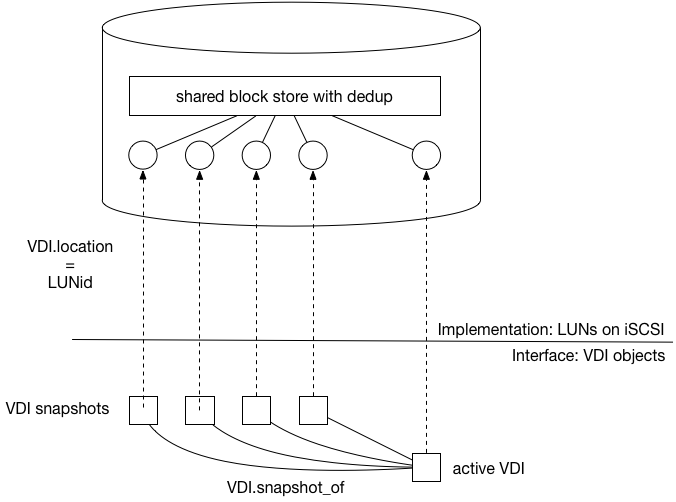
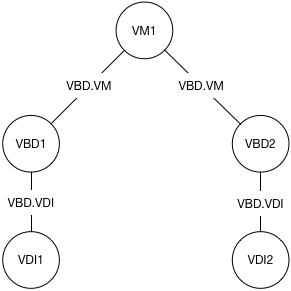
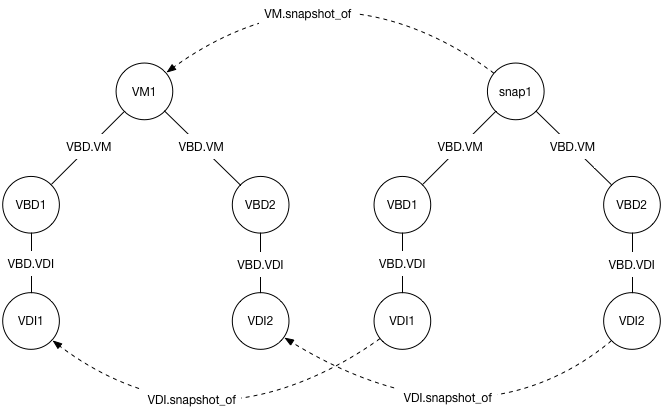
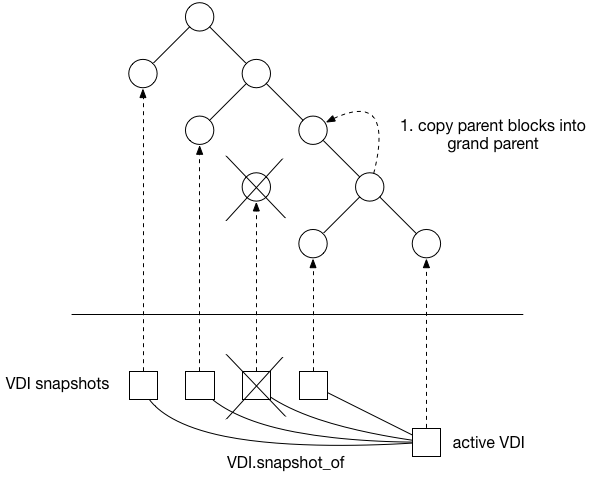
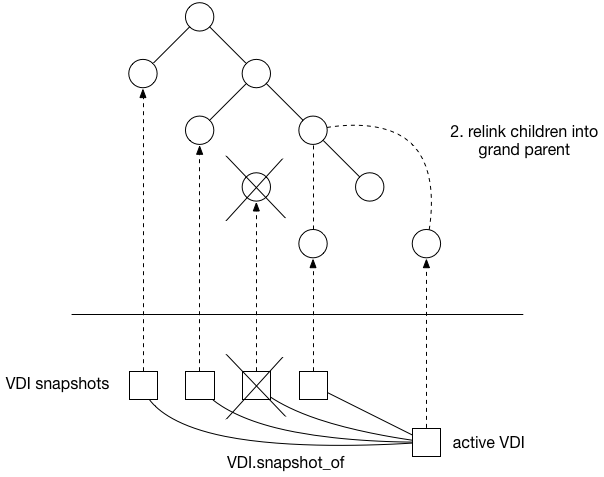
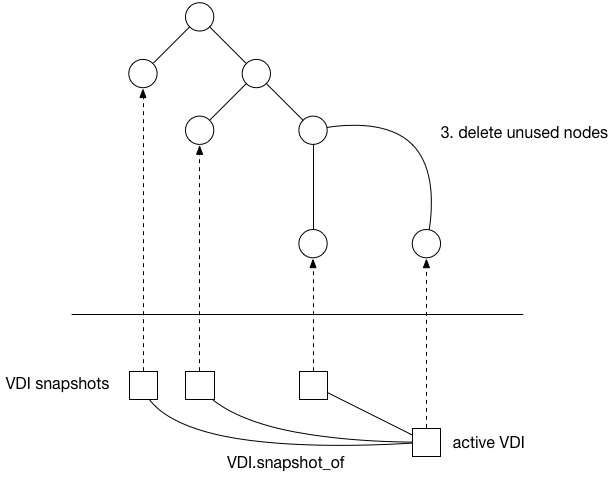

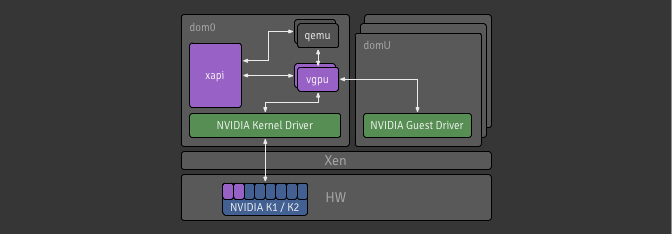
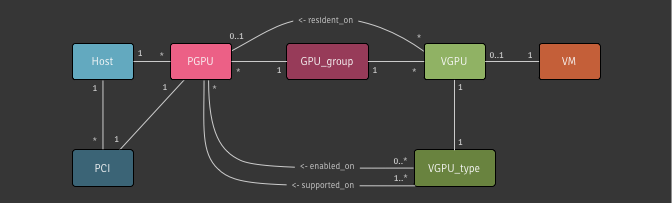
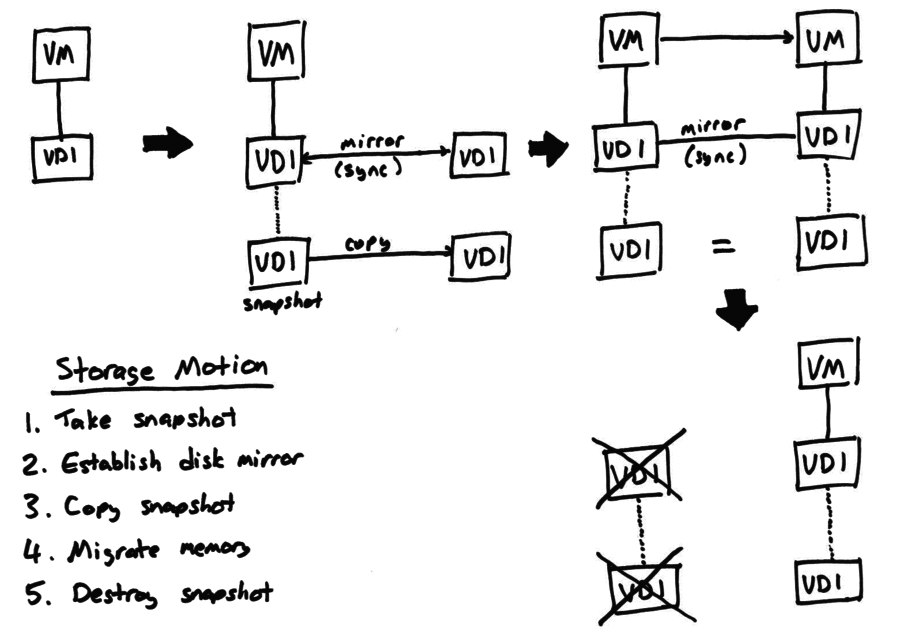
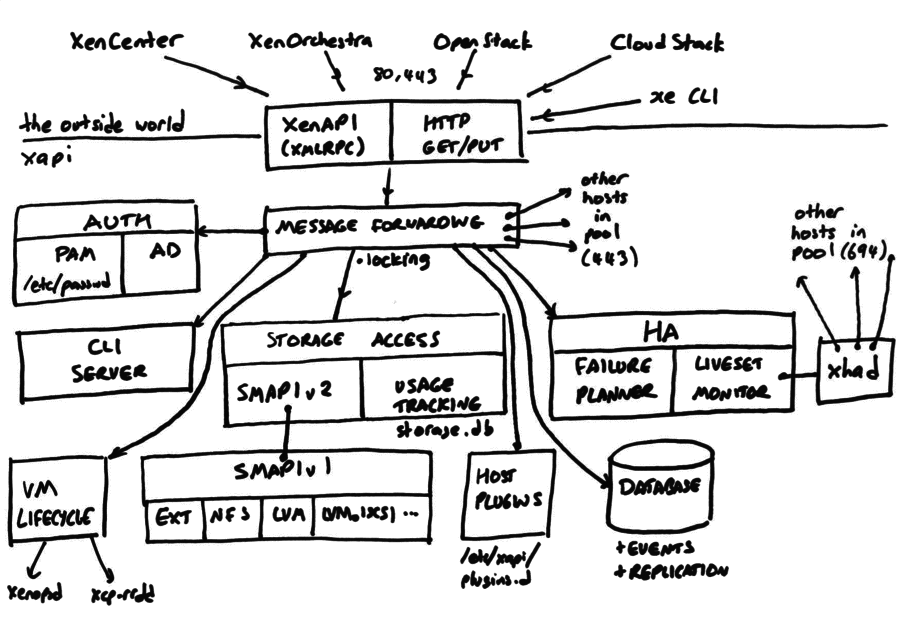


 is the amount corresponding to the ith
reservation.
is the amount corresponding to the ith
reservation.
 and subtracts this from its model of the host’s free memory, ensuring
that it doesn’t accidentally reallocate this memory for some other
purpose.
and subtracts this from its model of the host’s free memory, ensuring
that it doesn’t accidentally reallocate this memory for some other
purpose.

 For each domain, the ideal balloon target is now