Design Documents
Key: Revision
Proposed
Confirmed
Released (vA.B)
Unrecognised status
| Design document | |
|---|---|
| Revision | v1 |
| Status | proposed |
At XCP-ng, we are working on overcoming the 2TiB limitation for VM disks while preserving essential features such as snapshots, copy-on-write capabilities, and live migration.
To achieve this, we are introducing Qcow2 support in SMAPI and the blktap driver. With the alpha release, we can: - Create a VDI - Snapshot it - Export and import it to/from XVA - Perform full backups
However, we currently cannot export a VDI to a Qcow2 file, nor import one.
The purpose of this design proposal is to outline a solution for implementing VDI import/export in Qcow2 format.
The import and export of VHD-based VDIs currently rely on vhd-tool, which is responsible for streaming data between a VDI and a file. It supports both Raw and VHD formats, but not Qcow2.
There is an existing tool called qcow-tool originally packaged by MirageOS. It is no longer actively maintained, but it can produce Qcow files readable by QEMU.
Currently, qcow-tool does not support streaming, but we propose to add this capability. This means replicating the approach used in vhd-tool, where data is pushed to a socket.
We have contacted the original developer, David Scott, and there are no objections to us maintaining the tool if needed.
Therefore, the most appropriate way to enable Qcow2 import/export in XAPI is to
add streaming support to qcow-tool.
GET /export_raw_vdiPUT /import_raw_vdiExport_raw_vdi.handler and
Import_raw_vdi.handler.Qcow2,
as currently only Raw, Tar, and Vhd are supported.Importexport.Format module and a new
content type: application/x-qemu-disk.
See mime-types format.Vhd_tool_wrapper, which sets up parameters for vhd-tool.
We need to add a new wrapper for the Qcow2 format, which will instead use
qcow-tool, a tool that we will package (see the section below).qcow2) will be specified in the URI. For example:/import_raw_vdi?session_id=<OpaqueRef>&task_id=<OpaqueRef>&vdi=<OpaqueRef>&format=qcow2We need to package qcow-tool.
This new tool will be called from ocaml/xapi/qcow_tool_wrapper.ml, as
described in the previous section.
To export a VDI to a Qcow2 file, we need to add functionality similar to
Vhd_tool_wrapper.send, which calls vhd-tool stream.
vhd-tool, which
supports multiple destinations, we will only support Qcow2 files.vhd-tool stream/bin/vhd-tool stream \
--source-protocol none \
--source-format hybrid \
--source /dev/sm/backend/ff1b27b1-3c35-972e-76ec-a56fe9f25e36/87711319-2b05-41a3-8ee0-3b63a2fc7035:/dev/VG_XenStorage-ff1b27b1-3c35-972e-76ec-a56fe9f25e36/VHD-87711319-2b05-41a3-8ee0-3b63a2fc7035 \
--destination-protocol none \
--destination-format vhd \
--destination-fd 2585f988-7374-8131-5b66-77bbc239cbb2 \
--tar-filename-prefix \
--progress \
--machine \
--direct \
--path /dev/mapper:.Vhd_tool_wrapper.receive, which calls vhd-tool serve.vhd-tool serve/bin/vhd-tool serve \
--source-format raw \
--source-protocol none \
--source-fd 3451d7ed-9078-8b01-95bf-293d3bc53e7a \
--tar-filename-prefix \
--destination file:///dev/sm/backend/f939be89-5b9f-c7c7-e1e8-30c419ee5de6/4868ac1d-8321-4826-b058-952d37a29b82 \
--destination-format raw \
--progress \
--machine \
--direct \
--destination-size 180405760 \
--prezeroedqcow_tool_wrapper. The forkhelpers.ml manages the list of file descriptors
and we will mimic what the vhd tool wrapper does to link a UUID to socket.| Design document | |
|---|---|
| Revision | v3 |
| Status | proposed |
At XCP-ng, we are enhancing support for QCOW2 images in SMAPI. The primary motivation for this change is to overcome the 2TB size limitation imposed by the VHD format. By adding support for QCOW2, a Storage Repository (SR) will be able to host disks in VHD and/or QCOW2 formats, depending on the SR type. In the future, additional formats—such as VHDx—could also be supported.
We need a mechanism to expose to end users which image formats are supported by a given SR. The proposal is to extend the SM API object with a new field that clients (such as XenCenter, XenOrchestra, etc.) can use to determine the available formats.
To expose the available image formats to clients (e.g., XenCenter, XenOrchestra, etc.),
we propose adding a new field called supported_image_formats to the Storage Manager
(SM) module. This field will be included in the output of the SM.get_all_records call.
# xe sm-list params=allOutput of the command will look like (notice that CLI uses hyphens):
uuid ( RO)                         : c6ae9a43-fff6-e482-42a9-8c3f8c533e36
name-label ( RO)                   : Local EXT3 VHD
name-description ( RO)             : SR plugin representing disks as VHD files stored on a local EXT3 filesystem, created inside an LVM volume
type ( RO)                         : ext
vendor ( RO)                       : Citrix Systems Inc
copyright ( RO)                    : (C) 2008 Citrix Systems Inc
required-api-version ( RO)         : 1.0
capabilities ( RO) [DEPRECATED]     : SR_PROBE; SR_SUPPORTS_LOCAL_CACHING; SR_UPDATE; THIN_PROVISIONING; VDI_ACTIVATE; VDI_ATTACH; VDI_CLONE; VDI_CONFIG_CBT; VDI_CREATE; VDI_DEACTIVATE; VDI_DELETE; VDI_DETACH; VDI_GENERATE_CONFIG; VDI_MIRROR; VDI_READ_CACHING; VDI_RESET_ON_BOOT; VDI_RESIZE; VDI_SNAPSHOT; VDI_UPDATE
features (MRO)                    : SR_PROBE: 1; SR_SUPPORTS_LOCAL_CACHING: 1; SR_UPDATE: 1; THIN_PROVISIONING: 1; VDI_ACTIVATE: 1; VDI_ATTACH: 1; VDI_CLONE: 1; VDI_CONFIG_CBT: 1; VDI_CREATE: 1; VDI_DEACTIVATE: 1; VDI_DELETE: 1; VDI_DETACH: 1; VDI_GENERATE_CONFIG: 1; VDI_MIRROR: 1; VDI_READ_CACHING: 1; VDI_RESET_ON_BOOT: 2; VDI_RESIZE: 1; VDI_SNAPSHOT: 1; VDI_UPDATE: 1
configuration ( RO)               : device: local device path (required) (e.g. /dev/sda3)
driver-filename ( RO)              : /opt/xensource/sm/EXTSR
required-cluster-stack ( RO)       :
supported-image-formats ( RO) : vhd, raw, qcow2The supported_image_formats field will be populated by retrieving information
from the SMAPI drivers. Specifically, each driver will update its DRIVER_INFO
dictionary with a new key, supported_image_formats, which will contain a list
of strings representing the supported image formats
(for example: ["vhd", "raw", "qcow2"]). Although the formats are listed as a
list of strings, they are treated as a set-specifying the same format multiple
times has no effect.
supported_image_formatsIf a driver does not provide this information (as is currently the case with existing drivers), the default value will be an empty list. This signifies that the driver determines which format to use when creating VDI. During a migration, the destination driver will choose the format of the VDI if none is explicitly specified. This ensures backward compatibility with both current and future drivers.
If the supported image format is exposed to the client, then, when creating new VDI,
user can specify the desired format via the sm_config parameter image-format=qcow2 (or
any format that is supported). If no format is specified, the driver will use its
preferred default format. If the specified format is not supported, an error will be
generated indicating that the SR does not support it. Here is how it can be achieved
using the XE CLI:
# xe vdi-create \
    sr-uuid=cbe2851e-9f9b-f310-9bca-254c1cf3edd8 \
    name-label="A new VDI" \
    virtual-size=10240 \
sm-config:image-format=vhdWhen migrating a VDI, an API client may need to specify the desired image format if the destination SR supports multiple storage formats.
To support this, a new parameter, dest_img_format, is introduced to
VDI.pool_migrate. This field accepts a string specifying the desired format (e.g., qcow2),
ensuring that the VDI is migrated in the correct format. The new signature of
VDI.pool_migrate will be
VDI ref pool_migrate (session ref, VDI ref, SR ref, string, (string -> string) map).
If the specified format is not supported or cannot be used (e.g., due to size limitations),
an error will be generated. Validation will be performed as early as possible to prevent
disruptions during migration. These checks can be performed by examining the XAPI database
to determine whether the SR provided as the destination has a corresponding SM object with
the expected format. If this is not the case, a format not found error will be returned.
If no format is specified by the client, the destination driver will determine the appropriate
format.
# xe vdi-pool-migrate \
    uuid=<VDI_UUID> \
    sr-uuid=<SR_UUID> \
dest-img-format=qcow2A VDI migration can also occur during a VM migration. In this case, we need to
be able to specify the expected destination format as well. Unlike VDI.pool_migrate,
which applies to a single VDI, VM migration may involve multiple VDIs.
The current signature of VM.migrate_send is (session ref, VM ref, (string -> string) map, bool, (VDI ref -> SR ref) map, (VIF ref -> network ref) map, (string -> string) map, (VGPU ref -> GPU_group ref) map). Thus there is already a parameter that maps each source
VDI to its destination SR. We propose to add a new parameter that allows specifying the
desired destination format for a given source VDI: (VDI ref -> string). It is
similar to the VDI-to-SR mapping. We will update the XE cli to support this new format.
It would be image_format:<source-vdi-uuid>=<destination-image-format>:
# xe vm-migrate \
        host-uuid=<HOST_UUID> \
        remote-master=<IP> \
        remote-password=<PASS> \
        remote-username=<USER> \
        vdi:<VDI1_UUID>=<SR1_DEST_UUID> \
        vdi:<VDI2_UUID>=<SR2_DEST_UUID> \
        image-format:<VDI1_UUID>=vhd \
        image-format:<VDI2_UUID>=qcow2 \
        uuid=<VM_UUID>
The destination image format would be a string such as vhd, qcow2, or another
supported format. It is optional to specify a format. If omitted, the driver
managing the destination SR will determine the appropriate format.
As with VDI pool migration, if this parameter is not supported by the SM driver,
a format not found error will be returned. The validation must happen before
sending a creation message to the SM driver, ideally at the same time as checking
whether all VDIs can be migrated.
To be able to check the format, we will need to modify VM.assert_can_migrate and
add the mapping from VDI references to their image formats, as is done in VM.migrate_send.
It should have no impact on existing storage repositories that do not provide any information about the supported image format.
This change impacts the SM data model, and as such, the XAPI database version will be incremented. It also impacts the API.
supported_image_formats) is added to the SM records.VM.migrate_send: (VDI ref -> string) mapVM.assert_can_migrate: (VDI ref -> string) mapVDI.pool_migrate: stringxe CLI will now be able to query and display the supported image formats for a given SR.| Design document | |
|---|---|
| Revision | v3 |
| Status | proposed |
| Review | #144 |
| Revision history | |
| v1 | Initial version |
| v2 | Included some open questions under Xapi point 2 |
| v3 | Added new error, task, and assumptions |
When hosts use an aggregated local storage SR, then disks are going to be mirrored to several different hosts in the pool (RAID). This ensures that if a host goes down (e.g. due to a reboot after installing a hotfix or upgrade, or when “fenced” by the HA feature), all disk contents in the SR are still accessible. This also means that if all disks are mirrored to just two hosts (worst-case scenario), just one host may be down at any point in time to keep the SR fully available.
When a node comes back up after a reboot, it will resynchronise all its disks with the related mirrors on the other hosts in the pool. This syncing takes some time, and only after this is done, we may consider the host “up” again, and allow another host to be shut down.
Therefore, when installing a hotfix to a pool that uses aggregated local storage, or doing a rolling pool upgrade, we need to make sure that we do hosts one-by-one, and we wait for the storage syncing to finish before doing the next.
This design aims to provide guidance and protection around this by blocking hosts to be shut down or rebooted from the XenAPI except when safe, and setting the host.allowed_operations field accordingly.
If an aggregated local storage SR is in use, and one of the hosts is rebooting or down (for whatever reason), or resynchronising its storage, the operations reboot and shutdown will be removed from the host.allowed_operations field of all hosts in the pool that have a PBD for the SR.
This is a conservative approach in that assumes that this kind of SR tolerates only one node “failure”, and assumes no knowledge about how the SR distributes its mirrors. We may refine this in future, in order to allow some hosts to be down simultaneously.
The presence of the reboot operation in host.allowed_operations indicates whether the host.reboot XenAPI call is allowed or not (similarly for shutdown and host.shutdown). It will not, of course, prevent anyone from rebooting a host from the dom0 console or power switch.
Clients, such as XenCenter, can use host.allowed_operations, when applying an update to a pool, to guide them when it is safe to update and reboot the next host in the sequence.
In case host.reboot or host.shutdown is called while the storage is busy resyncing mirrors, the call will fail with a new error MIRROR_REBUILD_IN_PROGRESS.
Xapi needs to be able to:
Task for it (in the DB). This task can be used to track progress, if available.host.allowed_operations for all hosts in the pool according to the rules described above. This comes down to updating the function valid_operations in xapi_host_helpers.ml, and will need to use a combination of the functionality from the two points above, plus and indication of host liveness from host_metrics.live.host_metrics.live is updated to detect pool slaves going up and down (probably at least in Db_gc.check_host_liveness and Xapi_ha).host.reboot or host.shutdown call is executed: Message_forwarding.Host.{reboot,shutdown,with_host_operation}.All of the above runs on the pool master (= SR master) only.
The above will be safe if the storage cluster is equal to the XenServer pool. In general, however, it may be desirable to have a storage cluster that is larger than the pool, have multiple XS pools on a single cluster, or even share the cluster with other kinds of nodes.
To ensure that the storage is “safe” in these scenarios, xapi needs to be able to ask the storage backend:
If the cluster is equal to the pool, then xapi can do point 2 without asking the storage backend, which will simplify things. For the moment, we assume that the storage cluster is equal to the XS pool, to avoid making things too complicated (while still need to keep in mind that we may change this in future).
| Design document | |
|---|---|
| Revision | v1 |
| Status | confirmed |
We want to make debugging easier by recording exception backtraces which are
We therefore need
OCaml has fast exceptions which can be used for both
To keep the exceptions fast, exceptions and backtraces are decoupled: there is a single active backtrace per-thread at any one time. If you have caught an exception and then throw another exception, the backtrace buffer will be reinitialised, destroying your previous records. For example consider a ‘finally’ function:
let finally f cleanup =
  try
    let result = f () in
    cleanup ();
    result
  with e ->
    cleanup ();
    raise e (* <-- backtrace starts here now *)
This function performs some action (i.e. f ()) and guarantees to
perform some cleanup action (cleanup ()) whether or not an exception
is thrown. This is a common pattern to ensure resources are freed (e.g.
closing a socket or file descriptor). Unfortunately the raise e in
the exception handler loses the backtrace context: when the exception
gets to the toplevel, Printexc.get_backtrace () will point at the
finally rather than the real cause of the error.
We will use a variant of the solution proposed by
Jacques-Henri Jourdan
where we will record backtraces when we catch exceptions, before the
buffer is reinitialised. Our finally function will now look like this:
let finally f cleanup =
  try
    let result = f () in
    cleanup ();
    result
  with e ->
    Backtrace.is_important e;
    cleanup ();
    raise e
The function Backtrace.is_important e associates the exception e
with the current backtrace before it gets deleted.
Xapi always has high-level exception handlers or other wrappers around all the
threads it spawns. In particular Xapi tries really hard to associate threads
with active tasks, so it can prefix all log lines with a task id. This helps
admins see the related log lines even when there is lots of concurrent activity.
Xapi also tries very hard to label other threads with names for the same reason
(e.g. db_gc). Every thread should end up being wrapped in with_thread_named
which allows us to catch exceptions and log stacktraces from Backtrace.get
on the way out.
Making nice backtraces requires us to think when we write our exception raising and handling code. In particular:
Backtrace.is_important e with the exception to capture the backtrace first.Not_found becoming a XenAPI
INTERNAL_ERROR) then you must use Backtrace.reraise <old> <new> to
ensure the backtrace is preserved.Debug.log_backtrace e
if and only if you reasonably expect the resulting backtrace to be helpful
and not spammy.Debug.with_thread_named will do this for you.Python exceptions behave similarly to the OCaml ones: if you raise a new exception while handling an exception, the backtrace buffer is overwritten. Therefore the same considerations apply.
The function sys.exc_info() can be used to capture the traceback associated with the last exception. We must guarantee to call this before constructing another exception. In particular, this does not work:
raise MyException(sys.exc_info())Instead you must capture the traceback first:
  exc_info = sys.exc_info()
raise MyException(exc_info)We need to be able to take an exception thrown from python code, gather the backtrace, transmit it to an OCaml program (e.g. xenopsd) and glue it onto the end of the OCaml backtrace. We will use a simple json marshalling format for the raw backtrace data consisting of
(Note we don’t use the more natural list of pairs as this confuses the “rpclib” code generating library)
In python:
    results = {
      "error": str(s[1]),
      "files": files,
      "lines": lines,
    }
    print json.dumps(results)
In OCaml:
  type error = {
    error: string;
    files: string list;
    lines: int list;
  } with rpc
print_string (Jsonrpc.to_string (rpc_of_error ...))Backtraces will be written to syslog as usual. However it will also be possible to retrieve the information via the CLI to allow diagnostic tools to be written more easily.
We add a global CLI argument “–trace” which requests the backtrace be printed, if one is available:
# xe vm-start vm=hvm --trace
Error code: SR_BACKEND_FAILURE_202
Error parameters: , General backend error [opterr=exceptions must be old-style classes or derived from BaseException, not str],
Raised Server_error(SR_BACKEND_FAILURE_202, [ ; General backend error [opterr=exceptions must be old-style classes or derived from BaseException, not str];  ])
Backtrace:
0/50 EXT @ st30 Raised at file /opt/xensource/sm/SRCommand.py, line 110
1/50 EXT @ st30 Called from file /opt/xensource/sm/SRCommand.py, line 159
2/50 EXT @ st30 Called from file /opt/xensource/sm/SRCommand.py, line 263
3/50 EXT @ st30 Called from file /opt/xensource/sm/blktap2.py, line 1486
4/50 EXT @ st30 Called from file /opt/xensource/sm/blktap2.py, line 83
5/50 EXT @ st30 Called from file /opt/xensource/sm/blktap2.py, line 1519
6/50 EXT @ st30 Called from file /opt/xensource/sm/blktap2.py, line 1567
7/50 EXT @ st30 Called from file /opt/xensource/sm/blktap2.py, line 1065
8/50 EXT @ st30 Called from file /opt/xensource/sm/EXTSR.py, line 221
9/50 xenopsd-xc @ st30 Raised by primitive operation at file "lib/storage.ml", line 32, characters 3-26
10/50 xenopsd-xc @ st30 Called from file "lib/task_server.ml", line 176, characters 15-19
11/50 xenopsd-xc @ st30 Raised at file "lib/task_server.ml", line 184, characters 8-9
12/50 xenopsd-xc @ st30 Called from file "lib/storage.ml", line 57, characters 1-156
13/50 xenopsd-xc @ st30 Called from file "xc/xenops_server_xen.ml", line 254, characters 15-63
14/50 xenopsd-xc @ st30 Called from file "xc/xenops_server_xen.ml", line 1643, characters 15-76
15/50 xenopsd-xc @ st30 Called from file "lib/xenctrl.ml", line 127, characters 13-17
16/50 xenopsd-xc @ st30 Re-raised at file "lib/xenctrl.ml", line 127, characters 56-59
17/50 xenopsd-xc @ st30 Called from file "lib/xenops_server.ml", line 937, characters 3-54
18/50 xenopsd-xc @ st30 Called from file "lib/xenops_server.ml", line 1103, characters 4-71
19/50 xenopsd-xc @ st30 Called from file "list.ml", line 84, characters 24-34
20/50 xenopsd-xc @ st30 Called from file "lib/xenops_server.ml", line 1098, characters 2-367
21/50 xenopsd-xc @ st30 Called from file "lib/xenops_server.ml", line 1203, characters 3-46
22/50 xenopsd-xc @ st30 Called from file "lib/xenops_server.ml", line 1441, characters 3-9
23/50 xenopsd-xc @ st30 Raised at file "lib/xenops_server.ml", line 1452, characters 9-10
24/50 xenopsd-xc @ st30 Called from file "lib/xenops_server.ml", line 1458, characters 48-60
25/50 xenopsd-xc @ st30 Called from file "lib/task_server.ml", line 151, characters 15-26
26/50 xapi @ st30 Raised at file "xapi_xenops.ml", line 1719, characters 11-14
27/50 xapi @ st30 Called from file "lib/pervasiveext.ml", line 22, characters 3-9
28/50 xapi @ st30 Raised at file "xapi_xenops.ml", line 2005, characters 13-14
29/50 xapi @ st30 Called from file "lib/pervasiveext.ml", line 22, characters 3-9
30/50 xapi @ st30 Raised at file "xapi_xenops.ml", line 1785, characters 15-16
31/50 xapi @ st30 Called from file "message_forwarding.ml", line 233, characters 25-44
32/50 xapi @ st30 Called from file "message_forwarding.ml", line 915, characters 15-67
33/50 xapi @ st30 Called from file "lib/pervasiveext.ml", line 22, characters 3-9
34/50 xapi @ st30 Raised at file "lib/pervasiveext.ml", line 26, characters 9-12
35/50 xapi @ st30 Called from file "message_forwarding.ml", line 1205, characters 21-199
36/50 xapi @ st30 Called from file "lib/pervasiveext.ml", line 22, characters 3-9
37/50 xapi @ st30 Raised at file "lib/pervasiveext.ml", line 26, characters 9-12
38/50 xapi @ st30 Called from file "lib/pervasiveext.ml", line 22, characters 3-9
9/50 xapi @ st30 Raised at file "rbac.ml", line 236, characters 10-15
40/50 xapi @ st30 Called from file "server_helpers.ml", line 75, characters 11-41
41/50 xapi @ st30 Raised at file "cli_util.ml", line 78, characters 9-12
42/50 xapi @ st30 Called from file "lib/pervasiveext.ml", line 22, characters 3-9
43/50 xapi @ st30 Raised at file "lib/pervasiveext.ml", line 26, characters 9-12
44/50 xapi @ st30 Called from file "cli_operations.ml", line 1889, characters 2-6
45/50 xapi @ st30 Re-raised at file "cli_operations.ml", line 1898, characters 10-11
46/50 xapi @ st30 Called from file "cli_operations.ml", line 1821, characters 14-18
47/50 xapi @ st30 Called from file "cli_operations.ml", line 2109, characters 7-526
48/50 xapi @ st30 Called from file "xapi_cli.ml", line 113, characters 18-56
49/50 xapi @ st30 Called from file "lib/pervasiveext.ml", line 22, characters 3-9
One can automatically set “–trace” for a whole shell session as follows:
export XE_EXTRA_ARGS="--trace"We already store error information in the XenAPI “Task” object and so we can store backtraces at the same time. We shall add a field “backtrace” which will have type “string” but which will contain s-expression encoded backtrace data. Clients should not attempt to parse this string: its contents may change in future. The reason it is different from the json mentioned before is that it also contains host and process information supplied by Xapi, and may be extended in future to contain other diagnostic information.
We already store error information in the xenopsd API “Task” objects, we can extend these to store the backtrace in an additional field (“backtrace”). This field will have type “string” but will contain s-expression encoded backtrace data.
Errors in SMAPIv1 are returned as XMLRPC “Faults” containing a code and
a status line. Xapi transforms these into XenAPI exceptions usually of the
form SR_BACKEND_FAILURE_<code>. We can extend the SM backends to use the
XenAPI exception type directly: i.e. to marshal exceptions as dictionaries:
  results = {
    "Status": "Failure",
    "ErrorDescription": [ code, param1, ..., paramN ]
  }
We can then define a new backtrace-carrying error:
SR_BACKEND_FAILURE_WITH_BACKTRACEwhich is internally transformed into SR_BACKEND_FAILURE_<code> and
the backtrace is appended to the current Task backtrace. From the client’s
point of view the final exception should look the same, but Xapi will have
a chance to see and log the whole backtrace.
As a side-effect, it is possible for SM plugins to throw XenAPI errors directly, without interpretation by Xapi.
| Design document | |
|---|---|
| Revision | v2 |
| Status | confirmed |
XenAPI allows users to rollback the state of a VM to a previous state, which is
stored in a snapshot, using the call VM.revert. Because there is no
VDI.revert call, VM.revert uses VDI.clone on the snapshot to duplicate
the contents of that disk and then use the new clone as the storage for the VM.
Because VDI.clone creates new VDI refs and uuids, some problematic
behaviours arise:
VDI.snapshot_of. This means
that the database has to be combed through to change these references.
Because the database doesn’t support transactions this operation is not atomic
and can produce inconsistent database states.Additionally, some filesystems support snapshots natively, doing the clone procedure is much costlier than allowing the filesystem to do the revert.
We will fix these problems by:
VDI_REVERT in SM interface (xapi_smint). This
allows backends to advertise that they support the new functionalityVDI.revert in storage_interface, which is
gated by the feature VDI_REVERTVDI.revert to xapi_vdi which will call the storage operation if the
backend advertises it, and fallback to the previous method that uses
VDI.clone if it doesn’t advertise it, or issues are detected at runtime
that prevent itVM.revert to use VDI.revertvdi_revert for common storage types, including File and LVM-based
SRsVM.revert does not regressThe code that reverts the state of storage is located in update_vifs_vbds_vgpus_and_vusbs. The steps it does is:
snapshot_of; as well as the suspend VDI.snapshot_of references to the deleted VDIs
and replaces them with the referenced of the newly cloned snapshots.The function VDI.revert will be added, with arguments:
snapshot: Ref(VDI): the snapshot to which we want to revertdriver_params: Map(String,String): optional extra parametersRef(VDI) reference to the new VDI with the reverted contentsThe function will extract the reference of VDI whose contents need to be
replaced. This is the snapshot’s snapshot_of field, then it will call the
storage function function VDI.revert to have its contents replaced with the
snapshot’s. The VDI object will not be modified, and the reference returned is
the VDI’s original reference.
If anything impedes the successful finish of an in-place revert, like the SM
backend does not advertising the feature VDI_REVERT, not implement the
feature, or the snapshot_of reference is invalid; an exception will be
raised.
The function VDI.revert is added, with the following arguments:
dbg: the task identifier, useful for tracingsr: SR where the new VDI must be createdsnapshot_info: metadata of the snapshot, the contents of which must be
made available in the VDI indicated by the snapshot_of fieldThe function vdi_revert is defined with the following arguments:
sr_uuid: the UUID of the SR containing both the VDI and the snapshotvdi_uuid: the UUID of the snapshot whose contents must be duplicatedtarget_uuid: the UUID of the target whose contents must be replacedThe function will replace the contents of the target_uuid VDI with the
contents of the vdi_uuid VDI without changing the identify of the target
(i.e. name-label, uuid and location are guaranteed to remain the same).
The vdi_uuid is preserved by this operation. The operation is obvoiusly
idempotent.
In an analogous way to SMAPIv1, the function Volume.revert is defined with the
following arguments:
dbg: the task identifier, useful for tracingsr: the UUID of the SR containing both the VDI and the snapshotsnapshot: the UUID of the snapshot whose contents must be duplicatedvdi: the UUID of the VDI whose contents must be replacedVDI_REVERT so backends can advertise itVDI.revert in the VM.revert after the VDIs have been destroyed, and
before the snapshot’s VDIs have been cloned. If any of the reverts fail
because a Not_implemented exception is thrown, or the snapshot_of
contains an invalid reference, add the affected VDIs to the list to be cloned
and recovered, using the existing methodxe vdi-revert CLI commandWe will modify
vdi_revert function which throws
a ’not implemented’ exceptionVDI.revert using a variant of the existing
snapshot/clone machineryVDI_REVERT capabilityVDI.revert using a variant of the existing
snapshot/clone machineryVDI_REVERT capabilityPrototype code exists here:
| Design document | |
|---|---|
| Revision | v1 |
| Status | released (6.0) |
This document describes design details for the PR-1006 requirements.
Steps for a user to create a bond:
Network.createBond.create with a ref to this Network, a list of refs of
slave PIFs, and a MAC address to use.PIF.reconfigure_ip to configure the bond master.Host.management_reconfigure if one of the slaves is the
management interface. This command will call interface-reconfigure
to bring up the master and bring down the slave PIFs, thereby
activating the bond. Otherwise, call PIF.plug to activate the
bond.Bond.create XenAPI call:
Remove duplicates in the list of slaves.
Validate the following:
Create the master PIF object.
bondx, with x the smallest
unused non-negative integer.Create the Bond object, specifying a reference to the master. The
value of the PIF.master_of field on the master is dynamically
computed on request.
Set the PIF.bond_slave_of fields of the slaves. The value of the
Bond.slaves field is dynamically computed on request.
Steps for a user to create a bond:
Network.createBond.create with a ref to this Network, a list of refs of
slave PIFs, and a MAC address to use.In the following, for a host h, a VIF-to-move is a VIF associated with a VM that is either
The Bond.create XenAPI call is updated to do the following:
Remove duplicates in the list of slaves.
Validate the following, and raise an exception if any of these check fails:
Try unplugging all currently attached VIFs of the set of VIFs that need to be moved. Roll back and raise an exception of one of the VIFs cannot be unplugged (e.g. due to the absence of PV drivers in the VM).
Determine the primary slave: the management PIF (if among the slaves), or the first slave with IP configuration.
Create the master PIF object.
bondx, with x the smallest
unused non-negative integer.PIF.disallow_unplug = true, this will
be copied to the master.Create the Bond object, specifying a reference to the master. The
value of the PIF.master_of field on the master is dynamically
computed on request. Also a reference to the primary slave is
written to Bond.primary_slave on the new Bond object.
Set the PIF.bond_slave_of fields of the slaves. The value of the
Bond.slaves field is dynamically computed on request.
Move VLANs, plus the VIFs-to-move on them, to the master.
Move Tunnels to the master. The tunnel Networks move up with the tunnels. As tunnel keys are different for all tunnel networks, there are no complications as in the VLAN case.
Move VIFs-to-move on the slaves to the master.
If one of the slaves is the current management interface, move management to the master; the master will automatically be plugged. If none of the slaves is the management interface, plug the master if any of the slaves was plugged. In both cases, the slaves will automatically be unplugged.
On all slaves, reset the IP configuration and set disallow_unplug
to false.
Note: “moving” a VIF, VLAN or tunnel means “re-creating somewhere else, and destroying the old one”.
Steps for a user to destroy a bond:
PIF.reconfigure_ip and Host.management_reconfigure.
Otherwise, no PIF.unplug needs to be called on the bond master, as
Bond.destroy does this automatically.Bond.destroy with a ref to the Bond object.PIF.plug
(this is does not happen automatically).Bond.destroy XenAPI call:
Validate the following constraints:
Bring down the master PIF and clean up the underlying network devices.
Remove the Bond and master PIF objects.
Steps for a user to destroy a bond:
Bond.destroy with a ref to the Bond object.Bond.destroy XenAPI call is updated to do the following:
PIF.disallow_unplug = true, this will be copied
to the primary slave.When a pool slave starts up, bonds and VLANs on the pool master are replicated on the slave:
The behaviour of the xe CLI commands bond-create, bond-destroy,
pif-plug, and host-management-reconfigure is changed to match their
associated XenAPI calls.
XenCenter already automatically moves the management interface when a
bond is created or destroyed. This is no longer necessary, as the
Bond.create/destroy calls already do this. XenCenter only needs to
copy any PIF.other_config keys that is needs between primary slave and
bond master.
| Design document | |
|---|---|
| Revision | v2 |
| Status | proposed |
We would like to add optional coverage profiling to existing OCaml projects in the context of XenServer and XenAPI. This article presents how we do it.
Binaries instrumented for coverage profiling in the XenServer project need to run in an environment where several services act together as they provide operating-system-level services. This makes it a little harder than profiling code that can be profiled and executed in isolation.
To build binaries with coverage profiling, do:
./configure --enable-coverage
make
Binaries will log coverage data to /tmp/bisect*.out from which a
coverage report can be generated in coverage/:
bisect-ppx-report -I _build -html coverage /tmp/bisect*.out
The open-source BisectPPX instrumentation framework uses extension
points (PPX) in the OCaml compiler to instrument code during
compilation. Instrumented code for a binary is then compiled as usual
and logs during execution data to in-memory data structures. Before an
instrumented binary terminates, it writes the logged data to a file.
This data can then be analysed with the bisect-ppx-report tool, to
produce a summary of annotated code that highlights what part of a
codebase was executed.
BisectPPX has several desirable properties:
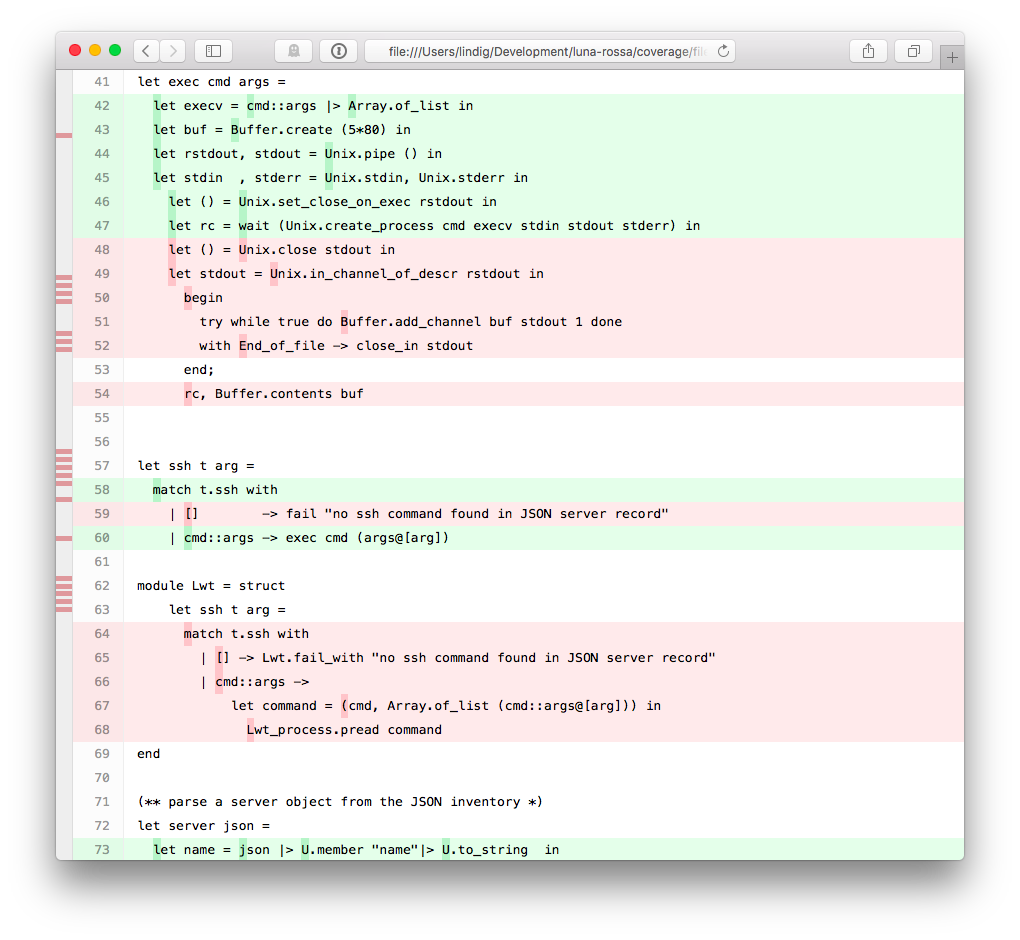
Red parts indicate code that wasn’t executed whereas green parts were. Hovering over a dark green spot reveals how often that point was executed.
The individual steps of instrumenting code with BisectPPX are greatly abstracted by OCamlfind (OCaml’s library manager) and OCamlbuild (OCaml’s compilation manager):
# write code
vim example.ml

# build it with instrumentation from bisect_ppx
ocamlbuild -use-ocamlfind -pkg bisect_ppx -pkg unix example.native

# execute it - generates files ./bisect*.out
./example.native

# generate report
bisect-ppx-report -I _build -html coverage bisect000*

# view coverage/index.html

Summary:
 - 'binding' points: 2/2 (100.00%)
 - 'sequence' points: 10/10 (100.00%)
 - 'match/function' points: 5/8 (62.50%)
 - total: 17/20 (85.00%)
The fourth step generates a HTML report in coverage/. All it takes is
to declare to OCamlbuild that a module depends on bisect_ppx and it
will be instrumented during compilation. Behind the scenes ocamlfind
makes sure that the compiler uses a preprocessing step that instruments
the code.
During execution the code instrumentation leads to the collection of
data. This code registers a function with at_exit that writes the data
to bisect*.out when exit is called. A binary can terminate without
calling exit and in that case the file would not be written. It is
therefore important to make sure that exit is called. If this does not
happen naturally, for example in the context of a daemon that is
terminated by receiving the TERM signal, a signal handler must be
installed:
let stop signal =
  printf "caught signal %a\n" Debug.Pp.signal signal;
  exit 0

Sys.set_signal Sys.sigterm (Sys.Signal_handle stop)
By default coverage data can only be dumped at exit, which is inconvenient if you have a test-suite that needs to reuse a long running daemon, and starting/stopping it each time is not feasible.
In such cases we need an API to dump coverage at runtime, which is provided by bisect_ppx >= 1.3.0.
However each daemon will need to set up a way to listen to an event that triggers this coverage dump,
furthermore it is desirable to make runtime coverage dumping compiled in conditionally to be absolutely sure
that production builds do not use coverage preprocessed code.
Hence instead of duplicating all this build logic in each daemon (xapi, xenopsd, etc.) provide this
functionality in a common library xapi-idl that:
org.xen.xapi.coverage.<name> message queue for runtime coverage dump commands:dump <Number> will cause runtime coverage to be dumped to a file
named bisect-<name>-<random>.<Number>.outreset will cause the runtime coverage counters to be resetDaemons that use Xcp_service.configure2 (e.g. xenopsd) will benefit from this runtime trigger automatically,
provided they are themselves preprocessed with bisect_ppx.
Since we are interested in collecting coverage data for system-wide test-suite runs we need a way to trigger
dumping of coverage data centrally, and a good candidate for that is xapi as the top-level daemon.
It will call Xcp_coverage.dispatcher_init (), which listens on org.xen.xapi.coverage.dispatch and
dispatches the coverage dump command to all message queues under org.xen.xapi.coverage.* except itself.
On production, and regular builds all of this is a no-op, ensured by using separate lib/coverage/disabled.ml and lib/coverage/enabled.ml
files which implement the same interface, and choosing which one to use at build time.
By default, BisectPPX writes data in a binary’s current working
directory as bisectXXXX.out. It doesn’t overwrite existing files and
files from several runs can be combined during analysis. However, this
name and the location can be inconvenient when multiple programs share a
directory.
BisectPPX’s default can be overridden with the BISECT_FILE
environment variable. This can happen on the command line:
BISECT_FILE=/tmp/example ./example.native
In the context of XenServer we could do this in startup scripts. However, we added a bit of code
val Coverage.init: string -> unit
that sets the environment variable from inside the program. The files
are written to a temporary directory (respecting $TMP or using /tmp)
and uses the string-typed argument to include it in the name. To be
effective, this function must be called before the programs exits. For
clarity it is called at the begin of program execution.
While instrumentation is easy on the level of a small file or project it
is challenging in a bigger project. We decided to focus on projects that
are build with the Oasis build and packaging manager. These have a
well-defined structure and compilation process that is controlled by a
central _oasis file. This file describes for each library and binary
its dependencies at a package level. From this, Oasis generates a
configure script and compilation rules for the OCamlbuild system.
Oasis is designed that the generated files can be shipped without
requiring Oasis itself being available.
Goals for instrumentation are:
_oasis filesIn the ideal case, we could introduce a configuration switch
./configure --enable-coverage that would prepare compilation for
coverage instrumentation. While Oasis supports the creation of such
switches, they cannot be used to control build dependencies like
compiling a file with or without package bisec_ppx. We have chosen a
different method:
A Makefile target coverage augments the _tags file to include the
rules in file _tags.coverage that cause files to be instrumented:
make coverage # prepare
make          # build
leads to the execution of this code during preparation:
coverage: _tags _tags.coverage
  test ! -f _tags.orig && mv _tags _tags.orig || true
  cat _tags.coverage _tags.orig > _tags
The file _tags.coverage contains two simple OCamlbuild rules that
could be tweaked to instrument only some files:
<**/*.ml{,i,y}>: pkg_bisect_ppx
<**/*.native>:   pkg_bisect_ppx
When make coverage is not called, these rules are not active and
hence, code is not instrumented for coverage. We believe that this
solution to control instrumentation meets the goals from above. In
particular, what files are instrumented and when is controlled by very
few lines of declarative code that lives in the main repository of a
project.
The crucial files in an Oasis-controlled project that is set up for coverage analysis are:
./_oasis                      - make "profiling" a build depdency
./_tags.coverage              - what files get instrumented
./profiling/coverage.ml       - support file, sets env var
./Makefile                    - target 'coverage'
The _oasis file bundles the files under profiling/ into an internal
library which executables then depend on:
	# Support files for profiling
	Library profiling
		CompiledObject:     best
		Path:               profiling
		Install:            false
		Findlibname:        profiling
		Modules:            Coverage
		BuildDepends:

	Executable set_domain_uuid
		CompiledObject:     best
		Path:               tools
		ByteOpt:            -warn-error +a-3
		NativeOpt:          -warn-error +a-3
		MainIs:             set_domain_uuid.ml
		Install:            false
		BuildDepends:
			xenctrl,
			uuidm,
			cmdliner,
			profiling			# <-- here
The Makefile target coverage primes the project for a profiling build:
	# make coverage - prepares for building with coverage analysis

	coverage: _tags _tags.coverage
		test ! -f _tags.orig && mv _tags _tags.orig || true
		cat _tags.coverage _tags.orig > _tags
| Design document | |
|---|---|
| Revision | v7 |
| Status | released (7.0) |
| Revision history | |
| v1 | Initial version |
| v2 | Add details about VM migration and import |
| v3 | Included and excluded use cases |
| v4 | Rolling Pool Upgrade use cases |
| v5 | Lots of changes to simplify the design |
| v6 | Use case refresh based on simplified design |
| v7 | RPU refresh based on simplified design |
The old XS 5.6-style Heterogeneous Pool feature that is based around hardware-level CPUID masking will be replaced by a safer and more flexible software-based levelling mechanism.
A VM can only be migrated safely from one host to another if both hosts offer the set of CPU features which the VM expects. If this is not the case, CPU features may appear or disappear as the VM is migrated, causing it to crash. The purpose of feature levelling is to hide features which the hosts do not have in common from the VM, so that it does not see any change in CPU capabilities when it is migrated.
Most pools start off with homogenous hardware, but over time it may become impossible to source new hosts with the same specifications as the ones already in the pool. The main use of feature levelling is to allow such newer, more capable hosts to be added to an existing pool while preserving the ability to migrate existing VMs to any host in the pool.
The CPU levelling feature aims to both:
To make migrations safe:
Note: Due to the limitations of the old Heterogeneous Pools feature, we are not able to guarantee the safety of VMs that are migrated to a Levelling-v2 host from an older host, during a rolling pool upgrade. This is because such VMs may be using CPU features that were not captured in the old feature sets, of which we are therefore unaware. However, migrations between the same two hosts, but before the upgrade, may have already been unsafe. The promise is that we will not make migrations more unsafe during a rolling pool upgrade.
To make VMs mobile:
A user wants to add a new host to an existing XenServer pool. The new host has all the features of the existing hosts, plus extra features which the existing hosts do not. The new host will be allowed to join the pool, but its extra features will be hidden from VMs that are started on the host or migrated to it. The join does not require any host reboots.
A user wants to add a new host to an existing XenServer pool. The new host does not have all the features of the existing ones. XenCenter warns the user that adding the host to the pool is possible, but it would lower the pool’s CPU feature level. The user accepts this and continues the join. The join does not require any host reboots. VMs that are started anywhere on the pool, from now on, will only see the features of the new host (the lowest common denominator), such that they are migratable to any host in the pool, including the new one. VMs that were running before the pool join will not be migratable to the new host, because these VMs may be using features that the new host does not have. However, after a reboot, such VMs will be fully mobile.
A user wants to add a new host to an existing XenServer pool. The new host does not have all the features of the existing ones, and at the same time, it has certain features that the pool does not have (the feature sets overlap). This is essentially a combination of the two use cases above, where the pool’s CPU feature level will be downgraded to the intersection of the feature sets of the pool and the new host. The join does not require any host reboots.
A user wants to upgrade or repair the hardware of a host in an existing XenServer pool. After upgrade the host has all the features it used to have, plus extra features which other hosts in the pool do not have. The extra features are masked out and the host resumes its place in the pool when it is booted up again.
A user wants to upgrade or repair the hardware of a host in an existing XenServer pool. After upgrade the host has fewer features than it used to have. When the host is booted up again, the pool CPU’s feature level will be automatically lowered, and the user will be alerted of this fact (through the usual alerting mechanism).
A user wants to remove a host from an existing XenServer pool. The host will be removed as normal after any VMs on it have been migrated away. The feature set offered by the pool will be automatically re-levelled upwards in case the host which was removed was the least capable in the pool, and additional features common to the remaining hosts will be unmasked.
A VM which was running on the pool before the upgrade is expected to continue to run afterwards. However, when the VM is migrated to an upgraded host, some of the CPU features it had been using might disappear, either because they are not offered by the host or because the new feature-levelling mechanism hides them. To have the best chance for such a VM to successfully migrate (see the note under “Principles for Migration”), it will be given a temporary VM-level feature set providing all of the destination’s CPU features that were unknown to XenServer before the upgrade. When the VM is rebooted it will inherit the pool-level feature set.
A VM which is started during the upgrade will be given the current pool-level feature set. The pool-level feature set may drop after the VM is started, as more hosts are upgraded and re-join the pool, however the VM is guaranteed to be able to migrate to any host which has already been upgraded. If the VM is started on the master, there is a risk that it may only be able to run on that host.
To allow the VMs with grandfathered-in flags to be migrated around in the pool, the intra pool VM migration pre-checks will compare the VM’s feature flags to the target host’s flags, not the pool flags. This will maximise the chance that a VM can be migrated somewhere in a heterogeneous pool, particularly in the case where only a few hosts in the pool do not have features which the VMs require.
To allow cross-pool migration, including to pool of a higher XenServer version, we will still check the VM’s requirements against the pool-level features of the target pool. This is to avoid the possibility that we migrate a VM to an ‘island’ in the other pool, from which it cannot be migrated any further.
host.cpu_info is a field of type (string -> string) map that contains information about the CPUs in a host. It contains the following keys: cpu_count, socket_count, vendor, speed, modelname, family, model, stepping, flags, features, features_after_reboot, physical_features and maskable.features_after_reboot, physical_features and maskable.features key will continue to hold the current CPU features that the host is able to use. In practise, these features will be available to Xen itself and dom0; guests may only see a subset. The current format is a string of four 32-bit words represented as four groups of 8 hexadecimal digits, separated by dashes. This will change to an arbitrary number of 32-bit words. Each bit at a particular position (starting from the left) still refers to a distinct CPU feature (1: feature is present; 0: feature is absent), and feature strings may be compared between hosts. The old format simply becomes a special (4 word) case of the new format, and bits in the same position may be compared between old and new feature strings.features_pv will be added, representing the subset of features that the host is able to offer to a PV guest.features_hvm will be added, representing the subset of features that the host is able to offer to an HVM guest.pool.cpu_info of type (string -> string) map (read only) will be added. It will contain:vendor: The common CPU vendor across all hosts in the pool.features_pv: The intersection of features_pv across all hosts in the pool, representing the feature set that a PV guest will see when started on the pool.features_hvm: The intersection of features_hvm across all hosts in the pool, representing the feature set that an HVM guest will see when started on the pool.cpu_count: the total number of CPU cores in the pool.socket_count: the total number of CPU sockets in the pool.pool.other_config:cpuid_feature_mask override key will no longer have any effect on pool join or VM migration.VM.last_boot_CPU_flags will be updated to the new format (see host.cpu_info:features). It will still contain the feature set that the VM was started with as well as the vendor (under the features and vendor keys respectively).pool.join currently requires that the CPU vendor and feature set (according to host.cpu_info:vendor and host.cpu_info:features) of the joining host are equal to those of the pool master. This requirement will be loosened to mandate only equality in CPU vendor:host.cpu_info:vendor equals pool.cpu_info:vendor.POOL_HOSTS_NOT_HOMOGENEOUS with reason argument "CPUs differ". This will remain the error that is raised if the pool join fails due to incompatible CPU vendors.pool.other_config:cpuid_feature_mask override key will no longer have any effect.host.set_cpu_features and host.reset_cpu_features will be removed: it is no longer to use the old method of CPU feature masking (CPU feature sets are controlled automatically by xapi). Calls will fail with MESSAGE_REMOVED.host.cpu_info:vendor = VM.last_boot_CPU_flags:vendor and host.cpu_info:features_{pv,hvm} ⊇ VM.last_boot_CPU_flags:features. A VM_INCOMPATIBLE_WITH_THIS_HOST error will be returned otherwise (as happens today).pool.cpu_info:vendor = VM.last_boot_CPU_flags:vendor and pool.cpu_info:features_{pv,hvm} ⊇ VM.last_boot_CPU_flags:featuresThe following changes to the xe CLI will be made:
xe host-cpu-info (as well as xe host-param-list and friends) will return the fields of host.cpu_info as described above.xe host-set-cpu-features and xe host-reset-cpu-features will be removed.xe host-get-cpu-features will still return the value of host.cpu_info:features for a given host.The old xc_get_boot_cpufeatures hypercall will be removed, and replaced by two new functions, which are available to xenopsd through the Xenctrl module:
external get_levelling_caps : handle -> int64 = "stub_xc_get_levelling_caps"

type featureset_index = Featureset_host | Featureset_pv | Featureset_hvm
external get_featureset : handle -> featureset_index -> int64 array = "stub_xc_get_featureset"
In particular, the get_featureset function will be used by xapi/xenopsd to ask Xen which are the widest sets of CPU features that it can offer to a VM (PV or HVM). I don’t think there is a use for get_levelling_caps yet.
Host.cpu_info, which contains all the fields that need to go into the host.cpu_info field in the xapi DB. The type already exists but is unused. Add the function HOST.get_cpu_info to obtain an instance of the type. Some code from xapi and the cpuid.ml from xen-api-libs can be reused.featureset (Vm.t.platformdata), which xenopsd will write to xenstore along with the other platform keys (no code change needed in xenopsd). Xenguest will pick this up when a domain is created, and will apply the CPUID policy to the domain. This has the effect of masking out features that the host may have, but which have a 0 in the feature set bitmap.xc/domain.ml.Create_misc.create_host_cpu function to use the new xenopsd call.pool.cpu_info.features_{pv,hvm}. Newly started VMs will inherit the new level; already running VMs will not be affected, but will not be able to migrate to this host.pool_cpu_features_downgraded.pool.cpu_info.features_{pv,hvm}) and set VM.last_boot_CPU_flags (cpuid_helpers.ml).platformdata (see above).VM.last_boot_CPU_flags of the VM to-migrate with host.cpu_info of the receiving host. Migration is only allowed if the CPU vendors and the same, and host.cpu_info:features ⊇ VM.last_boot_CPU_flags:features. The check can be overridden by setting the force argument to true.features_pv or features_hvm field.pool.cpu_info (features_pv or features_hvm depending on how the VM was booted) rather than host.cpu_info.VM.last_boot_CPU_flags will be maintained, and the new domain will be started with the same CPU feature set enabled, by writing the feature set string to platformdata (see above).VM.last_boot_CPU_flags will be extended with the extra bits in host.cpu_info:features_{pv,hvm}, i.e. the widest feature set that can possibly be granted to the VM (just in case the VM was using any of these features before the migration).xc_get_featureset hypercall). However, the CPU features that are switched off by the new implementation are features that a VM would not have been able to actually use. We therefore need a don’t-care feature set (similar to the old pool.other_config:cpuid_feature_mask key) with bits that we may ignore in migration checks, and switch off after the migration. This will be a xapi config file option.The VM.last_boot_CPU_flags field must be upgraded to the new format (only really needed for VMs that were suspended while exported; preserve_power_state=true), as described above.
Update pool join checks according to the rules above (see pool.join), i.e. remove the CPU features constraints.
pool.cpu_info) will be initialised when the pool master upgrades, and automatically adjusted if needed (downwards) when slaves are upgraded, by each upgraded host’s started sequence (as above under “Xapi startup”).VM.last_boot_CPU_flags fields of running and suspended VMs will be “upgraded” to the new format on demand, when a VM is migrated to or resume on an upgraded host, as described above.| Design document | |
|---|---|
| Revision | v1 |
| Status | proposed |
All hosts in a pool use the shared database by sending queries to the pool master. This creates
The reliability problem can be ameliorated by running with HA enabled, but this is not always possible.
Both problems can be addressed by observing that the database objects correspond to distinct physical objects where eventual consistency is perfectly ok. For example if host ‘A’ is running a VM and changes the VM’s name, it doesn’t matter if it takes a while before the change shows up on host ‘B’. If host ‘B’ changes its network configuration then it doesn’t matter how long it takes host ‘A’ to notice. We would still like the metadata to be replicated to cope with failure, but we can allow changes to be committed locally and synchronised later.
Note the one exception to this pattern: the current SM plugins use database fields to implement locks. This should be shifted to a special-purpose lock acquire/release API.
A git repository is a database of key=value pairs with branching history.
If we placed our host and VM metadata in git then we could commit
changes and pull and push them between replicas. The
Irmin library provides an easy programming
interface on top of git which we could link with the Xapi database layer.
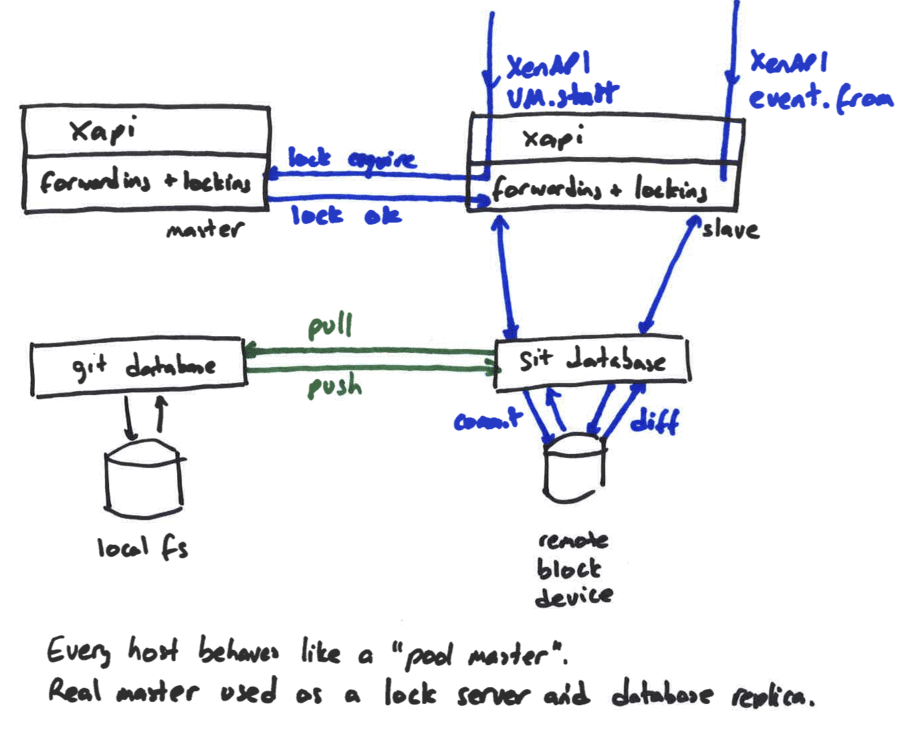
The diagram above shows two hosts: one a master and the other a regular host.
The XenAPI client has sent a request to the wrong host; normally this would
result in a HOST_IS_SLAVE error being sent to the client. In the new
world, the host is able to process the request, only contacting the master
if it is necessary to acquire a lock. Starting a VM would require a lock; but
rebooting or migrating an existing VM would not. Assuming the lock can
be acquired, then the operation is executed locally with all state updates
being made to a git topic branch.
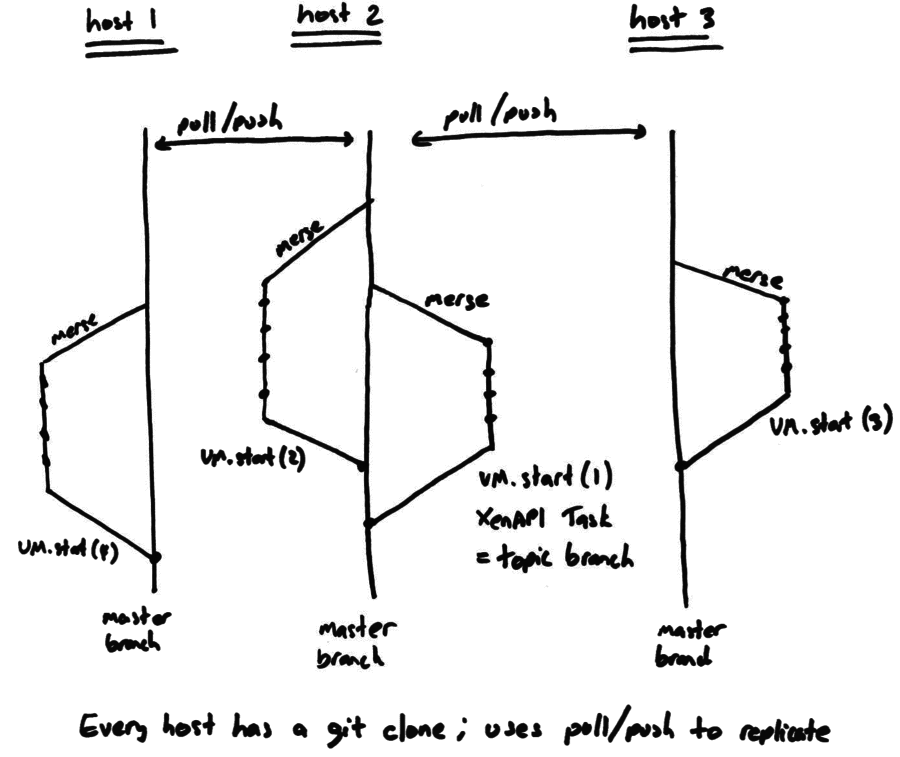
Roughly we would have 1 topic branch per pending XenAPI Task. Once the Task completes successfully, the topic branch (containing the new VM state) is merged back into master. Separately each host will pull and push updates between each other for replication.
We would avoid merge conflicts by construction; either
We will gain the following
We will lose the following
event.from calls to
the same host (although any host will do)A pull/push replicator: this would have to monitor the list
of hosts in the pool and distribute updates to them in some vaguely
efficient manner. Ideally we would avoid hassling the pool master and
use some more efficient topology: perhaps a tree?
A git diff to XenAPI event converter: whenever a host pulls
updates from another it needs to convert the diff into a set of touched
objects for any event.from to read. We could send the changeset hash
as the event.from token.
Irmin nested views: since Tasks can be nested (and git branches can be nested) we need to make sure that Irmin views can be nested.
We need to go through the xapi code and convert all mixtures of database access and XenAPI updates into pure database calls. With the previous system it was better to use a XenAPI to remote large chunks of database effects to the master than to perform them locally. It will now be better to run them all locally and merge them at the end. Additionally since a Task will have a local branch, it won’t be possible to see the state on a remote host without triggering an early merge (which would harm efficiency)
We need to create a first-class locking API to use instead of the
VDI.sm_config locks.
A basic prototype has been created:
$ opam pin xen-api-client git://github.com/djs55/xen-api-client#improvements
$ opam pin add xapi-database git://github.com/djs55/xapi-database
$ opam pin add xapi git://github.com/djs55/xen-api#schema-sexp
The xapi-database is clone of the existing Xapi database code
configured to run as a separate process. There is
code to convert from XML to git
and
an implementation of the Xapi remote database API
which uses the following layout:
$ git clone /xapi.db db
Cloning into 'db'...
done.

$ cd db; ls
xapi

$ ls xapi
console   host_metrics  PCI          pool     SR      user  VM
host      network       PIF          session  tables  VBD   VM_metrics
host_cpu  PBD           PIF_metrics  SM       task    VDI

$ ls xapi/pool
OpaqueRef:39adc911-0c32-9e13-91a8-43a25939110b

$ ls xapi/pool/OpaqueRef\:39adc911-0c32-9e13-91a8-43a25939110b/
crash_dump_SR                 __mtime           suspend_image_SR
__ctime                       name_description  uuid
default_SR                    name_label        vswitch_controller
ha_allow_overcommit           other_config      wlb_enabled
ha_enabled                    redo_log_enabled  wlb_password
ha_host_failures_to_tolerate  redo_log_vdi      wlb_url
ha_overcommitted              ref               wlb_username
ha_plan_exists_for            _ref              wlb_verify_cert
master                        restrictions

$ ls xapi/pool/OpaqueRef\:39adc911-0c32-9e13-91a8-43a25939110b/other_config/
cpuid_feature_mask  memory-ratio-hvm  memory-ratio-pv

$ cat xapi/pool/OpaqueRef\:39adc911-0c32-9e13-91a8-43a25939110b/other_config/cpuid_feature_mask
ffffff7f-ffffffff-ffffffff-ffffffff
Notice how:
| Design document | |
|---|---|
| Revision | v1 |
| Status | released (6.0.2) |
This document describes design details for the PR-1032 requirements.
The design consists of four parts:
Host.reset_networking, which removes all the
PIFs, Bonds, VLANs and tunnels associated with the given host, and a
call PIF.scan_bios to bring back the PIFs with device names as
defined in the BIOS.xe-reset-networking script that can be executed on a XenServer
host, which prepares the reset and causes the host to reboot.xe-reset-networking.xe-reset-networking, calls Host.reset_networking and re-creates
the PIFs.The xe-reset-networking script takes the following parameters:
| Parameter | Description |
|---|---|
-m, --master | The IP address of the master. Optional if the host is pool slave, ignored otherwise. |
--device | Device name of management interface. Optional. If not specified, it is taken from the firstboot data. |
--mode | IP configuration mode for management interface. Optional. Either dhcp or static (default is dhcp). |
--ip | IP address for management interface. Required if --mode=static, ignored otherwise. |
--netmask | Netmask for management interface. Required if --mode=static, ignored otherwise. |
--gateway | Gateway for management interface. Optional; ignored if --mode=dhcp. |
--dns | DNS server for management interface. Optional; ignored if --mode=dhcp. |
DNS server for management interface. Optional; ignored if --mode=dhcp.
The script takes the following steps after processing the given parameters:
/etc/xensource/pool.conf to determine whether the host is a
pool master or pool slave.pool.conf file to
the one given in the -m parameter, if present.service network stop).interface-reconfigure --force.MANAGEMENT_INTERFACE and clear CURRENT_INTERFACES in
/etc/xensource-inventory./tmp/network-reset to trigger XAPI to complete the
network reset after the reboot. This file should contain the full
configuration details of the management interface as key/value pairs
(format: <key>=<value>\n), and looks similar to the firstboot data
files. The file contains at least the keys DEVICE and MODE, and
IP, NETMASK, GATEWAY, or DNS when appropriate.A new hidden API call:
Host.reset_networkinghostAfter reboot, in the XAPI start-up sequence trigged by the presence of
/tmp/network-reset:
/tmp/network-reset.Host.reset_networking with a ref to the localhost.PIF.scan with a ref to the localhost to recreate the
(physical) PIFs.PIF.reconfigure_ip to configure the management interface.Host.management_reconfigure./tmp/network-reset.Add an “Emergency Network Reset” option under the “Network and
Management Interface” menu. Selecting this option will show some
explanation in the pane on the right-hand side. Pressing <Enter> will
bring up a dialogue to select the interfaces to use as management
interface after the reset. After choosing a device, the dialogue
continues with configuration options like in the “Configure Management
Interface” dialogue. After completing the dialogue, the same steps as
listed for xe-reset-networking are executed.
Host.management_reconfigure, pool
slaves may also use the network reset functionality to reconnect to
the master on its new IP.| Design document | |
|---|---|
| Revision | v3 |
| Status | proposed |
| Review | #120 |
It has been possible to identify the NICs of a Host which can support FCoE. This property can be listed in PIF object under capabilities field.
Set(String) in PIF object. For FCoE capable NIC will have string “fcoe” in PIF capabilities field.capabilities field will be ReadOnly, This field cannot be modified by user.New field:
PIF.capabilities will be type Set(string).get_capabilities.introduce_internal on when creating a PIF.refresh_all on xapi startup.New function:
string list get_capabilties (string)capable exposed by fcoe_driver.py as part of dom0.capable method output.fcoe_driver method capable states FCoE is supported on the NIC.PIF.introduce then PIF.scan.refresh_all which then populate the capabilities field as empty set.PIF.capabilities field is exposed through xe pif-list and xe pif-param-list as usual.| Design document | |
|---|---|
| Revision | v1 |
| Status | released (6.0) |
This document contains the software design for GPU pass-through. This code was originally included in the version of Xapi used in XenServer 6.0.
Rather than modelling GPU pass-through from a PCI perspective, and having the user manipulate PCI devices directly, we are taking a higher-level view by introducing a dedicated graphics model. The graphics model is similar to the networking and storage model, in which virtual and physical devices are linked through an intermediate abstraction layer (e.g. the “Network” class in the networking model).
The basic graphics model is as follows:
Currently, the following restrictions apply:
The design introduces a new generic class called PCI to capture state and information about relevant PCI devices in a host. By default, xapi would not create PCI objects for all PCI devices, but only for the ones that are managed and configured by xapi; currently only GPU devices.
The PCI class has no fields specific to the type of the PCI device (e.g. a graphics card or NIC). Instead, device specific objects will contain a link to their underlying PCI device’s object.
The new XenAPI classes and changes to existing classes are detailed below.
Fields:
| Name | Type | Description |
|---|---|---|
| uuid | string | Unique identifier/object reference. |
| class_id | string | PCI class ID (hidden field) |
| class_name | string | PCI class name (GPU, NIC, …) |
| vendor_id | string | Vendor ID (hidden field). |
| vendor_name | string | Vendor name. |
| device_id | string | Device ID (hidden field). |
| device_name | string | Device name. |
| host | host ref | The host that owns the PCI device. |
| pci_id | string | BDF (domain/Bus/Device/Function identifier) of the (physical) PCI function, e.g. “0000:00:1a.1”. The format is hhhh:hh:hh.h, where h is a hexadecimal digit. |
| functions | int | Number of (physical + virtual) functions; currently fixed at 1 (hidden field). |
| attached_VMs | VM ref set | List of VMs that have this PCI device “currently attached”, i.e. plugged, i.e. passed-through to (hidden field). |
| dependencies | PCI ref set | List of dependent PCI devices: all of these need to be passed-thru to the same VM (co-location). |
| other_config | (string -> string) map | Additional optional configuration (as usual). |
Hidden fields are only for use by xapi internally, and not visible to XenAPI users.
Messages: none.
A physical GPU device (pGPU).
Fields:
| Name | Type | Description |
|---|---|---|
| uuid | string | Unique identifier/object reference. |
| PCI | PCI ref | Link to the underlying PCI device. |
| other_config | (string -> string) map | Additional optional configuration (as usual). |
| host | host ref | The host that owns the GPU. |
| GPU_group | GPU_group ref | GPU group the pGPU is contained in. Can be Null. |
Messages: none.
A group of identical GPUs across hosts. A VM that is associated with a GPU group can use any of the GPUs in the group. A VM does not need to install new GPU drivers if moving from one GPU to another one in the same GPU group.
Fields:
| Name | Type | Description |
|---|---|---|
| VGPUs | VGPU ref set | List of vGPUs in the group. |
| uuid | string | Unique identifier/object reference. |
| PGPUs | PGPU ref set | List of pGPUs in the group. |
| other_config | (string -> string) map | Additional optional configuration (as usual). |
| name_label | string | A human-readable name. |
| name_description | string | A notes field containing human-readable description. |
| GPU_types | string set | List of GPU types (vendor+device ID) that can be in this group (hidden field). |
Messages: none.
A virtual GPU device (vGPU).
Fields:
| Name | Type | Description |
|---|---|---|
| uuid | string | Unique identifier/object reference. |
| VM | VM ref | VM that owns the vGPU. |
| GPU_group | GPU_group ref | GPU group the vGPU is contained in. |
| currently_attached | bool | Reflects whether the virtual device is currently “connected” to a physical device. |
| device | string | Order in which the devices are plugged into the VM. Restricted to “0” for now. |
| other_config | (string -> string) map | Additional optional configuration (as usual). |
Messages:
| Prototype | Description | |
|---|---|---|
| VGPU ref create (GPU_group ref, string, VM ref) | Manually assign the vGPU device to the VM given a device number, and link it to the given GPU group. | |
| void destroy (VGPU ref) | Remove the association between the GPU group and the VM. |
It is possible to assign more vGPUs to a group than number number of pGPUs in the group. When a VM is started, a pGPU must be available; if not, the VM will not start. Therefore, to guarantee that a VM has access to a pGPU at any time, one must manually enforce that the number of vGPUs in a GPU group does not exceed the number of pGPUs. XenCenter might display a warning, or simply refuse to assign a vGPU, if this constraint is violated. This is analogous to the handling of memory availability in a pool: a VM may not be able to start if there is no host having enough free memory.
Fields:
PCI_bus fieldVGPU ref set VGPUs: List of vGPUs.PCI ref set attached_PCIs: List of PCI devices that are
“currently attached” (plugged, passed-through) (hidden field).Fields:
PCI ref set PCIs: List of PCI devices.PGPU ref set PGPUs: List of physical GPU devices.(string -> string) map chipset_info, which contains at
least the key iommu. If "true", this key indicates whether the
host has IOMMU/VT-d support build in, and this functionality is
enabled by Xen; the value will be "false" otherwise.(This may not be needed in Xen 4.1. Confirm with Simon.)
Provide a command that does this:
/opt/xensource/libexec/xen-cmdline --set-xen iommu=1Definitions:
pci_id,
vendor_id, and device_id.First boot and any subsequent xapi start:
Find out from dmesg whether IOMMU support is present and enabled in
Xen, and set host.chipset_info:iommu accordingly.
Detect GPU devices currently present in the host. For each:
Destroy all existing PCI objects of devices that are not currently present in the host (i.e. objects for devices that have been replaced or removed).
Destroy all existing PGPU objects of GPUs that are not currently present in the host. Send a XenAPI alert to notify the user of this fact.
Update the list of dependencies on all PCI objects.
Sync VGPU.currently_attached on all VGPU objects.
For any VMs that have VM.other_config:pci set to use a GPU, create an
appropriate vGPU, and remove the other_config option.
A generic PCI interface exposed to higher-level code, such as the networking and GPU management modules within Xapi. This functionality relies on Xenops.
The PCI module exposes the following functions:
PCI.attached_VMs is
smaller than PCI.functions.currently_attached field on dependent VGPU objects etc.PCI.attached_VMs.currently_attached field on dependent VGPU objects etc.PCI.attached_VMs.VGPU.create:
VGPU object in the DB.VGPU.currently_attached = false.VGPU.destroy:
VGPU.currently_attached = true
and the VM is running.VGPU object.VM.start(_on):
host.chipset_info:iommu = "false", raise VM_REQUIRES_IOMMU.VGPU.currently_attached to true. As a side-effect,
any dependent PCI devices would be plugged.VM.shutdown:
VGPU.currently_attached to false for all the VM’s VGPUs.VM.suspend, VM.resume(_on):
VGPU
objects, as suspend/resume for VMs with GPUs is currently not
supported.VM.pool_migrate:
VGPU
objects, as live migration for VMs with GPUs is currently not
supported.VM.clone, VM.copy, VM.snapshot:
VGPU objects along with the VM.VM.import, VM.export:
VGPU and GPU_group objects in the VM export format.VM.checkpoint
VGPU
objects, as checkpointing for VMs with GPUs is currently not
supported.Pool join:
For each PGPU:
GPU_group of identical PGPUs, or a new one.Copy each VGPU to the pool together with the VM that owns it, and
add it to the GPU group containing the same PGPU as before the
join.
Step 1 is done automatically by the xapi startup code, and step 2 is handled by the VM export/import code. Hence, no work needed.
Pool eject:
VGPU objects will be automatically GC’ed when the VMs are removed.PGPU and GPU_group objects.Hence, no work needed.
Xapi needs a way to obtain a list of all PCI devices present on a host. For each device, xapi needs to know:
/usr/share/hwdata/pci.ids)./usr/share/hwdata/pci.ids).| Design document | |
|---|---|
| Revision | v3 |
| Status | released (7.0) |
| Revision history | |
| v1 | Documented interface changes between xapi and xenopsd for vGPU |
| v2 | Added design for storing vGPU-to-pGPU allocation in xapi database |
| v3 | Marked new xapi DB fields as internal-only |
As of XenServer 6.5, VMs can be provisioned with access to graphics processors (either emulated or passed through) in four different ways. Virtualisation of Intel graphics processors will exist as a fifth kind of graphics processing available to VMs. These five situations all require the VM’s device model to be created in subtly different ways:
Pure software emulation
-std-vga flag.Generic GPU passthrough
-priv flag to turn on privilege separation-std-vga flag to choose the
corresponding emulated graphics card.Intel integrated GPU passthrough (GVT-d)
-priv flag, qemu must be launched with the -std-vga and
-gfx_passthru flags. The actual PCI passthrough is handled separately
via xen.NVIDIA vGPU
-vgpu flag--domain - the VM’s domain ID--vcpus - the number of vcpus available to the VM--gpu - the PCI address of the physical GPU on which the emulated GPU will
run--config - the path to the config file which contains detail of the GPU to
emulateIntel vGPU (GVT-g)
-xengt-vgt_low_gm_sz - the low GM size in MiB-vgt_high_gm_sz - the high GM size in MiB-vgt_fence_sz - the number of fence registers-privTo handle all these possibilities, we will add some new types to xenopsd’s interface:
module Pci = struct
  type address = {
    domain: int;
    bus: int;
    device: int;
    fn: int;
  }

  ...
end

module Vgpu = struct
  type gvt_g = {
    physical_pci_address: Pci.address;
    low_gm_sz: int64;
    high_gm_sz: int64;
    fence_sz: int;
  }

  type nvidia = {
    physical_pci_address: Pci.address;
    config_file: string
  }

  type implementation =
    | GVT_g of gvt_g
    | Nvidia of nvidia

  type id = string * string

  type t = {
    id: id;
    position: int;
    implementation: implementation;
  }

  type state = {
    plugged: bool;
    emulator_pid: int option;
  }
end

module Vm = struct
  type igd_passthrough of
    | GVT_d

  type video_card =
    | Cirrus
    | Standard_VGA
    | Vgpu
    | Igd_passthrough of igd_passthrough

  ...
end

module Metadata = struct
  type t = {
    vm: Vm.t;
    vbds: Vbd.t list;
    vifs: Vif.t list;
    pcis: Pci.t list;
    vgpus: Vgpu.t list;
    domains: string option;
  }
end
The video_card type is used to indicate to the function
Xenops_server_xen.VM.create_device_model_config how the VM’s emulated graphics
card will be implemented. A value of Vgpu indicates that the VM needs to be
started with one or more virtualised GPUs - the function will need to look at
the list of GPUs associated with the VM to work out exactly what parameters to
send to qemu.
If Vgpu.state.emulator_pid of a plugged vGPU is None, this indicates that
the emulation of the vGPU is being done by qemu rather than by a separate
emulator.
n.b. adding the vgpus field to Metadata.t will break backwards compatibility
with old versions of xenopsd, so some upgrade logic will be required.
This interface will allow us to support multiple vGPUs per VM in future if necessary, although this may also require reworking the interface between xenopsd, qemu and demu. For now, xenopsd will throw an exception if it is asked to start a VM with more than one vGPU.
To support the above interface, xapi will convert all of a VM’s non-passthrough
GPUs into Vgpu.t objects when sending VM metadata to xenopsd.
In contrast to GVT-d, which can only be run on an Intel GPU which has been has been hidden from dom0, GVT-g will only be allowed to run on a GPU which has not been hidden from dom0.
If a GVT-g-capable GPU is detected, and it is not hidden from dom0, xapi will create a set of VGPU_type objects to represent the vGPU presets which can run on the physical GPU. Exactly how these presets are defined is TBD, but a likely solution is via a set of config files as with NVIDIA vGPU.
Allocation of vGPUs to physical GPUs
For NVIDIA vGPU, when starting a VM, each vGPU attached to the VM is assigned to a physical GPU as a result of capacity planning at the pool level. The resulting configuration is stored in the VM.platform dictionary, under specific keys:
vgpu_pci_id - the address of the physical GPU on which the vGPU will runvgpu_config - the path to the vGPU config file which the emulator will useInstead of storing the assignment in these fields, we will add a new internal-only database field:
VGPU.scheduled_to_be_resident_on (API.ref_PGPU)This will be set to the ref of the physical GPU on which the vGPU will run. From here, xapi can easily obtain the GPU’s PCI address. Capacity planning will also take into account which vGPUs are scheduled to be resident on a physical GPU, which will avoid races resulting from many vGPU-enabled VMs being started at once.
The path to the config file is already stored in the VGPU_type.internal_config
dictionary, under the key vgpu_config. xapi will use this value directly
rather than copying it to VM.platform.
To support other vGPU implementations, we will add another internal-only database field:
VGPU_type.implementation enum(Passthrough|Nvidia|GVT_g)For the GVT_g implementation, no config file is needed. Instead,
VGPU_type.internal_config will contain three key-value pairs, with the keys
vgt_low_gm_szvgt_high_gm_szvgt_fence_szThe values of these pairs will be used to construct a value of type
Xenops_interface.Vgpu.gvt_g, which will be passed down to xenopsd.
| Design document | |
|---|---|
| Revision | v1 |
| Status | released (6.5) |
It has been possible to enable and disable GRO and other “ethtool” features on PIFs for a long time, but there was never an official API for it. Now there is.
The former way to enable GRO via the CLI is as follows:
xe pif-param-set uuid=<pif-uuid> other-config:ethtool-gro=on
xe pif-plug uuid=<pif-uuid>
The other-config field is a grab-bag of options that are not clearly defined.
The options exposed through other-config are mostly experimental features, and
the interface is not considered stable. Furthermore, the field is read/write
and does not have any input validation, and cannot not trigger any actions
immediately. The latter is why it is needed to call pif-plug after setting
the ethtool-gro key, in order to actually make things happen.
New field:
PIF.properties of type (string -> string) map.gro key in their properties, with possible values on and off. There are currently no other properties defined.other-config:ethtool-gro key present on the PIF, it will be treated as an override of the gro key in PIF.properties.New function:
void PIF.set_property (PIF ref, string, string).properties field.CANNOT_CHANGE_PIF_PROPERTIES.INVALID_VALUE.properties of the associated bond slaves will also be set to same value.plug is needed). This includes any VLANs that are on top of the PIF to-be-changed, as well as any bond slaves.properties field set to "gro" -> "on". This includes PIFs obtained after a fresh installation of XenServer, as well as PIFs created using PIF.introduce or PIF.scan. In other words, GRO will be “on” by default.PIF.properties field, will give every physical and bond PIF a properties field set to "gro" -> "on". In other words, GRO will be “on” by default after an upgrade.PIF.properties. If not, the bond.create call will fail with INCOMPATIBLE_BOND_PROPERTIES.properties of the bond PIF will be equal to the properties of the bond slaves.PIF.properties field is exposed through xe pif-list and xe pif-param-list as usual.PIF.set_property call is exposed through xe pif-param-set. For example: xe pif-param-set uuid=<pif-uuid> properties:gro=off.| Design document | |
|---|---|
| Revision | v1 |
| Status | draft |
Microsoft Secure Boot certificates from 2011 are reaching end-of-life, and legacy VMs may still contain only the old certificate set. XenServer needs an out-of-band mechanism to update per-VM UEFI Secure Boot variables safely and at scale.
Scope of this design:
Certificate update is implemented as a dedicated API-driven workflow (not a plugin), so that:
A new VM field is introduced:
VM.secureboot_certificates_state (enum, readonly)States:
ok: No update required (including non-applicable VM types)update_available: Update requiredupdate_on_boot: Update scheduled for next bootstateDiagram update_available --> update_on_boot : Admin marks VM for update update_on_boot --> ok : VM boots, update succeeds update_on_boot --> update_on_boot : VM boots, update fails(retain state) ok --> update_available : recompute state(e.g. legacy VM import)
The new update API follows VM-admin-level access, aligned with existing NVRAM-related VM operations.
VM.secureboot_certificates_state applies to these VM-class objects,
Transition intent:
update_available -> update_on_bootupdate_on_boot -> okupdate_on_boot or is reset to update_available based on update result handlingNew API:
VM.update_secureboot_certificates_on_boot(session, vm, mark)Behavior:
mark=true: require current state update_available, then set update_on_bootmark=false: require current state update_on_boot, then set update_availableValidation:
OPERATION_NOT_ALLOWEDOn toolstack restart after upgrade:
secureboot_certificates_state for all VM records to okupdate_available where neededApplied to:
Default templates remain ok.
For VM import and cross-pool migration:
secureboot_certificates_state, determine state from NVRAM and set it during importsecureboot_certificates_state, reserve the state during importThe certificate state must stay consistent with actual NVRAM content.
Key interface change:
VM.set_NVRAM_EFI_variables with optional parameter update, we call it VM.set_NVRAM_EFI_variables_V2Rules:
update=yes -> set state okupdate=no -> do not update stateThis ensures compatibility when old varstored instances are still running during rolling update windows.
A standalone program will be introduced, which xapi calls to determine the SecureBoot cert state
Inputs:
temp file path which contains NVRAM EFI-variables dataBehavior:
update_required, xapi sets VM.secureboot_certificates_state to be update_available.update_ok, xapi sets VM.secureboot_certificates_state to be ok.VM.secureboot_certificates_state. Since xapi process has not completed initialization at that point, this program cannot call any services of xapi.When varstored initializes a VM and sees secureboot_certificates_state=update_on_boot, varstored does,
VM.set_NVRAM_EFI_variables_V2The VM.set_NVRAM_EFI_variables_V2 interface performs same as VM.set_NVRAM_EFI_variables, uses the existing varstored-guard process to make calls to xapi.
If VM.set_NVRAM_EFI_variables_V2 runs into error (e.g. there is something wrong with the communication with xapi),
VM.secureboot_certificates_statexapi-core, varstored, related components)secureboot_certificates_stateVM.update_secureboot_certificates_on_boot| Design document | |
|---|---|
| Revision | v1 |
| Status | released (5.6) |
cpuid instruction is used to obtain a CPU’s manufacturer,
family, model, stepping and features information.base_ecx, base_edx, ext_ecx and ext_edx
(after the registers used by cpuid to store the results).base_ecx and base_edx). The
newer Nehalem and Westmere CPUs support extended-feature masking
as well.cpuid to obtain the
(possibly modified) CPU info, or can obtain this information from
Xen. Masking is done only by Xen at boot time, before any domains
are loaded./boot/extlinux.conf. After a reboot,
the mask will be enforced.Currently, the datamodel has Host_cpu objects for each CPU core in a
host. As they are all identical, we are considering keeping just one CPU
record in the Host object itself, and deprecating the Host_cpu
class. For backwards compatibility, the Host_cpu objects will remain
as they are in MNR, but may be removed in subsequent releases.
Hence, there will be a new field called Host.cpu_info, a read-only
string-string map, containing the following fixed set of keys:
| Key name | Description |
|---|---|
cpu_count | The number of CPU cores in the host. |
family | The family (number) of the CPU. |
features | The current (possibly masked) feature vector, as given by cpuid. Format: "<base_ecx>-<base_edx>-<ext_ecx>-<ext_edx>", 4 groups of 8 hexadecimal digits, separated by dashes. |
features_after_reboot | The feature vector to be used after rebooting the host. This field can be modified by calling Host.set_cpu_features. Same format as features. |
flags | The flags of the physical CPU (a decoded version of the features field). |
maskable | Indicating whether the CPU supports Intel FlexMigration or AMD Extended Migration. There are three possible values: "no" means that masking is not possible, "base" means that only base features can be masked, and "full" means that base as well as extended features can be masked. |
model | The model number of the CPU. |
modelname | The model name of the CPU. |
physical_features | The original, unmasked features. Same format as features. |
speed | The speed of the CPU. |
stepping | The stepping of the CPU. |
vendor | The manufacturer of the CPU. |
Indicating whether the CPU supports Intel FlexMigration or AMD Extended
Migration. There are three possible values: "no" means that masking is
not possible, "base" means that only base features can be masked, and
"full" means that base as well as extended features can be masked.
Note: When the features and features_after_reboot are different,
XenCenter could display a warning saying that a reboot is needed to
enforce the feature masking.
The Pool.other_config:cpuid_feature_mask key is recognised. If this
key is present and if it contains a value in the same format as
Host.cpu_info:features, the value is used to mask the feature vectors
before comparisons during any pool join in the pool it is defined on.
This can be used to white-list certain feature flags, i.e. to ignore
them when adding a new host to a pool. The default it
ffffff7f-ffffffff-ffffffff-ffffffff, which white-lists the EST feature
for compatibility with XS 5.5 and earlier.
New messages:
Host.set_cpu_featureshost, new CPU feature vector
features.Host.cpu_info:features_after_reboot), if features is valid.Host.reset_cpu_featureshost.xc_get_boot_cpufeatures in libxc./etc/xensource/libexec/xen-cmdline, which provides a
future-proof way of modifying the Xen command-line key/value pairs.
This script has the following options, where mask is one of
cpuid_mask_ecx, cpuid_mask_edx, cpuid_mask_ext_ecx or
cpuid_mask_ext_edx, and value is 0xhhhhhhhh (h is represents
a hex digit).:--list-cpuid-masks--set-cpuid-masks mask=value mask=value--delete-cpuid-masks mask maskrestrict_cpu_masking key has been added to the host licensing
restrictions map. This will be true when the Host.edition is
free, and false if it is enterprise or platinum.The Host.cpu_info field is refreshed:
cpu_count, vendor, speed, modelname,
flags, stepping, model, and family are obtained from
/etc/xensource/boot_time_cpus (and ultimately from
/proc/cpuinfo).features and physical_features are obtained
from Xen and the features_after_reboot key is made equal to the
features field.maskable key is determined by the CPU details.family = 6 and (model = 1dh or (model = 17h and stepping >= 4))
(maskable = "base")family = 6 and ((model = 1ah and stepping > 2) or model = 1eh or model = 25h or model = 2ch or model = 2eh or model = 2fh)
(maskable = "full")family >= 10h (maskable = "full")Host.set_cpu_features call:features_after_reboot to the given feature
vector.xen-cmdline script. The mask is represented by one or more of
the following key/value pairs (where h represents a hex
digit):cpuid_mask_ecx=0xhhhhhhhhcpuid_mask_edx=0xhhhhhhhhcpuid_mask_ext_ecx=0xhhhhhhhhcpuid_mask_ext_edx=0xhhhhhhhhHost.reset_cpu_features call:physical_features to features_after_reboot.xen-cmdline script (if any).Pool.join fails when the vendor and feature keys do not match,
and disregards any other key in Host.cpu_info.Pool.other_config:cpuid_feature_mask. The value of this
field should have the same format as Host.cpu_info:features.
When comparing the CPUID features of the pool and the joining
host for equality, this mask is applied before the comparison.
The default is ffffff7f-ffffffff-ffffffff-ffffffff, which
defines the EST feature, bit 7 of the base ecx flags, as “don’t
care”.Pool.eject clears the database (as usual), and additionally
removes the feature mask from /boot/extlinux.conf (if any).New commands:
host-cpu-infouuid (optional, uses localhost if absent).Host.cpu_info associated with the host.host-get-cpu-featuresuuid (optional, uses localhost if absent).Host.cpu_info:features] associated with
the host.host-set-cpu-featuresfeatures (string of 32 hexadecimal digits,
optionally containing spaces or dashes), uuid (optional, uses
localhost if absent).Host.set_cpu_features.host-reset-cpu-featuresuuid (optional, uses localhost if absent).Host.reset_cpu_features.The following commands will be deprecated: host-cpu-list,
host-cpu-param-get, host-cpu-param-list.
WARNING:
If the user is able to set any mask they like, they may end up disabling CPU features that are required by dom0 (and probably other guest OSes), resulting in a kernel panic when the machine restarts. Hence, using the set function is potentially dangerous.
It is apparently not easy to find out exactly which flags are safe to mask and which aren’t, so we cannot prevent an API/CLI user from making mistakes in this way. However, using XenCenter would always be safe, as XC always copies features masks from real hosts.
If a machine ends up in such a bad state, there is a way to get out of it. At the boot prompt (before Xen starts), you can type “menu.c32”, select a boot option and alter the Xen command-line to remove the feature masks, after which the machine will again boot normally (note: in our set-up, there is first a PXE boot prompt; the second prompt is the one we mean here).
The API/CLI documentation should stress the potential danger of using this functionality, and explain how to get out of trouble again.
| Design document | |
|---|---|
| Revision | v1 |
| Status | proposed |
There are no APIs to config the NTP and timezone on the host. Previously, users had to login on the host via ssh and configure NTP and time manually. The goal of this feature is to introduce new APIs in XAPI to support NTP and time configuration, especially in the scenario that users disable ssh service on the host. XAPI can also store the NTP and timezone configuration in XAPI DB to provide cache for the getter APIs.
New fields:host.ntp_mode, enum host_ntp_mode(DHCP, Custom, Factory, Disabled)host.ntp_custom_servers, string set
New APIs: host.set_ntp_mode, host.set_ntp_custom_servers, host.get_ntp_mode,
host.get_ntp_custom_servers, host.get_ntp_servers_status
Abstract the NTP configuration to 4 modes.
In this mode, NTP uses the DHCP assigned NTP servers as sources.
How the NTP and DHCP interaction?
On the host, dhclient executes /etc/dhcp/dhclient.d/chrony.sh to update the
ntp servers when network event happens.
chrony.sh writes ntp servers to /run/chrony-dhcp/$interface.sources/run/chrony-dhcp by sourcedir /run/chrony-dhcp in
the conf filechrony.sh runs chronyc reload sources to reload NTP sourcesThen NTP sources can be updated automatically in the DHCP mode
How to switch DHCP mode?
Dhclient stores dhcp lease in /var/lib/xcp/dhclient-$interface.leases, see
module Dhclient in /ocaml/networkd/lib/network_utils.ml.
When switch the NTP mode to DHCP, XAPI
chrony.shWhen switch ntp mode from dhcp to others, XAPI
In this mode, NTP uses host.ntp_custom_servers as sources.
When switch the NTP mode to Custom, XAPI
host.ntp_custom_servers as NTP source items in chronyd confWhen host.ntp_custom_servers changes and host.ntp_mode is Custom, set chronyd
conf with new custom servers and restart chronyd.
In this mode, ntp uses factory-ntp-servers in XAPI config file. Generally the
factory-ntp-servers will be defined by the product.
This mode disables NTP service on the host.
host.get_ntp_servers_status calls chronyc -c sources to get ntp servers status.
Output parse:
Source mode: '^' = server, '=' = peer, '#' = local clock.
Source state: '*' = current synced, '+' = combined, '-' = not combined,
'?' = unreachable, 'x' = time may be in error, '~' = time too variableNew field: host.timezone, string
New APIs: host.set_timezone, host.get_timezone, host.list_timezones
The timezone is in IANA timezone database format. Timezone on the host can be
get by realpath /etc/localtime which is linked to timezone file under
/usr/share/zoneinfo/. It can set by link/etc/localtime to
/usr/share/zoneinfo/<timezone>. All the valid timezones are actually the files
under /usr/share/zoneinfo/.
Comparing to using a fixed UTC offset, the benefit is:
They are equivalent to the timedatectl commands
timedatectl set-timezone
timedatectl status | grep "Time zone"
timedatectl list-timezonesNew API: host.get_ntp_synchronized, host.set_servertime
host.get_ntp_synchronized shows if the system time is synchronized with NTP
source.
host.set_servertime offers an API to set the server time when NTP disabled.
it accepts a RFC3339 datetime format timestamp with timezone, i.e. ends with ‘Z’
to represent the UTC or explicit UTC offset like ‘+05:00’.
For the new fields in this doc, on XAPI start, dbsync will get the real host status and sync to XAPI DB to make the real host status and XAPI DB consistent. Upgrade case can also be benefited from the dbsync.
If the user changes the config behind XAPI, like modify the chronyd conf directly via ssh, the real status on the host and XAPI DB come to inconsistent and may lead to unpredicted result, unless restart XAPI.
Set NTP DHCP mode and get the status
session.xenapi.host.set_timezone(host_ref, 'UTC')
session.xenapi.host.set_ntp_mode(host_ref, 'DHCP')
session.xenapi.host.get_ntp_synchronized(host_ref)
session.xenapi.host.get_ntp_servers_status(host_ref)
Set NTP Custom mode and get the status
session.xenapi.host.set_timezone(host_ref, 'Europe/London')
servers = ['time.server1.com', 'time.server2.com', 'time.server3.com']
session.xenapi.host.set_ntp_custom_servers(host_ref, servers)
session.xenapi.host.set_ntp_mode(host_ref, 'Custom')
session.xenapi.host.get_ntp_synchronized(host_ref)
session.xenapi.host.get_ntp_servers_status(host_ref)
Set NTP default mode and get the status
session.xenapi.host.set_ntp_mode(host_ref, 'Factory')
session.xenapi.host.get_ntp_synchronized(host_ref)
session.xenapi.host.get_ntp_servers_status(host_ref)
Disable NTP and set server time
session.xenapi.host.set_timezone(host_ref, 'Europe/London')
session.xenapi.host.set_ntp_mode(host_ref, 'Disabled')
session.xenapi.host.set_servertime(host_ref, "20251105T16:11:55Z")host.ntp_mode
host.ntp_custom_servers
host.timezone
host.set_timezone
host.list_timezones
host.get_timezone
host.get_ntp_synchronized
host.set_ntp_mode
host.get_ntp_mode
host.set_ntp_custom_servers
host.get_ntp_custom_servers
host.get_ntp_servers_status
host.set_servertime| Design document | |
|---|---|
| Revision | v3 |
| Status | released (6.5 sp1) |
| Review | #33 |
Passthrough of discrete GPUs has been available since XenServer 6.0. With some extensions, we will also be able to support passthrough of integrated GPUs.
New fields will be added (both read-only):
PGPU.dom0_access enum(enabled|disable_on_reboot|disabled|enable_on_reboot)host.display enum(enabled|disable_on_reboot|disabled|enable_on_reboot)as well as new API calls used to modify the state of these fields:
PGPU.enable_dom0_accessPGPU.disable_dom0_accesshost.enable_displayhost.disable_displayEach of these API calls will return the new state of the field e.g. calling
host.disable_display on a host with display = enabled will return
disable_on_reboot.
Disabling dom0 access will modify the xen commandline (using the xen-cmdline tool) such that dom0 will not be able to access the GPU on next boot.
Calling host.disable_display will modify the xen and dom0 commandlines such that neither will attempt to send console output to the system display device.
A state diagram for the fields PGPU.dom0_access and host.display is shown
below:
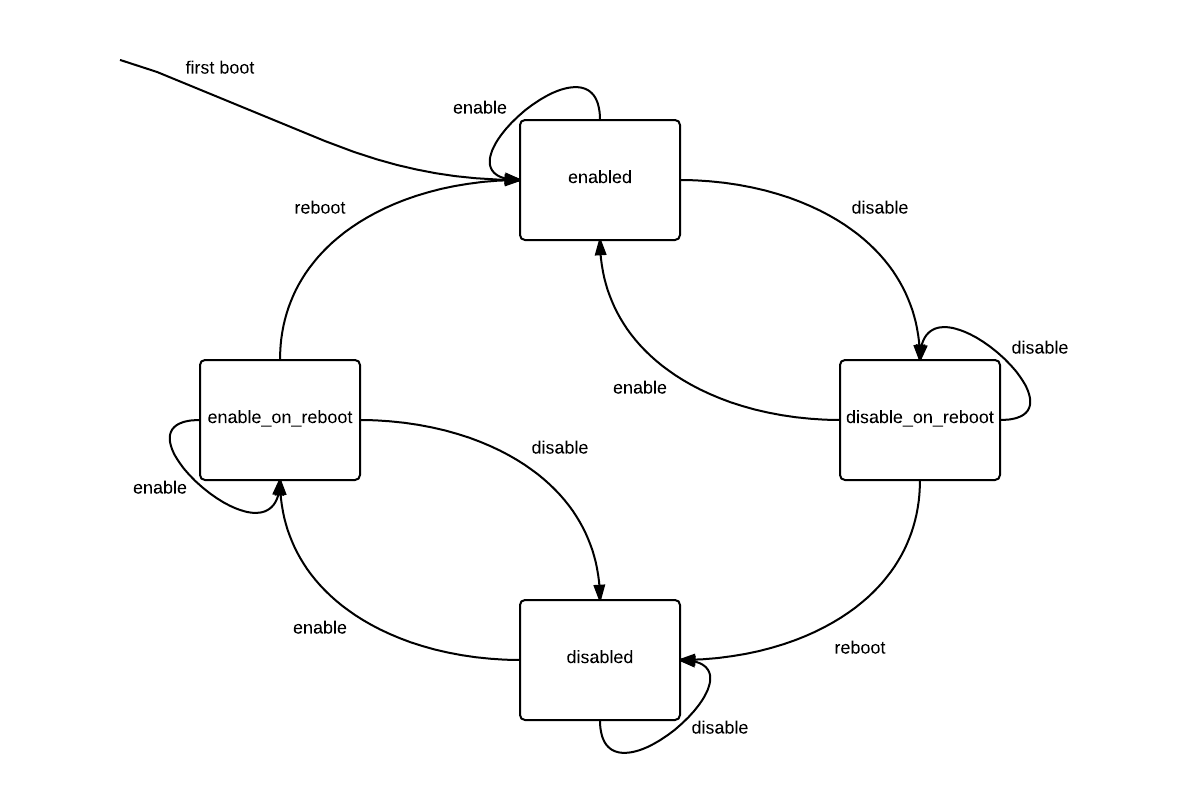
While it is possible for these two fields to be modified independently, a client must disable both the host display and dom0 access to the system display device before that device can be passed through to a guest.
Note that when a client enables or disables either of these fields, the change can be cancelled until the host is rebooted.
Currently, xapi will not create a PGPU object for the PCI device with address
reported by /dev/vga_arbiter. This is to prevent a GPU in use by dom0 from
from being passed through to a guest. This behaviour will be changed - instead
of not creating a PGPU object at all, xapi will create a PGPU, but its
supported_VGPU_types field will be empty.
However, the PGPU’s supported_VGPU_types will be populated as normal if:
A read-only field will be added:
PGPU.is_system_display_device boolThis will be true for a PGPU iff /dev/vga_arbiter reports the PGPU as the
system display device for the host on which the PGPU is installed.
When starting a VM attached to an integrated GPU, the VM config sent to xenopsd will contain a video_card of type IGD_passthrough. This will override the type determined from VM.platform:vga. xapi will consider a GPU to be integrated if both:
When xenopsd starts qemu for a VM with a video_card of type IGD_passthrough, it will pass the flags “-std-vga” AND “-gfx_passthru”.
| Design document | |
|---|---|
| Revision | v1 |
| Status | draft |
LLDP is a link-layer discovery protocol used by network devices to advertise their identity, capabilities, and neighbor information on a local network. This design adds supported LLDP capability to XAPI and networkd so that a host can advertise its identity and selected system information to directly connected switches, and can also retrieve selected LLDP neighbor information from those switches. The primary use case is host-to-switch verification.
The following are introduced by this design:
PIF_metricsThe implementation uses XAPI for configuration, networkd for per-host application of configuration, and lldpd as the LLDP agent in dom0 user space.
XAPI stores LLDP configuration in the database and exposes LLDP neighbor data through XenAPI.
networkd configures the LLDP agent to apply LLDP configuration for individual physical NICs and queries the LLDP agent for received LLDP TLVs.
lldpd runs as a daemon process in dom0 user space. It receives and sends LLDPDUs via PF_PACKET + SOCK_RAW sockets. It is actively maintained by upstream as the time being.
The following fields are added to the XAPI database.
pool.lldp_enabledType: bool
When true, LLDP is enabled on the NIC associated with each managed physical PIF on every host in the pool.
When false, LLDP is disabled on the NIC associated with each managed physical PIF on every host in the pool.
This setting does not apply to other types of PIFs, such as non-managed PIFs, bond PIFs, VLAN PIFs, tunnel PIFs, or SR-IOV PIFs.
PIF.lldp_mode determines the final effective state on individul PIF.
LLDP receiving and advertising are always enabled or disabled together.
Default after update/RPU from a version/release without LLDP support to a version/release with LLDP support: false
Default after fresh install: true
PIF.lldp_modeType: enum pif_lldp_mode
Values:
default: follow pool.lldp_enabled;enabled: LLDP is enabled on the NIC associated with the managed physical PIF;disabled: LLDP is disabled on the NIC associated with the managed physical PIF.This setting does not apply to other types of PIFs, such as non-managed PIFs, bond PIFs, VLAN PIFs, tunnel PIFs, or SR-IOV PIFs.
Default after update/RPU from a version/release without LLDP support to a version/release with LLDP support: default.
Default after fresh install: default.
pool.lldp_multicast_addressType: enum lldp_multicast_address
Values:
nearestbridge: 01:80:C2:00:00:0Enearestnontpmrbridge: 01:80:C2:00:00:03nearestcustomerbridge: 01:80:C2:00:00:00This value controls the multicast MAC address used for LLDP transmission.
After a change, it is applied when pool.set_lldp_enabled or PIF.set_lldp_mode is called with force=true.
This value is not considered to change often. Changing it does not trigger any application action for simplicity.
Default after update/RPU from a version/release without LLDP support to a version/release with LLDP support: nearestbridge.
Default after fresh install: nearestbridge.
PIF_metrics.lldp_neighborType: map(string, string)
Stores the received LLDP TLVs from the corresponding PIF.
Default: empty
The following new APIs are added.
pool.set_lldp_enabledParameters:
self: the pool reference;value: true or false;force: bool, default false.Behavior:
force=false and value = pool.lldp_enabled, do nothing;pool.lldp_enabled to value, apply LLDP configuration to every physical PIF in the pool by calling PIF.plug to each host;PIF.set_lldp_modeParameters:
self: the PIF reference;value: default, enabled, or disabled;force: bool, default false.Behavior:
force=false and value= PIF.lldp_mode, do nothing;PIF.lldp_mode to value, apply LLDP configuration to the physical NIC represented by the PIF by calling PIF.plug to the host.The interface_config_t record in the networkd database is extended with LLDP configuration. networkd can configure LLDP independently using its own database when XAPI is unavailable, for example during host boot.
The default enabled setting is false to minimize impact without high-level configuration from XAPI or the user. This database can be updated as XAPI pushes configurtions to networkd through networkd calls.
type lldp_multicast_address =
  | Nearestbridge
  | Nearestnontpmrbridge
  | Nearestcustomerbridge
[@@deriving rpcty]

type lldp = {
  force: bool [@default false] (* Override the blocking list when true. See below. *)
; chassis_id: string [@default ""]
; system_name: string [@default ""]
; system_description: string [@default ""]
; enabled: bool [@default false];
; address: lldp_multicast_address list [@default [Nearestbridge]];
}
[@@deriving rpcty]

type interface_config_t = {
  ...
  lldp: lldp option [@default None];
}Some NICs share hardware with storage functions such as CNA and hardware FCoE. Enabling LLDP on these NICs may affect those storage functions. This is especially important when the storage function provides the boot disk of a host. For safety, LLDP is disabled by default on NICs which are managed by drivers in a known blocking list when enablement comes from the pool-level default. Users may still enable LLDP on such NICs through per-PIF XenAPI after confirming that it is safe in practice. The blocking mechanism is based on the NIC driver. Other approaches, such as PCI bus/device location or PCI device ID, are either unreliable or too complex.
networkd uses a per-host NIC-driver blocking list which is persisted under files under /etc/xensource/lldp-nic-driver-blocklist.d/ with content like:
bnx2x
enic
qede
It’s a directory to allow other components like host install drop custom drivers to avoid impact on installation.
The effective LLDP state on a NIC is determined by pool.lldp_enabled, PIF.lldp_mode, and whether the NIC driver is in the blocking list used by networkd.
pool.lldp_enabled | PIF.lldp_mode | parameter passed to networkd | NIC driver in blocking list | effective LLDP state |
|---|---|---|---|---|
true | default | true | no | enabled |
true | default | true | yes | disabled |
false | default | false | * | disabled |
* | enabled | true | * | enabled |
* | disabled | false | * | disabled |
When LLDP is enabled on a physical NIC, the LLDP agent advertises the following TLVs.
| TLV | Value |
|---|---|
| Chassis ID | Host UUID (shared by all individual interfaces) |
| Port ID | Interface MAC address |
| Port Description | Interface name |
| System Name | XAPI host.name_label |
| System Description | XAPI host.name_description |
| Management Address | Management IP address |
| System Capabilities | Bridge |
| TTL | Default value from the LLDP agent |
Some advertised values follow the default behavior of lldpd, while others are configured by networkd when preparing the LLDP agent configuration.
networkd periodically queries statistics for individual NICs and writes them to the in-memory file /dev/shm/network_stats. The file format is defined in ocaml/xapi-idl/network/network_stats.ml and is extended with a new field, lldp_neighbor.
type lldp_rx = {
  system_name: string option;
  port_id: string option;
  port_description: string option;
}
[@@deriving rpcty]

type iface_stats = {
  ...
  lldp_neighbor: lldp_rx option;
}
networkd queries lldpd for the LLDP TLVs recevied on individual NICs and writes them into /dev/shm/network_stats.
Monitor_dbcalls.monitor_dbcall_thread in XAPI reads the in-memory file /dev/shm/network_stats periodically, and exposes the data through PIF_metrics.lldp_neighbor by storing them in XenAPI map form.
During the first host boot, networkd does not enable LLDP on physical interfaces because the default value of lldp.enabled in interface_config_t is false.
After XAPI starts, network-init scans physical interfaces (PIF.scan), creates PIF objects, and brings them up through Nm.bring_pif_up.
During this process, XAPI pushes its built-in configuration to networkd to enable LLDP on individual NICs. networkd may still keep LLDP disabled on some NICs based on the built-in blocking list.
After update or RPU from a version/release without LLDP support to a version/release with LLDP support, the default values of the new fields (pool.lldp_enabled and PIF.lldp_mode) cause networkd to keep LLDP disabled on all NICs.
The PIF.lldp_mode of PIFs on the joining host has the default value. The joining host shares the pool-level pool.lldp_enabled setting.
These configurations are pushed to networkd via PIF.scan during the first-boot network-init service on the joining host.
pool.lldp_enabled, PIF.lldp_mode, and the networkd database revert to the values used just like after fresh install.
| Design document | |
|---|---|
| Revision | v1 |
| Status | proposed |
All hosts in a pool use the shared database by sending queries to the pool master. This creates a performance bottleneck as the pool size increases. All hosts in a pool receive a database backup from the master periodically, every couple of hours. This creates a reliability problem as updates may be lost if the master fails during the window before the backup.
The reliability problem can be avoided by running with HA or the redo log enabled, but this is not always possible.
We propose to:
In a later phase we can move to a completely distributed database.
We will create a database-level variant of the existing XenAPI event.from
API. The new RPC will block until a database event is generated, and then
the events will be returned using the existing “redo-log” event types. We
will add a few second delay into the RPC to batch the updates.
We will replace the pool database download logic with an event.from-like
loop which fetches all the events from the master’s database and applies
them to the local copy. The first call will naturally return the full database
contents.
We will turn on the existing “in memory db cache” mechanism on all hosts, not just the master. This will be where the database updates will go.
The result should be that every host will have a /var/xapi/state.db file,
with writes going to the master first and then filtering down to all slaves.
We will re-use the Disaster Recovery multiple database mechanism to allow slaves to access their local database. We will change the defalult database “context” to snapshot the local database, perform reads locally and write-through to the master.
We will add an HTTP header to all forwarded XenAPI calls from the master which will include the current database generation count. When a forwarded XenAPI operation is received, the slave will deliberately wait until the local cache is at least as new as this, so that we always use fresh metadata for XenAPI calls (e.g. the VM.start uses the absolute latest VM memory size).
We will document the new database coherence policy, i.e. that writes on a host will not immediately be seen by reads on another host. We believe that this is only a problem when we are using the database for locking and are attempting to hand over a lock to another host. We are already using XenAPI calls forwarded to the master for some of this, but may need to do a bit more of this; in particular the storage backends may need some updating.
| Design document | |
|---|---|
| Revision | v3 |
| Status | proposed |
| Revision history | |
| v1 | Initial version |
| v2 | Addition of `networkd_db` update for Upgrade |
| v3 | More info on `networkd_db` and API Errors |
This document describes design details for the REQ-42: Support Use of VLAN on XAPI Management Interface.
Creating a VLAN is already there, Lisiting the steps to create a VLAN which is used later in the document. Steps:
eth0, eth1.
xe pif-list params=uuid physical=true host-uuid=UUID this will list pif-UUIDxe network-create name-label=VLAN1
It returns a new network-UUIDxe vlan-create pif-uuid=pif-UUID network-uuid=network-UUID vlan=VLAN-ID
It returns a new VLAN PIF new-pif-UUIDxe pif-plug uuid=new-pif-UUIDxe pif-reconfigure-ip uuid=new-pif-UUID mode= IP= netmask= gateway= DNS= This will configure IP on the PIF, here mode is must and other parametrs are needed on selecting mode=staticSimilarly, creating a vlan pif can be achieved by corresponding XenAPI calls.
For a newly installed host, If host installer was asked to put the management interface on given VLAN.
We will expect a new entry VLAN=ID under /etc/firstboot.d/data/management.conf.
Listing current contents of management.conf which will be used later in the document.
LABEL=eth0 -> Represents Pyhsical device on which Management Interface must reside.
MODE=dhcp||static -> Represents IP configuration mode for the Management Interface. There can be other parameters like IP, NETMASK, GATEWAY and DNS when we have static mode.
VLAN=ID -> New entry for specifying VLAN TAG going to be configured on device LABEL.
Management interface going to be configured on this VLAN ID with specified mode.
Firstboot script /etc/firstboot.d/30-prepare-networking need to be updated for configuring
management interface to be on provided VLAN ID.
Steps to be followed:
PIF.scan performed in the script must have created the PIFs for the underlying pyhsical devices.LABEL.Creating a VLAN, i.e. network-create, vlan-create and pif-plug. Now we have a new PIF for the VLAN.pif-reconfigure-ip for the new VLAN PIF.host-management-reconfigure using new VLAN PIF.XCP-Networkd during first boot and boot after pool eject gets the initial network setup from the management.conf and xensource-inventory file to update the network.db for management interface info.
XCP-Networkd must honour the new VLAN config.
Steps to be followed:
read_config step tries to read the /var/lib/xcp/networkd.db file which is not yet created just after host installation.networkd.db read throws Read_Error, it tries to read network.dbcache which is also not available hence it goes to read read_management_conf file.static or dhcp taken from management.conf.bridge_name is taken as MANAGEMENT_INTERFACE from xensource-inventory, further bridge_config and interface_config are build based on MODE.Bridge.make_config() and Interface.make_config() are performed with respective bridge_config and interface_config.networkd_db provides the management interface info to the host installer during upgrade.
It reads /var/lib/xcp/networkd.db file to output the Management Interface information. Here we need to update the networkd_db to output the VLAN information when vlan bridge is a input.
Steps to be followed:
networkd_db -iface xapi0 this will list mode as dhcp or static, if mode=static then it will provide ipaddr and netmask too.networkd_db -bridge xapi0 It should output the VLAN info like:
interfaces=
vlan=vlanID
parent=xenbr0 using the parent bridge user can identify the physical interfaces.
Here we will extract VLAN and parent bridge from bridge_config under networkd.db.Detail design is mentioned on http://xapi-project.github.io/xapi/design/emergency-network-reset.html
For using xe-reset-networking utility to configure management interface on VLAN, We need to add one more parameter --vlan=vlanID to the utility.
There are certain parameters need to be passed to this utility: –master, –device, –mode, –ip, –netmask, –gateway, –dns and new one –vlan.
Steps to be followed:
VLANID is passed then let bridge=xapi0.bridge=xapi0 into xensource-inventory file, This should work as Xapi check avialable bridges while creating networks.VLAN=vlanID into management.conf and /tmp/network-reset.check_network_reset under xapi.ml to perform steps Creating a VLAN and perform management_reconfigure on vlan pif.
Step Creating a VLAN must have created the VLAN record in Xapi DB similar to firstboot script.networkd_db program and handle the VLAN config.Under Emergency Network Reset option under the Network and Management Interface menu.
Selecting this option will show some explanation in the pane on the right-hand side.
Pressing Configure Management Interface dialogue.
There will be an additionall option for VLAN in the dialogue.
After completing the dialogue, the same steps as listed for xe-reset-networking are executed.
Currently pool-join fails if VLANs are present on the host joining a pool.
We need to allow pool-join only if Pool and host joining a pool both has management interface on same VLAN.
Steps to be followed:
pre_join_checks update function assert_only_physical_pifs to check Pool master management_interface is on same VLAN.Host.get_management_interface on Pool master and get the vlanID, match it with localhost management_interface VLAN ID.
If it matches then allow pool-join.Currently managament interface VLAN config on host is not been retained in xensource-inventory or management.conf file.
We need to retain the vlanID under config files.
Steps to be followed:
Pool.eject we need to update write_first_boot_management_interface_configuration_file function.managament.conf file and the bridge into xensource-inventory file.
In order to be retained by XCP-Networkd on startup after the host is ejected.Currently there is no Pool Level API to reconfigure management_interface for all of the Hosts in a Pool at once.
API Pool.management_reconfigure will be needed in order to reconfigure manamegemnt_interface on all hosts in a Pool to the same Network either VLAN or Physical.
Currently call Host.management_reconfigure with VLAN pif-uuid can change the management_interface to specified VLAN.
Listing the steps to understand the workflow of management_interface reconfigure. We will be using Host.management_reconfigure call inside the new API.
Steps performed during management_reconfigure:
bring_pif_up get called for the pif.xensource-inventory get updated with the latest info of interface.
3 update-mh-info updates the management_mac into xenstore._the_ management interface is used by slaves to connect to pool master.on_dom0_networking_change refreshes console URIs for the new IP address.Listing steps to be performed manually on each Host or Pool as a prerequisite to use the New API. We need to make sure that new network which is going to be a management interface has PIFs configured on each Host. In case of pyhsical network we will assume pifs are configured on each host, In case of vlan network we need to create vlan pifs on each Host. We would assume that VLAN is available on the switch/network.
Manual steps to be performed before calling new API:
network.create, In case of pyhsical NICs network must be present.VLAN.create using above network ref, physical PIF ref and vlanID, Not needed in case of pyhsical network.
Or An Alternate call pool.create_VLAN providing device and above network will create vlan PIFs for all hosts in a pool.PIF.reconfigure_ip for each new Network PIF on each Host.If User wishes to change the management interface manually on each Host in a Pool, We should allow it, There will be a guideline for that:
User can individually change management interface on each host calling Host.management_reconfigure using pifs on physical devices or vlan pifs.
This must be perfomed on slaves first and lastly on Master, As changing management_interface on master will disconnect slaves from master then further calls Host.management_reconfigure cannot be performed till master recover slaves via call pool.recover_slaves.
Pool.management_reconfigurenetwork.management_interface on each host of a pool.network provided it will check pifs are present on each Host,
In case of VLAN network it will check vlan pifs on provided network are present on each Host of Pool.Host.management_reconfigure on each slave then lastly on master.pool.recover_slaves on master inorder to recover slaves which might have lost the connection to master.Possible API errors that may be raised by pool.management_reconfigure:
INTERFACE_HAS_NO_IP : the specified PIF (pif parameter) has no IP configuration. The new API checks for all PIFs on the new Network has IP configured. There might be a case when user has forgotten to configure IP on PIF on one or many of the Hosts in a Pool.New API ERROR:
REQUIRED_PIF_NOT_PRESENT : the specified Network (network parameter) has no PIF present on the host in pool. There might be a case when user has forgotten to create vlan pif on one or many of the Hosts in a Pool.| Design document | |
|---|---|
| Revision | v1 |
| Status | proposed |
To reduce VM migration time, we want to compress the VM migration data stream. This document describes a new approach that might replace an existing feature, described first below.
Xapi implements external migration stream compression. This uses an
external zstd process each to compress (source) and decompress
(destination) the VM and GPU streams, restively. The compression is
transparent to the underlying daemons like XenGuest and vgpu/demu. It is
controlled by an optional boolean parameter compress to the VM.migrate
API/XE call. When not explicitly provided, a boolean pool parameter
Pool.migration_compression is used. The current default (false) is to
not use use compression for migration. A pool-level default simplifies
managing the policy to use for migration compared to a host-level
default.
This feature requires to communicate the use of compression to the receiving host such that it can set up the decompression; this is done using cookies. Both VM and GPU memory is compressed during VM migration.
Benchmarking found that this compression scheme is only beneficial when using slow networks (like 10Gb Ethernet). It comes with considerable internal overhead from using processes and pipe communication for the compression and decompression work. That is the reason stream compression is not enabled by default.
The main implementation of the feature (with some changes added later) is in commit:
This design is about adding an alternative stream compression. This one is implemented inside XenGuest such that the stream it produces is internally using compression. XenGuest is not using an external process for this and hence incurs less overhead because no process intercommunication is required. Benchmarking confirmed the performance advantage of this architecture.
The use of compression on the source side needs to be signaled by Xenopsd via a command line argument to emu0manager and XenGuest. On the receiving side XenGuest will recognise the compressed stream and does not require special signaling.
Xapi only permits migration from older to newer versions of the Xapi Toolstack. This implies that no older XenGuest version will ever receive a potentially compressed stream that it would not be equipped to handle. For backward compatibility, xapi still needs to be able to receive a compressed migration stream using external compression - even if future Xapi implementation chose no longer to create them.
Currently only the stream created by XenGuest would use compression, but not the stream containing GPU data created by vgpu/demu. This might change in the future when we decide to implement in-stream compression there, too.
Theoretically, internal compression implemented in XenGuest and existing external compression are independent and could be used both. However, this would apply a compression to an already compressed stream, which is unlikely to be effective and we don’t plan to support this feature.
VM.pool_migrate API and xe vm-migrate remain unchanged. Both accept
an optional boolean value that indicates whether to use compression or
not. In the absence of this parameter, the default is taken from
Pool.migration_compression (which is currently false).
The compression method used when Pool.migration_compression=true is
not controlled by the API or the customer but is controlled by a
default in xenopsd which can be changed in xenopd.conf for testing.
In summary, this means the API and XE CLI interface remain unchanged.
Outside the changes described here, the following other components are affected:
EMU Manager needs to accept a new flag to indicated that compression is used during migration.
XenGuest needs to accept a flag passed by EMU Manager to use compression.
Xapi will always accept stream/external compressed migration streams but might stop using them for migration.
We might add internal compression to vGPU migration in the future. The API would be unaffected by this.
The current design forces all destinations to accept all compression streams because compatibility is not negotiate between source and destination. This is a general problem and not limited to compression. We could expose a general table to clients that lists features supported by xenopsd such that any other xenopsd would send data in the preferred format.
| Design document | |
|---|---|
| Revision | v2 |
| Status | confirmed |
| Revision history | |
| v1 | Initial revision |
| v2 | Short-term simplications and scope reduction |
Xapi currently uses a cluster manager called xhad. Sometimes other software comes with its own built-in way of managing clusters, which would clash with xhad (example: xhad could choose to fence node ‘a’ while the other system could fence node ‘b’ resulting in a total failure). To integrate xapi with this other software we have 2 choices:
This document proposes a way to do the latter.
We will add the following new field:
pool.ha_cluster_stack of type string (read-only)"xhad" on upgrade, which implies that so far we have used XenServer’s own cluster stack, called xhad.We assume for now that a particular cluster manager will be mandated (only) by certain types of clustered storage, recognisable by SR type (e.g. OCFS2 or Melio). The SR backend will be able to inform xapi if the SR needs a particular cluster stack, and if so, what is the name of the stack.
When pool.enable_ha is called, xapi will determine which cluster stack to use based on the presence or absence of such SRs:
xhad.If multiple SRs that need a particular cluster stack exist, then the storage parts of xapi must ensure that no two such SRs are ever attached to a pool at the same time.
We will add the following API error that may be raised by pool.enable_ha:
INCOMPATIBLE_STATEFILE_SR: the specified SRs (heartbeat_srs parameter) are not of the right type to hold the HA statefile for the cluster_stack that will be used. For example, there is a Melio SR attached to the pool, and therefore the required cluster stack is the Melio one, but the given heartbeat SR is not a Melio SR. The single parameter will be the name of the required SR type.The following new API error may be raised by PBD.plug:
INCOMPATIBLE_CLUSTER_STACK_ACTIVE: the operation cannot be performed because an incompatible cluster stack is active. The single parameter will be the name of the required cluster stack. This could happen (or example) if you tried to create an OCFS2 SR with XenServer HA already enabled.In future, we may add a parameter to explicitly choose the cluster stack:
pool.enable_ha called cluster_stack of type string which will have the default value of empty string (meaning: let the implementation choose).pool.enable_ha may raise two new errors:UNKNOWN_CLUSTER_STACK:
The operation cannot be performed because the requested cluster stack does not exist. The user should check the name was entered correctly and, failing that, check to see if the software is installed. The exception will have a single parameter: the name of the cluster stack which was not found.CLUSTER_STACK_CONSTRAINT: HA cannot be enabled with the provided cluster stack because some third-party software is already active which requires a different cluster stack setting. The two parameters are: a reference to an object (such as an SR) which has created the restriction, and the name of the cluster stack that this object requires.The xapi.conf file will have a new field: cluster-stack-root which will have the default value /usr/libexec/xapi/cluster-stack. The existing xhad scripts and tools will be moved to /usr/libexec/xapi/cluster-stack/xhad/. A hypothetical cluster stack called foo would be placed in /usr/libexec/xapi/cluster-stack/foo/.
In Pool.enable_ha with cluster_stack="foo" we will verify that the subdirectory <cluster-stack-root>/foo exists. If it does not exist, then the call will fail with UNKNOWN_CLUSTER_STACK.
Alternative cluster stacks will need to conform to the exact same interface as xhad.
| Design document | |
|---|---|
| Revision | v1 |
| Status | proposed |
Xen’s ioreq-server feature allows for several device emulator
processes to be attached to the same domain, each emulating different
sets of virtual hardware. This makes it possible, for example, to
emulate network devices in a separate process for improved security
and isolation, or to provide special purpose emulators for particular
virtual hardware devices.
ioreq-server is currently used in XenServer to support vGPU, where it
is configured via the legacy toolstack interface. These changes will make
multiple emulators usable in open source Xen via the new libxl interface.
The singleton device_model_version, device_model_stubdomain and device_model fields in the b_info structure will be replaced by a list of (version, stubdomain, model, arguments) tuples, one for each emulator.
libxl_domain_create_new() will be changed to spawn a new device model for each entry in the list.
It may also be useful to spawn the device models separately and only
attach them during domain creation. This could be supported by
making each device_model entry a union of pid | parameter_tuple.
If such an entry specifies a parameter tuple, it is processed as above;
if it specifies a pid, libxl_domain_create_new(), the existing device
model with that pid is attached instead.
Patches to make QEMU register with Xen as an ioreq-server have been submitted upstream, but not yet applied.
QEMU’s --machine none and --nodefaults options should make it
possible to create an empty machine and add just a host bus, PCI bus
and device. This has not yet been fully demonstrated, so QEMU changes
may be required.
ioreq-server has only been used to connect one extra
device model, in addition to the default one. Multiple emulators
should work, but there is a chance that bugs will be discovered.This functionality will only be available through the experimental Xenlight-based xenopsd.
VM_build clause in the atomics_of_operation function will be
changed to fill in the list of emulators to be created (or attached)
in the b_info structvGPU support is implemented mostly in xenopsd, so no Xapi changes are required to support vGPU through the generic device model mechanism. Changes would be required if we decided to expose the additional device models through the API, but in the near future it is more likely that any additional device models will be dealt with entirely by xenopsd.
| Design document | |
|---|---|
| Revision | v1 |
| Status | proposed |
NUMA stands for Non-Uniform Memory Access and describes that RAM access for CPUs in a large system is not equally fast for all of them. CPUs are grouped into so-called nodes and each node has fast access to RAM that is considered local to its node and slower access to other RAM. Conceptually, a node is a container that bundles some CPUs and RAM and there is an associated cost when accessing RAM in a different node. In the context of CPU virtualisation assigning vCPUs to NUMA nodes is an optimisation strategy to reduce memory latency. This document describes a design to make NUMA-related assignments for Xen domains (hence, VMs) visible to the user. Below we refer to these assignments and optimisations collectively as NUMA for simplicity.
NUMA is more generally discussed as NUMA Feature.
Xen 4.20 implements NUMA optimisation. We want to expose the following
NUMA-related properties of VMs to API clients, and in particualar
XenCenter. Each one is represented by a new field in XAPI’s VM_metrics
data model:
VM_metrics.numa_optimised: boolean: if the VM is
optimised for NUMAVM_metrics.numa_nodes: integer: number of NUMA nodes of the host
the VM is usingVM_metrics.numa_node_memory: int -> int map; mapping a NUMA node
(int) to an amount of memory (bytes) in that node.Required NUMA support is only available in Xen 4.20. Some parts of the code will have to be managed by patches.
As far as Xapi clients are concerned, we implement new fields in the
VM_metrics class of the data model and surface the values in the CLI
via records.ml; we could decide to make numa_optimised visible by
default in xe vm-list.
Introducing new fields requires defaults; these would be:
numa_optimised: falsenuma_nodes: 0numa_node_memory: []The data model ensures that the values are visible to API clients.
NUMA properties are observed by Xenopsd and Xapi learns about them as
part of the Client.VM.stat call implemented by Xenopsd. Xapi makes
these calls frequently and we will update the Xapi VM fields related to
NUMA simply as part of processing the result of such a call in Xapi.
For this to work, we extend the return type of VM.stat in
xenops_types.ml, type Vm.statewith three fields:
numa_optimised: boolnuma_nodes: intnuma_node_memory: (int, int64) listmatching the semantics from above.
Xenopsd implements the VM.stat return value in
Xenops_server_sen.get_statewhere the three fields would be set. Xenopsds relies on bindings to Xen to observe NUMA-related properties of a domain.
Given that NUMA related functionality is only available for Xen 4.20, we probably will have to maintain a patch in xapi.spec for compatibility with earlier Xen versions.
The (existing) C bindings and changes come in two forms: new functions and an extension of a type used by and existing function.
    external domain_get_numa_info_node_pages_size : handle -> int -> int
      = "stub_xc_domain_get_numa_info_node_pages_size"
Thia function reports the number of NUMA nodes used by a Xen domain (supplied as an argument)
    type domain_numainfo_node_pages = {
      tot_pages_per_node : int64 array;
    }
    external domain_get_numa_info_node_pages :
      handle -> int -> int -> domain_numainfo_node_pages
      = "stub_xc_domain_get_numa_info_node_pages"
This function receives as arguments a domain ID and the number of nodes
this domain is using (acquired using domain_get_numa_info_node_pages)
The number of NUMA nodes of the host (not domain) is reported by
Xenctrl.physinfo which returns a value of type physinfo.
    index b4579862ff..491bd3fc73 100644
    --- a/tools/ocaml/libs/xc/xenctrl.ml
    +++ b/tools/ocaml/libs/xc/xenctrl.ml
    @@ -155,6 +155,7 @@ type physinfo =
         capabilities     : physinfo_cap_flag list;
         max_nr_cpus      : int;
         arch_capabilities : arch_physinfo_cap_flags;
    +    nr_nodes         : int;
       }
We are not reporting nr_nodes directly but use it to determine the
value of numa_optimised for a domain/VM:
numa_optimised =
    (VM.numa_nodes = 1)
    or (VM.numa_nodes < physinfo.Xenctrl.nr_nodes)
The three new fields that become part of type VM.state are updated as
part of get_state() using the primitives above.
| Design document | |
|---|---|
| Revision | v1 |
| Status | proposed |
OCFS2 is a (host-)clustered filesystem which runs on top of a shared raw block device. Hosts using OCFS2 form a cluster using a combination of network and storage heartbeats and host fencing to avoid split-brain.
The following diagram shows the proposed architecture with xapi:
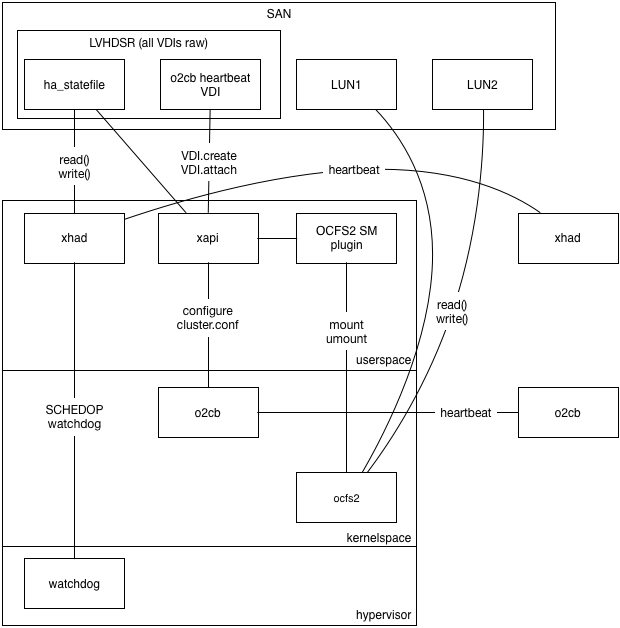
Please note the following:
xapi will be
modified to configure the cluster and manage the cluster node numbers.xhad process which runs in userspace but in the realtime
scheduling class so it has priority over all other userspace tasks. xhad
sends heartbeats via the ha_statefile VDI and via UDP, and uses the
Xen watchdog for host fencing.o2cb kernel driver which sends heartbeats via the
o2cb_statefile and via TCP, fencing the host by panicing domain 0.OCFS2 uses the O2CB “cluster stack” which is similar to our xhad. To configure
O2CB we need to
In the current Xapi toolstack there is a single global implicit cluster called a “Pool” which is used for: resource locking; “clustered” storage repositories and fault handling (in HA). In the long term we will allow these types of clusters to be managed separately or all together, depending on the sophistication of the admin and the complexity of their environment. We will take a small step in that direction by keeping the OCFS2 O2CB cluster management code at “arms length” from the Xapi Pool.join code.
In xcp-idl we will define a new API category called “Cluster” (in addition to the categories for Xen domains , ballooning , stats , networking and storage ). These APIs will only be called by Xapi on localhost. In particular they will not be called across-hosts and therefore do not have to be backward compatible. These are “cluster plugin APIs”.
We will define the following APIs:
Plugin:Membership.create: add a host to a cluster. On exit the local host cluster software
will know about the new host but it may need to be restarted before the
change takes effecthostname:string: the hostname of the management domainuuid:string: a UUID identifying the hostid:int: the lowest available unique integer identifying the host
where an integer will never be re-used unless it is guaranteed that
all nodes have forgotten any previous state associated with itaddress:string list: a list of addresses through which the host
can be contactedPlugin:Membership.destroy: removes a named host from the cluster. On exit the local
host software will know about the change but it may need to be restarted
before it can take effectuuid:string: the UUID of the host to removePlugin:Cluster.query: queries the state of the clustermaintenance_required:bool: true if there is some outstanding configuration
change which cannot take effect until the cluster is restarted.hosts: a list of all known hosts together with a state including:
whether they are known to be alive or dead; or whether they are currently
“excluded” because the cluster software needs to be restartedPlugin:Cluster.start: turn on the cluster software and let the local host joinPlugin:Cluster.stop: turn off the cluster softwareXapi will be modified to:
Cluster which will have columnsname: string: this is the name of the Cluster plugin (TODO: use same
terminology as SM?)configuration: Map(String,String): this will contain any cluster-global
information, overrides for default values etc.enabled: Bool: this is true when the cluster “should” be running. It
may require maintenance to synchronise changes across the hosts.maintenance_required: Bool: this is true when the cluster needs to
be placed into maintenance mode to resync its configurationXenAPI:Cluster.enable which sets enabled=true and waits for all
hosts to report Membership.enabled=true.XenAPI:Cluster.disable which sets enabled=false and waits for all
hosts to report Membership.enabled=false.Membership which will have columnsid: int: automatically generated lowest available unique integer
starting from 0cluster: Ref(Cluster): the type of cluster. This will never be NULL.host: Ref(host): the host which is a member of the cluster. This may
be NULL.left: Date: if not 1/1/1970 this means the time at which the host
left the cluster.maintenance_required: Bool: this is true when the Host believes the
cluster needs to be placed into maintenance mode.Host.memberships: Set(Ref(Membership))vdi_type to include o2cb_statefile as well as ha_statefilePool.enable_o2cb with argumentsheartbeat_sr: Ref(SR): the SR to use for global heartbeatsconfiguration: Map(String,String): available for future configuration tweaksPool.enable_ha this will find or create the heartbeat VDI, create the
Cluster entry and the Membership entries. All Memberships will have
maintenance_required=true reflecting the fact that the desired cluster
state is out-of-sync with the actual cluster state.XenAPI:Membership.enableself:Host: the host to modifycluster:Cluster: the cluster.XenAPI:Membership.disableself:Host: the host to modifycluster:Cluster: the cluster name.Host.memberships field and calls Plugin:Membership.create and
Plugin:Membership.destroy to keep the local cluster software up-to-date
when any host in the pool changes its configurationPlugin:Cluster.query after an Plugin:Membership:create or
Plugin:Membership.destroy to see whether the
SR needs maintenanceMembership
record’s left date, deletes the Membership.XenAPI:Pool.join to resync with the master’s Host.memberships list.XenAPI:Pool.eject toMembership.disable in the cluster plugin to stop the o2cb serviceMembership.destroy in the cluster plugin to remove every other host
from the local configurationHost metadata from the poolXenAPI:Membership.left to NOW()XenAPI:Host.forget toHost metadata from the poolXenAPI:Membership.left to NOW()XenAPI:Cluster.maintenance_required to trueA Cluster plugin called “o2cb” will be added which
Plugin:Membership.destroyPlugin:Membership.createPlugin:Cluster.start: find the VDI with type=o2cb_statefile;
add this to the “static-vdis” list; chkconfig the service on. We
will use the global heartbeat mode of o2cb.Plugin:Cluster.stop: stop the service; chkconfig the service off;
remove the “static-vdis” entry; leave the VDI itself aloneSummary of differences between this and xHA:
o2cb we
should be able to have join work live and only eject requires
maintenance modeWe need to ensure o2cb and xhad do not try to conflict by fencing
hosts at the same time. We shall:
use the default o2cb timeouts (hosts fence if no I/O in 60s): this
needs to be short because disk I/O on otherwise working hosts can
be blocked while another host is failing/ has failed.
make the xhad host fence timeouts much longer: 300s. It’s much more
important that this is reliable than fast. We will make this change
globally and not just when using OCFS2.
In the xhad config we will cap the HeartbeatInterval and StatefileInterval
at 5s (the default otherwise would be 31s). This means that 60 heartbeat
messages have to be lost before xhad concludes that the host has failed.
The SM plugin OCFS2 will be a file-based plugin.
TODO: which file format by default?
The SM plugin will first check whether the o2cb cluster is active and fail
operations if it is not.
When either HA or OCFS O2CB “fences” the host it will look to the admin like a host crash and reboot. We need to (in priority order)
If heartbeat I/O fails for more than 60s when running o2cb then the host will fence.
This can happen either
for a good reason: for example the host software may have deadlocked or someone may have pulled out a network cable.
for a bad reason: for example a network bond link failure may have been ignored and then the second link failed; or the heartbeat thread may have been starved of I/O bandwidth by other processes
Since the consequences of fencing are severe – all VMs on the host crash simultaneously – it is important to avoid the host fencing for bad reasons.
We should recommend that all users
Furthermore we need to help users monitor their I/O paths. It’s no good if they use a bonded network but fail to notice when one of the paths have failed.
The current XenServer HA implementation generates the following I/O-related alerts:
HA_HEARTBEAT_APPROACHING_TIMEOUT (priority 5 “informational”): when half the
network heartbeat timeout has been reached.HA_STATEFILE_APPROACHING_TIMEOUT (priority 5 “informational”): when half the
storage heartbeat timeout has been reached.HA_NETWORK_BONDING_ERROR (priority 3 “service degraded”): when one of the bond
links have failed.HA_STATEFILE_LOST (priority 2 “service loss imminent”): when the storage heartbeat
has completely failed and only the network heartbeat is left.Unfortunately alerts are triggered on “edges” i.e. when state changes, and not on “levels” so it is difficult to see whether the link is currently broken.
We should define datasources suitable for use by xcp-rrdd to expose the current state (and the history) of the I/O paths as follows:
pif_<name>_paths_failed: the total number of paths which we know have failed.pif_<name>_paths_total: the total number of paths which are configured.sr_<name>_paths_failed: the total number of storage paths which we know have failed.sr_<name>_paths_total: the total number of storage paths which are configured.The pif datasources should be generated by xcp-networkd which already has a
network bond monitoring thread.
THe sr datasources should be generated by xcp-rrdd plugins since there is no
storage daemon to generate them.
We should create RRDs using the MAX consolidation function, otherwise information
about failures will be lost by averaging.
XenCenter (and any diagnostic tools) should warn when the system is at risk of fencing in particular if any of the following are true:
pif_<name>_paths_failed is non-zerosr_<name>_paths_failed is non-zeropif_<name>_paths_total is less than 2sr_<name>_paths_total is less than 2XenCenter (and any diagnostic tools) should warn if any of the following have been true over the past 7 days:
pif_<name>_paths_failed is non-zerosr_<name>_paths_failed is non-zeroThe network and storage paths used by heartbeats must remain responsive otherwise the host will fence (i.e. the host and all VMs will crash).
Outstanding issue: how slow can multipathd get? How does it scale with the number of
LUNs.
When a host crashes the effect on the user is severe: all the VMs will also crash. In cases where the host crashed for a bad reason (such as a single failure after a configuration error) we must help the user understand how they can avoid the same situation happening again.
We must make sure the crash kernel runs reliably when xhad and o2cb
fence the host.
Xcp-rrdd will be modified to store RRDs in an mmap(2)d file sin the dom0
filesystem (rather than in-memory). Xcp-rrdd will call msync(2) every 5s
to ensure the historical records have hit the disk. We should use the same
on-disk format as RRDtool (or as close to it as makes sense) because it has
already been optimised to minimise the amount of I/O.
Xapi will be modified to run a crash-dump analyser program xen-crash-analyse.
xen-crash-analyse will:
o2cbxhado2cb or xhad then the analyserxhad.log and look for evidence of heartbeats “approaching
timeout”TODO: depending on what information we can determine from the analyser, we
will want to record some of it in the Host_crash_dump database table.
XenCenter will be modified to explain why the host crashed and explain what the user should do to fix it, specifically:
o2cb or xhad then eitherThe documentation should strongly recommend
xcp-networkd will be modified to change the behaviour of the DHCP client.
Currently the dhclient will wait for a response and eventually background
itself. This is a big problem since DHCP can reset the hostname, and this can
break o2cb. Therefore we must insist that PIF.reconfigure_ip becomes
fully synchronous, supporting timeout and cancellation. Once the call returns
– whether through success or failure – there must not be anything in the
background which will change the system’s hostname.
TODO: figure out whether we need to request “maintenance mode” for hostname changes.
The purpose of “maintenance mode” is to take a host out of service and leave it in a state where it’s safe to fiddle with it without affecting services in VMs.
XenCenter currently does the following:
Host.disable: prevents new VMs starting hereHost.evacuate: move the running VMs somewhere elseThe problems with maintenance mode are:
We should also
PBD.unplug: all storage. This allows the network to be safely reconfigured.
If the network is configured when NFS storage is plugged then the SR can
permanently deadlock; if the network is configured when OCFS2 storage is
plugged then the host can crash.TODO: should we add a Host.prepare_for_maintenance (better name TBD)
to take care of all this without XenCenter having to script it. This would also
help CLI and powershell users do the right thing.
TODO: should we insist that the host is rebooted to leave maintenance mode? This would make maintenance mode more reliable and allow us to integrate maintenance mode with xHA (where maintenance mode is a “staged reboot”)
TODO: should we leave all clusters as part of maintenance mode? We probably need to do this to avoid fencing.
Assume you have an existing Pool of 2 hosts. First the client will set up the O2CB cluster, choosing where to put the global heartbeat volume. The client should check that the I/O paths have all been setup correctly with bonding and multipath and prompt the user to fix any obvious problems.

Internally within Pool.enable_o2cb Xapi will set up the cluster metadata
on every host in the pool:

At this point all hosts have in-sync cluster.conf files but all cluster
services are disabled. We also have requires_mainenance=true on all
Membership entries and the global Cluster has enabled=false.
The client will now try to enable the cluster with Cluster.enable:

Now all hosts are in the cluster and the SR can be created using the standard SM APIs.
Assume you have an existing Pool of 2 hosts with o2cb clustering enabled
and at least one ocfs2 filesystem mounted. If the host is online then
XenAPI:Pool.eject will:

Note that:
o2cb cluster.conf to comment out
the former hostMembership table still remembers the node number of the ejected host–
this cannot be re-used until the SR is taken down for maintenance.cluster.conf
and the one they would use if they restarted the cluster service, so all
hosts report that the cluster must be taken offline i.e. requires_maintence=true.OCFS2 is fundamentally a different type of storage to all existing storage
types supported by xapi. OCFS2 relies upon O2CB, which provides
Host-level High Availability. All HA implementations
(including O2CB and xhad) impose restrictions on the server admin to
prevent unnecessary host “fencing” (i.e. crashing). Once we have OCFS2 as
a feature, we will have to live with these restrictions which previously only
applied when HA was explicitly enabled. To reduce complexity we will not try
to enforce restrictions only when OCFS2 is being used or is likely to be used.
| Design document | |
|---|---|
| Revision | v1 |
| Status | proposed |
“Patches” are signed binary blobs which can be queried and applied.
They are stored in the dom0 filesystem under /var/patch. Unfortunately
the patches can be quite large – imagine a repo full of RPMs – and
the dom0 filesystem is usually quite small, so it can be difficult
to upload and apply some patches.
Instead of writing patches to the dom0 filesystem, we shall write them to disk images (VDIs) instead. We can then take advantage of features like
VDI.copyto manage the patches.
Add a field pool_patch.VDI of type Ref(VDI). When a new patch is
stored in a VDI, it will be referenced here. Older patches and cleaned
patches will have invalid references here.
The HTTP handler for uploading patches will choose an SR to stream the
patch into. It will prefer to use the pool.default_SR and fall back
to choosing an SR on the master whose driver supports the VDI_CLONE
capability: we want the ability to fast clone patches, one per host
concurrently installing them. A VDI will be created whose size is 4x
the apparent size of the patch, defaulting to 4GiB if we have no size
information (i.e. no content-length header)
pool_patch.clean_on_host will be deprecated. It will still try to
clean a patch from the local filesystem but this is pointless for
the new VDI patch uploads.
pool_patch.clean will be deprecated. It will still try to clean a patch
from the local filesystem of the master but this is pointless for the
new VDI patch uploads.
pool_patch.pool_clean will be deprecated. It will destroy any associated
patch VDI. Users will be encouraged to call VDI.destroy instead.
pool_patch records will only be deleted if both the filename field
refers to a missing file on the master and the VDI field is a dangling
reference
Patches stored in VDIs will be stored within a filesystem, like we used
to do with suspend images. This is needed because (a) we want to execute
the patches and block devices cannot be executed; and (b) we can use
spare space in the VDI as temporary scratch space during the patch
application process. Within the VDI we will call patches patch rather
than using a complicated filename.
When a host wishes to apply a patch it will call VDI.copy to duplicate
the VDI to a locally-accessible SR, mount the filesystem and execute it.
If the patch is still in the master’s dom0 filesystem then it will fall
back to the HTTP handler.
| Design document | |
|---|---|
| Revision | v1 |
| Status | proposed |
GPU passthrough is already available in XAPI, this document proposes to also offer passthrough for all PCI devices through XAPI.
New methods for PCI object:
PCI.enable_dom0_access
PCI.disable_dom0_access
PCI.get_dom0_access_status: compares the outputs of /opt/xensource/libexec/xen-cmdline
and /proc/cmdline to produce one of the four values that can be currently contained
in the PGPU.dom0_access field:
How do determine the expected dom0 access state:
If the device id is present in both pciback.hide of /proc/cmdline and xen-cmdline: enabled
If the device id is present not in both pciback.hide of /proc/cmdline and xen-cmdline: disabled
If the device id is present in the pciback.hide of /proc/cmdline but not in the one of xen-cmdline: disabled_on_reboot
If the device id is not present in the pciback.hide of /proc/cmdline but is in the one of xen-cmdline: enabled_on_reboot
A function rather than a field makes the data always accurate and even accounts for
changes made by users outside XAPI, directly through /opt/xensource/libexec/xen-cmdline
With these generic methods available, the following field and methods will be deprecated:
PGPU.enable_dom0_accessPGPU.disable_dom0_accessPGPU.dom0_access (DB field)They would still be usable and up to date with the same info as for the PCI methods.
hide a PCI:
PCI.disable_dom0_access on an enabled PCIdisabled_on_rebootdisabledunhide a PCI:
PCI.enable_dom0_access on an disabled PCIenabled_on_rebootenabledget a PCI dom0 access state:
enabled PCI, make sure the get_dom0_access_status returns enabledget_dom0_access_status returns disabled_on_rebootget_dom0_access_status returns disabledget_dom0_access_status returns enabled_on_rebootget_dom0_access_status returns enabledCheck PCI/PGPU dom0 access coherence:
| Design document | |
|---|---|
| Revision | v1 |
| Status | proposed |
The SMAPIv3 plugin architecture requires that storage plugins are able to work in the absence of xapi. Amongst other benefits, this allows them to be tested in isolation, are able to be shared more widely than just within the XenServer community and will cause less load on xapi’s database.
However, many of the currently existing SMAPIv1 backends require inter-host operations to be performed. This is achieved via the use of the Xen-API call ‘host.call_plugin’, which allows an API user to execute a pre-installed plugin on any pool member. This is important for operations such as coalesce / snapshot where the active data path for a VM somewhere in the pool needs to be refreshed in order to complete the operation. In order to use this, the RPM in which the SM backend lives is used to deliver a plugin script into /etc/xapi.d/plugins, and this executes the required function when the API call is made.
In order to support these use-cases without xapi running, a new mechanism needs to be provided to allow the execution of required functionality on remote hosts. The canonical method for remotely executing scripts is ssh - the secure shell. This design proposal is setting out how xapi might manage the public and private keys to enable passwordless authentication of ssh sessions between all hosts in a pool.
On firstboot (and after being ejected), the host should generate a host key (already done I believe), and an authentication key for the user (root/xapi?).
Three new fields will be added to the host object:
host.ssh_public_host_key : string: This is the host key that identifies the host
during the initial ssh key exchange protocol. This should be added to the
‘known_hosts’ field of any other host wishing to ssh to this host.
host.ssh_public_authentication_key : string: This field is the public
key used for authentication when sshing from the root account on that host -
host A. This can be added to host B’s authorized_keys file in order to
allow passwordless logins from host A to host B.
host.ssh_ready : bool: A boolean flag indicating that the configuration
files in use by the ssh server/client on the host are up to date.
One new field will be added to the pool record:
pool.revoked_authentication_keys : string list: This field records all
authentication keys that have been used by hosts in the past. It is updated
when a host is ejected from the pool.On pool join, the master creates the record for the new host and populates the
two public key fields with values supplied by the joining host. It then sets
the ssh_ready field on all other hosts to false.
On each host in the pool, a thread is watching for updates to the
ssh_ready value for the local host. When this is set to false, the host
then adds the keys from xapi’s database to the appropriate places in the ssh
configuration files and restarts sshd. Once this is done, the host sets the
ssh_ready field to ’true’
On pool eject, the host’s ssh_public_host_key is lost, but the authetication key is added to a list of revoked keys on the pool object. This allows all other hosts to remove the key from the authorized_keys list when they next sync, which in the usual case is immediately the database is modified due to the event watch thread. If the host is offline though, the authorized_keys file will be updated the next time the host comes online.
| Design document | |
|---|---|
| Revision | v1 |
| Status | proposed |
There is a significant delay between the VM being unpaused and XAPI reporting it as started during a bootstorm. It can happen that the VM is able to send UDP packets already, but XAPI still reports it as not started for minutes.
XAPI currently processes all events from xenopsd in a single thread, the unpause events get queued up behind a lot of other events generated by the already running VMs.
We need to ensure that unpause events from xenopsd get processed in a timely manner, even if XAPI is busy processing other events.
If we process the events in a Round-Robin fashion then unpause events are reported in a timely fashion.
We need to ensure that events operating on the same VM are not processed in parallel.
Xenopsd already has code that does exactly this, the purpose of the xapi-work-queues refactoring PR is to
reuse this code in XAPI by creating a shared package between xenopsd and xapi: xapi-work-queues.
From the documentation of the new Worker Pool interface:
A worker pool has a limited number of worker threads. Each worker pops one tagged item from the queue in a round-robin fashion. While the item is executed the tag temporarily doesn’t participate in round-robin scheduling. If during execution more items get queued with the same tag they get redirected to a private queue. Once the item finishes execution the tag will participate in RR scheduling again.
This ensures that items with the same tag do not get executed in parallel, and that a tag with a lot of items does not starve the execution of other tags.
The XAPI side of the changes will look like this
Known limitations: The active per-VM events should be a small number, this is already ensured in the push_with_coalesce / should_keep code on the xenopsd side. Events to XAPI from xenopsd should already arrive coalesced.
| Design document | |
|---|---|
| Revision | v2 |
| Status | draft |
We have had several customer incidents in the past that have been attributed to “overloading” Xapi. This effectively means that a client is making requests at a rate that Xapi cannot handle. This can result in very bad response times (“we tried to shut down 20 VMs and this took 2 hours!”) and general system instability and unavailability.
In some cases, there is a mix of “well behaved” clients and others that are either misconfigured or make improper use of the API, hammering the pool and breaking use of the good guys. For example, a dodgy monitoring service may lock out the control software, or slow down VM lifecycle operations.
Part of the problem is that Xapi and xenopsd are not very good at handling load, in particular in a pool where the coordinator is often a bottleneck. A lot of work has already been done make the Toolstack cope better under load. This is important and a lot more can be done in this space.
However, even a very efficient Toolstack can be overloaded by a particularly determined client, unless the client is deliberate slowed down in some way. Hence, a way of throttling clients is needed in addition to performance improvements, as a complimentary approach.
Last year, thread prioritisation was tried. This could be revisited, but we also need an approach that allows us to pose hard constraints on clients. For example, as an admin, I want to configure Xapi to give my control panel unlimited access, but explicitly limit how much Monitoring App X can do.
The proposal here is to do a simpler kind of per-client rate limiting at the API level. The objective is to introduce a simple mechanism to slow down individual clients which are overloading the system. This design intentionally enforces rate limits on a per-client basis rather than capping total system throughput. System-wide admission control or global load shedding is explicitly out of scope and would require separate mechanisms.
The idea is to use a Token Bucket algorithm, where each client gets its own Token Bucket with specific parameters to rate limit its requests. The Token Bucket algorithm has two basic parameters:
The capacity: the maximum number of tokens that fit in the bucket.
The fill rate: the number of tokens per second that get added to the bucket (up to its capacity).
Serving requests consumes tokens for the bucket - the token cost will be proportional to the amount of work that the request requires. For example, a simple DB call like VM.get_power_state may cost 1 token, while a VM.start call may cost 100 tokens.
The basic principle is that for a client to get a request accepted, it needs to have enough tokens in the bucket. If there are not enough tokens, then the request will be queued until there are enough - the bucket is constantly refilled, so all requests eventually get served. When a request is accepted, its required number of tokens are taken out of the bucket.
Therefore, the bucket’s fill rate determines the long-term average rate at which requests are served. For example, if the rate is 1 token/second, then on average 1 DB call per second can be made.
The capacity is related to the maximum “burst size”. For example, a capacity of 100 tokens means that, if the bucket is full, the client can make 100 DB calls in quick succession, before it is slowed done to match the rate.
One instance of a Token Bucket would apply to all calls from a given client, potentially made on multiple connections.
In order to let pool administrators know who they should be rate limiting, we will also introduce a Caller datamodel class which tracks all requests made to Xapi.
Callers will be a high-level way of tracking clients. We allow callers to be identified by a number of different parameters: AD user, IP address, originator, user agent. When an unknown caller makes a request to Xapi, we record their data in a new row. The pool administrator will be able to merge related callers together and assign them labels.
The caller classification allows wildcards for any field, though we require that at least one field be specified. This lets us, for example, combine all accesses from the Xapi python API by specifying the user-agent .
A rate limiter can be associated with any number of callers, and the parameters of the rate limiter can either be derived from the usage patterns of the callers or selected from a number of preset profiles.
In order to assist with rate limiting, we can store statistics about callers. We identify two kinds of statistics: volatile and stable. Volatile statistics change over time without any input, e.g. sliding windows. These will be stored in RRDs. By contrast, stable statistics only vary at most once per request, and so are safe to store in the main database.
Volatile statistics:
Stable statistics:
We propose two new datamodel tables: Caller, which stores the data associated with each caller, and Rate limit, which identifies one or more callers with a rate limiter.
Caller:
| Mutability | Name | Type | Description |
|---|---|---|---|
| RO | uuid | String | Unique identifier for the caller |
| RW | name_label | String | User-assigned label for the caller |
| RW | name_description | String | User-assigned description for the caller |
| RO | user_agent | String | user agent matching pattern |
| RO | client_ip | String | Client IP address matching pattern |
| RO | last_access | DateTime | Last time the caller made a request |
| SRW | groups | Set String | Set of labels used for cumulative metrics |
| RO | rate_limit | Ref Rate_limit | Associated rate limiter - can be null |
Callers identify the origin of incoming requests, and they serve a dual purpose of metrics gathering and providing a target for rate limiting. We allow users to query the metrics for an individual caller, or for all callers belonging to a given group. A new caller record will be added automatically whenever a request from an unknown origin is made to Xapi, and callers can also be added manually by users.
Rate limit:
| Mutability | Name | Type | Description |
|---|---|---|---|
| RO | uuid | String | Unique identifier for the rate limiter |
| RW | name_label | String | User-assigned label for the rate limiter |
| RW | name_description | String | User-assigned description for the rate limiter |
| SRO | callers | Set (Ref Caller) | Callers associated with this rate limiter |
| RO | burst_size | Float | Amount of tokens that can be consumed in one burst |
| RO | fill_rate | Float | Tokens added to the bucket per second |
A rate limit can be applied to a group of callers, which then have a collective
rate limit applied. Each caller can have at most one rate limiter applied,
which then becomes stored in its rate_limit field. We have two distinct
notions of groups here: rate limits store groups of callers, but groups of
callers are also represented in their groups field. We do this to allow for a
decoupling of rate limiting and data reporting, and to simplify the underlying
code by storing direct references to objects where possible.
We define the following API functions for the caller datamodel:
Caller.create(name_label, name_description, user_agent, client_ip): Create a new caller.Caller.set_name_label(caller, name_label): Set name label on the callerCaller.destroy(caller): Destroy the callerCaller.add_group(caller, group): Add caller to groupCaller.remove_group(caller, group): Remove caller from groupCaller.query_usage(caller, time_period): Obtain usage statistics for an individual callerCaller.query_group_usage(group, time_period): Obtain usage statistics for a group of callersAnd the following functions for the rate limiter datamodel:
Rate_limit.create(name_label, callers, burst_size, fill_rate): Create a
rate limiter with the supplied parameters.Rate_limit.add_caller(rate_limit, caller): Add a caller to the callers setRate_limit.remove_caller(rate_limit, caller): Remove a caller from the callers setRate_limit.set_burst_size(rate_limit, burst_size): Set the burst size for the
rate limiterRate_limit.set_fill_rate(rate_limit, burst_size): Set the fill rate for the
rate limiterRate_limit.destroy(rate_limit): Destroy the rate limiter - should also
clear the rate_limit field from its associated callersWhen a request arrives, Xapi matches the request’s metadata against the
Caller table. Each field in a Caller record is a pattern matched against
the corresponding field in the request using prefix matching: a pattern
matches iff it is a prefix of the request’s field value. Prefix patterns are
specified by terminating with *. A pattern without * matches only exact
equals. A record matches a request iff all fields match.
We treat logging and rate limiting differently:
The most specific match is the matching Caller record with the longest
total prefix length across all fields. For example, a record that matches
user_agent with a full value is more specific than one that matches only a
short prefix. We resolve ties through a lexicographic ordering amongst fields:
IP address first, then user agent.
This results in the statistics being stored by callers tracking everything that matches, but only the most specific rate limiter to any given request will be triggered.
Note that this means overlapping records define independent rate limiters
rather than a shared budget. For example, if foo* is limited to 10 req/s and
foo is limited to 5 req/s, then a request whose user-agent is exactly foo
will only deduct from the foo bucket (the more specific match), while
requests matching foo* but not foo (e.g. foobar) deduct from the foo*
bucket. The total sustained rate across both groups can therefore reach 15
req/s. This is the expected behaviour of two separate rate limiters; sharing a
single budget across overlapping patterns with different limits is not
supported.
Caller.query_usage and Caller.query_group_usage are backed by RRDs, so
historical data over the queried time period survives toolstack restarts.
Stable statistics (e.g. last_access) are read from the database and are
therefore also preserved.Calls into Xapi are intercepted at two points:
do_dispatch function within
xapi/server_helpers.ml. At this point, we already have a session available if
the caller is logged in, and we know which Xapi call is being made.add_handler function within
xapi/xapi_http.ml. Here we have less information, so the rate limiting is less
fine-grained, though there is scope to integrate more closely with the handlers
should it be necessary.Both caller and rate limiter are implemented internally via a single table
which maps caller -> caller_metrics.t * (rate_limit_data.t option). If a rate
limiter is being applied, then the cost of the call must come out of the
associated token bucket, and if there are not enough tokens in the bucket then
the response is delayed until the bucket is refilled.
An exception to this is async RPC calls, which always respond immediately but the work that they initiate does get added to the rate limiting queue.
The internals of this are all implemented in a new library: libs/rate-limit, which contains modules for token buckets, rate limiting queues, client classification, and LRU cache, together with comprehensive unit tests.
Token buckets enforce rate limiting by storing tokens that get depleted on request and are refilled over time. They have two parameters
In our implementation, we split the buckets into two types:
type state = {tokens: float; last_refill: Mtime.span}

type t = {
    burst_size: float
  ; fill_rate: float (* Tokens per second *)
  ; state: state Atomic.t
  }
The main type, type t, stores the token bucket parameters together with an
atomically wrapped state for thread safety. The state type itself contains the
token count at last refill, together with the last refill time.
By keeping track of the last refill time, we refill the tokens only when a new request comes in. We provide two functions for consuming: one is non-blocking and returns a boolean for whether the consume was successful, and the other blocks until the tokens have been consumed.
A token bucket enforces an overall request rate but provides no guarantees about ordering or fairness under contention. When multiple callers compete for tokens, whichever thread or process happens to run first can repeatedly consume newly refilled tokens, while others may be delayed indefinitely. Under sustained load, this can lead to starvation for less aggressively scheduled or slower clients.
To alleviate this, we keep rate limited requests in a queue which get processed as the token bucket is refilled over time:
type t = {
    bucket: Token_bucket.t
  ; process_queue:
      (float * (unit -> unit)) Queue.t (* contains token cost and callback *)
  ; process_queue_lock: Mutex.t
  ; worker_thread_cond: Condition.t
  ; should_terminate: bool ref (* signal termination to worker thread *)
  ; worker_thread: Thread.t
}
The worker thread is responsible for executing the callbacks in the process
queue when their time arrives. As above, we provide two functions for consuming
from the token bucket; submit_async returns immediately and places a function
to be executed at a later time in the queue, while submit_sync blocks until
its function is executed by the rate limiter but may return a value.
We define a Key module to identify clients. This contains only user_agent and
client_ip at present, but can be expanded to cover AD user and originator, for
example.
module Key = struct
  type t = {user_agent: string; client_ip: string}
This module implements a match : t -> t -> bool function, which treats empty
strings as wildcards – for example match {"", "1.1.1.1"} {"firefox", "1.1.1.1"}
will succeed. In order to store all recorded users, we use a simple association
list with a cache:
type 'a cached_table = {
    table: (Key.t * 'a) list
  ; cache: (Key.t, 'a option) Lru.t
}

type 'a t = 'a cached_table Atomic.t
We use the atomic type to allow thread-safe updates, and provide functions for inserting, deleting, and obtaining items from the table.
| Design document | |
|---|---|
| Revision | v2 |
| Status | released (xenserver 6.5 sp1) |
| Review | #12 |
To administer guest VMs it can be useful to connect to them over Remote Desktop Protocol (RDP). XenCenter supports this; it has an integrated RDP client.
First it is necessary to turn on the RDP service in the guest.
This can be controlled from XenCenter. Several layers are involved. This description starts in the guest and works up the stack to XenCenter.
This feature was completed in the first quarter of 2015, and released in Service Pack 1 for XenServer 6.5.
The XenServer guest agent installed in Windows VMs can turn the RDP service on and off, and can report whether it is running.
The guest agent is at https://github.com/xenserver/win-xenguestagent
Interaction with the agent is done through some Xenstore keys:
The guest agent running in domain N writes two xenstore nodes when it starts up:
/local/domain/N/control/feature-ts = 1/local/domain/N/control/feature-ts2 = 1This indicates support for the rest of the functionality described below.
(The “…ts2” flag is new for this feature; older versions of the guest agent wrote the “…ts” flag and had support for only a subset of the functionality (no firewall modification), and had a bug in updating .../data/ts.)
To indicate whether RDP is running, the guest agent writes the string “1” (running) or “0” (disabled) to xenstore node
/local/domain/N/data/ts.
It does this on start-up, and also in response to the deletion of that node.
The guest agent also watches xenstore node /local/domain/N/control/ts and it turns RDP on and off in response to “1” or “0” (respectively) being written to that node. The agent acknowledges the request by deleting the node, and afterwards it deletes local/domain/N/data/ts, thus triggering itself to update that node as described above.
When the guest agent turns the RDP service on/off, it also modifies the standard Windows firewall to allow/forbid incoming connections to the RDP port. This is the same as the firewall change that happens automatically when the RDP service is turned on/off through the standard Windows GUI.
xenopsd sets up watches on xenstore nodes including the control tree and data/ts, and prompts xapi to react by updating the relevant VM guest metrics record, which is available through a XenAPI call.
XenAPI includes a new message (function call) which can be used to ask the guest agent to turn RDP on and off.
This is VM.call_plugin (analogous to Host.call_plugin) in the hope that it can be used for other purposes in the future, even though for now it does not really call a plugin.
To use it, supply plugin="guest-agent-operation" and either fn="request_rdp_on" or fn="request_rdp_off".
See http://xapi-project.github.io/xen-api/classes/vm.html
The function strings are named with “request” (rather than, say, “enable_rdp” or “turn_rdp_on”) to make it clear that xapi only makes a request of the guest: when one of these calls returns successfully this means only that the appropriate string (1 or 0) was written to the control/ts node and it is up to the guest whether it responds.
Note that the current behaviour depends on some global options: “Enable Remote Desktop console scanning” and “Automatically switch to the Remote Desktop console when it becomes available”.
| Design document | |
|---|---|
| Revision | v1 |
| Status | released (7,0) |
Current problems with rrdd:
This determines the host to which rrdd will archive a VM’s rrd when the VM’s domain disappears - rrdd will always try to archive to the master. However, when a host joins a pool as a slave rrdd is not restarted so this knowledge is out of date. When a VM shuts down on the slave rrdd will archive the rrd locally. When starting this VM again the master xapi will attempt to push any locally-existing rrd to the host on which the VM is being started, but since no rrd archive exists on the master the slave rrdd will end up creating a new rrd and the previous rrd will be lost.
When rebooting a VM, there is a chance rrdd will attempt to update that VM’s rrd during the brief period when there is no domain for that VM. If this happens, rrdd will archive the VM’s rrd to the master, and then create a new rrd for the VM when it sees the new domain. If rrdd doesn’t attempt to update that VM’s rrd during this period, rrdd will continue to add data for the new domain to the old rrd.
To solve these problems, we will remove some of the intelligence from rrdd and make it into more of a slave process of xapi. This will entail removing all knowledge from rrdd of whether it is running on a master or a slave, and also modifying rrdd to only start monitoring a VM when it is told to, and only archiving an rrd (to a specified address) when it is told to. This matches the way xenopsd only manages domains which it has been told to manage.
For most VM lifecycle operations, xapi and rrdd processes (sometimes across more than one host) cooperate to start or stop recording a VM’s metrics and/or to restore or backup the VM’s archived metrics. Below we will describe, for each relevant VM operation, how the VM’s rrd is currently handled, and how we propose it will be handled after the redesign.
The master xapi makes a remove_rrd call to the local rrdd, which causes rrdd to to delete the VM’s archived rrd from disk. This behaviour will remain unchanged.
The master xapi makes a push_rrd call to the local rrdd, which causes rrdd to send any locally-archived rrd for the VM in question to the rrdd of the host on which the VM is starting. This behaviour will remain unchanged.
Every update cycle rrdd compares its list of registered VMs to the list of domains actually running on the host. Any registered VMs which do not have a corresponding domain have their rrds archived to the rrdd running on the host believed to be the master. We will change this behaviour by stopping rrdd from doing the archiving itself; instead we will expose a new function in rrdd’s interface:
val archive_rrd : vm_uuid:string -> remote_address:string -> unitThis will cause rrdd to remove the specified rrd from its table of registered VMs, and archive the rrd to the specified host. When a VM has finished shutting down or suspending, the xapi process on the host on which the VM was running will call archive_rrd to ask the local rrdd to archive back to the master rrdd.
Removing rrdd’s ability to automatically archive the rrds for disappeared domains will have the bonus effect of fixing how the rrds of rebooting VMs are handled, as we don’t want the rrds of rebooting VMs to be archived at all.
This will be handled automatically, as internally VM.checkpoint carries out a VM.suspend followed by a VM.resume.
The source host’s xapi makes a migrate_rrd call to the local rrd, with a destination address and an optional session ID. The session ID is only required for cross-pool migration. The local rrdd sends the rrd for that VM to the destination host’s rrdd as an HTTP PUT. This behaviour will remain unchanged.
| Design document | |
|---|---|
| Revision | v1 |
| Status | released (7.0) |
| Revision history | |
| v1 | Initial version |
rrdd plugins currently report datasources via a shared-memory file, using the following format:
DATASOURCES
000001e4
dba4bf7a84b6d11d565d19ef91f7906e
{
  "timestamp": 1339685573.245,
  "data_sources": {
    "cpu-temp-cpu0": {
      "description": "Temperature of CPU 0",
      "type": "absolute",
      "units": "degC",
      "value": "64.33"
      "value_type": "float",
    },
    "cpu-temp-cpu1": {
      "description": "Temperature of CPU 1",
      "type": "absolute",
      "units": "degC",
      "value": "62.14"
      "value_type": "float",
    }
  }
}
This format contains four main components:
DATASOURCES
This should always be present.
000001e4
dba4bf7a84b6d11d565d19ef91f7906e
{
  "timestamp": 1339685573.245,
  "data_sources": {
    "cpu-temp-cpu0": {
      "description": "Temperature of CPU 0",
      "type": "absolute",
      "units": "degC",
      "value": "64.33"
      "value_type": "float",
    },
    "cpu-temp-cpu1": {
      "description": "Temperature of CPU 1",
      "type": "absolute",
      "units": "degC",
      "value": "62.14"
      "value_type": "float",
    }
  }
}
The disadvantage of this protocol is that rrdd has to parse the entire JSON structure each tick, even though most of the time only the values will change.
For this reason a new protocol is proposed.
| value | bits | format | notes |
|---|---|---|---|
| header string | (string length)*8 | string | “DATASOURCES” as in the V1 protocol |
| data checksum | 32 | int32 | binary-encoded crc32 of the concatenation of the encoded timestamp and datasource values |
| metadata checksum | 32 | int32 | binary-encoded crc32 of the metadata string (see below) |
| number of datasources | 32 | int32 | only needed if the metadata has changed - otherwise RRDD can use a cached value |
| timestamp | 64 | double | Unix epoch |
| datasource values | n * 64 | int64 | double | n is the number of datasources exported by the plugin, type dependent on the setting in the metadata for value_type [int64|float] |
| metadata length | 32 | int32 | |
| metadata | (string length)*8 | string |
All integers/double are bigendian. The metadata will have the same JSON-based format as
in the V1 protocol, minus the timestamp and value key-value pair for each
datasource.
| field | values | notes | required |
|---|---|---|---|
| description | string | Description of the datasource | no |
| owner | host | vm | sr | The object to which the data relates | no, default host |
| value_type | int64 | float | The type of the datasource | yes |
| type | absolute | derive | gauge | The type of measurement being sent. Absolute for counters which are reset on reading, derive stores the derivative of the recorded values (useful for metrics which continually increase like amount of data written since start), gauge for things like temperature | no, default absolute |
| default | true | false | Whether the source is default enabled or not | no, default false |
| units | The units the data should be displayed in | no | |
| min | The minimum value for the datasource | no, default -infinity | |
| max | The maximum value for the datasource | no, default +infinity |
{
  "datasources": {
    "memory_reclaimed": {
      "description":"Host memory reclaimed by squeezed",
      "owner":"host",
      "value_type":"int64",
      "type":"absolute",
      "default":"true",
      "units":"B",
      "min":"-inf",
      "max":"inf"
    },
    "memory_reclaimed_max": {
      "description":"Host memory that could be reclaimed by squeezed",
      "owner":"host",
      "value_type":"int64",
      "type":"absolute",
      "default":"true",
      "units":"B",
      "min":"-inf",
      "max":"inf"
    },
    {
    "cpu-temp-cpu0": {
      "description": "Temperature of CPU 0",
      "owner":"host",
      "value_type": "float",
      "type": "absolute",
      "default":"true",
      "units": "degC",
      "min":"-inf",
      "max":"inf"
    },
    "cpu-temp-cpu1": {
      "description": "Temperature of CPU 1",
      "owner":"host",
      "value_type": "float",
      "type": "absolute",
      "default":"true",
      "units": "degC",
      "min":"-inf",
      "max":"inf"
    }
  }
}
The above formatting is not required, but added here for readability.
if header != expected_header:
    raise InvalidHeader()
if data_checksum == last_data_checksum:
    raise NoUpdate()
if data_checksum != crc32(encoded_timestamp_and_values):
    raise InvalidChecksum()
if metadata_checksum == last_metadata_checksum:
    for datasource, value in cached_datasources, values:
        update(datasource, value)
else:
    if metadata_checksum != crc32(metadata):
        raise InvalidChecksum()
    cached_datasources = create_datasources(metadata)
    for datasource, value in cached_datasources, values:
        update(datasource, value)
This means that for a normal update, RRDD will only have to read the header plus the first (16 + 16 + 4 + 8 + 8*n) bytes of data, where n is the number of datasources exported by the plugin. If the metadata changes RRDD will have to read all the data (and parse the metadata).
| Design document | |
|---|---|
| Revision | v1 |
| Status | proposed |
| Revision history | |
| v1 | Initial version |
rrdd plugins protocol v2 report datasources via shared-memory file, however it has various limitations :
Therefore, it implies various limitations on plugins and limits OpenMetrics support for the metrics daemon.
Moreover, it may not be practical for plugin developpers and parser implementations :
A simpler protocol is proposed, based on OpenMetrics binary format to ease plugin and parser implementations.
For this protocol, we still use a shared-memory file, but significantly change the structure of the file.
| value | bits | format | notes |
|---|---|---|---|
| header string | 12*8=96 | string | “OPENMETRICS1” which is one byte longer than “DATASOURCES”, intentionally made at 12 bytes for alignment purposes |
| data checksum | 32 | uint32 | Checksum of the concatenation of the rest of the header (from timestamp) and the payload data |
| timestamp | 64 | uint64 | Unix epoch |
| payload length | 32 | uint32 | Payload length |
| payload data | 8*(payload length) | binary | OpenMetrics encoded metrics data (protocol-buffers format) |
All values are big-endian.
The header size is constant (28 bytes) that implementation can rely on (read the entire header in one go, simplify usage of memory mapping).
As opposed to protocol v2 but alike protocol v1, metadata is included along metrics in OpenMetrics format.
owner attribute for metric should be exposed using a OpenMetrics label instead (named owner).
Multiple metrics that shares the same name should be exposed under the same
Metric Family and be differenciated by labels (e.g owner).
if header != expected_header:
    raise InvalidHeader()
if data_checksum == last_data_checksum:
    raise NoUpdate()
if timestamp == last_timestamp:
    raise NoUpdate()
if data_checksum != crc32(concat_header_end_payload):
    raise InvalidChecksum()

metrics = parse_openmetrics(payload_data)

for family in metrics:
    if family_exists(family):
        update_family(family)
    else
        create_family(family)

track_removed_families(metrics)| Design document | |
|---|---|
| Revision | v2 |
| Status | proposed |
| Review | #186 |
| Revision history | |
| v1 | Initial version |
| v2 | Renaming VMSS fields and APIs. API message_create superseeds vmss_create_alerts. |
| v3 | Remove VMSS alarm_config details and use existing pool wide alarm config |
| v4 | Renaming field from retention-value to retained-snapshots and schedule-snapshot to scheduled-snapshot |
| v5 | Add new API task_set_status |
The scheduled snapshot feature will utilize the existing architecture of VMPR. In terms of functionality, scheduled snapshot is basically VMPR without its archiving capability.
snapshot, checkpoint, snapshot_with_quiesce].hourly -> On every day, Each hour, Mins [0;15;30;45]daily -> On every day, Hour [0 to 23], Mins [0;15;30;45]weekly -> Days [Monday,Tuesday,Wednesday,Thursday,Friday,Saturday,Sunday], Hour[0 to 23], Mins [0;15;30;45]There is a new record for VM Scheduled Snapshot with new fields.
New fields:
name-label type String : Name label for VMSS.name-description type String : Name description for VMSS.enabled type Bool : Enable/Disable VMSS to take snapshot.type type Enum [snapshot; checkpoint; snapshot_with_quiesce] : Type of snapshot VMSS takes.retained-snapshots type Int64 : Number of snapshots limit for a VM, max limit is 10 and default is 7.frequency type Enum [hourly; daily; weekly] : Frequency of taking snapshot of VMs.schedule type Map(String,String) with (key, value) pair:Monday,Tuesday,Wednesday,Thursday,Friday,Saturday,Sunday]last-run-time type Date : DateTime of last execution of VMSS.VMs type VM refs : List of VMs part of VMSS.New fields to VM record:
scheduled-snapshot type VMSS ref : VM part of VMSS.is-vmss-snapshot type Bool : If snapshot created from VMSS.| Design document | |
|---|---|
| Revision | v1 |
| Status | draft |
| Term | Meaning |
|---|---|
| AD | Windows Active Directory |
| samba/winbind | Client used in xapi to talk to AD |
| DC | Windows AD domain controller |
| ldap/ldaps | Lightweight Directory Access Protocol / over SSL |
| Joining host | The host joining to a pool |
To integrate XenServer with AD, XenServer performs LDAP queries in the following use cases:
Currently XenServer uses plain LDAP queries, which is a concern for some enterprise customers.
External auth details are stored in the host (table) → external_auth_configuration (field). For example:
external_auth_configuration: {
    domain: xenrt16718.local,
    user: Administrator,
    workgroup: XENRTXENRT16718,
    netbios_name: genus-35-103d,
    machine_pwd_last_change_time: 1767508709
}
A new field ldaps (bool, optional) will be added to external_auth_configuration field to state whether LDAPS should be used instead of LDAP. If not set, LDAP will be used for backward compatibility.
So the field will look like:
external_auth_configuration: {
    domain: xenrt16718.local,
    user: Administrator,
    workgroup: XENRTXENRT16718,
    netbios_name: genus-35-103d,
    machine_pwd_last_change_time: 1767508709,
    ldaps: true
}To enforce security, if customer uses self-signed certificate, they need to upload the root CA certificate to XenServer, so XenServer can verify the certificate/public key used talking to DC for LDAPS.
The trusted-certificates.md design enhanced the Certificate table and introduced a new field purpose for security, which limits the certificate only for specific purpose. ldaps will be added to purpose field as a value for LDAPS.
To enable external auth, the current API arguments are as follows:
pool (Ref _pool): The pool whose external authentication should be enabledconfig (Map (String, String)): A list of key-values containing the configuration dataservice_name (String): The name of the serviceauth_type (String): The type of authentication (e.g., AD for Active Directory)For example:
xe pool-enable-external-auth uuid=<uuid> auth-type=AD service-name=<domain> config:user=<user> config:pass=<pwd>This API signature does not change. Regarding the config map, one new option is added:
config:ldaps: whether LDAPS is required, default to falseclient ldap sasl wrapping to ldaps if true, seal otherwiseGiven ldaps default to false, this feature is NOT enabled until explicitly set.
Following new error codes added to indicate ldaps enable related error
POOL_AUTH_ENABLE_FAILED_NO_TRUSTED_CERTS: no trusted certs can be used for ldaps, refer to 4.1.2 for trusted certs finding.POOL_AUTH_ENABLE_FAILED_INVALID_TRUSTED_CERTS: found trusted certs, but none of the trusted certs can be used to connect to DC.POOL_AUTH_ENABLE_FAILED_SETUP_TLS_CONNECTION: failed to set up TLS connection to DC (e.g. GnuTLS handshake failure such as tstream_tls_sync_setup: GNUTLS ERROR). The error message contains the underlying details reported by winbind.Note: Current error code handling infrastructure requires the error code prefix with POOL_AUTH_ENABLE_FAILED.
User can specify LDAPS during join domain as in 3.1.
For the existing joined domain, user can switch between LDAP and LDAPS with this new API. Args as follows:
pool (Ref _pool): pool to set LDAPSldaps (Bool): whether LDAPS is requiredforce (Bool): whether to set ldaps even when ldaps is currently setThis API will set the ldaps in database (Refer to 2.1).
This API performs following sanity check and rejects update if check fails:
ldaps query to embedded user krbtgt for the joined domainNote:
force to perform an extra ldaps ping for debug purposeauthenticate_username_password should fail if this API is performing checking and configurationThis API will refresh winbind configuration (Refer to 4.1).
So following xe command can be used to switch between LDAP and LDAPS:
xe pool-external-auth-set-ldaps uuid=<uuid> ldaps=<true|false>This API may raise following errors
AUTH_NO_TRUSTED_CERTS: no trusted certs found to enable ldaps, refer to 4.1.2 for trusted certs finding.AUTH_INVALID_TRUSTED_CERTS: found trusted certs, but none of the trusted certs can be used to connect to DC.AUTH_SETUP_TLS_CONNECTION: failed to set up TLS CONNECTION to DC (e.g. GnuTLS handshake failure such as tstream_tls_sync_setup: GNUTLS ERROR). The error message contains the underlying details reported by winbind.AUTH_IS_DISABLED: AD is not enabled.AUTH_SET_LDAPS_FAILED: Failed to set ldaps, the error message contains the details like ldap query on domain failed.xapi generates a get message for each field automatically. To query the LDAPS status, client only needs to query the get method of host (class) → external-auth-configuration (field), and parse the result. The example as follows:
xe host-param-get uuid=<uuid> param-name=external-auth-configurationIf the certificate for LDAPS in DC is signed by a private CA (vs a trusted public CA), user needs to import their Root or Intermediate CA certificate into XenServer.
pool.install_trusted_certificate can install the certificate with following parameters, refer to trusted-certificates.md for the details:
session (ref session_id): reference to a valid sessionself (ref Pool): reference to the poolca (boolean): should always be true for ldaps. xapi should reject this CA otherwisecert (string): the trusted certificate in PEM formatpurpose (string list): the purposes of this cert. It can be one of following:ldaps if for specific this specific purposeldaps if no ldaps specific purpose foundNote: If the DCs (of joining domain and trusted domain in use) are signed by different CAs, all the CAs need to be uploaded to XenServer.
To enforce LDAPS, following are required:
To enforce LDAPS, xapi just passthrough the configuration to winbind. Following configuration needs to be updated to /etc/samba/smb.conf, details refer to smb.conf:
client ldap sasl wrapping = <ldaps | seal>
tls verify peer = ca_and_name_if_available
tls trust system cas = yes
tls cafile = /etc/trusted-certs/ca-bundle-[ldaps|general].pem
tls priority = NONE:+VERS-TLS1.2:+AES-256-GCM:+AES-128-GCM:+AEAD:+ECDHE-RSA:+SIGN-ALL:+GROUP-SECP384R1:+COMP-NULL:%SERVER_PRECEDENCEldap and ldaps will flip client ldap sasl wrapping between seal and ldapstls cafile points to a CA bundle used to verify DC certs. Details refer to 4.1.2tls priority is following stunnel TLS configuration, this result to TLS 1.2 with cipher suite TLS_ECDHE_RSA_AES_128_GCM_SHA256, TLS_ECDHE_RSA_AES_256_GCM_SHA384, Windows Server 2012 and later as DC support itThis design is following trusted-certificates.md:
/etc/trusted-certs/ca-bundle-ldaps.pem if exists/etc/trusted-certs/ca-bundle-general.pem if exists and previous not matchNote: The selection/configuration is only refreshed on following cases:
pool.external_auth_set_ldaps APIxapi LDAP queries domain user status (if user has been added to manage XenServer) at configurable interval, and destroys the session created by domain user if user no longer in healthy status.
However, the LDAP query may fail due to various issues as follows:
Instead of destroying user session for stability, a warning will be printed in xensource.log
Note:
external_auth_set_ldaps perform LDAP(S) query check on every hostCurrently the pool.join pre-check checks the following:
external_auth_type: whether joined ADexternal_auth_service_name: whether joined the same domainThe pre-check is good enough, no matter whether ldaps is in use, as this ensures host can talk to AD. There are following cases:
When joining a host without AD to a pool with LDAPS enabled, the host may not have the (CA) certificate for the domain. It can be trivial to enforce customer to upload the CA certificate to every joining host, thus client would help to orchestrate certificates.
The workflow:
sequenceDiagram
participant user as User
participant client as Client
participant join as Joining host
participant coor as Pool Coordinator
participant dc as AD/DC

user->>client: pool.join
Note over client: precheck
alt precheck failed
client-->>user: precheck failed
end

Note over client,coor: sync trusted CA certs from coordinator to joining host
client->>join: pool.sync_trusted_certificates_from
join->>coor: pool.exchange_trusted_certificates_on_join
coor-->>join:
join-->>client:

user->>client: join domain username/password
client->>join: join domain username/password
join->>dc: join domain
dc-->>join:
join-->>client:

client->>join: pool.join
Note over join,coor: join pool ops<br/>certs sync
join-->>client:
client-->>user: pool.join succeed
Detailed Steps:
pool.sync_trusted_certificates_from to joiner host. The call willpool.join again with domain username and passwordpool.uninstall_trusted_certificate on joining host to revert the certspool.disable_external_auth is called during pool leave, thus the ldaps status is cleaned.
This design does not change it.
host (table) → external_auth_type (field) = AD
host (table) → external_auth_configuration (field) → ldaps (key) = true
| Design document | |
|---|---|
| Revision | v1 |
| Status | released (7.6) |
Xapi accesses storage through “plugins” which currently use a protocol called “SMAPIv1”. This protocol has a number of problems:
the protocol has many missing features, and this leads to people using the XenAPI from within a plugin, which is racy, difficult to get right, unscalable and makes component testing impossible.
the protocol expects plugin authors to have a deep knowledge of the
Xen storage datapath (tapdisk, blkback etc) and the storage.
the protocol is undocumented.
We shall create a new revision of the protocol (“SMAPIv3”) to address these problems.
The following diagram shows the new control plane:

Requests from xapi are filtered through the existing storage_access
layer which is responsible for managing the mapping between VM VBDs and
VDIs.
Each plugin is represented by a named queue, with APIs for
Legacy SMAPIv1 plugins will be processed via the existing storage_access.SMAPIv1
module. Newer SMAPIv3 plugins will be handled by a new xapi-storage-script
service.
The SMAPIv3 APIs will be defined in an IDL format in a separate repo.
The xapi-storage-script will run as a service and will
inotify to monitor a well-known path in dom0Plugin.queryxapi or the CLI are received, it will generate the SMAPIv3
.json message and fork the relevant script.The IDL will support
It will be possible to view the contents of the queue associated with any plugin, and see whether
xapi-storage-script has
crashed)It will be possible to
The following diagram shows what a plugin would look like:
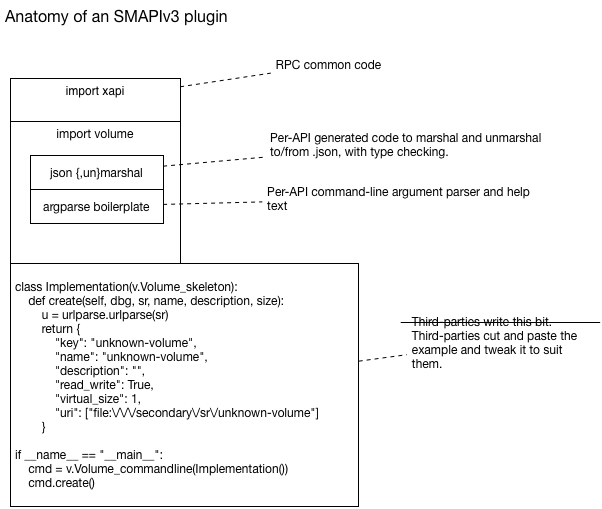
Please read the current SMAPIv3 documentation.
| Design document | |
|---|---|
| Revision | v1 |
| Status | proposed |
At present (early March 2015) the datamodel defines a VM as having a “platform” string-string map, in which two keys are interpreted as specifying a PCI device which should be emulated for the VM. Those keys are “device_id” and “revision” (with int values represented as decimal strings).
Limitations:
When instructing qemu to emulate PCI devices, qemu accepts twelve parameters for each device.
Future guest-agent features rely on additional emulated PCI devices. We cannot know in advance the full details of all the devices that will be needed, but we can predict some.
We need a way to configure VMs such that they will be given additional emulated PCI devices.
In the datamodel, there will be a new type of object for emulated PCI devices.
Tentative name: “emulated_pci_device”
Fields to be passed through to qemu are the following, all static read-only, and all ints except devicename:
We also need a “built_in” flag: see below.
Allow creation of these objects through the API (and CLI).
(It would be nice, but by no means essential, to be able to create one by specifying an existing one as a basis, along with one or more altered fields, e.g. “Make a new one just like that existing one except with interruptpin=9.”)
Create some of these devices to be defined as standard in XenServer, along the same lines as the VM templates. Those ones should have built_in=true.
Allow destruction of these objects through the API (and CLI), but not if they are in use or if they have built_in=true.
A VM will have a list of zero or more of these emulated-pci-device objects. (OPEN QUESTION: Should we forbid having more than one of a given device?)
Provide API (and CLI) commands to add and remove one of these devices from a VM (identifying the VM and device by uuid or other identifier such as name).
The CLI should allow performing this on multiple VMs in one go, based on a selector or filter for the VMs. We have this concept already in the CLI in commands such as vm-start.
In the function that adds an emulated PCI device to a VM, we must check if this is the first device to be added, and must refuse if the VM’s Virtual Hardware Platform Version is too low. (Or should we just raise the version automatically if needed?)
When starting a VM, check its list of emulated pci devices and pass the details through to qemu (via xenopsd).
| Design document | |
|---|---|
| Revision | v11 |
| Status | confirmed |
| Review | #139 |
| Revision history | |
| v1 | Initial version |
| v2 | Added details about the VDI's binary format and size, and the SR capability name. |
| v3 | Tar was not needed after all! |
| v4 | Add details about discovering the VDI using a new vdi_type. |
| v5 | Add details about the http handlers and interaction with xapi's database |
| v6 | Add details about the framing of the data within the VDI |
| v7 | Redesign semantics of the rrd_updates handler |
| v8 | Redesign semantics of the rrd_updates handler (again) |
| v9 | Magic number change in framing format of vdi |
| v10 | Add details of new APIs added to xapi and xcp-rrdd |
| v11 | Remove unneeded API calls |
Xapi has RRDs to track VM- and host-level metrics. There is a desire to have SR-level RRDs as a new category, because SR stats are not specific to a certain VM or host. Examples are size and free space on the SR. While recording SR metrics is relatively straightforward within the current RRD system, the main question is where to archive them, which is what this design aims to address.
All SR types, including the existing ones, should be able to have RRDs defined for them. Some RRDs, such as a “free space” one, may make sense for multiple (if not all) SR types. However, the way to measure something like free space will be SR specific. Furthermore, it should be possible for each type of SR to have its own specialised RRDs.
It follows that each SR will need its own xcp-rrdd plugin, which runs on the SR master and defines and collects the stats. For the new thin-lvhd SR this could be xenvmd itself. The plugin registers itself with xcp-rrdd, so that the latter records the live stats from the plugin into RRDs.
SR-level RRDs will be archived in the SR itself, in a VDI, rather than in the local filesystem of the SR master. This way, we don’t need to worry about master failover.
The VDI will be 4MB in size. This is a little more space than we would need for the RRDs we have in mind at the moment, but will give us enough headroom for the foreseeable future. It will not have a filesystem on it for simplicity and performance. There will only be one RRD archive file for each SR (possibly containing data for multiple metrics), which is gzipped by xcp-rrdd, and can be copied onto the VDI.
There will be a simple framing format for the data on the VDI. This will be as follows:
| Offset | Type | Name | Comment |
|---|---|---|---|
| 0 | 32 bit network-order int | magic | Magic number = 0x7ada7ada |
| 4 | 32 bit network-order int | version | 1 |
| 8 | 32 bit network-order int | length | length of payload |
| 12 | gzipped data | data |
Xapi will be in charge of the lifecycle of this VDI, not the plugin or xcp-rrdd, which will make it a little easier to manage them. Only xapi will attach/detach and read from/write to this VDI. We will keep xcp-rrdd as simple as possible, and have it archive to its standard path in the local file system. Xapi will then copy the RRDs in and out of the VDI.
A new value "rrd" in the vdi_type enum of the datamodel will be defined, and the VDI.type of the VDI will be set to that value. The storage backend will write the VDI type to the LVM metadata of the VDI, so that xapi can discover the VDI containing the SR-level RRDs when attaching an SR to a new pool. This means that SR-level RRDs are currently restricted to LVM SRs.
Because we will not write plugins for all SRs at once, and therefore do not need xapi to set up the VDI for all SRs, we will add an SR “capability” for the backends to be able to tell xapi whether it has the ability to record stats and will need storage for them. The capability name will be: SR_STATS.
The SR-stats VDI will be attached/detached on PBD.plug/unplug on the SR master.
On PBD.plug on the SR master, if the SR has the stats capability, xapi:
xcp-rrdd where to put them).xcp-rrdd about the RRDs so that it will load the RRDs and add newly recorded data to them (needs a function like push_rrd_local for VM-level RRDs).On PBD.unplug on the SR master, if the SR has the stats capability xapi:
xcp-rrdd to archive the RRDs for the SR, which it will do to the local filesystem.Xapi’s periodic scheduler regularly triggers xcp-rrdd to archive the host and VM RRDs. It will need to do this for the SR ones as well. Furthermore, xapi will need to attach the stats VDI and copy the RRD archives into it (as on PBD.unplug).
There will be a new handler for downloading an SR RRD:
http://<server>/sr_rrd?session_id=<SESSION HANDLE>&uuid=<SR UUID>
RRD updates are handled via a single handler for the host, VM and SR UUIDs
RRD updates for the host, VMs and SRs are handled by a a single handler at
/rrd_updates. Exactly what is returned will be determined by the parameters
passed to this handler.
Whether the host RRD updates are returned is governed by the presence of
host=true in the parameters. host=<anything else> or the absence of the
host key will mean the host RRD is not returned.
Whether the VM RRD updates are returned is governed by the vm_uuid key in the
URL parameters. vm_uuid=all will return RRD updates for all VM RRDs.
vm_uuid=xxx will return the RRD updates for the VM with uuid xxx only.
If vm_uuid is none (or any other string which is not a valid VM UUID) then
the handler will return no VM RRD updates. If the vm_uuid key is absent, RRD
updates for all VMs will be returned.
Whether the SR RRD updates are returned is governed by the sr_uuid key in the
URL parameters. sr_uuid=all will return RRD updates for all SR RRDs.
sr_uuid=xxx will return the RRD updates for the SR with uuid xxx only.
If sr_uuid is none (or any other string which is not a valid SR UUID) then
the handler will return no SR RRD updates. If the sr_uuid key is absent, no
SR RRD updates will be returned.
It will be possible to mix and match these parameters; for example to return RRD updates for the host and all VMs, the URL to use would be:
http://<server>/rrd_updates?session_id=<SESSION HANDLE>&start=10258122541&host=true&vm_uuid=all&sr_uuid=none
Or, to return RRD updates for all SRs but nothing else, the URL to use would be:
http://<server>/rrd_updates?session_id=<SESSION HANDLE>&start=10258122541&host=false&vm_uuid=none&sr_uuid=all
While behaviour is defined if any of the keys host, vm_uuid and sr_uuid is
missing, this is for backwards compatibility and it is recommended that clients
specify each parameter explicitly.
If the SR is presenting a data source called ‘physical_utilisation’, xapi will record this periodically in its database. In order to do this, xapi will fork a thread that, every n minutes (2 suggested, but open to suggestions here), will query the attached SRs, then query RRDD for the latest data source for these, and update the database.
The utilisation of VDIs will not be updated in this way until scalability worries for RRDs are addressed.
Xapi will cache whether it is SR master for every attached SR and only attempt to update if it is the SR master.
Get the filesystem location where sr rrds are archived: val sr_rrds_path : uid:string -> string
Archive the sr rrds to the filesystem: val archive_sr_rrd : sr_uuid:string -> unit
Load the sr rrds from the filesystem: val push_sr_rrd : sr_uuid:string -> unit
| Design document | |
|---|---|
| Revision | v3 |
| Status | proposed |
LVHD is a block-based storage system built on top of Xapi and LVM. LVHD disks are represented as LVM LVs with vhd-format data inside. When a disk is snapshotted, the LVM LV is “deflated” to the minimum-possible size, just big enough to store the current vhd data. All other disks are stored “inflated” i.e. consuming the maximum amount of storage space. This proposal describes how we could add dynamic thin-provisioning to LVHD such that
The following diagram shows the “Allocation plane”:
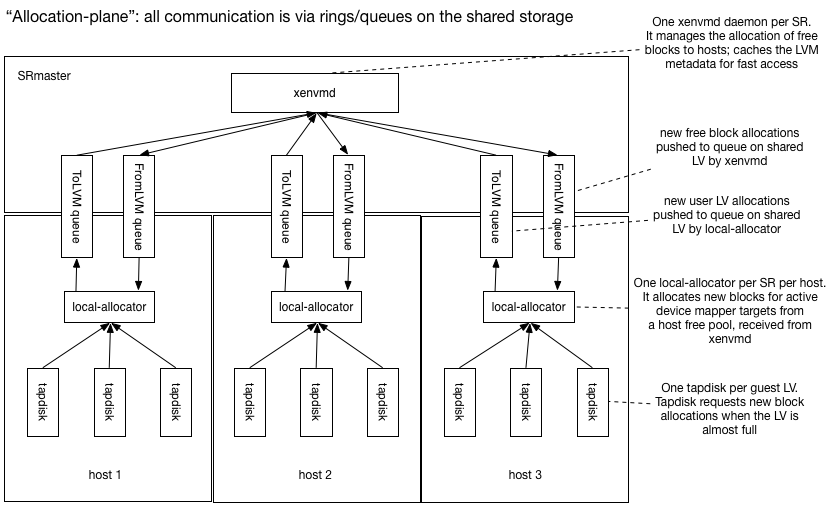
All VM disk writes are channelled through tapdisk which keeps track
of the remaining reserved space within the device mapper device. When
the free space drops below a “low-water mark”, tapdisk sends a message
to a local per-SR daemon called local-allocator and requests more
space.
The local-allocator maintains a free pool of blocks available for
allocation locally (hence the name). It will pick some blocks and
transactionally send the update to the xenvmd process running
on the SRmaster via the shared ring (labelled ToLVM queue in the diagram)
and update the device mapper tables locally.
There is one xenvmd process per SR on the SRmaster. xenvmd receives
local allocations from all the host shared rings (labelled ToLVM queue
in the diagram) and combines them together, appending them to a redo-log
also on shared storage. When xenvmd notices that a host’s free space
(represented in the metadata as another LV) is low it allocates new free blocks
and pushes these to the host via another shared ring (labelled FromLVM queue
in the diagram).
The xenvmd process maintains a cache of the current VG metadata for
fast query and update. All updates are appended to the redo-log to ensure
they operate in O(1) time. The redo log updates are periodically flushed
to the primary LVM metadata.
Since the operations are stored in the redo-log and will only be removed after the real metadata has been written, the implication is that it is possible for the operations to be performed more than once. This will occur if the xenvmd process exits between flushing to the real metadata and acknowledging the operations as completed. For this to work as expected, every individual operation stored in the redo-log must be idempotent.
Note that, while the host has plenty of free blocks, local allocations should
be fast. If the master fails and the local free pool starts running out
and tapdisk asks for more blocks, then the local allocator won’t be able
to provide them.
tapdisk should start to slow
I/O in order to provide the local allocator more time.
Eventually if tapdisk runs
out of space before the local allocator can satisfy the request then
guest I/O will block. Note Windows VMs will start to crash if guest
I/O blocks for more than 70s. Linux VMs, no matter PV or HVM, may suffer
from “block for more than 120 seconds” issue due to slow I/O. This
known issue is that, slow I/O during dirty pages writeback/flush may
cause memory starvation, then other userland process or kernel threads
would be blocked.
The following diagram shows the control-plane:
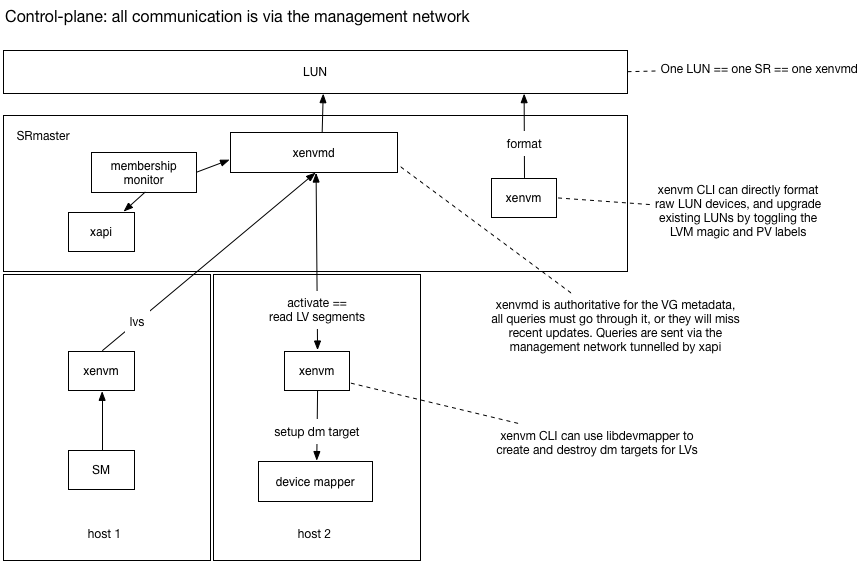
When thin-provisioning is enabled we will be modifying the LVM metadata at
an increased rate. We will cache the current metadata in the xenvmd process
and funnel all queries through it, rather than “peeking” at the metadata
on-disk. Note it will still be possible to peek at the on-disk metadata but it
will be out-of-date. Peeking can still be used to query the PV state of the volume
group.
The xenvm CLI uses a simple
RPC interface to query the xenvmd process, tunnelled through xapi over
the management network. The RPC interface can be used for
xenvm will query the LV segments and program
device mapperNote that current LVHD requires the management network for these control-plane functions.
When the SM backend wishes to query or update volume group metadata it should use the
xenvm CLI while thin-provisioning is enabled.
The xenvmd process shall use a redo-log to ensure that metadata updates are
persisted in constant time and flushed lazily to the regular metadata area.
Tunnelling through xapi will be done by POSTing to the localhost URI
/services/xenvmd/<SR uuid>
Xapi will the either proxy the request transparently to the SRmaster, or issue an http level redirect that the xenvm CLI would need to follow.
If the xenvmd process is not running on the host on which it should be, xapi will start it.
xenvmd:
xenvm:
xenvmd protocol to query / update LVsxapixenvmdxenvmdlocal_allocator:
tapdisk for requesting more spacexenvmdxenvmd and updates the device mapper target locallytapdisk:
xapi:
SM:
xenvm CLImembership_monitor
xenvmd and the local_allocatorThe local_allocator communicates with xenvmd via a pair
of queues on the shared disk. Using the disk rather than the network means
that VMs will continue to run even if the management network is not working.
In particular
The local_allocator needs to tell the xenvmd which blocks have
been allocated to which guest LV. xenvmd needs to tell the
local_allocator which blocks have become free. Since we are based on
LVM, a “block” is an extent, and an “allocation” is a segment i.e. the
placing of a physical extent at a logical extent in the logical volume.
The local_allocator needs to send a message with logical contents:
volume: a human-readable name of the LVsegments: a list of LVM segments which says
“place physical extent x at logical extent y using a linear mapping”.Note this message is idempotent.
The xenvmd needs to send a message with logical contents:
extents: a list of physical extents which are free for the host to useAlthough
for internal housekeeping xenvmd will want to assign these
physical extents to logical extents within the host’s free LV, the
local_allocator
doesn’t need to know the logical extents. It only needs to know
the set of blocks which it is free to allocate.
What happens when a local_allocator (re)starts, after a
When the local_allocator starts up, there are 2 cases:
Case 1 is uninteresting. In case 2 there may have been an allocation in progress when the process crashed and this must be completed. Therefore the operation is journalled in a local filesystem in a directory which is deliberately deleted on host reboot (Case 1). The allocation operation consists of:
pushing the allocation to xenvmd on the SRmasterNote that both parts of the allocation operation are idempotent and hence the whole operation is idempotent. The journalling will guarantee it executes at-least-once.
When the local_allocator starts up it needs to discover the list of
free blocks. Rather than have 2 code paths, it’s best to treat everything
as if it is a cold start (i.e. no local caches already populated) and to
ask the master to resync the free block list. The resync is performed by
executing a “suspend” and “resume” of the free block queue, and requiring
the remote allocator to:
pop all block allocations and incorporate these updatesxenvmd needs to know
The device containing the volume group should be written to a config file when the SR is plugged.
xenvmd does not remember which hosts it is listening to across crashes,
restarts or master failovers. The membership_monitor will keep the
xenvmd list in sync with the PBD.currently_attached fields.
The local_allocator should be able to crash at any time and recover
afterwards. If the user requests a PBD.unplug we can perform a
clean shutdown by:
xenvmd to suspend the block allocation queuelocal_allocator to acknowledge the suspension and exitxenvmd sees the acknowlegement, we know that the
local_allocator is offline and it doesn’t need to poll the queue any morexenvmd can be terminated at any time and restarted, since all compound
operations are journalled.
Downgrade is a special case of shutdown.
To downgrade, we need to stop all hosts allocating and ensure all updates
are flushed to the global LVM metadata. xenvmd can shutdown
by:
local_allocators (see previous section)We can use a simple ring protocol to represent the queues on the disk. Each queue will have a single consumer and single producer and reside within a single logical volume.
To make diagnostics simpler, we can require the ring to only support push
and pop of whole messages i.e. there can be no partial reads or partial
writes. This means that the producer and consumer pointers will always
point to valid message boundaries.
One possible format used by the prototype is as follows:
Within the producer state sector we can have:
Within the consumer state sector we can have:
The consumer and producer pointers point to message boundaries. Each message is prefixed with a 4 byte length and padded to the next 4-byte boundary.
To push a message onto the ring we need to
To pop a message from the ring we need to
When we journal an operation we want to guarantee to execute it never
or at-least-once. We can re-use the queue implementation by pushing
a description of the work item to the queue and waiting for the
item to be popped, processed and finally consumed by advancing the
consumer pointer. The journal code needs to check for unconsumed data
during startup, and to process it before continuing.
During startup (resync the free blocks) and shutdown (flush the allocations) we need to suspend and resume queues. The ring protocol can be extended to allow the consumer to suspend the ring by:
push function checks the bit and writes “suspend acknowledged”push no more
itemsThe key detail is that the handshake on the ring causes the two sides to synchronise and both agree that the ring is now suspended/ resumed.
To check that the suspend/resume protocol works well enough to be used to resynchronise the free blocks list on a slave, a simple promela model was created. We model the queue state as 2 boolean flags:
bool suspend /* suspend requested */
bool suspend_ack /* suspend acknowledged *./
and an abstract representation of the data within the ring:
/* the queue may have no data (none); a delta or a full sync.
   the full sync is performed immediately on resume. */
mtype = { sync delta none }
mtype inflight_data = none
There is a “producer” and a “consumer” process which run forever,
exchanging data and suspending and resuming whenever they want.
The special data item sync is only sent immediately after a resume
and we check that we never desynchronise with asserts:
  :: (inflight_data != none) ->
    /* In steady state we receive deltas */
    assert (suspend_ack == false);
    assert (inflight_data == delta);
    inflight_data = none
i.e. when we are receiving data normally (outside of the suspend/resume code) we aren’t suspended and we expect deltas, not full syncs.
The model-checker spin verifies this property holds.
Consider what will happen if a host fails when HA is disabled:
Therefore we recommend that users enable HA and only disable it for short periods of time. Note that, unlike other thin-provisioning implementations, we will allow HA to be disabled.
When a host calls SMAPI sr_attach, it will use xenvm to tell xenvmd on the
SRmaster to connect to the local_allocator on the host. The xenvmd
daemon will create the volumes for queues and a volume to represent the
“free blocks” which a host is allowed to allocate.
The xenvmd process should export RRD datasources over shared
memory named
sr_<SR uuid>_<host uuid>_free: the number of free blocks in
the local cache. It’s useful to look at this and verify that it doesn’t
usually hit zero, since that’s when allocations will start to block.
For this reason we should use the MIN consolidation function.sr_<SR uuid>_<host uuid>_requests: a counter of the number
of satisfied allocation requests. If this number is too high then the quantum
of allocation should be increased. For this reason we should use the
MAX consolidation function.sr_<SR uuid>_<host uuid>_allocations: a counter of the number of
bytes being allocated. If the allocation rate is too high compared with
the number of free blocks divided by the HA timeout period then the
SRmaster-allocator should be reconfigured to supply more blocks with the host.TODO: to be updated by Germano
tapdisk will be modified to
/etc/tapdisk3.conf/etc/tapdisk3.conf/etc/tapdisk3.confTODO: to be updated by Germano
The request has the following format:
| Octet offsets | Name | Description |
|---|---|---|
| 0,1 | tl | Total length (including this field) of message (in network byte order) |
| 2 | type | The value ‘0’ indicating an extend request |
| 3 | nl | The length of the LV name in octets, including NULL terminator |
| 4,..,4+nl-1 | name | The LV name |
| 4+nl,..,12+nl-1 | vdi_size | The virtual size of the logical VDI (in network byte order) |
| 12+nl,..,20+nl-1 | lv_size | The current size of the LV (in network byte order) |
| 20+nl,..,28+nl-1 | cur_size | The current size of the vhd metadata (in network byte order) |
The response is a single byte value “0” which is a signal to re-examime the LV size. The request will block indefinitely until it succeeds. The request will block for a long time if
There is one local_allocator process per plugged PBD.
The process will be
spawned by the SM sr_attach call, and shutdown from the sr_detach call.
The local_allocator accepts the following configuration (via a config file):
socket: path to a local Unix domain socket. This is where the local_allocator
listens for requests from tapdiskallocation_quantum: number of megabytes to allocate to each tapdisk on requestlocal_journal: path to a block device or file used for local journalling. This
should be deleted on reboot.free_pool: name of the LV used to store the host’s free blocksdevices: list of local block devices containing the PVsto_LVM: name of the LV containing the queue of block allocations sent to xenvmdfrom_LVM: name of the LV containing the queue of messages sent from xenvmd.
There are two types of messages:When the local_allocator process starts up it will read the host local
journal and
from_LVM queue to trigger a full retransmit
of free blocks from xenvmdThe procedure for handling an allocation request from tapdisk is:
from_LVM queuetoLVM queueThe SM sr_detach called from PBD.unplug will use the xenvm CLI to request
that xenvmd disconnects from a host. The procedure is:
xenvm disconnect hostxenvm sends an RPC to xenvmd tunnelled through xapixenvmd suspends the to_LVM queuelocal_allocator acknowledges the suspend and exitsxenvmd flushes all updates from the to_LVM queue and stops listeningxenvmd is a daemon running per SRmaster PBD, started in sr_attach and
terminated in sr_detach. xenvmd has a config file containing:
socket: Unix domain socket where xenvmd listens for requests from
xenvm tunnelled by xapihost_allocation_quantum: number of megabytes to hand to a host at a timehost_low_water_mark: threshold below which we will hand blocks to a hostdevices: local devices containing the PVsxenvmd continually
to_LVM queuesto_LVM queuesfrom_LVM queuesThe role of the membership monitor is to keep the list of xenvmd connections
in sync with the PBD.currently_attached fields.
We shall
host-pre-declare-dead script to use xenvm to send an RPC
to xenvmd to forcibly flush (without acknowledgement) the to_LVM queue
and destroy the LVs.Host.declare_dead to call host-pre-declare-dead before
the VMs are unlockedhost-pre-forget hook type which will be called just before a Host
is forgottenhost-pre-forget script to use xenvm to call xenvmd to
destroy the host’s local LVssr_attach should:MGT major version number to preventlocal_allocatorsr_detach should:xenvm to request the shutdown of local_allocatorvdi_deactivate should:xenvm to request the flushing of all the to_LVM queues to the
redo logvdi_activate should:xenvm to deflate the LV to the minimum size (with some slack)Note that it is possible to attach and detach the individual hosts in any order but when the SRmaster is unplugged then there will be no “refilling” of the host local free LVs; it will behave as if the master host has failed.
Thin provisioning will be automatically enabled on upgrade. When the SRmaster
plugs in PBD the MGT major version number will be bumped to prevent old
hosts from plugging in the SR and getting confused.
When a VDI is activated, it will be deflated to the new low size.
We shall make a tool which will
The tool will
PBDsPBD. As a side-effect all pending LVM updates will be
written to the LVM metadata.MGT volume to have the lower metadata versionRolling upgrade should work in the usual way. As soon as the pool master has been upgraded, hosts will be able to use thin provisioning when new VDIs are attached. A VM suspend/resume/reboot or migrate will be needed to turn on thin provisioning for existing running VMs.
A pool may be safely downgraded to a previous version without thin provisioning provided that the downgrade tool is run. If the tool hasn’t run then the old pool will refuse to attach the SR because the metadata has been upgraded.
If HA is enabled:
xhad elects a new master if necessaryXapi on the master will start xenvmd processes for shared thin-lvhd SRsxhad tells Xapi which hosts are alive and which have failed.Xapi runs the host-pre-declare-dead scripts for every failed hosthost-pre-declare-dead tells xenvmd to flush the to_LVM updatesXapi unlocks the VMs and restarts them on new hosts.If HA is not enabled:
Xapi which hosts have failed with xe host-declare-deadXapi runs the host-pre-declare-dead scripts for every failed hosthost-pre-declare-dead tells xenvmd to flush the to_LVM updatesXapi unlocks the VMsThe admin calls Pool.designate_new_master. This initiates a two-phase commit of the new master. As part of this, the slaves will restart, and on restart each host’s xapi will kill any xenvmd that should only run on the pool master. The new designated master will then restart itself and start up the xenvmd process on itself.
Dm-thin also uses 2 local LVs: one for the “thin pool” and one for the metadata. After replaying our journal we could potentially delete our host local LVs and switch over to dm-thin.
Each ring consists of 3 sectors of metadata followed by the data area. The contents of the first 3 sectors are:
| Sector, Octet offsets | Name | Type | Description |
|---|---|---|---|
| 0,0-30 | signature | string | Signature (“mirage shared-block-device 1.0”) |
| 1,0-7 | producer | uint64 | Pointer to the end of data written by the producer |
| 1,8 | suspend_ack | uint8 | Suspend acknowledgement byte |
| 2,0-7 | consumer | uint64 | Pointer to the end of data read by the consumer |
| 2,8 | suspend | uint8 | Suspend request byte |
Note. producer and consumer pointers are stored in little endian format.
The pointers are free running byte offsets rounded up to the next 4-byte boundary, and the position of the actual data is found by finding the remainder when dividing by the size of the data area. The producer pointer points to the first free byte, and the consumer pointer points to the byte after the last data consumed. The actual payload is preceded by a 4-byte length field, stored in little endian format. When writing a 1 byte payload, the next value of the producer pointer will therefore be 8 bytes on from the previous - 4 for the length (which will contain [0x01,0x00,0x00,0x00]), 1 byte for the payload, and 3 bytes padding.
A ring is suspended and resumed by the consumer. To suspend, the consumer first checks that the producer and consumer agree on the current suspend status. If they do not, the ring cannot be suspended. The consumer then writes the byte 0x02 into byte 8 of sector 2. The consumer must then wait for the producer to acknowledge the suspend, which it will do by writing 0x02 into byte 8 of sector 1.
Two different types of message can be sent on the FromLVM ring.
The FreeAllocation message contains the blocks for the free pool. Example message:
(FreeAllocation((blocks((pv0(12326 12249))(pv0(11 1))))(generation 2)))
Pretty-printed:
(FreeAllocation
    (
        (blocks
            (
                (pv0(12326 12249))
                (pv0(11 1))
            )
        )
        (generation 2)
    )
)
This is a message to add two new sets of extents to the free pool. A span of length 12249 extents starting at extent 12326, and a span of length 1 starting from extent 11, both within the physical volume ‘pv0’. The generation count of this message is ‘2’. The semantics of the generation is that the local allocator must record the generation of the last message it received since the FromLVM ring was resumed, and ignore any message with a generated less than or equal to the last message received.
The CapRequest message contains a request to cap the free pool at a maximum size. Example message:
(CapRequest((cap 6127)(name host1-freeme)))
Pretty-printed:
(CapRequest
    (
        (cap 6127)
        (name host1-freeme)
    )
)
This is a request to cap the free pool at a maximum size of 6127 extents. The ’name’ parameter reflects the name of the LV into which the extents should be transferred.
The ToLVM ring only contains 1 type of message. Example:
((volume test5)(segments(((start_extent 1)(extent_count 32)(cls(Linear((name pv0)(start_extent 12328))))))))
Pretty-printed:
(
    (volume test5)
    (segments
        (
            (
                (start_extent 1)
                (extent_count 32)
                (cls
                    (Linear
                        (
                            (name pv0)
                            (start_extent 12328)
                        )
                    )
                )
            )
        )
    )
)
This message is extending an LV named ’test5’ by giving it 32 extents starting at extent 1, coming from PV ‘pv0’ starting at extent 12328. The ‘cls’ field should always be ‘Linear’ - this is the only acceptable value.
Xenvmd will try to keep the free pools of the hosts within a range set as a fraction of free space. There are 3 parameters adjustable via the config file:
These three are all numbers between 0 and 1. Xenvmd will sum the free
size and the sizes of all hosts’ free pools to find the total
effective free size in the VG, F. It will then subtract the sizes of
any pending desired space from in-flight create or resize calls s. This
will then be divided by the number of hosts connected, n, and
multiplied by the three factors above to find the 3 absolute values
for the high, medium and low watermarks.
{high, medium, low} * (F - s) / n
When xenvmd notices that a host’s free pool size has dropped below the low watermark, it will be topped up such that the size is equal to the medium watermark. If xenvmd notices that a host’s free pool size is above the high watermark, it will issue a ‘cap request’ to the host’s local allocator, which will then respond by allocating from its free pool into the fake LV, which xenvmd will then delete as soon as it gets the update.
Xenvmd keeps track of the last update it has sent to the local allocator, and will not resend the same request twice, unless it is restarted.
| Design document | |
|---|---|
| Revision | v2 |
| Status | released (22.6.0) |
This design is modified by trusted-certificates.md.
Xenserver has used TLS-encrypted communications between xapi daemons in a pool since its first release. However it does not use TLS certificates to authenticate the servers it connects to. This allows possible attackers opportunities to impersonate servers when the pools’ management network is compromised.
In order to enable certificate verification, certificate exchange as well as proper set up to trust them must be provided by xapi. This is currently done by allowing users to generate, sign and install the certificates themselves; and then enable the Common Criteria mode. This requires a CA and has a high barrier of entry.
Using the same certificates for intra-host communication creates friction between what the user needs and what the host needs. Instead of trying to reconcile these two uses with one set of certificates, host will serve two certificates: one for API calls from external clients, which is the one that can be changed by the users; and one that is use for intra-pool communications. The TLS server in the host can select which certificate to serve depending on the service name the client requests when opening a TLS connection. This mechanism is called Server Name Identification or SNI in short.
Last but not least the update bearing these changes must not disrupt pool operations while or after being applied.
| Term | Meaning |
|---|---|
| SNI | Server Name Identification. This TLS protocol extension allows a server to select a certificate during the initial TLS handshake depending on a client-provided name. This usually allows a single reverse-proxy to serve several HTTPS websites. |
| Host certificate | Certificate that a host sends clients when the latter initiate a connection with the former. The clients may close the connection depending on the properties of this certificate and whether they have decided to trust it previously. |
| Trusted certificate | Certificate that a computer uses to verify whether a host certificate is valid. If the host certificate’s chain of trust does not include a trusted certificate it will be considered invalid. |
| Default Certificate | Xenserver hosts present this certificate to clients which do not request an SNI. Users are allowed to install their own custom certificate. |
| Pool Certificate | Xenserver hosts present this certificate to clients which request xapi:poolas the SNI. They are used for host-to-host communications. |
| Common Criteria | Common Criteria for Information Technology Security Evaluation is a certification on computer security. |
Currently Xenserver hosts generate self-signed certificates with the IP or FQDN as their subjects, users may also choose to install certificates. When installing these certificates only the cryptographic algorithms used to generate the certificates (private key and hash) are validated and no properties about them are required.
This means that using user-installed certificates for intra-pool communication may prove difficult as restrictions regarding FQDN and chain validation need to be ensured before enabling TLS certificate checking or the pool communications will break down.
Instead a different certificate is used only for pool communication. This allows to decouple whatever requirements users might have for the certificates they install to the requirements needed for secure pool communication. This has several benefits:
In general, the project is able to more safely change the parameters of intra-pool communication without disrupting how users use custom certificates.
To be able to establish trust in a pool, hosts must distribute the certificates to the rest of the pool members. Once that is done servers can verify whether they are connecting to another host in the pool by comparing the server certificate with the certificates in the trust root. Certificate pinning is available and would allow more stringent checks, but it doesn’t seem a necessity: hosts in a pool already share secret that allows them to have full control of the pool.
To be able to select a host certificate depending whether the connections is intra-pool or comes from API clients SNI will be used.
This allows clients to ask for a service when establishing a TLS connection.
This allows the server to choose the certificate they want to offer when negotiating the connection with the client.
The hosts will exploit this to request a particular service when they establish a connection with other hosts in the pool.
When initiating a connection to another host in the pool, a server will create requests for TLS connections with the server_name xapi:pool with the name_type DNS, this goes against RFC-6066 as this server_name is not resolvable.
This still works because we control the implementation in both peers of the connection and can follow the same convention.
In addition connections to the WLB appliance will continue to be validated using the current scheme of user-installed CA certificates. This means that hosts connecting to the appliance will need a special case to only trust user-installed certificated when establishing the connection. Conversely pool connections will ignore these certificates.
| Name | Filesystem location | User-configurable | Used for |
|---|---|---|---|
| Host Default | /etc/xensource/xapi-ssl.pem | yes (using API) | Hosts serve it to normal API clients |
| Host Pool | /etc/xensource/xapi-pool-tls.pem | no | Hosts serve to clients requesting “xapi:pool” as the SNI |
| Trusted Default | /etc/stunnel/certs/ | yes (using API) | Certificates that users can install for trusting appliances |
| Trusted Pool | /etc/stunnel/certs-pool/ | no | Certificates that are managed by the pool for host-to-host communications |
| Default Bundle | /etc/stunnel/xapi-stunnel-ca-bundle.pem | no | Bundle of certificates that hosts use to verify appliances (in particular WLB), this is kept in sync with “Trusted Default” |
| Pool Bundle | /etc/stunnel/xapi-pool-ca-bundle.pem | no | Bundle of certificates that hosts use to verify other hosts on pool communications, this is kept in sync with “Trusted Pool” |
The certificates until now have been signed using sha256WithRSAEncryption:
The Default Certificates served to API clients will continue to use sha256WithRSAEncryption with 2048-bit RSA keys. The Pool certificates will use the same algorithms for consistency.
The self-signed certificates until now have used a mix of IP and hostname claims:
The Pool certificates do not contain claims about IPs nor hostnames as this may change during runtime and depending on their validity may make pool communication more brittle. Instead the only claim they have is that their Issuer and their Subject are CN Host UUID, along with a serial number.
Self-signed certificates produced until now have had validity periods of 3650 days (~10 years). The Pool certificates will have the same validity period.
HTTPS Connections between hosts usually involve the xapi daemons and stunnel processes:
This means that stunnel needs to be set up correctly to verify certificates when connecting to other hosts. Some aspects like CA certificates are already managed, but certificate pinning is not.
There are several use cases that need to be modified in order correctly manage trust between hosts.
This is the main use case for the feature, the rest of use cases that need changes are modified to support this one. Currently a Xenserver host connecting to another host within the pool does not try to authenticate the receiving server when opening a TLS connection. (The receiving server authenticates the originating server by xapi authentication, see below)
Stunnel will be configured to verify the peer certificate against the CA certificates that are present in the host. The CA certificates must be correctly set up when a host joins the pool to correctly establish trust.
The previous behaviour for WLB must be kept as the WLB connection must be checked against the user-friendly CA certificates.
All incoming connections authenticate the client using credentials, this does not need the addition of certificates. (username and password, pool secret)
The hosts must present the certificate file to incoming connections so the client can authenticate them.
This is already managed by xapi, it configures stunnel to present the configured host certificate.
The configuration has to be changed so stunnel responds to SNI requests containing the string xapi:pool to serve the internal certificate instead of the client-installed one.
On xapi startup an additional certificate is created now for pool operations. It’s added to the trusted pool certificates. The certificate’s only claim is the host’s UUID. No IP nor hostname information is kept as the clients only check for the certificate presence in the trust root.
This use-case is delicate as it is the point where trust is established between hosts. This is done with a call from the joiner to the pool coordinator where the certificate of the coordinator is not verified. In this call the joiner transmits its certificate to the coordinator and the coordinator returns a list of the pool members’ UUIDs and certificates. This means that in the policy used is trust on first use.
To deal with parallel pool joins, hosts download all the Pool certificates in the pool from the coordinator after all restarts.
The connection is initiated by a client, just like before, there is no change in the API as all the information needed to start the join is already provided (pool username and password, IP of coordinator)
sequenceDiagram
participant clnt as Client
participant join as Joiner
participant coor as Coordinator
participant memb as Member
clnt->>join: pool.join coordinator_ip coordinator_username coordinator_password
join->>coor:login_with_password coordinator_ip coordinator_username coordinator_password

Note over join: pre_join_checks
join->>join: remote_pool_has_tls_enabled = self_pool_has_tls_enabled
alt are different
Note over join: interrupt join, raise error
end
Note right of join: certificate distribution
coor-->>join:
join->>coor: pool.internal_certificate_list_content
coor-->>join:

join->>coor: pool.upload_identity_host_certificate joiner_certificate uuid
coor->>memb: pool.internal_certificates_sync
memb-->>coor:

loop for every <user CA certificate> in Joiner
join->>coor: Pool.install_ca_certitificate <user CA certificate>
coor-->>join:
end

loop for every <user CRL> in Joiner
join->>coor: Pool.install_crl <user CRL>
coor-->>join:
end

join->>coor: host.add joiner
coor-->>join:

join->>join: restart_as_slave
join->>coor: pool.user_certificates_sync
join->>coor: host.copy_primary_host_certs
During pool eject the pool must remove the host certificate of the ejected member from the internal trust root, this must be done by the xapi daemon of the coordinator.
The ejected member will recreate both server certificates to replicate a new installation. This can be triggered by deleting the certificates and their private keys in the host before rebooting, the current boot scripts automatically generates a new self-signed certificate if the file is not present. Additionally, both the user and the internal trust roots will be cleared before rebooting as well.
When a pool has finished upgrading to the version with certificate checking the database reflects that the feature is turned off, this is done as part of the database upgrade procedure in xen-api. The internal certificate is created on restart. It is added to the internal trusted certificates directory. The distribution of certificate will happens when the tls verification is turned on, afterwards.
In order to give information about the validity and useful information of installed user-facing certificates to API clients as well as the certificates used for internal purposes, 2 fields are added to certificate records in xapi’s datamodel and database:
Additionally, now the _host field contains a null reference if the certificate is a corporate CA (a ca certificate).
The fields will get exposed in the CLI whenever a certificate record is listed, this needs a xapi-cli-server to be modified to show the new field.
To enable a frictionless migration when pools have tls verification enabled, the host certificate of the host receiving the vm is sent to the sender. This is done by adding the certificate of the receiving host as well as its pool coordinator to the return value of the function migrate_receive function. The sender can then add the certificate to the folder of CA certificates that stunnel uses to verify the server in a TLS connection. When the transaction finishes, whether it fails or succeeds the CA certificate is deleted.
The certificate is stored in a temporary location so xapi can clean up the file when it starts up, in case after the host fences or power cycles while the migration is in progress.
Xapi invokes sparse_dd with the filename correct trusted bundle as a parameter so it can verify the vhd-server running on the other host.
Xapi also invokes xcp-rrdd to migrate the VM metrics. xcp-rrdd is passed the 2 certificates to verify the remote hosts when sending the metrics.
Clients should not be aware of this change and require no change.
Xapi-cli-server, the server of xe embedded into xapi, connects to the remote coordinator using TLS to be able to initiate the migration. Currently no verification is done. A certificate is required to initiate the connection to verify the remote server.
In u6.3 and u6.4 no changes seem necessary.
The Pool certificates do not depend on hostnames. Changing the hostnames does not affect TLS certificate verification in a pool.
Installation of corporate CA can be done with current API. Certificates are added to the database as CA certificates.
This needs a reimplementation of the current API to reset host certificate, this time allowing the operation to happen when the host is not on emergency node and to be able to do it remotely.
A new API call is introduced to enable tls certificate verification: Pool.enable_tls_verification. This is used by the CLI command pool-enable-tls-verification. The call causes the coordinator of the pool to install the Pool certificates of all the members in its internal trust root. Then calls the api for each member to install all of these certificates. After this public key exchange is done, TLS certificate verification is enabled on the members, with the coordinator being the last to enable it.
When there are issues that block enabling the feature, the call returns an error specific to that problem:
The coordinator enabling verification last is done to ensure that if there is any issue enabling the coordinator host can still connect to members and rollback the setting.
A new field is added to the pool: tls_verification_enabled. This enables clients to query whether TLS verification is enabled.
A new emergency command is added emergency-host-disable-tls-verification. This command disables tls-verification for the xapi daemon in a host. This allows the host to communicate with other hosts in the pool.
After that, the admin can regenerate the certificates using the new host-refresh-server-certificate in the hosts with invalid certificates, finally they can reenable tls certificate checking using the call emergency-host-reenable-tls-verification.
The documentation will include instructions for administrators on how to reset certificates and manually installing the host certificates as CA certificates to recover pools.
This means they will not have to disable TLS and compromise on security.
Stockholm hosts provide alerts 30 days before hosts certificates expire, it must be changed to alert about users’ CA certificates expiring.
Pool certificates need to be cycled when the certificate expiry is approaching. Alerts are introduced to warn the administrator this task must be done, or risk the operation of the pool. A new API is introduced to create certificates for all members in a pool and replace the existing internal certificates with these. This call imposes the same requirements in a pool as the pool secret rotation: It cannot be run in a pool unless all the host are online, it can only be started by the coordinator, the coordinator is in a valid state, HA is disabled, no RPU is in progress, and no pool operations are in progress. The API call is Pool.rotate_internal_certificates. It is exposed by xe as pool-rotate-internal-certificates.
Xapi startup has to account for host changes that affect this feature and modify the filesystem and pool database accordingly.
The xapi database records for certificates must be changed according with the additions explained before.
Additions
Modifications:
Deprecations:
Following API additions:
And removals:
This feature needs clients to behave differently when initiating pool joins, to allow them to choose behaviour the toolstack will expose a new feature flag ‘Certificate_verification’. This flag will be part of the express edition as it’s meant to aid detection of a feature and not block access to it.
Several alerts are introduced:
<body><message>The trusted TLS server certificate {is expiring soon|has expired}.</message><date>20210302T02:00:01Z</date></body> <body><message>The TLS server certificate for internal communications {is expiring soon|has expired}.</message><date>20210302T02:00:01Z</date></body> <body><host>HOST-UUID</host></body> <body>
<total>35</total>
<known><username>usr5</username><originator>origin5</originator><ip>5.4.3.2</ip><number>10</number><date>20200922T15:03:13Z</date></known>
<known><username>usr4</username><useragent>UA</useragent><number>6</number><date>20200922T15:03:13Z</date></known>
<known><useragent>UA</useragent><ip>4.3.2.1</ip><number>4</number><date>20200922T14:57:11Z</date></known>
<unknown>10</unknown>
</body>| Design document | |
|---|---|
| Revision | v2 |
| Status | released (26.13.0) |
In various use cases, TLS connections are established on the host on which XAPI runs. When establishing a TLS connection, the peer identity needs to be validated. This is done using either a root CA certificate to perform certificate chain validation, or a pinned certificate for validation with certificate pinning. The root CA certificates and pinned certificates involved in this process are referred to as trusted certificates. When a trusted certificate is installed, the local endpoint can validate the peer identity during TLS connection establishment. Certificate chain validation is a general-purpose, standards-based approach but requires additional steps, such as getting the peer’s certificate signed by a CA. In contrast, certificate pinning offers a quicker way to set up trust in some cases without the overhead of CA signing. For example, when establishing a TLS connection, the peer endpoint presenting a self-signed server certificate, the local endpoint, after explicit user confirmation, can set up the trust by pinning the server certificate for this peer. For subsequent connections, the local endpoint validates the peer against the pinned certificate. This allows the use case to start in quicker and easier way without prior CA signing and without compromising security.
As the unified API for the whole system, XAPI also exposes interfaces for users to install and manage trusted certificates that are used by system components for different purposes.
The base design described in pool-certificates.md defines the database, API, and trust store in the filesystem for managing trusted certificates. This document introduces the following enhancements to that design:
Explicit separation of root CA certificates and pinned certificates: In the base design, both certificate types share the same database schema, APIs, and are stored together in a single bundle file. This makes it difficult to determine the appropriate validation approach based on the certificate type. The improvement introduces a type value to separate root CA certificates and pinned certificates explicitly.
Add a “purpose” attribute for trusted certificates: According to the base design, only certificates used for internal TLS connections among XAPI processes within a pool are stored separately. All other trusted certificates are grouped in a single bundle, which may include certificates for multiple purposes. By introducing a “purpose” attribute, certificates can be organized by their intended use, improving clarity and reducing ambiguity.
The Certificate class in database is defined to represent general certificates, including trusted certificates. One existing class field “type” supports the following enumeration values:
Two improvements in this design:
A new value “pinned” is introduced in this design so that the existing “ca” now represents trusted root CA only. The new “pinned” will represent trusted pinned certificates.
A new enumeration type “purpose” is introduced to indicate the intended usage of a trusted certificate. A new Certificate class field “purpose” (a set of values of enumeration type “purpose”) will be added to represent all applicable purposes of a trusted certificate. By default, this set is empty which corresponds to the existing “ca” certificates for general purpose.
This is an existing API to install a trusted certificate into the pool with its arguments being defined as:
Prior to this design, the API’s name parameter represents the certificate file name as persisted on the dom0 file system. In this design, this API will be deprecated because it exposes implementation details that should remain internal and hidden from users. The new “pool.install_trusted_certificate” should be used instead. For the same reason, “pool.uninstall_ca_certificate” will also be deprecated.
This is a new API introduced in this design with its arguments being defined as:
This new API is used to install trusted certificate. When purpose is an empty set, it stands for a root CA certificate for general purpose. The purpose can not be an empty set when the ca is false, because each pinned certificate is specific to a single server and therefore unsuitable for a shared trusted certificate for general purpose.
It returns void when succeed. Otherwise, return corresponding API error.
This is a new API introduced in this design to uninstall a trusted certificate with its arguments being defined as:
It returns void when succeed. Otherwise, return corresponding API error.
According to the base design, trusted certificates are exchanged between the pool and the joining host during the pre‑join phase. This design basically preserves that behavior to ensure the joiner works correctly both before and after joining the pool. However, a number of modifications have been introduced compared with the base design.
sequenceDiagram
participant clnt as Client
participant join as Joiner
participant coor as Coordinator
participant memb as Member
clnt->>join: Pool.join coordinator_ip coordinator_username coordinator_password
join->>coor:login_with_password rpc_no_verify coordinator_ip coordinator_username coordinator_password
coor-->>join:

Note over join: pre_join_checks
rect rgba(0,0,0,0.05)
join->>join: assert_tls_verification_matches
alt fails
Note over join: interrupt join, raise error
end
end

Note over join: exchnage trusted intra-pool host identity certificates
rect rgba(0,0,0,0.05)
join->>coor: Pool.exchange_certificates_on_join <Joiner's trusted host identity cert>
coor->>coor: Cert_distrib.exchange_certificates_with_joiner start
coor->>memb: Host.cert_distrib_atom Write
memb-->>coor:
coor->>coor: Cert_distrib.get_local_pool_certs
coor-->>coor: Cert_distrib.exchange_certificates_with_joiner done
coor-->>join: <trusted host identity certs in pool>
join->>join: Cert_distrib.import_joining_pool_certs <trusted host identity certs in pool>
end

join->>coor:login_with_password rpc_verify coordinator_ip coordinator_username coordinator_password
coor-->>join:

Note over join: exchange legacy ca certificates
rect rgba(0,0,0,0.05)
join->>coor: Pool.exchange_ca_certificates_on_join <Joiner's legacy ca certs>
coor->>coor: Cert_distrib.exchange_ca_certificates_with_joiner
coor-->>join: <legacy ca certs in pool>
join->>join: Cert_distrib.import_joining_pool_ca_certificates <legacy ca certs in pool>
end

Note over join: exchange trusted certificates
rect rgba(0,0,0,0.05)
join->>coor: Pool.exchange_trusted_certificates_on_join <Joiner's trusted certs>
loop for every <trusted> in Joiner
coor->>coor: Pool.install_trusted_certificate start
coor->>memb: Host.cert_distrib_atom Write
memb-->>coor:
coor->>memb: Host.certificate_sync
memb-->>coor:
coor-->>coor: Pool.install_trusted_certificate done
end
coor->>coor: Cert_distrib.collect_trusted_certs
coor-->>join: <trusted certs in pool>
loop for every <trusted> in pool
join->>join: Pool.install_trusted_certificate
end
end

Note over join: exchange CRLs
rect rgba(0,0,0,0.05)
join->>coor: Pool.exchange_crls_on_join <Joiner's CRLs>
loop for every <CRL> in Joiner
coor->>coor: Pool.crl_install start
coor->>memb: Host.cert_distrib_atom Write
memb-->>coor:
coor->>memb: Host.certificate_sync
memb-->>coor:
coor-->>coor: Pool.crl_install done
end
coor->>coor: Cert_distrib.collect_crls
coor-->>join: <CLRs in pool>
loop for every <CRL> in pool
join->>join: Pool.crl_install
end
end

join->>coor: Host.add joiner
coor-->>join:

join->>join: restart_as_slave

Note over join: Copy all certificates from coordinator
rect rgba(0,0,0,0.05)
join->>coor: Host.copy_primary_host_certs
coor->>join: Host.cert_distrib_atom Write
join-->>coor:
coor->>join: Host.cert_distrib_atom GenBundle
join-->>coor:
coor-->>join: return from Host.copy_primary_host_certs
end
The trusted certificates will be removed from any host which is being eject from the pool.
The install/uninstall APIs above are not the only ways of managing the trusted certificates. A particular API, e.g. “pool.set_wlb_url”, may also install the trusted certificate used to validate the WLB server on subsequent TLS connections. However, regardless of the entry point, all trusted certificates must be represented by a Certificate database object and stored in the same way described below as if installed by the install APIs.
The trusted certificates are stored in individual hosts’ filesystems. The existing stores defined in the base design are:
| Name | Filesystem location | User-configurable | Used for |
|---|---|---|---|
| Trusted Default | /etc/stunnel/certs/ | yes (using API) | Certificates that users can install for trusting appliances |
| Trusted Pool | /etc/stunnel/certs-pool/ | no | Certificates that are managed by the pool for host-to-host communications |
| Default Bundle | /etc/stunnel/xapi-stunnel-ca-bundle.pem | no | Bundle of certificates that hosts use to verify appliances (in particular WLB), this is kept in sync with “Trusted Default” |
| Pool Bundle | /etc/stunnel/xapi-pool-ca-bundle.pem | no | Bundle of certificates that hosts use to verify other hosts on pool communications, this is kept in sync with “Trusted Pool” |
Regarding the “User-configurable”, when it is “yes”, it means a user can only install and remove the file with “name” parameter of “pool.install_ca_certificate” ; when it is “no”, it means the user can’t install or remove it even via APIs. In any cases, a user can’t change the certificate files directly.
When a trusted certificate is being installed via “pool.install_ca_certificate”, the trusted certificate will be stored in the “Trusted Default” and “Default Bundle”. This design doesn’t change this for backwards compatibility. But the API “pool.install_ca_certificate” will be marked as deprecated.
The pool “Trusted Pool” and “Pool Bundle” are for host-to-host TLS communications within a pool. This design doesn’t change them.
The stores for the certificates installed via “pool.install_trusted_certificate” are defined as:
| Name | Filesystem location | Used for |
|---|---|---|
| Trusted General CA | /etc/trusted-certs/ca-general/ | Trusted root CA certificates that users can install to validate a peer’s identity when establishing a TLS connection for general purpose. |
| Trusted Peer | /etc/trusted-certs/pinned-<PURPOSE>/ | Trusted pinned certificates that users can install to validate a peer’s identity when establishing a TLS connection for <PURPOSE>. |
| Trusted CA | /etc/trusted-certs/ca-<PURPOSE>/ | Trusted root CA certificates that users can install to validate a peer’s identity when establishing a TLS connection for <PURPOSE>. |
| General Bundle | /etc/trusted-certs/ca-bundle-general.pem | Bundle of trusted root CA certificates under /etc/trusted-certs/ca-general/ to verify a peer’s identity when establishing a TLS connection for general purpose. |
| Peer Bundle | /etc/trusted-certs/pinned-bundle-<PURPOSE>.pem | Bundle of trusted pinned certificates under /etc/trusted-certs/pinned-<PURPOSE>/ to verify a peer’s identity when establishing a TLS connection for <PURPOSE>. |
| CA Bundle | /etc/trusted-certs/ca-bundle-<PURPOSE>.pem | Bundle of trusted root CA certificates under /etc/trusted-certs/ca-<PURPOSE>/ to verify a peer’s identity when establishing a TLS connection for <PURPOSE>. |
The filesystem location is derived from the <PURPOSE>. Each <PURPOSE> string corresponds to a predefined value of the “purpose” type in the database, implemented as predefined constants. The certificate file names under filesystem locations of “Trusted General CA”, “Trusted Peer” and “Trusted CA” will be the UUIDs of the Certificate objects.
The “Peer Bundle”, “CA Bundle”, and “Default Bundle” can be directly used when establishing TLS connections. The endpoint to validate the peer’s identity must unambiguously choose only one non-empty bundle from them with the following precedence order:
No more attempts on remaining bundles when validation with the selected one fails (the server certificate is not trusted by the selected bundle).
For example, if “Peer Bundle” doesn’t exist and the “CA Bundle” (if not empty) is selected to do the validation, the endpoint should not try with “General Bundle” even when the validation with “CA Bundle” failed.
| Design document | |
|---|---|
| Revision | v1 |
| Status | released (5.6 fp1) |
To isolate network traffic between VMs (e.g. for security reasons) one can use VLANs. The number of possible VLANs on a network, however, is limited, and setting up a VLAN requires configuring the physical switches in the network. GRE tunnels provide a similar, though more flexible solution. This document proposes a design that integrates the use of tunnelling in the XenAPI. The design relies on the recent introduction of the Open vSwitch, and requires an Open vSwitch (OpenFlow) controller (further referred to as the controller) to set up and maintain the actual GRE tunnels.
We suggest following the way VLANs are modelled in the datamodel. Introducing a
VLAN involves creating a Network object for the VLAN, that VIFs can connect to.
The VLAN.create API call takes references to a PIF and Network to use and a
VLAN tag, and creates a VLAN object and a PIF object. We propose something
similar for tunnels; the resulting objects and relations for two hosts would
look like this:
PIF (transport) -- Tunnel -- PIF (access) \          / VIF
                                            Network -- VIF
PIF (transport) -- Tunnel -- PIF (access) /          \ VIF
string uuid (read-only)PIF ref access_PIF (read-only)PIF ref transport_PIF (read-only)(string -> string) map status (read/write); owned by the controller, containing at least the
key active, and key and error when appropriate (see below)(string -> string) map other_config (read/write)New fields in PIF class (automatically linked to the corresponding tunnel
fields):
PIF ref set tunnel_access_PIF_of (read-only)PIF ref set tunnel_transport_PIF_of (read-only)tunnel ref create (PIF ref, network ref)void destroy (tunnel ref)For clients to determine which network backend is in use (to decide whether
tunnelling functionality is enabled) a key network_backend is added to the
Host.software_version map on each host. The value of this key can be:
bridge: the Linux bridging backend is in use;openvswitch: the [Open vSwitch] backend is in use.The user is responsible for creating tunnel and network objects, associating VIFs with the right networks, and configuring the physical PIFs, all using the XenAPI/CLI/XC.
The tunnel.status field is owned by the controller. It
may be possible to define an RBAC role for the controller, such that only the
controller is able to write to it.
The tunnel.create message does not take
a tunnel identifier (GRE key). The controller is responsible for assigning
the right keys transparently. When a tunnel has been set up, the controller
will write its key to tunnel.status:key, and it will set
tunnel.status:active to "true" in the same field.
In case a tunnel could
not be set up, an error code (to be defined) will be written to
tunnel.status:error, and tunnel.status:active will be "false".
OPENVSWITCH_NOT_ACTIVE if the Open vSwitch networking sub-system
is not active (the host uses linux bridging).IS_TUNNEL_ACCESS_PIF if the specified transport PIF is a tunnel access PIF.tunnel.status:active
field is initialised to "false", indicating that no actual tunnelling
infrastructure has been set up yet.PIF.plug on the new tunnel access PIF.PIF.unplug on the tunnel access PIF. Destroys the tunnel and
tunnel access PIF objects.TRANSPORT_PIF_NOT_CONFIGURED if the underlying transport PIF has
PIF.ip_configuration_mode = None, as this interface needs to be configured
for the tunnelling to work. Otherwise, the transport PIF will be plugged.interface-reconfigure to “bring up” the tunnel access PIF,
which causes it to create a local bridge.interface-reconfigure. The
controller is responsible for setting up these links. If the controller is
not available, no links can be created, and the tunnel network degrades to an
internal network (only intra-host connectivity).PIF.currently_attached is set to true.interface-reconfigure to “bring down” the tunnel PIF, which
causes it to destroy the local bridge.PIF.currently_attached is set to false.PIF.unplug on the associated tunnel access PIF(s).PIF_TUNNEL_STILL_EXISTS.VLAN.create fails with IS_TUNNEL_ACCESS_PIF if given an
underlying PIF that is a tunnel access PIF.tunnel class to determine which bridges/networks
require GRE tunnelling.tunnel.get_all to obtain the information about all
tunnels.tunnel class to stay up-to-date.tunnel.status:active to "true" for
all tunnel links that have been set up, and "false" if links are broken.tunnel.status:error in case something went wrong.tunnel.status:key on the associated tunnel object
(at the same time tunnel.status:active will be set to "true").tunnel.status:key (optional; the key should anyway be disregarded if
tunnel.status:active is "false").New xe commands (analogous to xe vlan-):
tunnel-createtunnel-destroytunnel-listtunnel-param-gettunnel-param-list| Design document | |
|---|---|
| Revision | v2 |
| Status | released (8.2) |
It is often necessary to replace the TLS certificate used to secure communications to Xenservers hosts, for example to allow a XenAPI user such as Citrix Virtual Apps and Desktops (CVAD) to validate that the host is genuine and not impersonating the actual host.
Historically there has not been a supported mechanism to do this, and as a result users have had to rely on guides written by third parties that show how to manually replace the xapi-ssl.pem file on a host. This process is error-prone, and if a mistake is made, can result in an unusable system. This design provides a fully supported mechanism to allow replacing the certificates.
It is expected that an API caller will provide, in a single API call, a private key, and one or more certificates for use on the host. The key will be provided in PKCS #8 format, and the certificates in X509 format, both in base-64-encoded PEM containers.
Multiple certificates can be provided to cater for the case where an intermediate certificate or certificates are required for the caller to be able to verify the certificate back to a trusted root (best practice for Certificate Authorities is to have an ‘offline’ root, and issue certificates from an intermediate Certificate Authority). In this situation, it is expected (and common practice among other tools) that the first certificate provided in the chain is the host’s unique server certificate, and subsequent certificates form the chain.
To detect mistakes a user may make, certain checks will be carried out on the provided key and certificate(s) before they are used on the host. If all checks pass, the key and certificate(s) will be written to the host, at which stage a signal will be sent to stunnel that will cause it to start serving the new certificate.
Xapi must provide an API call through Host RPC API to install host certificates:
let install_server_certificate = call
    ~lifecycle:[Published, rel_stockholm, ""]
    ~name:"install_server_certificate"
    ~doc:"Install the TLS server certificate."
    ~versioned_params:
      [{ param_type=Ref _host; param_name="host"; param_doc="The host"
       ; param_release=stockholm_release; param_default=None}
      ;{ param_type=String; param_name="certificate"
       ; param_doc="The server certificate, in PEM form"
       ; param_release=stockholm_release; param_default=None}
      ;{ param_type=String; param_name="private_key"
       ; param_doc="The unencrypted private key used to sign the certificate, \
                    in PKCS#8 form"
       ; param_release=stockholm_release; param_default=None}
      ;{ param_type=String; param_name="certificate_chain"
       ; param_doc="The certificate chain, in PEM form"
       ; param_release=stockholm_release; param_default=Some (VString "")}
      ]
    ~allowed_roles:_R_POOL_ADMIN
    ()
This call should be implemented within xapi, using the already-existing crypto libraries available to it.
Analogous to the API call, a new CLI call host-server-certificate-install
must be introduced, which takes the parameters certificate, key and
certificate-chain - these parameters are expected to be filenames, from which
the key and certificate(s) must be read, and passed to the
install_server_certificate RPC call.
The CLI will be defined as:
"host-server-certificate-install",
{
  reqd=["certificate"; "private-key"];
  optn=["certificate-chain"];
  help="Install a server TLS certificate on a host";
  implementation=With_fd Cli_operations.host_install_server_certificate;
  flags=[ Host_selectors ];
};Xapi must perform the following validation steps on the provided key and certificate. If any validation step fails, the API call must return an error with the specified error code, providing any associated text:
Validate that it is a pem-encoded PKCS#8 key, use error
SERVER_CERTIFICATE_KEY_INVALID [] and exposed as
“The provided key is not in a pem-encoded PKCS#8 format.”
Validate that the algorithm of the key is RSA, use error
SERVER_CERTIFICATE_KEY_ALGORITHM_NOT_SUPPORTED, [<algorithms's ASN.1 OID>]
and exposed as “The provided key uses an unsupported algorithm.”
Validate that the key length is ≥ 2048, and ≤ 4096 bits, use error
SERVER_CERTIFICATE_KEY_RSA_LENGTH_NOT_SUPPORTED, [length] and exposed as
“The provided RSA key does not have a length between 2048 and 4096.”
The library used does not support multi-prime RSA keys, when it’s
encountered use error SERVER_CERTIFICATE_KEY_RSA_MULTI_NOT_SUPPORTED [] and
exposed as “The provided RSA key is using more than 2 primes, expecting only
2”
Validate that it is a pem-encoded X509 certificate, use error
SERVER_CERTIFICATE_INVALID [] and exposed as “The provided certificate is not
in a pem-encoded X509.”
Validate that the public key of the certificate matches the public key from
the private key, using error SERVER_CERTIFICATE_KEY_MISMATCH [] and exposing
it as “The provided key does not match the provided certificate’s public key.”
Validate that the certificate is currently valid. (ensure all time comparisons are done using UTC, and any times presented in errors are using ISO8601 format):
Ensure the certificate’s not_before date is ≤ NOW
SERVER_CERTIFICATE_NOT_VALID_YET, [<NOW>; <not_before>] and exposed as
“The provided certificate certificate is not valid yet.”
Ensure the certificate’s not_after date is > NOW
SERVER_CERTIFICATE_EXPIRED, [<NOW>; <not_after>] and exposed as “The
provided certificate has expired.”
Validate that the certificate signature algorithm is SHA-256
SERVER_CERTIFICATE_SIGNATURE_NOT_SUPPORTED [] and exposed as
“The provided certificate is not using the SHA256 (SHA2) signature algorithm.”
SERVER_CERTIFICATE_CHAIN_INVALID [] and exposed as “The provided
intermediate certificates are not in a pem-encoded X509.”If validation has been completed successfully, a temporary file must be created with permissions 0x400 containing the key and certificate(s), in that order, separated by an empty line.
This file must then be atomically moved to /etc/xensource/xapi-ssl.pem in order to ensure the integrity of the contents. This may be done using rename with the origin and destination in the same mount-point.
A daily task must be added. This task must check the expiry date of the first
certificate present in /etc/xensource/xapi-ssl.pem, and if it is within 30
days of expiry, generate a message to alert the administrator that the
certificate is due to expire shortly.
The body of the message should contain:
<body>
  <message>
    The TLS server certificate is expiring soon
  </message>
  <date>
    <expiry date in ISO8601 'YYYY-MM-DDThh:mm:ssZ' format>`
  </date>
</body>
The priority of the message should be based on the number of days to expiry as follows:
| Number of days | Priority |
|---|---|
| 0-7 | 1 |
| 8-14 | 2 |
| 14+ | 3 |
The other fields of the message should be:
| Field | Value |
|---|---|
| name | HOST_SERVER_CERTIFICATE_EXPIRING |
| class | Host |
| obj-uuid | < Host UUID > |
Any existing HOST_SERVER_CERTIFICATE_EXPIRING messages with this host’s UUID
should be removed to avoid a build-up of messages.
Additionally, the task may also produce messages for expired server
certificates which must use the name HOST_SERVER_CERTIFICATE_EXPIRED.
This kind of message must contain the message “The TLS server certificate has
expired.” as well as the expiry date, like the expiring messages.
They also may replace the existing expiring messages in a host.
Currently xapi exposes a CLI command to print the certificate being used to verify external hosts. We would like to also expose through the API and the CLI useful metadata about the certificates in use by each host.
The new class is meant to cover server certificates and trusted certificates.
A new class, Certificate, will be added with the following schema:
| Field | Type | Notes |
|---|---|---|
| uuid | ||
| type | CA | Certificate trusted by all hosts |
| Host | Certificate that the host presents to normal clients | |
| name | String | Name, only present for trusted certificates |
| host | Ref _host | Host where the certificate is installed |
| not_before | DateTime | Date after which the certificate is valid |
| not_after | DateTime | Date before which the certificate is valid |
| fingerprint_sha256 | String | The certificate’s SHA256 fingerprint / hash |
| fingerprint_sha1 | String | The certificate’s SHA1 fingerprint / hash |
There are currently-existing CLI parameters for certificates:
pool-certificate-{install,uninstall,list,sync},
pool-crl-{install,uninstall,list} and host-get-server-certificate.
The new command must show the metadata of installed server certificates in the pool. It must be able to show all of them in the same call, and be able to filter the certificates per-host.
To make it easy to separate it from the previous calls and to reflect that
certificates are a class type in xapi the call will be named certificate-list
and it will accept the parameter host-uuid=<uuid>.
In the case a certificate is let to expire TLS clients connecting to the host will refuse to establish the connection. This means that the host is going to be unable to be managed using the xapi API (Xencenter, or a CVAD control plane)
There needs to be a mechanism to recover from this situation.
A CLI command must be provided to install a self-signed certificate, in the
same way it is generated during the setup process at the moment.
The command will be host-emergency-reset-server-certificate.
This command is never to be forwarded to another host and will call openssl to
create a new RSA private key
The command must notify stunnel to make sure stunnel uses the newly-created certificate.
The auto-generated xapi-ssl.pem currently contains Diffie-Hellman (DH)
Parameters, specifically 512 bits worth. We no longer support any ciphers which
require DH parameters, so these are no longer needed, and it is acceptable for
them to be lost as part of installing a new certificate/key pair.
The generation should also be modified to avoid creating these for new installations.
| Design document | |
|---|---|
| Revision | v1 |
| Status | released (7.0) |
| Review | #156 |
| Revision history | |
| v1 | Initial version |
When xapi starts, it may create a number of VGPU_type objects. These act as VGPU presets, and exactly which VGPU_type objects are created depends on the installed hardware and in certain cases the presence of certain files in dom0.
When deciding which VGPU_type objects need to be created, xapi needs to determine whether a suitable VGPU_type object already exists, as there should never be duplicates. At the moment the combination of vendor name and model name is used as a primary key, but this is not ideal as these values are subject to change. We therefore need a way of creating a primary key to uniquely identify VGPU_type objects.
We will add a new read-only field to the database:
VGPU_type.identifier (string)This field will contain a string representation of the parameters required to uniquely identify a VGPU_type. The parameters required can be summed up with the following OCaml type:
type nvidia_id = {
  pdev_id : int;
  psubdev_id : int option;
  vdev_id : int;
  vsubdev_id : int;
}

type gvt_g_id = {
  pdev_id : int;
  low_gm_sz : int64;
  high_gm_sz : int64;
  fence_sz : int64;
  monitor_config_file : string option;
}

type t =
  | Passthrough
  | Nvidia of nvidia_id
  | GVT_g of gvt_g_id
When converting this type to a string, the string will always be prefixed with
0001: enabling future versioning of the serialisation format.
For passthrough, the string will simply be:
0001:passthrough
For NVIDIA, the string will be nvidia followed by the four device IDs
serialised as four-digit hex values, separated by commas. If psubdev_id is
None, the empty string will be used e.g.
Nvidia {
  pdev_id = 0x11bf;
  psubdev_id = None;
  vdev_id = 0x11b0;
  vsubdev_id = 0x109d;
}
would map to
0001:nvidia,11bf,,11b0,109d
For GVT-g, the string will be gvt-g followed by the physical device ID encoded
as four-digit hex, followed by low_gm_sz, high_gm_sz and fence_sz encoded
as hex, followed by monitor_config_file (or the empty string if it is None)
e.g.
GVT_g {
  pdev_id = 0x162a;
  low_gm_sz = 128L;
  high_gm_sz = 384L;
  fence_sz = 4L;
  monitor_config_file = None;
}
would map to
0001:gvt-g,162a,80,180,4,,
Having this string in the database will allow us to do a simple lookup to test whether a certain VGPU_type already exists. Although it is not currently required, this string can also be converted back to the type from which it was generated.
When deciding whether to create VGPU_type objects, xapi will generate the identifier string and use it to look for existing VGPU_type objects in the database. If none are found, xapi will look for existing VGPU_type objects with the tuple of model name and vendor name. If still none are found, xapi will create a new VGPU_type object.
| Design document | |
|---|---|
| Revision | v1 |
| Status | released (7.0) |
Some VMs can only be run on hosts of sufficiently recent versions.
We want a clean way to ensure that xapi only tries to run a guest VM on a host that supports the “virtual hardware platform” required by the VM.
[0] or [0L] in OCaml notation). The zero represents the implicit version supported by older hosts that lack the code to handle the Virtual Hardware Platform Version concept.[0; 1] i.e. a list containing the two integer elements 0 and 1. (Alternatively this could come from a config file.)[0] (maintained in the DB by the master).For the version we could consider some type other than integer, but a strict ordering is needed.
Version 1 denotes support for a certain feature:
When a VM starts, if a certain flag is set in VM.platform then XenServer will provide an emulated PCI device which will trigger the guest Windows OS to seek drivers for the device, or updates for those drivers. Thus updated drivers can be obtained through the standard Windows Update mechanism.
If the PCI device is removed, the guest OS will fail to boot. A VM using this feature must not be migrated to or started on a XenServer that lacks support for the feature.
Therefore at VM start, we can look at whether this feature is being used; if it is, then if the VM’s Virtual Hardware Platform Version is less than 1 we should raise it to 1.
Consider a VM that requires version 1 or higher. Suppose it is exported, then imported into an old host that does not support this feature. Then the host will not check the versions but will attempt to run the VM, which will then have difficulties.
The only way to prevent this would be to make a backwards-incompatible change to the VM metadata (e.g. a new item in an enum) so that the old hosts cannot read it, but that seems like a bad idea.
| Design document | |
|---|---|
| Revision | v1 |
| Status | proposed |
VLAN filtering is a Layer 2 network segmentation mechanism that controls how Ethernet frames are forwarded across switch ports based on VLAN membership. It enables a single physical switching infrastructure to support multiple isolated broadcast domains while maintaining traffic separation and policy enforcement.
When VLAN filtering is enabled, the switch evaluates incoming frames against configured VLAN rules before allowing traffic to traverse the network. Frames are sent either tagged (IEEE 802.1Q) or untagged depending on port configuration requirements.
VLAN filtering is commonly used to isolate network segments, and provides only partial view of a trunk link to VM.
The general use case is providing trunk to some VM in multi-tenants configuration. For example, having a VM firewall with VLAN trunking but seeing only a subset of the VLANs present on the trunk.
As examples, the following configurations could be considered, with one host having a PIF interface with the following VLANs [10,11,12,13] on it :
trunks=[] : VM-A sees all tagged packets so from VLANs 10 to 13 (what we are able to do currently)tag=10 : VM-B sees untagged packets from VLAN 10 (what we are able to do currently)trunks=[10,11] : VM-C sees tagged packets from VLANs 10 and 11trunks=[11,12] : VM-D sees tagged packets from VLANs 11 and 12trunks=[10] : VM-E sees tagged packets from VLAN 10The VIF class would be extended with a new attribute:
This is a new API introduced to manage trunks attribute.
VIF.add_trunks
VIF.remove_trunks
VIF.set_trunks
When a VIF is created, trunks attribute on VIF is synchronized to trunks attribute on Port table in OpenvSwitch.
As the empty list is the current default in OpenvSwitch,
it doesn’t introduce changes from current behaviour when default value is used.
The trunks attribute on Port table is kept synchronized with trunks attribute on VIF during all the lifecycle of the port.
From https://www.openvswitch.org/support/dist-docs/ovs-vswitchd.conf.db.5.html:
trunks: set of up to 4,096 integers, in range 0 to 4,095 For a trunk, native-tagged, or native-untagged port, the 802.1Q VLAN or VLANs that this port trunks; if it is empty, then the port trunks all VLANs. Must be empty if this is an access port.
The type of the port is defined by vlan_mode column on the Port table.
As in XAPI we don’t set it, we are using the default mode defined as following:
- If tag contains a value, the port is an access port. The trunks column should be empty.
- Otherwise, the port is a trunk port. The trunks column value is honored if it is present.
The tag in OpenvSwitch is derived from the PIF’s VLAN tag on the VIF’s Network.
For consistency with OpenvSwitch, the trunks attribute is so expected to be empty if tag is also set.
In XAPI term it means that a VIF with not empty trunks attribute could only be associated to not VLAN Network (Network with PIF with VLAN = -1).
This introduces a validation constraint preventing incompatible configurations:
trunks cannot be associated with a Network backed by a VLAN-tagged PIF (PIF.vLAN ≠ -1).trunks attribute must remain empty.PIF.vLAN ≠ -1) cannot be associated with a Network that contains a VIF with non-empty trunks.All VIFs will get a new trunks attribute which will be the default value (empty set). It doesn’t introduce any behavior changes.
For each created VIF, the value of trunks attribute will be set to trunks attribute on OpenvSwitch Port table.
If the VM is migrated, the trunks attribute on OpenvSwitch Port table on the new host is keep in synchronization with the value of trunks attribute.
On trunks attribute change, the value will be set to trunks attribute on OpenvSwitch Port table.
The change is effective immediately and transparently (without replugging the VIF).
The proposed design was chosen after considering the following elements. They are taken up here to present the possible options and reasons for choosing to use VIF.
Port configurationvlan-slave-of (the set of VLANs attached to that PIF)It was chosen to put trunks attribute on VIF as:
The well suited alternative would be to create a new object (like VLAN or Bond) for holding the trunk information, but it seems overkill for the purpose.
Other alternatives would need more changes in current XAPI invariants.
trunks column must be empty; the tag column specifies the VLAN. Packets are untagged.trunks column specifies which VLANs are allowed; if empty, all VLANs are allowed. Packets are tagged.| Design document | |
|---|---|
| Revision | v2 |
| Status | proposed |
Windows guests should have XenServer-specific drivers installed. As of mid-2015 these have been always been installed and upgraded by an essentially manual process involving an ISO carrying the drivers. We have a plan to enable automation through the standard Windows Update mechanism. This will involve a new additional virtual PCI device being provided to the VM, to trigger Windows Update to fetch drivers for the device.
There are many existing Windows guests that have drivers installed already. These drivers must be uninstalled before the new drivers are installed (and ideally before the new PCI device is added). To make this easier, we are planning a XenAPI call that will cause the removal of the old drivers and the addition of the new PCI device.
Since this is only to help with updating old guests, the call may well be removed at some point in the future.
The XenAPI call will be called VM.xenprep_start. It will update the VM record to note that the process has started, and will insert a special ISO into the VM’s virtual CD drive.
That ISO will contain a tool which will be set up to auto-run (if auto-run is enabled in the guest). The tool will:
XenServer will interpret the ejection of the CD as a success signal, and when the VM shuts down without the special ISO in the drive, XenServer will:
VM.auto_update_drivers to true.VM.virtual_hardware_platform_version is less than 2, then set it to 2.(The tool that runs in the guest is out of scope for this document.)
The XenAPI call VM.xenprep_start will throw a power-state error if the VM is not running.
For RBAC roles, it will be available to “VM Operator” and above.
It will:
VM.other_config key xenprep_progress=ISO_inserted to record the fact that the xenprep process has been initiated.If xenprep_start is called on a VM already undergoing xenprep, the call will return successfully but will not do anything.
If the VM does not have an empty virtual CD drive, the call will fail with a suitable error.
While xenprep is in progress, any request to eject the xenprep ISO (except from inside the guest) will be rejected with a new error “VBD_XENPREP_CD_IN_USE”.
There will be a new XenAPI call VM.xenprep_abort which will:
xenprep_progress entry from VM.other_config.This is not intended for cancellation while the xenprep tool is running, but rather for use before it starts, for example if auto-run is disabled or if the VM has a non-Windows OS.
Aim: when the guest shuts down after ejecting the CD, XenServer will start the guest again with the new PCI device.
Xapi works through the queue of events it receives from xenopsd. It is possible that by the time xapi processes the cd-eject event, the guest might have shut down already.
When the shutdown (not reboot) event is handled, we shall check whether we need to do anything xenprep-related. If
other_config map has xenprep_progress as either of ISO_inserted or shutdown, andthen we must (in the specified order)
VM.other_config set xenprep_progress=shutdownVM.virtual_hardware_platform_version is less than 2, then set it to 2.VM.auto_update_drivers to true.xenprep_progress from VM.other_configThe most relevant code is probably the update_vm function in ocaml/xapi/xapi_xenops.ml in the xen-api repo (or in some function called from there).